You unlocked the car and started it to drive to work. It's cold outside, we turned on the heater and noticed that coolant began to flow into the cabin. The Lada Kalina stove faucet has fallen into disrepair again. The solution that localizes the problem is to move the tap under the hood. To do this you need:
- Lengthen the drive rod.
- Replace the pipes to the heater radiator.
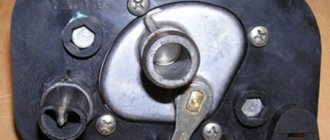
It's easier to change in the future. If the tap starts leaking again, but not into the interior. So, where is the stove tap on Kalina? It is located under the dashboard at the center console level and is easy to find. Unfortunately, it cannot be repaired, the assembly can only be replaced. And this is the only reliable option related to replacement. We recommend installing the ceramic one instead of the factory version.
The ceramic element guarantees reliability, high wear resistance, and smooth operation. When installing the faucet, it is advisable to treat the installation site with rubber sealant. It is more convenient to do it on a pit or overpass. But, if such options are not available, then you can drive one wheel onto the curb.
Replacing the heater tap Lada Kalina
You unlocked the car and started it to drive to work. It's cold outside, we turned on the heater and noticed that coolant began to flow into the cabin. The Lada Kalina stove faucet has fallen into disrepair again. The solution that localizes the problem is to move the tap under the hood. To do this you need:
- Lengthen the drive rod.
- Replace the pipes to the heater radiator.
It's easier to change in the future. If the tap starts leaking again, but not into the interior. So, where is the stove tap on Kalina? It is located under the dashboard at the center console level and is easy to find. Unfortunately, it cannot be repaired, the assembly can only be replaced. And this is the only reliable option related to replacement. We recommend installing the ceramic one instead of the factory version.
The ceramic element guarantees reliability, high wear resistance, and smooth operation. When installing the faucet, it is advisable to treat the installation site with rubber sealant. It is more convenient to do it on a pit or overpass. But, if such options are not available, then you can drive one wheel onto the curb.
Stove valve: main causes of malfunctions
The stove tap is one of the vulnerable parts of a car's heating system that is susceptible to oxidation. Most often, the malfunction appears with the onset of the cold season, when it becomes necessary to heat the interior and windows of the car.
If we consider the main malfunctions of the stove faucet:
- Jamming and failure of this element of the heating system associated with contamination by antifreeze deposits (decay of coolant or other contaminants). The malfunction is eliminated by replacing the stove tap;
- Souring of the faucet of the VAZ 2114 stove - the faucet cannot be closed or opened, as a result, there is a lack of hot air supply (most often occurs in the summer). The problem is eliminated by replacing the part with a new one;
- The heater faucet is leaking, jammed in one specific position (manufacturing defect, destruction of a part or low-quality coolant). The solution to the problem is diagnostics and repair, followed by replacement of a defective or worn stove faucet.
When is it necessary to replace the heater valve?
Repairing the heater valve on a Lada Kalina car is required in two cases:
- The faucet “sours” or “sticks.”
- The product leaks at the joints.
No matter what caused the problem, the product should be replaced. Otherwise, the consequences will be more serious. Signs of a faulty faucet:
- There is a smell of coolant in the cabin.
- We noticed traces of coolant on the floor of the car.
- The stove was turned on, but there was no heat.
A leaking heater faucet is considered not just another nuisance that will flood the interior, but a danger to the car’s ECU. If you notice traces of liquid under your feet, immediately carry out an inspection to find the possible cause of the leak. Use additional lighting or a flashlight to quickly inspect the heater valve. In addition to the faucet, the cause of antifreeze leakage may be damage to the pipes or radiator. You now know where the stove tap on Kalina is located. If you identify the source of the leak, which turns out to be a faucet, then you need to urgently replace it.
How to install a faucet on a VAZ 2115
The heater tap is a mechanism designed to regulate the flow of coolant into the heater radiator. A single heater faucet from a VAZ is installed on a VAZ. The main problem with the heater faucet on a VAZ is that it oxidizes, jams, and leaks, resulting in a puddle of coolant forming under your feet, which can damage the electronics.
New Lada: Checking and adjusting wheel alignment angles (wheel alignment) Lada Kalina | Section 6. Chassis of the car Lada Kalina / Lada Kalina (VAZ 1118)
Why is the heater valve leaking? Let's consider the following situation: when spring comes, we close the heater tap, i.e. move the heater temperature control to the extreme left position. Throughout spring, summer and autumn, we very rarely regulate the temperature of the stove, as a result of which the faucet turns sour.
- How to change the heater tap on a VAZ photo and video
- Where is the part located?
- Where is it located and when is it necessary to replace the VAZ heater tap, how to change the heater tap (video)
- which heater valve is better to install on a vaz
- Replacing the VAZ heater valve - step-by-step instructions | VAZ REPAIR
Drive belt - main functions, symptoms and causes of malfunction.
page" How to Change the Stove Tap on a VAZ How to Change the Stove Tap on a VAZ Off. Step-by-step instructions for replacing the stove faucet on a VAZ. How to drain antifreeze, how to refill it, plus 5 more steps with photos and videos. Here are the part numbers. Repair and maintenance of VAZ, ,. The key is "10". How to change the stove tap? if you install a ceramic faucet, then you will not achieve the same heat transfer.
Wheel bearing - TOP 5 reasons for failure! Types of car wheels: their pros and cons.
The main reasons why the idle speed of a VAZ floats. Replacing the VAZ clutch without removing the box and draining the oil. Why doesn't reverse gear engage on the Lada Kalina? Do-it-yourself diagnostics and repairs.
Self-adjustment of the VAZ carburetor Do-it-yourself modification of the VAZ stove.
Procedure for replacing the stove faucet.
Change the heater valve on a cold engine. Place a rag under your feet to absorb any spilled liquid. We will replace the stove valve without removing the dashboard. All we need is to get to the place where the heater valve is located on Kalina.
- Remove the air filter housing.
- Remove the ignition module.
- Unscrew the bolt and drain the antifreeze
- We unscrew the nut in the place where the stove pipes go into the cabin.
- Remove the upper heater pipe from the thermostat.
- Remove the lower pipe.
- Let's go to the salon.
- Disconnect the gas cable from the pedal.
- Remove the gas pedal along with the bracket.
- Unscrew the heater radiator cap.
- We bend the metal part, which is located to the left of the stove body.
- Partially unscrew one handbrake mounting bolt, and completely unscrew the other. Now you can unscrew the tunnel screws.
- Disconnect the cigarette lighter plug and the fuse box.
- We unscrew and disassemble the front console. Everything is visible and accessible, nothing is complicated.
- We remove the ashtray. In place of the emergency button there are two plugs. When you pull it out, you will see screws under them.
- Label and number all chips and wires. Then there will be no complications during assembly.
- Pull out the electronic control unit (ECU) as far as the wires will allow. Place it in a safe place, most importantly, away from the heater.
- Now you will have to unscrew all the bolts that you encounter during disassembly. Only then will it be possible to completely dismantle the front console.
- Remove the dashboard panel, move the radiator to the side, and then take out the air duct. You have reached the place where the Kalina stove tap is located.
Remove the old faucet, install the new one and reassemble everything in reverse order. We also recommend changing the pipes going to the radiator from the faucet.
Removal algorithm
As for removing the element, with all three replacement methods without removing the panel, dismantling is performed in the same way. The algorithm for removing the heater radiator is as follows:
- Drain the antifreeze from the cooling system.
- We dismantle the engine air filter along with the air duct.
- Disconnect the battery terminals and remove the battery from the car.
- Remove the battery mounting plate.
- Under the steering rack we find two pipes through which coolant is supplied to the heater radiator, loosen their clamps and pull the tubes off the fittings.
- Near the fittings we find a nut that secures a mounting plate with a rubber seal through which the heat exchanger fittings pass to the engine shield. unscrew this nut.
- Let's go to the salon. On the driver's side, remove the decorative side trim of the center console.
- Unscrew the gas pedal and move it to the side.
- We remove the brake light sensor located near the brake pedal.
- Since it will not be possible to remove the brake pedal without dismantling the steering column and mechanism, we do this. We remove the bracket for fixing the pin that connects the brake pedal to the vacuum booster, remove the pin and bend the stop plate of the brake light sensor. After this, we lift the pedal up and it does not interfere with removing the radiator.
- Unscrew the three screws securing the radiator to the body.
- Since the radiator outlet is blocked by fittings, they need to be sawed off or broken off.
- After sawing off the fittings, the radiator will “come out” of the seat.
But dismantling the heat exchanger is only half the battle; you still need to install a new element, but the fittings prevent this from being done.
Lada Oka frankenstein › Logbook › WARMTH IN A CAR (part 1) - getting rid of the heater tap, etc.
Hello Vsemushki)
Well, I’m writing again about the cigarette butt repairman) I already wrote earlier about the fact that the heater faucet is running in the car (this creates a lot of problems, such as the smell of antifreeze in the cabin, the constant addition of antifreeze, dirt in the lard, and less heat in the car! And one more thing Based on the experience with a penny, I decided that I would just remove the tap and install a copper pipe! Since during the entire time I was driving the cop, I almost never closed the tap, even in the summer! It’s all in the air, if you turn off the air supply, the heater radiator does not heat up the street air and does not warms the interior! This system is also used on our LADA KALINA. Where the faucet is not installed from the factory. Let's get to work) - first of all, I drained the antifreeze and removed the air intake casing from the engine compartment (held on by four screws) and saw a bunch of leaves, dirt and etc., but the worst thing was that there was a lot of rust hidden under the casing!
-Then I removed the tube and tap from the radiator and washed it under water with shampoo)))
Then I took and put the radiator back in place for fitting) I saw that the new pipe was almost touching the body of the car, and the engine compartment gasket did not match the pipes) Well, I took a round file and adjusted everything as it should)
Something like this) Put everything back in place! and I’m glad) now in the car the tap won’t run))) and I’ll adapt the remaining tap opening regulator somewhere else) But that’s not all! To be continued) thank you all and bye =)
Summary
We hope that the article helped you find out where the stove tap on Kalina is located. And the main thing is that it is not so difficult to change it at home.
The best prices and conditions for the purchase of new cars
Credit 9.9% / Installments / Trade-in / 98% approval / Gifts in the salon
The heating system in the cabin of the budget Lada Kalina model can significantly increase comfort for the driver and his passengers. It ensures that the required temperature conditions are maintained inside the car. Along with such useful options as:
- "ABS";
- airbag;
- electric power steering;
- electric front windows;
- front seat heating function,
The design of the interior heater allows the manufacturer to achieve a fairly acceptable level of equipment, which is very worthy for a small-class Lada Kalina model and makes it competitive among its rivals in this segment.
Recommendations
Comments 36
The thermostat from which car costs from 2110 or from 2108?
It’s worth the tenth, but I don’t have time to post it in the BZ)
I put it on all my eyes, except Chinese and grants, I even put it on 21099, the effect is stunning
Well, I don’t know how with the oversized thermos) it didn’t work for me when I bought it) I immediately installed the tenth one and I like it!)
... “By the way, this place is rotting because water and snow entering through the air intake do not completely drain out, and splashing on the body ruins it))))” ... There should be a plastic casing that prevents water from getting there if it is installed CORRECTLY. And drainage from this casing occurs through a rubber valve. And if this valve, I would even say the valve, is clean from dirt and leaves, then there will never be rust there. Moreover, rotting.
Well, I won’t argue, of course) but I have this casing and it doesn’t fit tightly to the left side of the air duct (if you stand facing the soot), that is, water gets between the air duct and the small casing.
When reinstalling, the casing must be placed BEHIND the air duct
He stood there, I also stuck him in)
It seems like ceramic taps are on sale now, maybe it was worth trying? but the usual ones, yes, they constantly leaked. Most likely because we rarely use them, it sours, sticks and then breaks down and leaks.
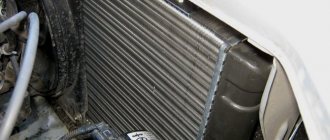
I see the heater radiator is original, it should be warm if it’s not clogged with pieces of sealant.
Well, I put in a ceramic one for a penny, it seems to be normal, but I don’t use it at all) and on the perch I washed the radiator, it seems to be normal), but the bad thing is that aluminum has worse heat transfer than brass, so it heats worse in the okha than in the cop.
It’s normal and the aluminum heats up. When I had a new one, my eyes were already drying out. Then, as if I didn’t keep my own thermos, I started putting others in and that’s it, the warmth was no longer the same. I got fed up with this and stupidly went and bought a new stove radiator. Kraft, it was just the one that was in stock. When I took mine off, I also wanted to wash it, but pieces of sealant flew out of it. In general, I installed a new radiator and... there was still no heat, although I rebuilt the thermos on the 10th, my hand does not tolerate the hose that goes into the cabin, but there is no heat. and now, 4 years later, I recently changed it on 12k and let’s read the reviews, it turns out that you need to install the same DAAZ that is installed from the factory. It has the densest packing of heat sink plates and it’s like a labyrinth, it’s not visible to the light in short. Here it is it really blows boiling water, it hurts my hand, my nails curl up)
and I set the ceramic faucet to 2105. But it didn’t completely shut off the antifreeze. So I sold it.
I've never heard of such things as roditors! To be honest, when I bought the thermos, I didn’t open it at all, I just installed the tenth one and it’s also not possible to hold the tube, but it only heats so-so! Well, the faucet closed normally, I just helped it close with my second hand.
I myself flew by 700 rubles. I think I bought a new radiator, which means it will be hot. But that’s not the point. The radiator is not the same as the radiator. Just go to the store yourself, where there is a choice of 3-4 things, lay them out next to each other: Pramo, Luzar, Kraft, DAAZ and look at the honeycombs. Visually, in one there will be rare cracks, like in a fence). Of course, the air will fly through it and will not have time to heat up. Moreover, you look at the light and it can be seen. And in DAAZ it’s like small labyrinths, how the air winds through it. it's long, but understandable))
Well, I definitely won’t buy a new one just yet)
I've never heard of such things as roditors! To be honest, when I bought the thermos, I didn’t open it at all, I just installed the tenth one and it’s also not possible to hold the tube, but it only heats so-so! Well, the faucet closed normally, I just helped it close with my second hand.
Did you blow out the 10th thermos in the store? they are there too, 1 is normal, holds, and the other 3 let a large circle pass, because the design is somehow incomprehensible. The tin does not press tightly.
List of faults in the heating circuit
If the owner of LADA Kalina suspects the presence of any deviations from the normal functioning of the heating system, then the diagnostic procedures below will be required.
- The first step is to make sure that there is a sufficient amount of antifreeze in the cooling circuit.
- Next, check the integrity of the fuse.
- We make sure that the fan speed regulator is working properly.
- A weak air flow through the deflectors indicates the need to check the condition of the filter component.
- If there is no warm flow into the cabin when the engine is warm, then there may be air pockets in the cooling system or the dampers in the air ducts are jammed.
- A faulty temperature sensor will cause only hot or, conversely, cold flow to enter the cabin.
- Among the common reasons is depressurization of the LADA Kalina cooling system. Sometimes this may be due to the loss of tightness of the heater radiator itself. At the same time, antifreeze will enter the cabin, giving itself away as a specific smell and wet decorative floor covering. In order to detect a leak in a timely manner, it is necessary to monitor the level in the expansion tank frequently.
Common faults
The stove itself on Kalina is well conceived, but due to the poor quality of the elements and parts, various troubles constantly happen to it. Even the latest models with climate control have various “diseases”.
The list of the most common faults looks like this:
- The heater core is leaking;
- the heater damper is jammed or does not open completely;
- failure of the fan or control unit;
- gear motor failure;
- the temperature sensor or heater resistor has become unusable;
- The cabin filter is clogged.
To find out where this or that element of the heating system is located, you should look at the operating instructions; there will definitely be a corresponding diagram there.
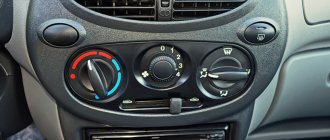
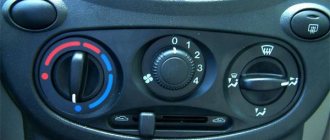
The design of the Kalina stove without climate control is such that the air sucked in by the fan passes through the air filter and enters the heater radiator. There it is heated and supplied to different areas of the cabin through adjustable grilles and openings. The dampers are controlled and the fan speeds are switched manually. This heating system is more reliable because it does not contain any electronics.
On a Lada Kalina with climate control, the rotation of the dampers is controlled by a gearmotor at the command of the electronic unit. The latter receives signals from a temperature sensor located inside the car and reacts accordingly to changes in the microclimate. The controller interacts with both the heater and air conditioner.
Let's sum it up
The heating system is simple. Timely diagnostics can save the owner of a LADA Kalina from unexpected breakdowns; the heater circuit will also help with this. Monitor the level of antifreeze, change it according to the regulations, and the system radiator will serve its regulated life, delighting you with warmth and comfort in the cabin.
The Lada Kalina air heater is considered one of the best in terms of heat performance in the VAZ family, but is far from the most reliable in operation. Problems begin almost at the car dealership, as many motorists say. But most of the problems are completely solvable, and often even without the involvement of car service specialists.
Diagnosis and troubleshooting
The easiest way to resolve the issue is regarding the cabin filter. For the first time, thorough blowing of the element will be enough, but then it is better to replace it. The real problem is a leaking radiator or a broken fan; an expensive replacement of the unit cannot be avoided. An equally high price will have to be paid for a new control unit.
It will be somewhat cheaper to install a new temperature sensor, gearmotor or resistor for the Kalina heater. Moreover, the malfunction still needs to be correctly diagnosed, which can be quite difficult. A burnt resistor is easily identified - the fan only runs at maximum speed.
It is more difficult to check the sensor hidden in the lighting shade. Symptom of a malfunction - a hot or cold stream flows from one or more grilles, regardless of the position of the regulator handle.
It is more difficult to detect how well the mechanical heater regulator is functioning. To do this, you need to get to it by disassembling part of the front panel. In the same way, the proper operation of the air dampers is determined.
To carry out diagnostics, it is better to start searching for problems with the most accessible elements, and only then start disassembling.
Heating system composition
The operating principle of the heater in the Lada Kalina is very simple. It is built on a supply and exhaust circuit. The heater circuit contains:
- cabin air filter;
- air ducts;
- heater radiator;
- electric fan;
- air flow and fan operating mode control module.
The design of the interior stove looks exactly like this, and is located behind the dashboard and only the system controls are present on its front surface in the Lada Kalina cabin. A running engine generates heat, which is removed from it by the cooling system. This circuit includes a heating radiator. The circulating liquid heats the honeycombs, from which the warm flow is directed into the cabin by means of a fan. Adjustment of the required temperature, strength and direction of the air stream is carried out using the handles and dampers present in the cabin. Sometimes the dampers need to be adjusted.
How to change a radiator
The operation is very labor-intensive, for which the car service center will charge you a hefty sum. But there is another, slightly barbaric, but fast and widely practiced method. The work flow diagram is as follows:
- Drain the antifreeze, disconnect and remove the battery, and then disconnect the hoses from the heater pipes.
- Unscrew the nut located near the fittings in the engine compartment. It holds a steel plate that will interfere with the removal of the heater.
- Remove the gas pedal and pull out the steel brake pedal shaft. Unscrew the decorative panel and behind it the plastic panel covering the stove radiator.
- To remove it, cut an opening in the plastic frame that allows you to pull the radiator towards the driver.
- Install the new element and reassemble in the reverse order. The cut opening can be sealed with plastic and decorated in any suitable way.
When performing the operation, it is worth moving the controller located directly under the stove to another place. Antifreeze dripping from it can damage sensitive electronics. Also, with the radiator removed, it is easy to change a faulty heater valve or gear motor, because access to them will be open. The gearbox is a single unit with a damper position sensor and can also be changed entirely.
Radiator installation methods
You can install a new radiator by:
- shortening fittings;
- trimming the heater housing;
- expanded installation of a heat exchanger.
One of the methods for installing the VAZ Kalina heater radiator is to shorten the fittings. Having trimmed them, we put the heat exchanger in place. But using this method, you will have to additionally change the rubber coolant supply pipes to longer ones (the pipes from the VAZ-2109 are suitable) and slightly modify the plate with the seal.
The disadvantage of this method is that after shortening the fittings, their connection with the rubber pipes is located in the passenger compartment, and in the event of a leak at the connection, the leaked antifreeze will end up on the floor.
In order not to shorten the fittings, we trim the body a little on the side and bottom. By cutting out a piece of the case, the window for placing the radiator in the seat will increase, which will allow you to install a new element. After installation, the cut pieces of the body are installed in place and secured with bolts, and the cut line is sealed with sealant. The negative fact of this method is cutting the body. In addition, if the cut lines are poorly sealed, the efficiency of the stove will decrease due to dissipation of air flow.
The third method is an expanded installation. With this installation, the fittings are directed towards the passenger compartment. To connect the heat exchanger of the stove to the cooling system with such an installation, you will need long pipes and special corner adapters with which the tubes are connected to the fittings. This installation method does not require cutting the body or shortening the fittings, but it is not suitable for the VAZ Kalina equipped with air conditioning, since some elements of the air conditioning system interfere with the pulling of the tubes.
It is up to the car owner to decide which replacement method to use. Finally, a little advice - during the work process, pay attention to the ECU - move it to another place or at least securely wrap it with plastic film to protect it from antifreeze.
Video: Replacing the radiator of the KALINA stove. Simplified version
The powerful stove in Kalina allows you to comfortably endure the harsh Russian winters. Over time, its effectiveness decreases, the smell of antifreeze appears in the cabin, and a greasy film appears on the windows. It’s worse when a puddle of antifreeze is found on the floor and the expansion tank is empty. For Kalina, the entire stove radiator is replaced. The problem is that the design of the heater differs from previous VAZ models and to replace it it is necessary to disassemble the front panel. The service will charge from 6,000 rubles for disassembling and replacing the radiator, so many car owners prefer to change it themselves.
Fan replacement
The most convenient way to get to the unit is from the passenger seat, which will have to be dismantled so that you don’t have to do acrobatics inside the cabin. The chair runners are held in place by 4 13 mm nuts; unscrewing them is not difficult. Further work on replacing the fan is carried out in the following sequence:
- Remove the cabin filter and remove dirt and dust from the opening.
- Unscrew 4 screws located on the back wall of the glove compartment, and another one under the right heater grille.
- Remove the plastic cover from the stand and unscrew the 2 screws that secure the panel and the blower unit.
- Remove the blower unit, lift the plastic panel and loosen the 2 fan mounting nuts underneath it.
- Move the dashboard as far back as possible and secure it. The turbine must be removed from below, from a lying position.
You should not rush to change the fan when it only works at speed 1 and the heater switch is at maximum. This is a sure sign that the resistor located below the glove compartment has failed. The part is a small green plastic panel with a connection connector. Replacing the heater resistor is carried out without any disassembly; you just need to disconnect the connector and unscrew the 2 screws that secure it to the body.
Basically, troubleshooting the Kalina stove is not a difficult job, but very labor-intensive. To change a small part, you need to spend time disassembling to get to it.
Selection of quality spare parts and necessary tools
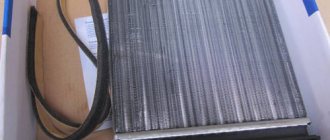
New heating system parts for domestic cars are presented in a wide range on the spare parts market, but not every manufacturer supplies high-quality parts that have a long, trouble-free service life, so when choosing, preference should be given to units that have original LADA part numbers and purchase the following units:
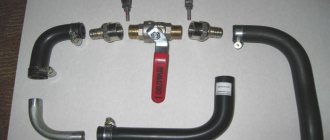
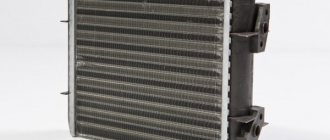
- heater radiator (original art. 11180-8101060-00);
- set of reinforced cooling system pipes (art. Repair kit 234РШ)
- metal ties 2 pcs;
- antifreeze.
Removing the heater radiator on a Lada Kalina is carried out without the use of specialized tools; it is enough to stock up on a standard set of auto mechanic keys, namely:
- open-end spanners (set);
- screwdrivers and pliers;
- hacksaw (needed if work is carried out without removing the dashboard);
- container for draining old coolant;
- gloves for hand safety.
At the beginning of 2022, the cost of replacing a heater radiator in specialized LADA services is 6 - 8 thousand rubles. Private auto repair shops estimate this work at about 5 thousand, and by carefully studying the instructions below, you can carry out all the repairs yourself without much difficulty, which will significantly help save the budget of the owner of Kalina.
process of dismantling and installing parts1ladakalina.ru
Information on how to change the stove on Kalina yourself is very popular for all motorists who have at least once encountered malfunctions of this VAZ 2118 unit.
The heating and ventilation system of Kalina itself is quite simple, but getting to its elements hidden behind the front panel (dashboard) is very difficult. Therefore, issues related to malfunctions of the cooling system in general and the heater radiator in particular deserve detailed consideration.
Cooling system problems
Most often, Lada Kalina car owners have to deal with the following malfunctions:
- engine overheating due to untimely switching on or failure of the main fan;
- the stove fan fails;
- the heater tap or the radiator itself leaks, which leads to a complete replacement of the Kalina heater;
- The VAZ 2118 power unit does not warm up to operating temperature due to the fact that the fan is constantly running.
Forced cooling of Kalina is controlled by an electronic control unit (ECU), based on pulses transmitted by the temperature sensor for turning on the fan. When the antifreeze in the upper pipe heats up to 103-105 °C, this sensor transmits a signal to the ECU, which starts the impeller through a relay.
If the fan switch-on temperature is reached and the cooler is not started, then the fault lies in the sensor itself or in the relay contacts.
When the cooling fan does not work, this threatens to overheat the engine, leading to the replacement of the piston group. But if the impeller rotates constantly, regardless of temperature, then you must immediately open the relay block. In one of them, which is responsible for the operation of the cooler, the contacts are probably stuck. A decrease in fluid temperature or engine overheating can also be caused by a jammed thermostat, which must only be replaced.
Also, only replacing the stove on Kalina can correct the situation when a leak appears in its radiator. The reason is that the factory parts are made of aluminum and cannot be soldered. It often happens that the heater fan does not withstand harsh operating conditions and fails. Here, too, only replacing the heater motor will help.
The trick is that the first group of faults, after correct diagnosis, can be eliminated quite easily. There is nothing difficult about changing the fan switch sensor or cleaning the relay contacts. Installing a new thermostat will take a little more time, but replacing a stove fan or radiator is quite a task.
You will have to remove the entire instrument panel, which is a lengthy process. That’s why information on how to change Kalina’s stove without dismantling the dashboard is so important.
Removing the old and installing a new radiator
Before replacing a leaking heater radiator, you need to prepare all the necessary tools, namely:
- hacksaw blade for metal;
- a set of socket and open-end wrenches;
- pliers, screwdriver;
- cut plastic canister or basin for antifreeze.
The first and main question: how to remove the stove on Kalina, so as not to disassemble the entire dashboard? First, you need to empty the cooling system by draining the liquid into a prepared container. Then the air filter is disconnected and removed along with the pipe, and the battery is also removed.
This opens up access to the pipes leading to the interior heater. They must be removed from the stove fittings, draining the remaining antifreeze into a basin.
Next to the fittings you can find a nut that secures the protective plate located inside the passenger compartment. It also needs to be unscrewed so that later the plate moves freely and does not interfere with dismantling the stove. Then you need to move into the interior and dismantle the following parts:
- Accelerator pedal. It is held on by 3 bolts; first you need to disconnect the cable and bend the plate.
- Side decorative panel.
- Plastic side cover of the stove.
- Brake pedal. There is no need to remove it entirely, just remove the metal rod so that the pedal rises.
Since the heater fittings stick out in the engine compartment, and its frame does not allow the radiator to be pulled out in the desired direction, for freedom of action it is necessary to cut out a piece of plastic from the side.
To do this, use a hacksaw blade to make the cut neat. After which the stove moves back a little and towards the driver's door, being removed from the socket. The new heater is installed in the same way, and the opening is sealed with plastic that was cut out earlier. The rest of the assembly is done in reverse order.
When the radiator is removed, it is possible to change the heater damper gear motor in case of incorrect operation. The gearbox and damper position sensor are manufactured as one unit, attached with 3 screws. You need to unscrew them, disconnect the gear motor and install a new one. Also, with the radiator removed, the heater tap can be easily replaced if such a need arises.
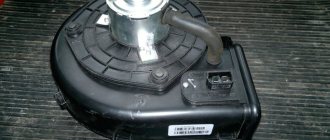
Removing the blower motor
The stove fan is a fairly reliable unit, but when used in difficult conditions (heat, a lot of dust or high humidity), its electric motor may fail.
Repairing a burnt-out motor is more difficult and more expensive than buying a new one, so in such a situation, the Kalina heater fan is replaced. To carry out the work, you need a standard set of tools, and even “star” socket wrenches. Such grooves have all self-tapping screws that will have to be unscrewed during disassembly. The latter begins with removing the outer plastic grille and removing the cabin filter.
All debris from the seat must be removed so that it does not fall on your head when dismantling the stove fan.
Replacing the heater motor will require you to take an acrobatic pose inside the Kalina's cabin, unless you remove the front passenger seat in advance. Its runners are fastened with 4 nuts, so this operation does not take much time.
Then you need to open the glove compartment, empty it of things and unscrew the 4 screws located on its back wall. Another screw is located outside, under the airflow grille, it also needs to be unscrewed.
Next, the decorative trim is removed from the right front pillar, underneath it you will find 2 screws securing the plastic panel and the blower unit. They are unscrewed, the blower unit is removed and the plastic panel is lifted (held on by Velcro).
There are 2 nuts under it, they should be loosened with a socket wrench. To remove the stove fan, you need to move the dashboard as far as possible and fix it in this position.
The last step is to lie on Kalina’s floor and remove the stove fan by disconnecting the electrical connector. It is necessary to replace its turbine with a new electric motor. Then the unit is installed in place, and then assembly work is carried out. The replacement process is shown in detail in the video.
back How to replace the heater radiator in Lada Kalina?
Next What racks should I put on Kalina? Similar articles
1ladakalina.ru