Installation of a modified vehicle
On a VAZ 2110 you can easily install a more advanced thermostat from Granta 2190. But you should still know a little about the design of the heating/cooling system in Granta. Its scheme can be easily implemented on the “ten”.
- Original TS Grants 2190 from BEHR;
- The lower radiator hose is from Granta, but the upper one 21214 will also work, or simply matched to size;
- Tee from VAZ 2110 for the cooling system;
- The studs are 8 mm in length - like from the camshaft bed;
- Straight long stove pipe from the “ten”;
- Gasket for thermostat.
We act according to this plan:
- We change the lower radiator pipe to the one from Granta (or similar). You can leave the original one, but connect it to a suitable diameter at a right angle using a piece of pipe. However, remember - the more connections, the more opportunities for leaks;
- We connect the expansion tank pipe through a VAZ 2110 tee: one end goes to the drain from the heater radiator, the other end goes to the supply pipe;
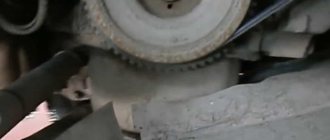
- Drain the coolant;
- We change the studs to longer ones and install the Granta thermostat;
- We twist the temperature sensor.
Next comes a check to see if the modified heating system is working properly. Typically, the Grant vehicle is more stable, provides faster heating of the air in the cabin, and is not subject to temperature fluctuations.
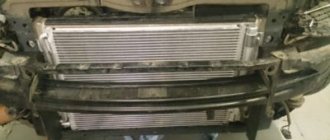
Choosing a new radiator
Choosing a radiator is not an easy task. Before removing the VAZ 2110 radiator, it is important to decide what will be the replacement. The choice is not large, but you should approach it with all responsibility.
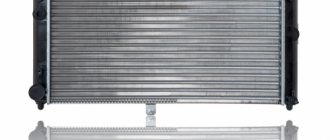
There are two options for cooling devices for the “ten” domestic model - aluminum and copper. The choice depends on several indicators: reliability, long-term operation, cost.
Aluminum radiator
Aluminum – light weight, low price. It has poor thermal conductivity, which significantly reduces the engine cooling effect. Corrosion begins to appear after a short period of use.
Copper radiator for VAZ 2110
Copper - heavy weight, effectively copes with the task assigned to it. Thanks to the copper coating, the radiator is protected from corrosion, which significantly increases its service life. It has high mechanical strength, which protects the device from unwanted leakage. Despite all the positive qualities, there is still a drawback - the high price.
It is quite difficult to specifically answer the question: how much does a radiator on a VAZ 2110 cost, as well as how much does a heater radiator on a VAZ 2110 cost, since the price depends directly on the manufacturer and the quality of the product.
Replacing an old-style VAZ 2110 radiator - step-by-step instructions
To remove the cooling radiator from an old-style VAZ 2110 with your own hands, you must perform the following sequence of actions:
- Drain the coolant through the bottom plug;
- Remove the battery as it is in the way;
- On the injection VAZ 2110, it is also necessary to remove the air filter;
- The upper mount to the frame must be disassembled, simultaneously releasing the fan;
- Remove the electric fan;
- Remove two hoses - for steam supply/discharge;
- Tilt the radiator towards the engine and remove.
That is, removal is quite simple. Now, if the radiator leaks slightly, but is not severely damaged by corrosion, you can repair it. Otherwise, replace it. When choosing a new radiator for a VAZ 2110, be sure to take into account the model of the previously installed one so that the new one fits perfectly.
Which radiator is better: copper or aluminum cooling radiator
Before replacing the cooling radiator, it is necessary to choose the right high-quality analogue. Today you can buy a VAZ 2110 radiator made of aluminum or copper, the part is offered from various manufacturers.
- An aluminum radiator is lighter in weight and more affordable. At the same time, the thermal conductivity of such a solution is lower, and there is also a higher tendency to corrosion. In any case, if we consider the aluminum radiator of the VAZ 2110, the price will be 25-30% lower than for copper radiators.
- A copper radiator is more durable and better resists corrosion, which increases the service life of this element.
Copper also conducts heat better, which improves the performance of the engine cooling system. The main disadvantage of copper radiators is their higher cost and fewer available options on the market.
As for popular manufacturers and costs, the 2110 Kraft radiator will be the most affordable. You can also opt for Luzar or DAAZ. It is important to understand that the price of a VAZ 2110 radiator should not be the main deciding factor. The first place should be the quality of the product and full compliance with the engine, taking into account the displacement.
Necessary tool for replacement on VAZ-2110
For dozens of older pre-2003 editions, the replacement is a little more complicated than the upgraded post-2003 2110 edition, but in any case, for the replacement we will need the following tools and supplies:
- container for draining antifreeze (with a wide neck);
- a set of screwdrivers with a square, extension and ratchet;
- Screwdriver Set;
- four new screw clamps;
- if you plan to replace antifreeze, use new antifreeze;
- correctly modified heater core (not interchangeable).
Replacing the heater radiator of the tenth family of a new model
Before disassembling, drain the antifreeze into a prepared container - if you have not completely replaced the fluid, you only need to drain it from the cylinder block by unscrewing the cap and placing the container under the engine. If you are replacing it, also drain the antifreeze from the radiator.
If a complete replacement of antifreeze is not planned, it can be partially drained, as shown in the photo (the expansion tank cap must be closed).
Before draining, remove the expansion tank cap and get to work:
- After draining the liquid, you can and should disassemble the expansion tank - loosen the screw clamps, remove the hoses, and unscrew the bolts securing the tank.
- The hood gasket should be in the way, remove it.
- Remove the sound and heat insulation from the engine casing. To do this, use a Phillips screwdriver to unscrew all the screws on the insulation from above. From below, the insulation is attached to the body with two bolts with a 10-mm head. It is more convenient to unscrew them using a high head with a cardan and an extension.
- Unscrew the plastic clamps from the insulating layer.
- We remove the finishing elements.
- Disconnect the connectors from the brake fluid level sensor on the reservoir cap.
- Remove the power steering vacuum tube from the body and set it aside.
- Using a 17mm socket and a ratchet, unscrew the master cylinder and carefully turn it forward without disconnecting the brake hoses.
- Go inside and disconnect the brake light switch connectors.
- Using a high head (13), unscrew the nuts securing the brake pedal and vacuum booster.
- From under the hood we take out the power steering with the pedal. There is no need to remove the plastic trim at the bottom of the windshield; everything can be lifted without it. Lift the vacuum unit and pull the pedal out through this hole. Move the vacuum valve to the side.
- The heater housing of the new copy is assembled from two parts, which greatly simplifies its dismantling. All you need to do is unscrew the three threaded bolts and first remove the right and then the left part. Remove the heater housing.
- Gain full access to the heater hoses by unscrewing the screw clamps on the inlet and outlet hoses and one steam vent.
- The radiator is installed at four points - a screw on top at the edge of the glass, two nuts at the height of the collector and one on the left near the filter. Find the screws that secure the radiator and remove them.
- Remove the old radiator, clean and rinse the cavity from dust and dirt, install a new or repaired old radiator. Assembly is carried out in reverse order. Pull out the old radiator. Clean the heater body from dirt.
- Remove the cover gasket and threshold plate.
- Remove the hose from this fitting.
- Remove the brake master cylinder.
- Remove the brake pedal mounting nuts.
- Remove the heater housing.
- Disconnect the connectors from the old radiator.
- Find the screws that secure the heating element and unscrew them.
After reassembly, check the operation of the heating element; the joints should be hot. If they do not heat up in the air seal system, remove it and check again.
We are replacing the stove 2110 of the old modification
Therefore, after draining the fluid and disconnecting the fan hoses, remove the frill, wipers and windshield trim. The radiator is held in place by clamps, 4 of which need to be removed.
Removing the windshield trim and heater casing clips.
After that:
- Unscrew the cabin filter mounting bolts; when unscrewing the bolts, remember their position (among them there are 4 long ones).
- Remove the fan with part of the casing. Remove the front part of the casing along with the fan.
- Pull out the filter housing and the back of the fan housing.
- Loosen the clamps and remove the three hoses (inlet, outlet and exhaust). Disconnect the hoses and pull out the old radiator.
- Pull out the heater core.
- When unscrewing the screws, remember their position (4 of them are long).
- Remove the front part of the case with the fan.
- Pull out the filter housing and the back of the fan housing.
- Disconnect the hoses and pull out the old radiator.
Replacing an old-style VAZ 2110 radiator - step-by-step instructions
To remove the cooling radiator from an old-style VAZ 2110 with your own hands, you must perform the following sequence of actions:
- Drain the coolant through the bottom plug;
- Remove the battery as it is in the way;
- On the injection VAZ 2110, it is also necessary to remove the air filter;
- The upper mount to the frame must be disassembled, simultaneously releasing the fan;
- Remove the electric fan;
- Remove two hoses - for steam supply/discharge;
- Tilt the radiator towards the engine and remove.
That is, removal is quite simple. Now, if the radiator leaks slightly, but is not severely damaged by corrosion, you can repair it. Otherwise, replace it. When choosing a new radiator for a VAZ 2110, be sure to take into account the model of the previously installed one so that the new one fits perfectly.
How to replace the cooling radiator on a VAZ 2110
Replacing a 2110 radiator is not a complicated procedure and can be done with your own hands in a regular garage. To replace it, you need to remove the radiator on the VAZ 2110, then perform a series of preparatory procedures and install a new one.
It is important to understand that during operation the cooling system may become clogged, and the possibility of mechanical breakdowns cannot be ruled out. Also, in addition to replacing the cooling radiator 2110, it is recommended to simultaneously change the coolant.
For this reason it is necessary:
- check the system for the presence/absence of antifreeze leaks in different areas except the radiator;
- all work should be carried out on a cold engine;
- prepare the required amount of fresh antifreeze to replace the coolant after installing the radiator.
How to remove a VAZ 2110 radiator and replace it
To remove the VAZ 2110 cooling radiator, you will need to perform the following steps:
- Place the car on a level surface (preferably with a hole) or lift the car on a lift;
- Remove the crankcase protection (if equipped) and unscrew the drain plug;
- Drain the antifreeze (done after the engine has cooled) into a prepared container;
- Remove the air filter, loosen the clamps on the pipes and pipes going to the cooling radiator;
We also recommend reading the article on how to remove air from the engine cooling system. In this article, you will learn about the causes of air congestion, signs and symptoms, and how to remove air from the engine cooling system. - Disconnect the pipes, unscrew the radiator fasteners, disconnect the connectors from the cooling fan;
- Remove the old radiator, remove the cooling system fan from it, install the fan on the new radiator;
- If necessary, replace the radiator mounting gaskets and install a new radiator;
- After completing the reassembly, you can fill the radiator with fresh coolant;
After pouring antifreeze and filling the system, it is also necessary to set the level in the expansion tank slightly above the minimum mark by 3-4 cm. - The final stage will be to start the engine and warm it up to operating temperatures (you need to wait until the cooling fan turns on at least 1-2 times).
- At the same time, you should check the system for leaks, make sure that there is no overheating of the engine due to air locks, etc.
- If everything is in order, you need to turn off the engine, let the engine cool, unscrew the expansion tank cap and check the antifreeze level again.
Design Features
The VAZ heating system consists of the heat source itself (stove), a heat distribution system throughout the cabin and a control system. The heating and heat distribution system is combined with the interior ventilation system. The heat flow is controlled by an air damper (in older designs a faucet was used). The air supplied to the cabin is heated by passing through the radiator of the VAZ 2110 stove and distributed through the distribution system.
Most of the flow is directed towards the windshield and side windows, through the deflectors equipped with flaps, as well as into the center of the cabin. Another flow is directed to the feet of the driver and the passenger sitting next to him (through two pairs of deflectors located at floor level and knee level), as well as through a tunnel on the floor and two air vents under the front seats to the rear seat, at floor level.
The VAZ stove fan provides three modes: low and medium speed and automatic speed selection (based on a signal from the control unit). The electric motor of the furnace fan is commutator, DC. The current consumption at the highest rotation speed is 14 A. The electric motor speed mode is set by changing its connection to the car battery, directly (maximum speed) or through additional resistance.
This resistor has a variable resistance of 0.23 Ohm and 0.82 Ohm. If the greatest resistance is connected to the circuit, then the fan rotates at low speed, and if less (0.23 Ohms) - then at medium speed. When repairing a VAZ 2110 stove, it is not recommended to remove the fan blades from the electric motor shaft: this can lead to imbalance. The electric motor cannot be repaired (except for cleaning the commutator contacts); if it fails, it is advisable to replace it along with the fan blades.
Purpose, design and principle of operation of the thermostat
The coolant circulating through the working channels of the engine blocks, its main purpose is to remove excess heat accumulated in the power unit due to the friction of the working elements of the engine and the impact of the high temperature of the exhaust gases passing through the exhaust circuit.
The main elements of the cooling system of the VAZ 2114, which are responsible for lowering the temperature of the antifreeze, are the electric cooling radiator fan and the thermostat.
To understand the principle of its operation, you need to see what the thermostat on a VAZ 2114 looks like. Structurally, it is designed in such a way that the valve that regulates the coolant flow is located inside a housing with three pipes:
- two inputs - from the engine and radiator;
- one day off - to the pump.
The main working element of the valve itself, located inside the thermostat, is a solid heat-sensitive filler, which, when heated, through a rubber insert, acts on the piston that moves the main valve. When it heats up, it opens it, when it cools down, on the contrary, it closes the hole, preventing the flow of antifreeze.
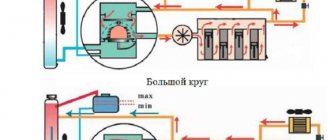
The thermostat is attached to the engine through a pipe to the cylinder head on the left side, under the air filter. It is connected to the radiator and pump using rubber pipes. On a cold engine, the valve of this coolant flow regulator is closed and after starting, the liquid that begins to be pumped by the pump forces moves along a “small circuit” or “in a small circle.” Both of these expressions are used among motorists. When moving in a small circle, the antifreeze passes through the heater radiator, intake manifold and throttle assembly. Liquid is not supplied to the radiator; the valve cuts off this path.
As the engine heats up, the coolant takes away some of the heat, heats up and, passing in a “small circle” through the thermostat, heats the temperature-sensitive element. The piston begins to move and open the main valve. This begins to happen when the liquid temperature reaches 87 degrees. In this case, part of the coolant begins to circulate through the radiator. When the temperature reaches 102 degrees, the valve opens completely, moving eight millimeters. In this mode, the entire coolant flow rushes in a “large circle” through the cooling radiator.
Experts recommend checking the operation of the thermostat without removing it from the car. To do this, after starting the engine, you need to touch the lower pipes coming from the radiator with your hands. They should be cold until the temperature rises above eighty degrees. As soon as the temperature rises above 85 degrees, the tubes should begin to heat up and after a while you can feel that the “large circle” circulation is working. The tubes should get quite hot.
If the lower pipes leaving the radiator continue to remain cold, it means the main valve has not opened and the thermostat is faulty. A malfunction of this regulator may also be indicated by the fact that the lower tubes begin to heat up almost immediately after starting the engine. This indicates that the valve is open and does not close when cold.
In both cases, a thermostat failure does not bring anything good for the engine. In the case when the valve is open, the antifreeze, passing in a “large circle,” does not have the opportunity to heat up to working condition. This reduces engine power and other performance parameters. In the case when the main valve is closed, the engine has a high risk of overheating the blocks. This is the most dangerous condition for the power unit. If you drive in this mode for some, even not very long, time, you can damage the engine, even to the point of breaking the shafts. And this, at a minimum, is a major overhaul of the entire internal combustion engine.
There is a different way to check the thermostat on a VAZ 2114. To do this, you need to pour water into a pan and, placing it on the stove to heat, immerse the thermostat there. Knowing at what temperature the thermostat on the VAZ 2114 opens, use a thermometer to monitor the heating of the water in the pan. At about 87 degrees the valve should open. If this happens, then the device is fully operational. It is better to check it in this way before installing it in place of a failed one.
Many car enthusiasts often ask specialists whether it is possible to repair the thermostat.
There is only one fairly reliable way to help the valve work. To do this, lightly hit the device body with a screwdriver several times. The impact should open the valve.
If this does not happen, then the thermostat on the VAZ 2114 needs to be replaced.
Features of replacing the thermostat on a VAZ-2111
To replace the thermostat, you first need to arm yourself with special tools and materials:
- heating radiator VAZ-2111 in high quality;
- from 4 or more clamps;
- a short screwdriver with a Phillips-type tip;
- tweezers.
Replacing the thermostat on a VAZ-2111 injector, designed for 8 and 16 valves, looks like this. Any beginner can do it:
- Drain the antifreeze from the engine block. Place a container of sufficient volume under the hole so that the liquid does not spill past.
- Remove the seal, made of rubber, in the form of a frill, also called a wind pad.
- Look under the brake cylinder, which is considered the main one, and disconnect the frill fixing screw.
- Now disconnect the 2 clamps to secure the wires and hoses.
- From the body, disconnect the wire coming from the fan on the negative side and the positive terminal.
- Carefully remove the 2 screws attached to the left side of the frill.
- Now you can move the frill slightly forward.
- Detach the windshield trim.
- Disconnect the terminal located in the coolant indicator sensor, remove the steam removal hose in the expansion tank.
- Remove the windshield washer hose.
- Remove the glass cleaner and remove the trim attached to the windshield.
- Next, remove the clamping devices of the housing of the heating device and the ventilation device. When the screws are unscrewed, you need to remember their location.
- Take out the VAZ-2111 cabin filter housing and be sure to replace it.
- Remove the rear half of the vent housing.
- Loosen the clamps and remove the antifreeze supply and discharge hose, do not forget about the steam exhaust hose.
- Finally, it's time to remove the heater core. This will not require much effort, if, of course, the dismantling is done correctly.
Next, get down to repairing the VAZ-2111 heating radiator, if the unit can still be repaired. Your task is to clean it properly, restoring the tightness to the maximum.
Along with radiator repair, proper repair of the furnace unit will be required. In doing so, follow these rules:
- if you install the plastic part of the fan of the furnace device, make sure that the pedal fits into the required hole;
- return the bolts to their original place and monitor whether the assemblies are seated.
6-7 hours - and the assembly will be completed. To ensure the job is done perfectly, it is advisable to also provide sound insulation. All that remains is to fill in the antifreeze and start checking the functioning of the stove. If there is no heating of the pipes, it’s time to deal with the air lock located in the system cooling device.
During your first trip to the VAZ-2111, you will notice that the air flow has become hotter, and the antifreeze levels in the expansion tank no longer decrease. If you learn how to perform simple repair work yourself, you will be able to save a certain amount of money and will not have to constantly contact a service station.
Instructions for replacing the thermostat are shown in the video: https://www.youtube.com/watch?v=JiOcujk1qYE
A video on how to properly check the condition of the thermostat in a VAZ-2111 is presented below: https://www.youtube.com/watch?v=XHnRqlf6gr0
If the thermostat is located separately from the engine, the following video will help with detailed instructions for checking the condition of the unit:
The thermostat is not large in size, but it has an important function, allowing the engine to be optimally cooled. That is, this small unit plays a very important role.
The main task of the thermostat is to control the operation of the entire cooling system and prevent engine overheating. Let's consider when a thermostat needs to be replaced on a VAZ 2110 and how to do it correctly.
What do you need for work?
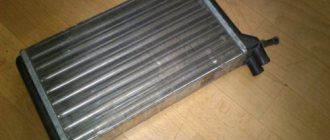
First of all, you will need a new heater radiator. The choice is presented in a fairly wide range, so decide for yourself here.
As for tools and materials, be sure to check the condition of the system pipes. It is possible that they are also damaged, so they will have to be replaced.
Buy a set of clamps. In general, you will need three of them, but it is better to take a reserve just in case. Moreover, this “just in case” happens to every second person who changes a stove radiator with their own hands.
Tools include a short Phillips screwdriver and tweezers. The latter will help you install the latches.
Article on the topic: VAZ 2110 rear wheel bearing: when to change and the complete replacement process
What do you need to know?
First of all, I want to draw attention to one point. In order to replace the heat exchanger, you do not need to remove the panel in the cabin
All repairs take place exclusively under the hood. Now about the main thing. Radiators VAZ 2110 can be:
- old model, released before September 2003;
- new designs released after the specified period.
Be sure to take this point into account, since the replacement procedure will be different in both cases. This information will also be useful to you when purchasing a heat exchanger. Before starting work, you must prepare all the materials and tools that will be required for replacement. What do you need:
- clamps in an amount of at least 4 pieces;
- sacral screwdriver;
- tweezers;
- high quality radiator.
Before making a replacement, it is necessary to drain the antifreeze. There are two options here:
- Drain the antifreeze from the engine block. To do this, unscrew the cap of the expansion tank. As a result, the pressure will drop. Next, unscrew the drain plug. It is located behind the ignition unit. Place a bucket and collect antifreeze. The total volume should be approximately four liters.
- You can drain the antifreeze using only the expansion tank. In this case, disconnect the hose at the stove. The volume of drained liquid is usually one liter.
Old sample
Now, the most important thing. We are starting to replace the old model VAZ 2110 heater radiator
It is important to follow all the steps exactly and not rush. Here is a detailed list of your actions
- Remove the rubber seal and windshield.
- Unscrew the screw securing the cover. It is located under the brake master cylinder.
- Remove the four screws from the top of the cover.
- Disconnect the two clamps from the lining that secure the hoses and wires.
- Disconnect the positive terminal and negative wire of the fan from the body.
- Unscrew the two screws located on the left side of the cover. Move it forward a little. There is no need to remove the cover completely.
- Remove the windshield trim by removing two nuts and five screws.
- Remove the hose that removes steam from the expansion tank.
- Disconnect the hose from the windshield washer. Next, unscrew the four screws.
- After removing the windshield wipers, remove the trim from the windshield.
- Remove the clamps from the radiator housing and fan.
- Unscrew the front fan housing.
- Also unscrew and remove the cabin filter housing screws.
- The rear fan housing can then be removed.
- Now you should loosen the clamps.
- Disconnect the supply hoses and damaged radiator.
- After the repair, we assemble all the elements in the reverse order.
New sample
When replacing the VAZ 2110 heater radiator of a new model, it is necessary to take into account that it is attached to the car body using:
- a screw located in the middle of the end of the windshield in its lower part;
- two nuts located above the exhaust manifold;
- one nut, which is located on the left near the filter.
The new type heat exchanger consists of two main blocks. Before installation, they should be separated by removing the left and right parts. After removing the right part, disconnect the steam exhaust hose. In turn, the right side also consists of two blocks. They are connected to each other by staples. If you remove them, you will separate the parts and gain access to the damper. I recommend replacing it with a new one. This completes all the work. There is nothing too complicated about replacing a radiator. It is enough just to strictly adhere to the order of actions and not to rush. The entire process of disassembly and assembly when replacing the radiator of a VAZ 2110 stove can be seen in the photos and videos that I published on this page. Do-it-yourself repairs will help you not only save money, but also better understand the technical aspects of your iron “friend.” As domestic cars age, they will require more care and attention. It’s good that I realized this in time, because I would have had to leave as much money at the car service center as the cost of the car itself. And this, as you understand, is not at all profitable.
I am a fan of domestic cars and try to maintain the condition of my iron pet for a long time. So far this is working out, plus I have accumulated experience in repairs. If you have any questions, you can contact me through the comments and I will respond as soon as possible. I would like to find like-minded people, so don’t forget to ask questions. Return to top
Author of the material: Dumchenkov Mikhail
Have questions about car repairs? Ask them in the consultation section, to do this, click on the link below.
auto mechanic
Choosing a radiator for VAZ-2110
The part is not cheap, but the stingy one pays twice. Therefore, in the case of a cooling radiator, it is better to overpay a hundred or two, but provide your engine with a normal operating temperature and save it from overheating.
The original radiator of the VAZ-2110 has lugs for fastening, but some manufacturers produce models without these fastenings.
Signs of malfunction and breakdown
The signs of a malfunctioning radiator that needs to be replaced are clear - an irreparable leak and puddles under the car.
Leaks can be caused not only by physical damage, but also by poor-quality coolants. In any case, repairing radiators using magic additives that close cracks and holes is detrimental to the engine. No one can say that this product will clog the cooling system. Therefore, there are two options - replacement or repair.
Articles
Sometimes repairing a radiator is completely impossible, and sometimes it will cost more than a new one. Therefore, we will immediately consider the market offers and the model. And there are only two models - for the 1.5-liter carburetor engine and for all the others. Later models for all injection engines are suitable for both Priora and Kalina. An old radiator for a carburetor engine has catalog number 2110-0810106000 and costs about 1000-1500 rubles. A new one with article number 2172-1300010, 2112-1301012, 21102-1301012, 2170-1301012-95 can cost from two to six thousand.
On “tens” since 2008 with radiators.
Prices
The price of a VAZ-2110 radiator depends on the material and manufacturer:
- Copper radiator. It is produced by only a few factories: Orenburg, SHAAZ and several foreign companies. The high price is justified by its high service life, excellent heat dissipation properties and maintainability. The only downsides are the price and weight. It is heavier both in rubles and in kilograms.
Copper radiator 2-row.
- Aluminum. The most popular type of radiators because they are the most affordable. Its advantages include what they don’t like about copper ones - weight and price. It's light and cheap. In other respects, it is much inferior to copper - in terms of corrosion resistance, strength, service life, and heat dissipation properties. In addition, aluminum radiators cannot be repaired. They are produced by several dozen domestic and foreign factories, and the most popular are radiators from DAAZ, Luzar, Kraft, Weber, Bautler and a number of other factories.
Aluminum radiator 2112-1301012.
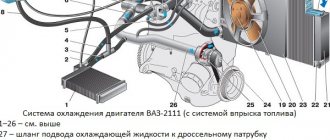
Diagram and design of the heating system in the VAZ-2110
The heating unit itself is represented by several components:
- Electric motor. A ventilation device is fixed on it, designed to pump a hot air flow.
- A radiator device, the failure of which will lead to the inoperability of the stove. On old-style heating systems, the radiator assembly is not equipped with a valve designed to shut off the flow of coolant through the device. Therefore, the unit practically does not leak, since leaks are usually associated with the faucet. The absence of this element ensures the fastest heating of the car interior.
- Three dampers. One of them is designed to close and open the heating channel, the second is used for recirculation, and the third is necessary to control the heater.
- The resistor device is designed to regulate the blowing speed.
Components of the heating system
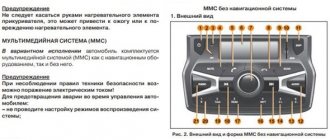
Main parts of the heating system for the interior of a VAZ 2110 car:
- 1 - electro-pneumatic valve device;
- 2 — front housing of the air intake of the heating unit;
- 3 - water deflector device, presented in the form of an air intake flap;
- 4 — valve device for controlling the damper of the air flow recirculation system;
- 5 — recirculation system damper;
- 6 — rear part of the air intake housing of the heating unit;
- 7 — heating channel damper;
- 8 — damper of the heating unit control system;
- 9 — radiator unit;
- 10 - protective plastic casing of the radiator device;
- 11 - bushing installed in the steam outlet pipe;
- 12 — bushing for the supply line of the heating unit;
- 13 — bushing of the outlet pipe;
- 14 - electric motor of the heating system;
- 15 — electric motor housing;
- 16 - supporting surface of the damper drive lever used to control the stove;
- 17 — drive handle for controlling the damper of the heating system;
- 18 — gear motor of the drive device, presented in small sizes;
- 19 - resistor element;
- 20 - protective cover for the heating unit lining.
Connection diagram for blowers and controls
Main components of the stove:
- 1 - air ducts designed to warm up the rear of the car;
- 2 — plastic lining running from the center console to the rear seats;
- 3 - blowers designed to blow feet;
- 4 - main nozzles for ventilation of the car interior;
- 5 — side nozzles for interior ventilation;
- 6 — nozzles intended for heating the glass installed in the front doors;
- 7 — control knob for the interior heating unit;
- 8 — plastic housing of the air distribution device;
- 9 — damper for the foot warming system;
- 10 - plastic flap designed to warm up the windshield;
- 11 - heating unit.
The difference between old and new stoves
Old and new type heating systems have some features in connection diagrams as a result of the following differences:
- Radiator design. Heats in cars of different years of manufacture have different radiator assembly designs. In older heating systems, radiators are equipped with taps to drain the refrigerant.
- Different designs of SAUO controllers. Cars manufactured before 2003 used five position controllers. In newer versions of the car, devices numbered 4 and 5 were removed from the design.
- Micro-gearbox design. The main difference is the different type of resistor elements. When replacing elements, you need to consider whether these parts are interchangeable or not.
We repair the VAZ 2110 radiator with our own hands
A situation arises when the radiator of a VAZ-twenty-one ten (2110) car stops functioning. Then the question that comes to mind for car owners is: “What to do now? What should I do? Most owners, without hesitation, go to purchase a new radiator, and if there is no money to purchase a new spare part, they solve the problem in a different way - they carry out the repair on their own.
How to remove a radiator fan?
Before repairing the radiator, you need, as you well know, to remove it. Before immediate removal, do not forget to drain the coolant. Remember that you need to drain it when the engine has cooled down, then unfasten the electric fan. After the fan has been removed, the clamps are loosened and the supply and steam exhaust hoses are detached.
And to remove the radiator from its mounting location, tilt it towards the engine, and then safely remove it. The bottom of the radiator is placed on rubber pads, of which there are two. When assembled, they fit into the holes.
Radiator soldering
If you have an irresistible desire to repair the radiator yourself, we admit that without certain knowledge, frankly speaking, you will be lost. It should be clarified that you must also have knowledge of activities such as welding and soldering.
The domestic car radiator (2110) is made of brass, so soldering is carried out using low-melting solders.
If you want to solder cracks, you need to prepare the radiator, that is, clean it of all dirt and only then solder it. However, do not use this option to seal holes. To eliminate the hole, arm yourself with an old radiator, from which pieces of sheet brass will be cut. Apply the plates to the hole and solder around the perimeter. A damaged tube can only be soldered if its defects are no more than ten percent, otherwise the tube must be replaced.
Removing a non-working tube and its elements
To begin, stock up on a hot rod, place it in the tube and wait for a while - if the temperature of the rod is normal, the solder will soften. Remove the tube from the tank and install a new one in its place.
Argon-arc electric welding is carried out with the support of a filler material; there are often cases when a special aluminum welding wire is used. Here you need to take into account some points: aluminum oxide deposits do not provide sufficient weldability. To prevent this, argon is supplied to the welding site; it should perfectly protect the metal from oxidation, as a result of which the weld will be without pores and cavities. After heating to the desired temperature, all substances turn from solid to liquid. During such welding, the temperature reaches four hundred degrees Celsius, or even higher. In this case, the aluminum will not be strong and will crumble to the point of a weak impact.
Video - “Replacing and repairing the heater radiator of a VAZ-twenty-one ten (2110), twenty-one eleven (2111), twenty-one twelve (2112).”
If you need to solve this issue for a short time, you can use chemicals.
Repairing a radiator with recovery fluid
For minor damage to the heat exchanger, there is an option to use a restoration agent (for example, sealant, powder restorer). This repair option is most suitable if you need to drive to the place where the radiator is being manipulated. Do not trust chemical reducing agents. By using a fake, you will make things worse for the entire cooling system. Therefore, we strongly recommend using “cold welding” as a temporary solution.
A little bit of history. This is interesting.
The VAZ-2110 is a front-wheel drive car of a new generation with a sedan body of the Volzhsky Automobile - the only VAZ model that did not receive a name.
“Zhiguli”, “Samara”, “Niva”, “Kalina”... but there was no original name for it. But every seventh car sold in Russia, including foreign cars, is a VAZ car of the “tenth” family. Three bodies in one family are a decent choice by domestic standards. Of course, many foreign manufacturers offer not only sedans, hatchbacks, and station wagons, but also convertibles, minivans, and all-wheel drive versions. But such diversity is typical for the next price range, and in its niche, the “ten” looks stronger than its foreign competitors.
The most popular model of the family is the VAZ-2110 sedan. By the way, a couple of years ago the plant approved a new designation - Lada 110, but in the documents everything remained the same. The three-volume body in the minds of our people is still more solid than a family station wagon or a youth hatchback.
The founder of a new generation of front-wheel drive cars, the VAZ 2110 sedan has been in mass production since 1996. Unlike previous models, the VAZ-2110 car contains new original developments: the use of galvanized metal for body parts that are most susceptible to corrosion, fastening the hood on gas struts, an adjustable steering column, an on-board control system, an immobilizer, a gasoline vapor recovery system, ventilated brake discs and a number of other innovations. It is possible to install an air conditioner, which is standard equipment on some of the machines. According to their price characteristics, the cars belong to the upper segment of the price range of VAZ cars.
The trunk is roomy for its class, however, part of the useful volume is hidden by old-fashioned hinges, and the shape is spoiled by well-developed wheel arches. There are also no useful little things, such as lugs for attaching the luggage net; however, there is no net itself... But the spare wheel, like the Samara, is turned upside down - a towing cable, a set of wrenches, and a pair of work gloves will move into the recess of the wheel rim.
The “Ten” was initially equipped only with short-stroke carburetor 1.5-liter 69-horsepower VAZ-21083 engines, which, combined with a high degree of unification in a number of components and assemblies (unfortunately, not all) with already produced cars, made it somewhat easier for the owners of the first “ dozen” of their operation and maintenance. Although there were quite a few problems with “original” and therefore scarce spare parts (for example, an expansion tank, front struts, etc.). But the performance characteristics: maximum speed of 162 km/h and average fuel consumption of 7.5 l/100 km are significantly improved (by 12%) compared to model 21099, mainly due to a decrease in the aerodynamic drag coefficient. Currently, the carburetor engine has given way under the hood to a new generation of engines with distributed fuel injection and electronic control.
The model with an 8-valve, 79-horsepower, 1.5-liter engine with distributed fuel injection has the VAZ 21102 index. This engine provides sufficient power (56 kW) and torque (118 Nm), with moderate fuel consumption. The maximum speed of such a car reaches 170 km/h, and acceleration to “hundreds” takes 14 seconds. Cars with such an engine, due to its high elasticity and torque, are especially good when traveling in heavy city traffic.
For more active drivers, based on this engine there was a modern interior design (which is still not as neat as that of its foreign counterparts), good aerodynamics, a spacious luggage compartment (480 l) with wide transformation possibilities (hatch in the rear seat and a trunk lid that extends to the bumper, allow you to transport long loads), a high degree of maintainability - all this is in favor of the VAZ-2110.
The front-wheel drive “tenth” family from Tolyatti, designed from scratch, is, of course, a new word in the domestic automotive industry. Compared to previous VAZ models, the softness, smoothness and stability of the ride has increased (for which we had to pay for more “woofiness” in the steering, which, however, is acceptable for the higher class, which included the “ten”). Improved efficiency. But at the same time - lack of options, incompleteness, low-quality components. There is still a long way to go to reach the “world level”! In addition, due to the “soft” suspension and 13-inch wheels, the car constantly touches the road with insufficiently strong factory protection for the engine sump. Everything indicates that the ideal balance between ride comfort and handling for a domestic car has not yet been found.
Distinctive features: modern design and interior of the car, improved performance characteristics of the VAZ-2110 that meet the new increased requirements of the automotive market. In addition to the standard, the “norm” equipment includes electric windows, body paint with metallic enamels, velor upholstery of seats and doors, and headrests in the rear seat. Cars in the “luxury” configuration are additionally equipped with 14-inch alloy wheels, an on-board computer, a heated front seat system, electrically adjustable and heated exterior rear-view mirrors, and fog lights.