The cooling radiator is the most important element in the design of a car, since failure of the radiator leads to the fact that the engine cooling system does not fulfill its task and the engine overheats.
If the radiator is leaking, corroded or clogged:
- the coolant level in the system drops;
- the circulation of antifreeze is disrupted;
- the pressure in the cooling system increases.
The result is a malfunction of the cooling system (ruptured pipes) and overheating of the power plant, which can lead to critical engine failure. In such a situation, it is better to immediately replace a faulty radiator on a VAZ 2110, choosing the right replacement option. Read more in our article.
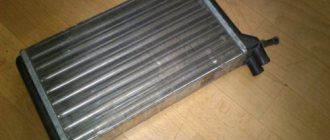
This device consists of:
- core (the so-called cooling part);
- lower and upper boxes (or, in other words, tanks) with pipes.
The core is tubular-lamellar. It is made of brass. In appearance, these are rows of oval tubes, which are arranged in a checkerboard pattern. These tubes are soldered with special cooling fins. The upper tank of the device is equipped with a filler neck, which has a sealed plug complete with outlet and inlet valves. The lower tank is equipped with a tap. The coolant is drained through it.
Which engine radiator and heater should I choose?
A car is a complex device that consists of various systems. One of them is the (CO) cooling system of the power unit. If any part of it fails, a whole series of problems immediately arise. The main thing is engine overheating. Most often this happens because the radiator is not working well.
At the same time, every driver wants to feel comfortable at any time of the year and especially in winter. This involves creating a warm, cozy environment in the cabin. But often, due to clogging of this automotive component, as well as corrosion processes, the VAZ 2110 heater radiator fails and requires repair or replacement.
Therefore, let’s try to figure out which unit is best to choose for the engine and for the stove so that it lasts long and reliably. Such a high-quality device will help in the operation of the cooling system in particular, and the entire car in general.
Most often, repair of this device is required due to its leakage. This is affected by corrosion and, of course, the quality of the materials used in its manufacture. In order for this car part to last longer, it should be looked after. Dirt, dust, leaves contaminate the cooling radiator of the VAZ 2110 and it begins to “perform its duties” much worse.
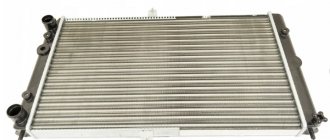
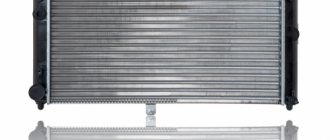
Because of this, as soon as summer begins, it is better to wash it. You can, of course, clean it of dirt with your own hands (more on that below), or you can also visit a car wash. These devices are distinguished by composition, namely: aluminum and copper. Let's look at them in more detail:
- aluminum models are less expensive and lighter. However, they also have disadvantages. These include lower thermal conductivity and greater susceptibility to corrosion.
- Copper analogues are distinguished by metal strength and durability (they resist corrosion better). Copper also has higher thermal conductivity, and, accordingly, higher efficiency.
I would like to note that companies often produce radiators for both the engine and the heater. The model will depend on the size of the power unit. A device (old model) is suitable for a 1.5 liter engine, but a heat dissipating “part” from Priora (this is a new model) is perfect for a 1.6 liter engine. But before purchasing, you need to check what type of device (radiator) your car is equipped with.
Design Features
The VAZ heating system consists of the heat source itself (stove), a heat distribution system throughout the cabin and a control system. The heating and heat distribution system is combined with the interior ventilation system. The heat flow is controlled by an air damper (in older designs a faucet was used). The air supplied to the cabin is heated by passing through the radiator of the VAZ 2110 stove and distributed through the distribution system.
Most of the flow is directed towards the windshield and side windows, through the deflectors equipped with flaps, as well as into the center of the cabin. Another flow is directed to the feet of the driver and the passenger sitting next to him (through two pairs of deflectors located at floor level and knee level), as well as through a tunnel on the floor and two air vents under the front seats to the rear seat, at floor level.
The VAZ stove fan provides three modes: low and medium speed and automatic speed selection (based on a signal from the control unit). The electric motor of the furnace fan is commutator, DC. The current consumption at the highest rotation speed is 14 A. The electric motor speed mode is set by changing its connection to the car battery, directly (maximum speed) or through additional resistance.
This resistor has a variable resistance of 0.23 Ohm and 0.82 Ohm. If the greatest resistance is connected to the circuit, then the fan rotates at low speed, and if less (0.23 Ohms) - then at medium speed. When repairing a VAZ 2110 stove, it is not recommended to remove the fan blades from the electric motor shaft: this can lead to imbalance. The electric motor cannot be repaired (except for cleaning the commutator contacts); if it fails, it is advisable to replace it along with the fan blades.
How to remove the cooling radiator of a VAZ-2110?
The cooling system of the 2110 car is a closed type, liquid, with forced circulation. The overall tightness is ensured by the exhaust and inlet valves, which are located in the plug of the expansion tank of the machine.
Thanks to the exhaust valve, the required increased (compared to atmospheric) pressure in the system on a hot engine is maintained (the temperature at which the liquid boils increases, as a result, steam loss decreases).
At a pressure of 1.1-1.5 kgf/cm2 it opens. If the pressure decreases, the inlet valve opens. The entire thermal regime of the power unit is maintained by an electric fan and thermostat. The fan is turned on by a sensor that is screwed into the left tank. If you need to remove the radiator, then:
- drain the coolant on a cooled engine;
- dismantle the electric fan;
- slightly loosen the clamps and then carefully remove the supply and steam exhaust hoses;
- Next, loosen the clamp and dismantle the outlet hose.
- tilt the radiator towards the engine and remove it.
- At the bottom of the device, the emphasis is placed on two rubber pads. During assembly, they must fit firmly into the holes of the cross member.
Assembly is carried out in the reverse order of disassembly.
Cooling radiator device
Content
The main structural elements include:
- frame;
- pipes;
- cores;
- drain valve located at the bottom of the housing;
- the fill plug is located on top of the main body, equipped with inlet and outlet valves;
- thermostat;
- fan.
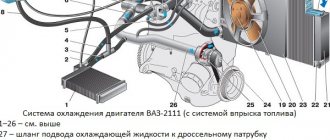
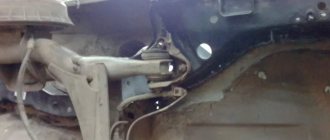
Cooling radiator design: 1 – radiator;
2 – sensor for turning on the electric fan; 6 – rubber cushion; 7 – drain plug. The housing design includes two tanks with attached pipes that transmit cooling. The cores include brass tubes soldered to the cooling fins located in the inner part of the housing. The fill plug directs the cooling liquid into the radiator; the drain valve is necessary so that, if necessary, the liquid can be drained from the cooling unit. The operation of the engine depends on which direction the radiator fan on the VAZ 2110 should rotate; if the system is operating correctly, cooling air should be supplied to the engine.
Replacing the heater core
One of the main reasons why the stove on a VAZ 2110 malfunctions is the leakage of antifreeze. Most often, antifreeze runs out directly from the radiator or through holes due to loose fastening of the hoses. The process of removing and subsequent replacement of this auto part is a very specific topic, about it in detail below. Now I would like to note that to replace it, you do not need to remove the panel in the cabin. All actions take place exclusively under the hood.
VAZ 2110 heaters are distinguished:
- old model (until September 2003);
- new model (after September 2003).
The procedure for replacing a device of a new and old model is not very different, but still, there are differences. At first the procedure is the same.
First, drain the antifreeze:
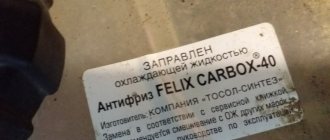
- This can be done from the engine block. To do this, unscrew the tank cap (this is necessary so that the pressure drops) and the drain plug, which is located behind the ignition module. About four liters of antifreeze should run out into the substituted container.
- You can also drain it through the expansion tank. To do this, you will need to remove the hose from the stove and thus pour out 1 liter of antifreeze. Then we remove the rubber pipe and loosen the three clamps. Further, depending on the type of heater (old or new), the procedure is slightly different.
What do you need for work?
First of all, you will need a new heater radiator. The choice is presented in a fairly wide range, so decide for yourself here.
As for tools and materials, be sure to check the condition of the system pipes. It is possible that they are also damaged, so they will have to be replaced.
Buy a set of clamps. In general, you will need three of them, but it is better to take a reserve just in case. Moreover, this “just in case” happens to every second person who changes a stove radiator with their own hands.
Tools include a short Phillips screwdriver and tweezers. The latter will help you install the latches.
Article on the topic: VAZ 2110 rear wheel bearing: when to change and the complete replacement process
Replacing an old-style heater core
We remove the car rubber seal of the wind lining and frill. We unscrew the screw that secures the frill (under the main brake cylinder). We unscrew the four screws on the right side of the frill. We unhook the two clamps on the frill that secure the hoses and wires.
Carefully disconnect the minus wire of the fan from the engine body, and also disconnect the positive terminal. Then unscrew the two screws of the frill (left side) and move it forward a little (but do not remove it completely). remove the windshield trim. After this, you need to disconnect the terminal of the sensor that monitors the coolant level.
Next, remove the steam removal hose from the expansion tank. Continuing further, disconnect the washer hose. You also need to unscrew four screws. We remove the windshield wipers and windshield trim. After this, we need to remove the clamps of the stove and fan housing. However, not all. Heater housing clamps only.
The next step is to unscrew the screws of the filter and the front part of the fan (they are the same, with the exception of only four long ones. It is better to remember their location). Now we remove the front of the stove fan. Afterwards, remove the filter housing. Next you can remove the back of the fan. Now we loosen the clamps a little and begin to remove the supply hoses, steam exhaust hose and antifreeze return.
We remove the leaking radiator. We carry out the necessary actions and collect everything in strictly reverse order. It is important to take into account some points during assembly: it is necessary to correctly mount the plastic housing of the “heating” fan, so that the pedal fits into the desired groove. There should be no extra bolts, all parts should fit tightly. If this does not work out, the micromotor gearbox will not be able to move the dampers and the stove will not heat.
Features of replacing the thermostat on a VAZ-2111
To replace the thermostat, you first need to arm yourself with special tools and materials:
- heating radiator VAZ-2111 in high quality;
- from 4 or more clamps;
- a short screwdriver with a Phillips-type tip;
- tweezers.
Replacing the thermostat on a VAZ-2111 injector, designed for 8 and 16 valves, looks like this. Any beginner can do it:
- Drain the antifreeze from the engine block. Place a container of sufficient volume under the hole so that the liquid does not spill past.
- Remove the seal, made of rubber, in the form of a frill, also called a wind pad.
- Look under the brake cylinder, which is considered the main one, and disconnect the frill fixing screw.
- Now disconnect the 2 clamps to secure the wires and hoses.
- From the body, disconnect the wire coming from the fan on the negative side and the positive terminal.
- Carefully remove the 2 screws attached to the left side of the frill.
- Now you can move the frill slightly forward.
- Detach the windshield trim.
- Disconnect the terminal located in the coolant indicator sensor, remove the steam removal hose in the expansion tank.
- Remove the windshield washer hose.
- Remove the glass cleaner and remove the trim attached to the windshield.
- Next, remove the clamping devices of the housing of the heating device and the ventilation device. When the screws are unscrewed, you need to remember their location.
- Take out the VAZ-2111 cabin filter housing and be sure to replace it.
- Remove the rear half of the vent housing.
- Loosen the clamps and remove the antifreeze supply and discharge hose, do not forget about the steam exhaust hose.
- Finally, it's time to remove the heater core. This will not require much effort, if, of course, the dismantling is done correctly.
Next, get down to repairing the VAZ-2111 heating radiator, if the unit can still be repaired. Your task is to clean it properly, restoring the tightness to the maximum.
Along with radiator repair, proper repair of the furnace unit will be required. In doing so, follow these rules:
- if you install the plastic part of the fan of the furnace device, make sure that the pedal fits into the required hole;
- return the bolts to their original place and monitor whether the assemblies are seated.
6-7 hours - and the assembly will be completed. To ensure the job is done perfectly, it is advisable to also provide sound insulation. All that remains is to fill in the antifreeze and start checking the functioning of the stove. If there is no heating of the pipes, it’s time to deal with the air lock located in the system cooling device.
During your first trip to the VAZ-2111, you will notice that the air flow has become hotter, and the antifreeze levels in the expansion tank no longer decrease. If you learn how to perform simple repair work yourself, you will be able to save a certain amount of money and will not have to constantly contact a service station.
Instructions for replacing the thermostat are shown in the video: https://www.youtube.com/watch?v=JiOcujk1qYE
A video on how to properly check the condition of the thermostat in a VAZ-2111 is presented below: https://www.youtube.com/watch?v=XHnRqlf6gr0
If the thermostat is located separately from the engine, the following video will help with detailed instructions for checking the condition of the unit:
The thermostat is not large in size, but it has an important function, allowing the engine to be optimally cooled. That is, this small unit plays a very important role.
The main task of the thermostat is to control the operation of the entire cooling system and prevent engine overheating. Let's consider when a thermostat needs to be replaced on a VAZ 2110 and how to do it correctly.
The new “type” of heater is attached to the car body like this:
- a screw in the middle, which is located at the bottom end of the windshield;
- 2 nuts are located above the exhaust manifold;
- 1 nut is located in the left corner (close to the filter).
You need to remove the rear window washer fluid reservoir, if there is one. We remove the filter, which is attached to the heater with a plastic cover with 4 screws. The stove consists of 2 parts. They are connected by three self-tapping screws. The heater fan is equipped with an air supply hose. You can look through it and see a self-tapping screw that needs to be removed along with two smaller screws.
We separate the stove into two parts. This is done as follows. We take the corresponding part of the device with each hand and turn it up a little and, then, carefully remove the right side, and after that, the entire part. Remove the right side. After this, we dismantle the steam exhaust hose. The right side, like the left, consists of two parts. They are connected by iron brackets.
They need to be removed. The part will split into two parts (here, between them, there is a seal). Now we will have access to the damper. It is better to use a new aluminum damper. Having carried out the necessary steps, we carry out the assembly in the reverse order.
When to change/remove the heater radiator
If you have a couple of days free, then you can shoot quite often if it brings moral satisfaction. If we change or remove the radiator, then there must be objective reasons for this. Since we need the stove to heat, we will remove it when it is not heating. But first you need to make sure that the problem is in the radiator. Even the very fact of an antifreeze leak can be caused not by the radiator at all, but by pipes of disgusting quality, which become woody and crack after a couple of years of operation. The difficulty is that the stove reliably hides its structure and is perfectly protected from industrial espionage, so that not a single part of it is accessible to enemies without disassembly.
Therefore, if antifreeze quickly leaks into the cabin or under the hood near the stove, you should at least try to determine the cause of the leak. A leak is fine, but with a groundless failure of the heater it’s more difficult. There can be many reasons:
- air lock in the heating circuit;
- clogged heater radiator;
- clogged cabin filter, if there is one at all;
- clogged air ducts;
- problems with the electric motor of the stove - it does not rotate, does not create pressure, creates insufficient pressure;
- electrical malfunctions - electronic climate control unit, violation of air recirculation operating modes, typical malfunctions of switches and regulators.
If there is still a need to replace the radiator, we will replace it, but first you need to select it.
Do-it-yourself radiator cleaning
There are situations when you notice that the engine begins to overheat. In this case, it is necessary to check how the car’s engine cooling system works. The main “blow” from dust, dirt, poplar fluff, and leaves is taken by the radiator. As a result, it overheats and fails. Therefore, let's try to figure out how and, most importantly, with what, to clean it.
The concept of “cleaning” a radiator can be considered mainly from the following two positions: in the first case, if it needs to be cleaned from the outside, that is, its surface needs to be washed. The second option is to wash the insides of this device. The presented methods will allow you to achieve some positive results, but they require completely different amounts of effort and time.
In the photo you can see a radiator that is contaminated with poplar fluff. Next, we’ll look at how best to clean it from dirt (before work, be sure to make sure it’s cooled down).
Reasons for failure of the cooling radiator
As a rule, the main reasons for the failure of the cooling radiator are:
- mechanical damage;
- vibration;
- corrosion.
Often flying stones damage the radiator, jamming its thin “honeycombs”. Also, vibration loads cause cracks to appear in different parts of the radiator.
As for hidden problems, untimely replacement of antifreeze or antifreeze, the use of coolant with unsuitable properties, as well as severe contamination of the cooling system leads to active corrosion destroying the internal cavities of the radiator.
To increase the service life of the radiator, it is necessary to monitor the cleanliness and serviceability of the cooling system. It is recommended to periodically flush the entire system, regularly change antifreeze, do not pour ordinary untreated water from the water supply into the system, and also clean the radiator externally from dirt, dust and fluff.
Cleaning the radiator from the outside
If you need to clean the cells of the device, then you can use the following options:
- washing with Karcher. This type of washing is based on a special high-pressure water cleaning technology. This method is very effective, but there are also negative reviews (they complain that the honeycombs are bent this way). But in reality, you just need to learn how to use the sink correctly. To safely use a Karcher, it is better to use not a “cutter” as an attachment, but a “vario”. You can use maximum speed. However, direct washing is not recommended. Better at a distance of 30-50cm. In this case, the angle must be right;
- There is also a similar method, but here air is used instead of water. The result is cleaning with compressed air. Without a doubt, there will be a positive effect, but how long it will take to wash the radiator is up to you to decide;
- Another option if you decide to clean the heat dissipation device is to use a nylon brush and soapy water. Actions should be performed in the direction of the radiator mounts, otherwise the metal will be damaged. The cleaning agent must be applied directly to the unit, wait a while (information about this is contained in the instructions for the product) and wash off the dirt with a regular watering hose.
Cleansing inside
If in the case of external cleaning all actions can be performed directly on the car, then for internal cleaning it is impossible to do without removal. First you need to drain the coolant. For this:
- place a container under the valve;
- unscrew the lid;
- turn off the valve;
- when all the liquid runs out, close the valve.
To clean the “core”, you need to direct a stream of water inside. When the radiator is full, you need to drain the water using the valve. This procedure should be carried out several times. If the contamination is severe enough, special cleaning fluids can be used. When the cleaning is completed, install the radiator in the car.
Don't forget to pump out any air pockets. To do this, it is necessary to run the engine with the lid open for about 15 minutes. Then you should turn on the heater to maximum. This will cause the coolant to circulate and the air will disappear. Another way is to drive the front wheels onto a hill. After this, you need to let the engine run for several minutes at high speeds.
Do-it-yourself VAZ 2110 radiator repair
If the VAZ 2110 radiator is leaking, then there are certain malfunctions that should be taken into account. In this situation, many owners resort to replacing it. However, oddly enough, in most cases you can get by with the usual repair of the VAZ 2110 radiator, rather than purchasing a new unit. Often you do not need to have special skills, but there are also cases when you cannot do without knowledge in the field of soldering and welding. To do this, you should learn to determine the real condition of the car and then begin repairs on your own.
The most common problem is device leakage. In such situations, the coolant runs out from the places where the metal and plastic are attached, and this leads to overheating of the power unit. It is not always possible to find a new device, and repairs, in turn, will cost 2 times less. Next we will talk about repairing the heater core and engine cooling system.
Why did it happen so?
Perhaps the automatic requests do not belong to you, but to another user accessing the network from the same IP address as you. You need to enter the characters into the form once, after which we will remember you and be able to distinguish you from other users exiting from this IP. In this case, the page with the captcha will not bother you for quite a long time.
You may have add-ons installed in your browser that can make automatic search requests. In this case, we recommend that you disable them.
It is also possible that your computer is infected with a virus program that is using it to collect information. Maybe you should check your system for viruses.
If you have any problems or would like our support team, please use the feedback form.
The VAZ 2110 radiator is the main element of the “tens” liquid cooling system. It is the radiator that cools the liquid (water, antifreeze or antifreeze), which removes heat from the engine cylinder block, where the combustion process of the working mixture occurs. The cylinder block has a whole network of channels for this. Along the way, the hot liquid enters the heater radiator of the stove, which heats the interior of the VAZ 2110.
Repair using chemicals
Minor damage can be repaired using special products, namely radiator restoration fluid, powder restorers or sealant. The principle of their operation is approximately the same: the product must be poured into the engine cooling system. The resulting mixture clogs cracks if it comes into contact with air.
Of course, not all chemistry is the same, therefore, in general, it is not possible to answer for the quality. For example, a low-quality reducing agent can cause harm. It will clog the entire cooling system. Thus, the stove will stop heating and, as a result, it will be necessary to flush the system or replace the stove radiator. Thus, for repairs, chemistry is only a temporary solution to the problems that have arisen.
Aluminum VS Copper: which radiator to choose?
Many years of experience in operating radiators made of various materials on domestic cars (including the VAZ-2112), it was noticed that its performance is not affected by the material from which it is made. Both copper and aluminum devices heat equally well.
The only criterion when choosing a radiator is its originality, since only a serious manufacturer is capable of producing a quality product. Therefore, when purchasing a heater radiator, it is necessary to pay attention to this criterion.
So, where exactly is the radiator of the VAZ-2112 stove? In the design of the interior heating system, the radiator is located inside the heater housing, occupying a horizontal position in relation to the central panel.
You can try to repair the radiator using soldering
The repair area should be thoroughly cleaned and a piece of sheet brass (brass devices) should be soldered to it. In such a situation, you need to use a gas torch and a soldering iron. If the tubes are cracked, it is better to replace them with new ones. The solder should be heated until it becomes soft. Then we remove the tube from the tank and
solder a new one in its place. The main disadvantage of this method is that exposure to high temperatures leads to deformation of the elements of the unit. Thus, we came to the conclusion that it is better to use argon arc welding for repairs.
Purpose, design and principle of operation of the thermostat
The coolant circulating through the working channels of the engine blocks, its main purpose is to remove excess heat accumulated in the power unit due to the friction of the working elements of the engine and the impact of the high temperature of the exhaust gases passing through the exhaust circuit.
The main elements of the cooling system of the VAZ 2114, which are responsible for lowering the temperature of the antifreeze, are the electric cooling radiator fan and the thermostat.
To understand the principle of its operation, you need to see what the thermostat on a VAZ 2114 looks like. Structurally, it is designed in such a way that the valve that regulates the coolant flow is located inside a housing with three pipes:
- two inputs - from the engine and radiator;
- one day off - to the pump.
The main working element of the valve itself, located inside the thermostat, is a solid heat-sensitive filler, which, when heated, through a rubber insert, acts on the piston that moves the main valve. When it heats up, it opens it, when it cools down, on the contrary, it closes the hole, preventing the flow of antifreeze.
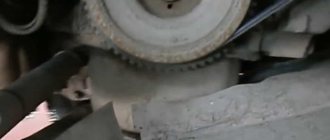
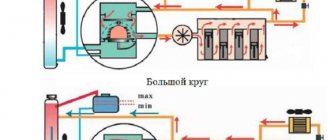
The thermostat is attached to the engine through a pipe to the cylinder head on the left side, under the air filter. It is connected to the radiator and pump using rubber pipes. On a cold engine, the valve of this coolant flow regulator is closed and after starting, the liquid that begins to be pumped by the pump forces moves along a “small circuit” or “in a small circle.” Both of these expressions are used among motorists. When moving in a small circle, the antifreeze passes through the heater radiator, intake manifold and throttle assembly. Liquid is not supplied to the radiator; the valve cuts off this path.
As the engine heats up, the coolant takes away some of the heat, heats up and, passing in a “small circle” through the thermostat, heats the temperature-sensitive element. The piston begins to move and open the main valve. This begins to happen when the liquid temperature reaches 87 degrees. In this case, part of the coolant begins to circulate through the radiator. When the temperature reaches 102 degrees, the valve opens completely, moving eight millimeters. In this mode, the entire coolant flow rushes in a “large circle” through the cooling radiator.
Experts recommend checking the operation of the thermostat without removing it from the car. To do this, after starting the engine, you need to touch the lower pipes coming from the radiator with your hands. They should be cold until the temperature rises above eighty degrees. As soon as the temperature rises above 85 degrees, the tubes should begin to heat up and after a while you can feel that the “large circle” circulation is working. The tubes should get quite hot.
If the lower pipes leaving the radiator continue to remain cold, it means the main valve has not opened and the thermostat is faulty. A malfunction of this regulator may also be indicated by the fact that the lower tubes begin to heat up almost immediately after starting the engine. This indicates that the valve is open and does not close when cold.
In both cases, a thermostat failure does not bring anything good for the engine. In the case when the valve is open, the antifreeze, passing in a “large circle,” does not have the opportunity to heat up to working condition. This reduces engine power and other performance parameters. In the case when the main valve is closed, the engine has a high risk of overheating the blocks. This is the most dangerous condition for the power unit. If you drive in this mode for some, even not very long, time, you can damage the engine, even to the point of breaking the shafts. And this, at a minimum, is a major overhaul of the entire internal combustion engine.
There is a different way to check the thermostat on a VAZ 2114. To do this, you need to pour water into a pan and, placing it on the stove to heat, immerse the thermostat there. Knowing at what temperature the thermostat on the VAZ 2114 opens, use a thermometer to monitor the heating of the water in the pan. At about 87 degrees the valve should open. If this happens, then the device is fully operational. It is better to check it in this way before installing it in place of a failed one.
Many car enthusiasts often ask specialists whether it is possible to repair the thermostat.
There is only one fairly reliable way to help the valve work. To do this, lightly hit the device body with a screwdriver several times. The impact should open the valve.
If this does not happen, then the thermostat on the VAZ 2114 needs to be replaced.
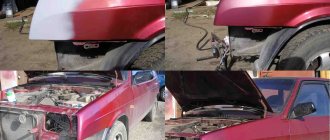
Radiator grille upgrade
In addition to the bumper grille, the grille can also be beautifully modified. If you equip your car with a mesh, the top grille will not only act as protection, but will also look aesthetically pleasing. The factory grille is constantly “weared out” by time, flies, roads, leaves. As a result, the varnish peels off and peels off in places.
The appearance is not attractive and something needs to be done about it. First you need to remove the grate and scrape out all the animals from it. Then everything needs to be washed well. Afterwards, you can start “cutting” from the mesh. Everything needs to be measured accurately. Next you need to remove the old varnish, degrease and paint all the elements.
The color design can be very different. It is necessary for everything to dry. Next, using a screwdriver and pliers, you should secure everything. The end result will look like in the photo.
Modification of the VAZ 2110 fan
Since the fan of the VAZ 2110 engine cooling system operates only at one speed, many owners do not like the peculiar jumping behavior of the arrow on the instrument panel. In addition, I would like to smooth out the abrupt shutdown of the fan. But first we should note the main disadvantages of the cooling system:
-there is a “thermal pumping” effect (the temperature, if it’s hot outside, constantly fluctuates);
- shock electrical loads on the vehicle on-board network.
Let's now take a closer look at the operation of the radiator fan: many owners of the VAZ 2110 do not like the fact that if the weather is hot outside and the car is not moving quickly, the coolant temperature rises close to the red zone on the dashboard of the corresponding sensor, and then the fan starts and the arrow drops down. It is swaying. Perhaps the panel is lying.
But the effect is still unpleasant and alarming. All drivers probably want to make the temperature “control” smoother. Owners want the temperature to be maintained at the same level at all times.
There are constant debates about this, but there is a solution to this problem
Option 1. The first method involves reducing the rotation speed of the Carlson and starting the electric motor more smoothly, at a low coolant temperature. But this option is relatively difficult for a person who does not understand car electrics. In general, the entire structure will not look very reliable due to the large number of wires.
Option 2 . This method is somewhat simpler than the previous one. It involves forcing the fan to turn on using a button. After this modification, the interior will be complemented by one more detail, namely a button. In the summer, standing in a traffic jam, you can press it and the interior will be filled with the measured rumble of the Carlson. It operates at low speeds as long as the button is pressed (this speed is enough to ensure that the coolant temperature does not exceed 90-95 degrees). However, if it rises above the marked value, the factory second maximum speed will turn on.
Option 3 . This approach, according to car enthusiasts, although not the cheapest, is probably the most correct and, more importantly, reliable. It involves installing a Smooth Control Unit for the Car Radiator Electric Fan. In general, this is a combination of advantages and a qualitative elimination of the disadvantages of cooling systems due to the introduction of a new algorithm, the so-called smooth control, which regulates the rotation speed of the electric fan. As a result, the engine temperature stabilizes. The cost of such a device is approximately 1200 rubles.
Option 4. Another option is the Fan Start Controller (FRC) for cars. This adapter is installed in the open circuit of the car fan power supply. It turns on more smoothly, and this increases the service life of the fan.
Diagram and design of the heating system in the VAZ-2110
The heating unit itself is represented by several components:
- Electric motor. A ventilation device is fixed on it, designed to pump a hot air flow.
- A radiator device, the failure of which will lead to the inoperability of the stove. On old-style heating systems, the radiator assembly is not equipped with a valve designed to shut off the flow of coolant through the device. Therefore, the unit practically does not leak, since leaks are usually associated with the faucet. The absence of this element ensures the fastest heating of the car interior.
- Three dampers. One of them is designed to close and open the heating channel, the second is used for recirculation, and the third is necessary to control the heater.
- The resistor device is designed to regulate the blowing speed.
Components of the heating system
Main parts of the heating system for the interior of a VAZ 2110 car:
- 1 - electro-pneumatic valve device;
- 2 — front housing of the air intake of the heating unit;
- 3 - water deflector device, presented in the form of an air intake flap;
- 4 — valve device for controlling the damper of the air flow recirculation system;
- 5 — recirculation system damper;
- 6 — rear part of the air intake housing of the heating unit;
- 7 — heating channel damper;
- 8 — damper of the heating unit control system;
- 9 — radiator unit;
- 10 - protective plastic casing of the radiator device;
- 11 - bushing installed in the steam outlet pipe;
- 12 — bushing for the supply line of the heating unit;
- 13 — bushing of the outlet pipe;
- 14 - electric motor of the heating system;
- 15 — electric motor housing;
- 16 - supporting surface of the damper drive lever used to control the stove;
- 17 — drive handle for controlling the damper of the heating system;
- 18 — gear motor of the drive device, presented in small sizes;
- 19 - resistor element;
- 20 - protective cover for the heating unit lining.
Connection diagram for blowers and controls
Main components of the stove:
- 1 - air ducts designed to warm up the rear of the car;
- 2 — plastic lining running from the center console to the rear seats;
- 3 - blowers designed to blow feet;
- 4 - main nozzles for ventilation of the car interior;
- 5 — side nozzles for interior ventilation;
- 6 — nozzles intended for heating the glass installed in the front doors;
- 7 — control knob for the interior heating unit;
- 8 — plastic housing of the air distribution device;
- 9 — damper for the foot warming system;
- 10 - plastic flap designed to warm up the windshield;
- 11 - heating unit.
The difference between old and new stoves
Old and new type heating systems have some features in connection diagrams as a result of the following differences:
- Radiator design. Heats in cars of different years of manufacture have different radiator assembly designs. In older heating systems, radiators are equipped with taps to drain the refrigerant.
- Different designs of SAUO controllers. Cars manufactured before 2003 used five position controllers. In newer versions of the car, devices numbered 4 and 5 were removed from the design.
- Micro-gearbox design. The main difference is the different type of resistor elements. When replacing elements, you need to consider whether these parts are interchangeable or not.
Here are the main ones. Let's start with the simplest ones:
- the bolt that attaches the plastic fan to the pulley has come loose;
- the radiator is not inserted into the socket and just lies on the suspension;
- part of the impeller blade broke off, resulting in an imbalance;
- there is dirt on the impeller, there is also an imbalance (it needs to be cleaned);
- due to the fact that the cushions are pressed, the motor does not hold up and there is vibration (you need to change the cushions, install special rubber gaskets);
- no lubrication, the fan is humming (the electric motor needs to be lubricated);
- broken bearing (it needs to be replaced).
To balance the impeller, you must:
Option 1 . By winding the wire around the blades, we check the imbalance. We gradually level it out until there is silence.
Option 2 . It is necessary to insert into the hole a part that is suitable in diameter (drill). Place the impeller with its axis on two horizontal supports. If there is an imbalance in this situation and the impeller tends to take an unclear position in space, this malfunction should be eliminated by grinding the blades. You can also glue a weight inside the impeller.
If, after the above reasons, vibrations and noise remain, then you should change the fan impeller, which will have eight blades (four blades come from the factory). Or finally make soundproofing. After replacement, the fan will definitely not work any worse. Most often, after replacing the fan with an eight-blade one, the vibrations and noise disappear, and driving in the car will now be very comfortable.
Design features
The VAZ-2110 heater radiator is fully compatible with other models of this family (2111, 2112). This is a single-section heat exchanger with two connection pipes. The device allows you to maintain a comfortable temperature in the cabin by supplying filtered hot flow from the engine. Also, the presence of a heating radiator eliminates fogging of the interior windows.
Be sure to read the article by our specialist, which describes in detail the technical characteristics of the VAZ-2110.
Standard dimensions: 160×50×290 mm. Made from aluminum. Curb weight is less than one kilogram. Currently, spare parts of the described type are produced by several enterprises. The most famous are DAAZ heating radiators, which were originally used on VAZ. Also, compatible parts are produced under the Luzar brand. If you do not want to frequently change heater components, pay attention to copper products, which are much stronger and have less heat transfer.
Replacing the radiator of the VAZ-2110 stove with copper analogues is carried out according to the same algorithm as the installation of standard heating equipment.