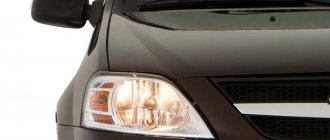
Reasons for poor lighting even after adjusting the headlights
- Cloudiness of the plastic shell results in poor light dispersion. There are two solutions here - buying new optical elements or polishing, which, by the way, you can even do yourself. For this purpose, a grinding machine is used, during breaks in which the plastic is washed to the desired level of transparency.
- The characteristics of headlights also affect the quality of illumination, since some are equipped with more powerful bulbs, while others have less. In this case, some use xenon “support”, which provides the proper luminous flux with minimal power.
- Cracks in glass can cause light to refract incorrectly. Here either its “reanimation” or complete replacement should help. In any case, this is one of the most expensive repairs, so it is better to periodically check the glass for mechanical damage.
How to replace the lamps yourself
Changing a light bulb in Kalina yourself is not difficult. The time spent on the work depends on the skill of the driver and the size of the hands. Some owners change light fixtures in 15-20 minutes without removing the headlight, while others suffer for more than an hour and ultimately dismantle the optics.
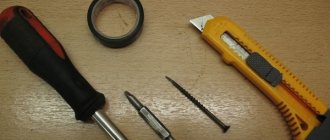
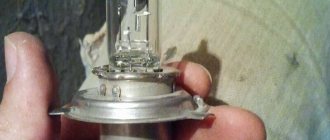
When replacing, cloth gloves are used. This helps protect the skin on your hands and also prevents contact with the bulb. When touched, fingerprints remain, which heat up when the light is turned on and after a while burn through the thin glass.
During work, the battery terminal is unscrewed to avoid a short circuit, which will lead to burnout of the fuse link in the fuse box.
Far module
Replacing the high beam lamp is easier than in the low beam module, since the cover is located closer to the radiator grille.
To perform the operation you will need:
- Turn off the Kalina engine.
- Open the hood lid.
- Remove the protective boot on the back of the flashlight.
- Carefully disconnect the plastic chip.
- Open the latch.
- Pull out the lamp.
Assembly is carried out in reverse order. When installing the terminal, you need to check the contacts and, if necessary, clean them using a flat-head screwdriver, sandpaper or a special chemical spray.
Low beam
Replacing a low beam lamp on a Lada Kalina depends on the experience of the owner and is divided into two types:
- Without removing the headlight.
- With module dismantling.
Most Kalina owners cannot replace the lamp in the left headlight due to limited space. In this case, you will have to ask a more dexterous friend or dismantle the lighting device yourself for convenience.
To change lamps on installed optics:
- Unscrew the filter housing near the left headlight and move it towards the engine.
- Disconnect the washer motor terminal, remove the screws and move the reservoir to the side.
- Open the light module seals.
- Remove the block with wires.
- Remove the spring clip.
- Remove the part.
Assembling the headlight with a new spare part is carried out in the reverse order.
To dismantle the headlights, you need to unscrew the grille, fasten the modules and disconnect the contact chip. Place the removed optics on a convenient surface and replace the light elements.
Dimensions and DRLs
In the first generation Kalina, the dimensions are installed under the cover of the near reflector.
Replacement is no different from work in the near headlight compartment, however, to disconnect the lamp, it is turned counterclockwise. Drivers often install a diode instead of the original light source, which has a bright glow and can work for more hours.
Replacing DRL lamps on second generation Kalina:
- Open the hood.
- Find the plastic retainer at the bottom of the lamp near the radiator grille.
- Turn left 90°.
- Pull towards yourself.
Daytime running lamps do not contain halogen in the bulb, so they can be handled by hand when installing. Parts without gas include reverse elements, which are changed by bending the trim in the luggage compartment. To replace the Kalina station wagon's brake light bulb, you will have to unscrew the plastic plug on the fifth door, disconnect the chip and pull out the old spare part.
Turn signal
If the marker light on Kalina is freely accessible, then it is more difficult to get to the turn signal module.
To install a new lamp, you need:
- Unscrew the screws holding the air intake barrel and washer fluid reservoir.
- Move the parts towards the engine.
- Feel for the plastic cartridge and turn it to the left.
- The lamp is removed from its seat by slightly pressing and turning it 90° to the left.
To install a new part, you need:
- Install it into the cartridge.
- Press and turn to the right until it stops.
The finished element is mounted in a standard hole. You can check the operation of the light by turning on the corresponding key on the Kalina instrument panel.
Fog lights
When replacing the fog lights, partial dismantling of the locker will be required. To do this you need:
- Turn the wheel towards the engine compartment.
- Unscrew the screws and unclip the clips where they are attached to the bumper.
- Bend the fender liner.
- Turn the light bulb to the left until it stops.
- Pull towards yourself.
- Disconnect the plug.
To install a new light source in the PTF, you must first snap the connector, insert the part into the lamp and turn it to the right.
After carrying out the work, you need to check the correct functioning of the light and adjust the angle of the reflector. A properly functioning car light ensures good visibility in all conditions and safety on the road.
Replacing low beam lamp Lada Largus
Added by avtorin on 12/15/2016
see also
Removing the LADA XRAY taillight
64 Comments 0 Like
Replacing the low beam light bulb Oka
29 Comments 0 Like
Removing the Oka starter
10 Comments 0 Like
Replacement of Lada Priora headlights
11 Comments 0 Like
Replacing low and high beam lamps Lada Priora
6 Comments 0 Like
Replacement of taillight lamps of Lada Priora
14 Comments 0 Like
Replacing the rear license plate lamp of Lada Priora
8 Comments 0 Like
Replacing the low beam lamp Lada Kalina 2
5 Comments 0 Like
Replacing brake light bulbs for Lada Kalina
18 Comments 0 Like
Installation of acoustic shelf Lada Kalina
19 Comments 0 Like
Replacing the Lada Kalina generator belt
2 Comments 0 Like
Installation of autostart Lada Kalina
4 Comments 0 Like
Leave a comment Delete comment
You must be logged in to post a comment.
Downloading a book
After successfully completing the payment (by any method) and returning to the KrutilVertel store from the payment system website, you will be taken to the successful payment page:
The book you purchased will be in your personal account, from where you can always download it.
Please note that after making the payment, you need to return back from the payment system website to the KrutilVertel website. If for some reason you did not return back to the site and closed the payment system tab with a message about the successful completion of the payment, please let us know - we will send you a letter indicating access to download the book
If for some reason you did not return back to the site and closed the payment system tab with a message about the successful completion of the payment, please let us know - we will send you a letter indicating access to download the book.
Rear additional lights for Lada Largus
LADA LargusDaytime running lightsLED running lights
One of the most popular Russian-made family and truck cars is the Lada Largus. This car is an adaptation of the famous Dacia Logan MCV model, which has been produced in Romania since 2006.
The Lada Largus (RF-90) rolled off the assembly line for sale in 2012. Today it can be found in 3 versions: a passenger station wagon with 5 seats, a station wagon with increased capacity (7 seats), and a cargo van.
To improve the illumination of the road surface by optics at the rear of the body, as well as to add effectiveness and improve the overall appearance of the Lada Largus, additional rear lights can be used. As you know, the cover for the pre-installed rear lights in this car model is represented by a black plug.
It, according to many motorists, does not fit very harmoniously into the overall appearance of the optics. For this reason, many owners of this car replace the plug with additional lighting (most often LED, as it is durable and quite bright).
To replace the plugs on the lights, you will need to dismantle it, and then connect the new optics to the wiring according to the diagram described in the instructions.
Rear additional lights of Lada Largus
Where can I buy additional lights?
Purchasing additional optics for the Lada Largus is a necessity due to increased driver safety while driving. With additional lights, the car will be much better visible to road users at night in any weather.
The material of the products is made from foreign high-quality ABS plastic, glass from German PMMA, and the lighting is provided by high-quality LEDs. The lights on the Laga Largus operate in 2 modes: brake light and side lights. The set weighs about 2 kg. It is also possible to change these operating modes to another scheme. The kit includes a pair of lights (left and right), wiring harnesses, installation and connection diagram. The installed optics will fit perfectly with the pre-installed ones, and the exterior of the car itself will look complete. In addition, installing additional lights will perfectly highlight the dimensions and brake lights.
Rear additional tuning lights for Lada Largus
In addition, there is a company on the market engaged in tuning domestic cars and supplying spare parts for them - TuneAvto. It also sells LED rear auxiliary lights made of ABS plastic. The product can operate in 3 modes at once, such as:
- dimensions;
- brake signal;
- dimensions + brake signal at the same time.
The product comes with a six-month warranty. The product weighs 1.8 kg. It is fully compatible with standard optics and is not subject to fading due to exposure to sunlight. Gives a complete look to all rear optics.
Installation instructions
To remove the plug and install additional rear lights instead, perform the work in the following sequence:
- Remove the main light from the rear of the body. To do this, you will need to unscrew 2 fasteners and then disconnect the block.
- After the lamp is removed, remove the upholstery inside the car, located on the rear pillars.
- Remove 3 fasteners holding the trim on the outside, and 1 fastener on the inside of the car. Remove the cover itself. If you have a 7-seater Lada Largus station wagon, you will need to remove the window fasteners, pistons, and mounting bolts for seat belts.
- Remove the pin from the trim. It will need to be screwed into a similar place in the trim on the additional lamp.
- Attach additional optics to the place of the lining using nuts.
- After connecting the wiring and checking the operation of the additional lighting, put the main optics in their original place.
Additional tail lights for Lada Largus
To connect the Lada Largus optics according to the diagram, you will need:
- Disconnect the terminal from the ground conductor and the battery.
- Connect the wiring of the new optics to the wiring harness of the main lighting. In the additional light, the black wire is ground, the yellow wire is the side light, and the red wire is the brake signal. The wiring of the pre-installed optics has an orange, blue and black wire (brake signal, parking lights, ground, respectively).
- Carefully insulate the wiring connection.
- To check whether the attached additional optics works on the Lada Largus, connect the battery. After this, turn on the dimensions and press the pedal that activates the brake light.
Replacing a stop largus lamp
The first part is here - www.drive2.ru/cars/lada/l...us/dim-x/journal/3159157/ Bullshit.
It turned out to be complete garbage. As the hero of the famous Soviet plasticine cartoon said: “It won’t be enough!”, in this case, light. Not a single lamp, even a converted one, gave light like an ordinary incandescent lamp. I decided to redo it again. And so we will collective farm.
Well, quite by accident I came across normal diodes for the rear light. In a store on the outskirts of the glorious city of Mineralnye Vody, there was a fairly wide range of diodes and very low prices. I took four pieces - 2 two-pin (parking brake light) and two single-pin ( rear fog light, reversing light).
The process turned out to be simple, but rather inconvenient. The plastic wings were so tight that I could barely unscrew them, I was afraid to break them.
but in the end everything seems to be fine. The flashlight came off easily, the only thing that got in the way, due to the shape of the body, was the rubber corrugation with wires that goes to the rear door.
The board is made of rather tacky plastic and is held in place by three latches, but apparently it requires gentle handling. It can be removed quite easily.
Base lamps, 1 and 2-pin. Can be removed and installed easily. The sad thing is that I haven’t found any for the turn signals (orange LEDs). They burn clearly brighter in daylight than incandescent lamps. I’m very interested in how the diode will behave in reversing lamp.
Photos will be up in the evening.
as promised - photos)))
This is what the whole thing looks like in sunlight:
for comparison, the original lamp:
although the issue with the fog lamp remains unclear. Since the diode gives directional light, the reflector remains out of use, and the whole thing doesn’t shine very well, to put it mildly...
in general, the foglight turned out to be quite sad...
although the reversing light is not much better. Apparently, you need to look for LEDs of a different type, with non-directional light.
The question is also confusing: the difference between the parking light and brake light modes, in my opinion, is quite insignificant. It’s sad...
In short, I thought hard about whether the game was worth the candle.
Price: 340 ₽ Mileage: 16400 km
Lada Largus 2013, petrol engine 1.6 l., 106 l. p., front drive, manual transmission — electronics
Cars for sale
Lada Largus, 2019
Lada Largus, 2012
Lada Largus, 2013
Lada Largus, 2015
Comments 3
In general, I still have incandescent lamps)))
Hello. I installed a single-contact light bulb for an additional stop signal, and encountered the following incident: the regular lamp is on, the diode lamp is not lit, since for a diode lamp (at least a cheap one), the polarity matters; I found out that in my car the connector for the additional stop signal + does not come to the central contact is like on all domestic cars, and the side contact is. For treatment, I had to do a polarity reversal in the connector going to the lampshade. I plan to install an analog G4 (diode) lamp in the reversing light in Leruamerlen 225 rubles, it requires a little modification.
It's time to change the standard light bulbs on the parking lights, brake lights, reverse lights, and PTF lights. The rear windows are tinted 5th and at night there is a catastrophic lack of lighting.
Used: a. Dimensions and brake lights 2-pin LED bulbs 15 LEDs. 2 pieces for 200 rub. b. Reverse 1-pin LED light bulb 7th generation. At the end there is a lens on the sides, 3 rectangular LEDs (I went and checked) 1 piece 550 RUR. V. PTF - 1-pin LED light bulb of the 6th generation at the end of the lens. 1 piece 450 rub.
Let's start: 1. Remove the jack. 2. Unscrew the wings that secure the rear brake light.
Reverse LED. Shines white light like a spotlight.
5. We change the bulbs we need and assemble everything in the reverse order; don’t forget to correct the corrugation at the left brake light.
Rear additional lights for Largus
Additional rear lights in LADA Largus are an original decoration of the car. Often, additional LED lights are installed instead of ordinary black overlays.
Of course, LED lights make the car more representative and complement it aesthetically. You can buy LED additional lights for Largus here.
Thus, the car gets a neat appearance.
Manufacturers make the housing of the taillights from impact-resistant imported ABS plastic, and the glass is made from German PMMA. The rear light is equipped with LED brake light and clearance repeaters.
If necessary, the LED board is very easy to replace. During installation, the standard covers are replaced, which are located above the lights and have standard connectors.
The set of additional LED rear lights includes:
- two chips for connection;
- two lanterns;
- instructions.
How to change rear additional lights?
First you need to remove the main light. To do this, you will need to unscrew the fastening in the form of two nuts and disconnect the block. After the main light is removed, you need to remove the upholstery inside the cabin on the rear pillars.
After this, you need to unscrew the three nuts that hold the trim on the outside, as well as another one that is located inside the car. Next, you need to remove the cover. Then you need to unscrew the pin from the trim and screw it into the additional lamp in the same way.
Then comes the installation of the additional rear light and its fastening in regular places. While connecting the flashlight, it is advisable to disconnect the terminal from the battery. The next step is to connect the rear light wire to the main headlight wires.
When connecting, it is important to pay attention to the colors of the wires
To check the proper operation of the additional rear lights, you need to connect the battery and turn on the headlights, and then press the brake light. Finally, the main lights need to be installed back.
Found a mistake? Select the text with the mouse and press Ctrl+Enter Additional brake light Surely every motorist nowadays knows what an additional one is, or According to unofficial data, which has not yet been confirmed by AvtoVAZ, in 2017 the famous Lada 4×4 SUV (Niva) expects a minor retuning of the car's brake lights. Stop lights on LEDs are becoming common today. When is it necessary to replace the rear shock absorbers? Installing rear aprons LED fog lights LED fog lights The color of the car can speak about the character of the car owner. It is also generally accepted that the more unusual the color, the more expensive the car. When repairs to the rear struts are needed Rear shock absorbers cannot be considered Show more
Remaking the light in the rear additional brake light lamp
After the previous entry https://www.lada-largus.com/blogs/osveschenie-salona/deformacija-dopolnitelnogo-stop-signala.html, I took care of replacing the standard tab in the rear brake light so that it would not heat up and deform the light.
This is how the end result turned out
I took a light bulb, picked one up at my old job, made in 1983 and cost 20 kopecks.
I carefully filed the glass with a file so as not to break it too much.
I broke off the flask and ground off the excess glass using a grindstone.
Soldered the wires to the antennae
Put on the thermal tubes and crimped them
I took the LED strip and cut off 6 diodes, 9 wouldn’t fit, and glued double-sided tape to secure the strip in the lampshade.
Soldered to the base wires
I glued it to the transparent glass and put it in place, photo without the red case.
PS When I assembled it, I couldn’t understand why the light wasn’t on, I walked around in circles for about 20 minutes, and be careful when connecting (+) and (-)
Based on the experience of handling domestic cars at the end of the 2000s, I was used to the fact that the skirts of the light bulbs were always marked with (-), and the central part was marked with (+), but here, on the contrary, this was news to me. Be careful
Thank you for reading to the end.
Accepted both + if you liked it and - if you didn’t
. I take criticism calmly and draw conclusions. Don't pass by.
Headlight adjustment
Car owners know that the procedure for adjusting Largus headlights with your own hands is not the fastest and easiest process. But it is extremely important, since the safety of those in the cabin depends on the correct setting of the light. The fact that there is a need to adjust the lighting of the head optics may be indicated by the signals of oncoming cars: they will flash their high beams, indicating that you are blinding them.
Before you start setting up, you need to make sure that it is necessary. The correct light is ensured by the following conditions:
- good condition of shock absorbers;
- optimal tire size and pressure;
- uniform distribution of load on different parts of the body.
If these criteria are deviated, the glow angle will be incorrect. If the problems described above are not identified, then you can safely move on to adjusting the light.
Washing methods and products used for it
There are three ways to flush the carburetor yourself:
- without removing the engine or disassembling it;
- by partial disassembly;
- by complete disassembly.
The first option involves adding chemically active liquids (additives) to the fuel. In other words, you need to pour a certain amount of cleaning agent into the tank and continue driving your car quietly, without wasting your time. Gasoline with an additive, moving through the fuel system, will itself dissolve and remove dirt. Of course, this method cannot be called effective, and everything that we tried to get rid of will inevitably end up in the engine cylinders.
To flush the carburetor without dismantling it, special additives are used
Flushing the carburetor by partial disassembly is the most popular type of maintenance. We will have to remove the air filter, cover, remove all elements that may be dirty, wash them and put the device back together. The efficiency of this method is quite high, and we can visually determine how clean the unit has become.
To flush, you will need to remove the air filter and carburetor cover.
Well, if you remove and disassemble the device completely, soak all its parts in cleaning liquid, and then rinse them manually and blow them with a stream of air, we will get a practically new carburetor.
Not so long ago, car owners cleaned the carburetors of their cars using liquids that can usually be found at home:
- refined gasoline;
- kerosene;
- diesel fuel;
- solvent.
Yes, they do a good job of removing various types of dirt and deposits on the internal walls of the device, especially if you have the opportunity and time to soak the necessary parts in them for a while. But today there is no need to use such means. It is better to purchase a special liquid from a car store. There are products on sale for both self-cleaning of the fuel system (filling the tank) and for servicing carburetors. The most popular and effective of them are:
Hi-Gear is a line of products for flushing the fuel system and carburetor. It has high dissolving abilities. Does not harm system elements. Available both in the form of additives and in the form of an aerosol;
- Mannol Vergaser Reiniger is an aerosol carburetor cleaner. Used for cleaning carburetors and injectors. Copes well with soot, oily deposits, and other contaminants;
- Jet 100 Ultra is a spray for quick cleaning of carburetors. It has the same properties, however, it acts faster.
Brake lights don't work - what's the danger?
This is a serious failure that can lead to driving safety problems because other motorists in traffic behind you will no longer be aware that your vehicle is braking. As a result, the distance between cars will be broken, which is unsafe.
You can find detailed installation instructions here. You may also be interested in an article about replacing generator brushes.
If an emergency occurs, the culprit will most likely be the owner of a car with a non-working brake light. As evidence, representatives of the road inspection use recordings from the video recorder, which is equipped with almost all modern cars.
What consequences can this lead to?
Brake lights, turn signals and side lights are very important, because they help ensure the safety of vehicles on congested highways. Thanks to them, other motorists can remotely determine the shape and size of the vehicle, as well as identify the maneuvers that you plan to carry out.
But fixing a situation with a faulty brake light is quite simple and most often it can be done without the help of specialists. The main thing is to determine the cause of the malfunction.
Lada Largus ALICE › Logbook › Replacing rear lamps with diodes
Well, quite by accident I came across normal diodes for the rear light. In a store on the outskirts of the glorious city of Mineralnye Vody, there was a fairly wide range of diodes and very low prices. I took four pieces - 2 two-pin (parking brake light) and two single-pin ( rear fog light, reversing light).
The process turned out to be simple, but rather inconvenient. The plastic wings were so tight that I could barely unscrew them, I was afraid to break them.
but in the end everything seems to be fine. The flashlight came off easily, the only thing that got in the way, due to the shape of the body, was the rubber corrugation with wires that goes to the rear door.
The board is made of rather tacky plastic and is held in place by three latches, but apparently it requires gentle handling. It can be removed quite easily.
base lamps, 1 and 2-pin. They can be removed and installed easily. The sad thing is that I haven’t found any for the turn signals (orange LEDs). They burn in daylight clearly brighter than incandescent lamps. I’m very interested in how the diode will behave in reversing lamp.
Photos will be up in the evening.
as promised - photos)))
This is what the whole thing looks like in sunlight:
for comparison, the original lamp:
although the issue with the fog lamp remains unclear. Since the diode gives directional light, the reflector remains out of use, and the whole thing doesn’t shine very well, to put it mildly...
in general, the foglight turned out to be quite sad...
although the reversing light is not much better. Apparently, you need to look for LEDs of a different type, with non-directional light.
The question is also confusing: the difference between the parking light and brake light modes, in my opinion, is quite insignificant. It’s sad...
In short, I thought hard about whether the game was worth the candle.
Problems when paying with bank cards
Sometimes difficulties may arise when paying with Visa/MasterCard bank cards. The most common of them:
- There is a restriction on the card for paying for online purchases
- A plastic card is not intended for making payments online.
- The plastic card is not activated for making payments online.
- There are not enough funds on the plastic card.
In order to solve these problems, you need to call or write to the technical support of the bank where you are served. Bank specialists will help you resolve them and make payments.
That's basically it. The entire process of paying for a book in PDF format on car repair on our website takes 1-2 minutes.
If you still have any questions, you can ask them using the feedback form, or write us an email at
Replacing the rear brake light bulb on a Renault Logan with your own hands
A brake light greatly increases the safety of driving a car. Nowadays, in addition to the main lights, all modern cars use an additional brake light, this attracts the attention of passing drivers. But what to do if it does not work for Renault Logan.
| TOP 15 most useful products for Renault Logan - OUR EXPERIENCE! |
- 1 Replacing the brake light bulb 1.1 Replacing the brake light bulb on a Renault Logan in a new body
- 1.2 Replacing the additional brake light lamp
- 1.3 Lamp selection 1.3.1 LED lamps
- 2.1 The brake light of the auxiliary light does not light up
Replacing the brake light bulb
So, we made sure that the light bulb burned out after all.
Replacing the bulb in the main brake light is no more difficult than replacing the low beam bulb. In this case, you need to disconnect the battery and begin replacement work. To do this you need to perform the following manipulations:
- Open the trunk.
- Unfold the trunk lining.
- Disconnect the wiring harness from the rear markers (if your front marker lamp has burned out, then read the material: replacing the front marker light on a Renault Logan).
Disconnect the power harness
Two lambs are marked with arrows
Removing the rear parking light unit
We put everything back together; on the other headlight the work is done in the same way. Replacing the license plate light bulb is almost the same.
When replacing, do not touch the lamp bulb; any grease that gets on it will speed up its failure.
Replacing a brake light bulb on a Renault Logan in a new body
The replacement is similar, only the rear marker light mountings have changed slightly. The rear dimensions are secured with one wing, which must be unscrewed. After this, pull the headlight towards you.
Replacing the additional brake light lamp
Everything is done as simply as possible. Replacement is made from the trunk.
- To replace, turn the lampshade to the left (counterclockwise) and remove it from its seat.
Turn counterclockwise, as in the photo
Removing the shade and lamp
Removing the lamp from the socket
Lamp selection
- For an additional brake light, the manufacturer recommends using halogen lamps marked P21W. The power of this standard light bulb is 21 W, voltage 12 V.
- For brake lights on Renault Logan, single-strand options are used.
It is important to select the correct replacement lamps. Osram Original Line 12V is considered one of the best. They have a long service life. In this case, there is no decrease in luminosity, and the bulb does not dim.
Another option for halogen lamps is Philips VisionPlus P21W. They are usually sold in packs of 2. They can be used not only for additional brake lights, but also for markers.
LED bulbs
LED lamp in the rear brake light
Many car enthusiasts strive to install LED lamps. When choosing such a lighting source, pay attention to luminosity. It should not be too high so as not to blind drivers driving behind. Select devices with a luminosity of 2000-3000 K.
An example of such a light bulb is the Osram LEDriving-Premium. According to the manufacturer, its service life is about 5 years. Energy savings compared to conventional halogen lamps up to 80%.
The brake light is not on, why?
The brake light is part of the vehicle's electrical system. If problems occur, you need to check this system. They start with the fuse box.
On Logan, fuse F3 is responsible for these lamps. So let's look at it.
The test can be done using a multimeter or by installing a known good fuse. If there is a problem with the fuse, all the brake lights do not light up. The same applies to the failure of the sensor that turns on the brake lights.
The additional brake light lamp does not light up
If only the additional light is not on, then it makes sense to immediately proceed to checking the wire going to it.
In some cases, it may break; to rule out this possibility, ring it. The reason may be not very good contact between the wire and the flashlight chip. After winter, contacts often oxidize, which causes poor current transmission. To avoid such a problem, you need to regularly clean the terminals and coat them with a special lubricant.
Conclusion
Any driver can, if necessary, change the additional brake light lamp without any problems. This does not require any tools at all. To replace the brake lamps in the rear lights, you will need a special screwdriver (phase 1). The service life of an installed lighting fixture depends on its quality. Purchase only recommended lamp models.
Ideas for tuning taillights
Many car enthusiasts want to make their car stand out by tuning its taillights.
Stickers and powerful lamps
One of the easiest ways to give your car an original look is with taillight stickers. Of course, these are not major changes and are more like child's play, but they can give the car an updated look.
A stylish and presentable appearance of a vehicle can be achieved using LEDs. With their help, you can give your car an original look, implementing the most daring design solutions.
Tuning includes the installation of powerful light bulbs in the optics. They are installed with a tinted film that darkens the rear light lens (the author of the video is House of Films).
An affordable and popular way to give any car model an individual appearance is overlays. Ready-made sets of linings are sold at the car market. You can make unique lantern covers with your own hands using fiberglass and epoxy glue.
DIY LED installation
Replacing lamps with LEDs consists of the following steps:
- First you need to remove the headlight. The removal tool can be a burning device to obtain an even seam.
- Next, you can remove the turn signal reflectors and take out the reflectors.
- At the next stage, the rear lights are disassembled.
- Markings are applied to the outer surface to place reflectors.
- Circles with a diameter of 15 mm are cut out of self-adhesive film and glued inside.
- The surface inside the stops and dimensions should be painted silver. When the paint dries, the circles should be removed.
- We install reflectors using epoxy glue. All joints should be coated with sealant.
- Pre-prepared boards with LEDs are installed in the case, and the wiring is connected.
- Assembly is carried out in reverse order. The parts are attached with glue.
- At the final stage, the operation of the optics is checked.
LED rear left light
Tail light covers
You can make your own covers using fiberglass. To do this, masking tape is first glued to the rear lights, then fiberglass, which should be impregnated with epoxy glue. All irregularities must be smoothed out and the layer must wait until it dries. It is recommended to apply several layers.
After 10-12 hours, the blank can be removed and the contours of the future product can be drawn on it. Then the profile is cut out. The resulting parts should be puttied, sanded with sandpaper, coated with primer and painted. At the final stage, the overlays are varnished. The covers are attached to the rear lights using double-sided tape.
Loading …
Stop signal
The principle of replacement is similar to the installation of the above-mentioned lamps, but it has its own nuances. Here, first, the trunk lid is opened and its decorative panel is removed. So, in order to replace the brake light, you must first of all clear the approach to the wing nuts.
After removing them, the entire headlight is turned out, which would be very problematic to do on your own. After all, you need to bring out its upper and lower parts at the same time so that they do not become a surprise. After unscrewing the screws, access to the lamp is open. The failed part is replaced, and all the previously listed steps are performed in the reverse order.
How to change the brake light bulb on a Ford Focus 3
The Focus 3 attracts its customers with its unique design. Thanks to body aerodynamics, a low drag coefficient is achieved, which greatly affects fuel consumption.
And improved sound insulation of the engine compartment, wheel arches and underbody reduces noise in the cabin at high speeds.
Inside, the Focus 3 can be simple or have all sorts of useful electronic gizmos, depending on the configuration.
For example, replacing brake light bulbs.
Open the trunk. On the inside (right or left depending on which light bulb needs to be changed) opposite the lampshade, remove the protective cover.
Under the cover you will see two nuts in the form of plastic tubes.
Gently unscrew them with your fingers. If they do not give in, take the pliers without squeezing them (in the form of a fork), resting against the blades of this bolt along the axis and tear it off. Next, twist it by hand.
After unscrewing the bolts, pry the lampshade from the outside and pull it away from the wing (the direction is indicated by the mounting bolts). The narrow feather part of the lampshade closer to the door is held on a clamping clip. Be careful not to break this fastener.
When you remove the ceiling lamp, you will see the sockets with turn signal bulbs and a brake light with a parking light.
After changing the required light bulb, reassemble everything in the reverse order.
There is no need to tighten the bolts securing the rear lamp with pliers; there is a possibility of stripping the threads.
Have a nice trip!!!
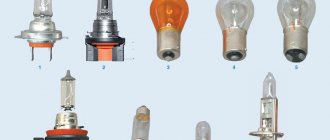
How to choose a lighting element?
The standard version of the configuration provides for the use of halogen lamps with an H4 base. This device contains two threads, each of which is responsible for its own light (naturally, near and far). Today's auto accessories market is able to offer its customers several analogue lamp options, structurally based on the following technologies:
Advice! When choosing lamps for your LADA Largus, lean towards the offers of specialized trading entities. The market is full of cheap analogues with Chinese ancestry. They cannot boast of reliability, and the effectiveness of such products is negligible. A useful point here would be to take into account the light characteristics of the lamp.
The most efficient lighting components are diode products. They can be installed not only as low or high beam devices, but also as marker optics or turn signals.
Note that an important advantage of a lamp using diode technology is its high ability to save energy. This factor is directly dependent on the manufacturer and the quality aspects of the product.
Important! During replacement, we remember their location, which will prevent incorrect installation and the need to repeat this manipulation.
Troubleshooting
What to do if even after replacing the low beam lamp does not light up? The cause may be blown fuses. Replacing them is even easier than changing light bulbs.
The fuses are located in the passenger compartment, to the left of the steering column. Fuses such as F9 (left headlight) and F10 (right) are responsible for the light.
The causes of failure are not always visual, so it is better to replace the required fuse. One of the reasons is poor-quality contacts of the fuse terminals. You can simply clean them out.
The Lada Largus does not have a low beam relay, so the reason may also be in the contacts of the headlights. They could oxidize or burn out. Poor contact of the machine ground wire is also possible. This reason can also be solved by cleaning.
If after the inspection you still have problems with the low beam, contact a specialist.
There is a special offer on our website. You can get a free consultation with our corporate lawyer by simply submitting your question in the form below.
Car headlights are designed to provide a full view of the road at night. The proper condition of all lighting sources on the car is a necessary condition for safety while driving. Traffic regulations set very strict requirements for the serviceability of headlights. A driver who does not comply with them is subject to a fine.
Headlights on Lada Largus may have the following types of problems:
- burnt out lamps;
- broken lamps;
- cracks on the surface of the optics;
- dimming of lights;
- incorrect formation of the light beam, etc.
The reasons for these problems may vary. Clouding of the optics is caused by the matting effect of dust particles in the oncoming air flow; cracks and broken lamps are usually the result of a collision with an obstacle while driving. Scratches on the surface of the optics can be the result of driving on roads with bushes and trees with spreading branches growing on the sides.
Driving with headlights that have any of the above factors is unacceptable. To carry out repairs, you can contact a service station, where qualified technicians will provide you with the required assistance. But car service costs money - not all vehicle owners are ready to incur financial expenses.
If you want to avoid spending money, try doing it yourself. On Lada Largus cars, replacing lamps and lights does not cause any particular difficulties. And use the information you glean from this article as a guide.
Standard replacement procedure
- Replacing the low beam lamp, as well as the high beam, begins by disconnecting the on-board power supply. This precedes all electrical repair work. In this case, a special switch is turned or the negative terminal is disconnected from the battery, which avoids accidental short circuits or erroneous connections during installation.
- The place where the Largus lamp will be replaced is determined. There, the rubber plugs covering the electrical components are removed, and two metal antennae are opened in front of the car owner, fixing them in the reflector. They are separated so that the used parts can come out of their seat without damaging the housing.
- Next, you need to disconnect the plugs from the wiring that was previously disconnected. Here it is worth paying attention to the order of arrangement, otherwise, during the installation of new parts, everything can be mixed up and they will have to be changed again.
- After connecting the plug with wiring to the new parts, they are mounted in place and secured with antennae. You should try not to touch the flasks with your hands, as this can lead to their rapid failure.
- If the light is dim during lighting, and the headlights flash when you turn on the headlights, then it is imperative to restore the contacts of the wires with the vehicle body. This is especially true for a marker lamp, because the fat that gets there begins to evaporate when heated and can cause ignition.
- At the end of this procedure, you need to put on the rubber plugs and secure all the parts in their places. After this, the car will be ready for use and the driver does not have to worry about malfunctions of the Lada Largus lighting fixtures.
Purpose of fuses in the block installed in the passenger compartment
Note: On various vehicle modifications, some of the fuses shown in the images may be missing.
more details:
| Protected circuit | |||
| F1 | 20 | Yellow | Windshield wiper, windshield wiper switch, heated tailgate relay |
| F2 | 5 | Beige | Instrument cluster, fuel pump relay, engine control unit (ECU) |
| F3 | 10 | Red | Brake light switch |
| F4 | 10 | Red | Diagnostic connector, immobilizer antenna unit, body electrical control unit |
| F5 | — | — | Reserve |
| F6 | — | — | Reserve |
| F7 | — | — | Reserve |
| F8 | — | — | Reserve |
| F9 | 10 | Red | Instrument cluster, left low beam |
| F10 | 10 | Red | Middle sows right headlight |
| F11 | 10 | Red | Instrument cluster, left high beam |
| F12 | 10 | Red | High beam right headlight |
| F13 | 30 | Green | Rear door window motors |
| F14 | 30 | Green | Front door power window motors |
| F15 | 10 | Red | ABS electronic control unit, acceleration sensors, steering angle sensor |
| F16 | 15 | Blue | Electrically heated front seats |
| F17 | 15 | Blue | Sound signal |
| F18 | 10 | Red | Left front and rear parking lights |
| F19 | 10 | Red | Right front and rear parking lights, glove compartment lighting, instrument cluster lighting, hazard warning switch, HVAC control unit, audio system, cigarette lighter, central locking switch, front door power window switches, license plate lights, right lights front and rear position lights |
| F20 | 7,5 | Brown | Rear fog light |
| F21 | 5 | Beige | Electrically heated exterior mirrors |
| F22 | — | Reserve | |
| F23 | — | — | Reserve |
| F24 | Reserve | ||
| F25 | — | Reserve | |
| F26 | 5 | Beige | SRS system |
| F27 | 20 | Yellow | Tailgate wiper motor, horn, TDC sensor, reverse light switch |
| F28 | 15 | Blue | Interior electrical control unit (energy saving mode) |
| F29 | 15 | Blue | Interior electrical control unit, diagnostic connector |
| F30 | 20 | Yellow | Interior electrical control unit |
| F31 | 15 | Blue | Fog lights, fog light relay |
| F32 | 30 | Green | Heated tailgate glass |
| F33 | — | Reserve | |
| F34 | — | Reserve | |
| F35 | — | Reserve | |
| F36 | 30 | Green | Electric motor for heating, air conditioning and ventilation systems |
| F37 | 5 | Beige | Electric exterior mirrors |
| F38 | 15 | Blue | Audio system, cigarette lighter |
| F39 | 10 | Red | HVAC Motor Relay |
Heated rear window relay (interior)
Relay view (dashboard removed for clarity)
The rear window heating relay (40A) is located in the passenger compartment, under the instrument panel. (to the left of the steering column, above the interior mounting block). To replace it you need to remove the instrument cluster.
Press the latch and disconnect the relay from the holder.
What lamps are installed on Largus
Before replacing a burnt-out lamp, you need to find out what type of socket and lamp standard is used in the car. To do this, it is convenient to use the tables below.
Headlight:
| Near/Far | H4 |
| Turn indicator | PY21W |
| Side light | W5W |
| PTF | H11 |
| Side repeater | WY5W |
Back light:
| Reverse | P21W |
| PTF | P21W |
| Side light/brake light | P21/5W |
| Turn indicator | PY21W |
| Additional brake light | Р21W |
| License plate light | W5W |
Salon:
| Trunk light | W5W |
| Salon lamp | W5W |
| Individual lighting | W5W |
| Glove compartment lighting | W5W |
| Illuminated hazard warning button | W1,2W |
| Cigarette lighter illumination | W1,2W |
| Heater control unit illumination | W1,2W |
No lamp part number required. The standard of light sources is the same for all cars. It is enough to use the table. After selecting the appropriate lamp, you can replace it.