Replacing the driveshaft of the Priora gearbox with the driveshaft of the Kalina gearbox.
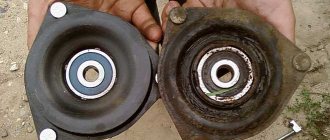
It’s no secret that the Priora has a congenital “sore” - the rattling of the gearbox driveshaft. In almost all Priors, the rubber boot of the gearbox driveshaft is destroyed after some time. One glance is enough to give a verdict: the boot is made of burnt rubber, so it doesn’t last long! It was decided to replace the Priora boot with a Viburnum boot, and also replace the Priora gearbox driveshaft itself with a Kalina driveshaft - it is too praised on various forums. I had to tinker a little with the Kalina gearbox driveshaft: the Kalina driveshaft rod is longer than the Priora rod by about 2 cm. Since I didn’t have the opportunity to compare the Kalina driveshaft with my own driveshaft (it was still on the car at that time), I had to cut it “blindly”. The original driveshaft of the Priora gearbox is essentially not a driveshaft at all: it bends only in one plane, while the Kalinov gearbox driveshaft bends in 2 planes. The feeling is very pleasant, the gears are engaged very softly and smoothly, no snagging. The lateral play of the lever has not changed, the longitudinal play has become smaller, but this difference is not noticeable either while moving or standing still.
Installing a short-stroke rocker on a Lada Priora - step-by-step instructions
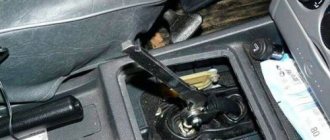
5. We take out the lever together with the rod through the interior; for convenience, you can disconnect the lever from the rod, although you don’t have to do this.
6. Remove the cardan. First of all, you need to pull off the rubber boot, then using a “10” wrench, unscrew the fastening bolt on the left side of the cardan.
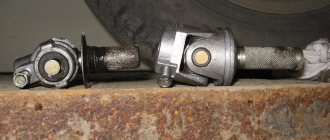
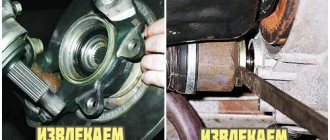
7. As you can see in the photo, the cardan rods differ in length. The problem is solved by shortening the Kalinovsky rod; this must be done taking into account the type of short-stroke link. In some cases, the rod may not go in completely, as a result the gearbox lever will move towards the handbrake. If you also need to shorten, then know that you need to cut off about 1-2 cm.
8. So, we install the “Kalinovsky” cardan, having previously lubricated it with lithol from the inside. The bolt screws in easily because it has a cone shape, but do not overtighten.
9. Traction is also installed through the interior. It’s more convenient to do this in pairs with an assistant: one holds it by the elastic band in the cabin, and you carefully pull the traction.
VAZ 2170 Adjusting the gearshift drive rod
Lada Priora Sedan Logbook Replacing valve seals
Adjusting the gear shift rod
Park the car, apply the handbrake and turn off the ignition.
Only for models up to 1994.
Only for models after 1994.
| Locate the locking hole on the top of the transmission housing adjacent to the nameplate. Remove the plug from the hole (indicated by the arrow). Place the gear lever in fourth gear, then take a screwdriver with a blade approximately 4mm in diameter and insert it into the hole; this will lock the gearbox in the fourth gear position - the screwdriver handle will not allow it to fall inside the gearbox. |
All models
| 1. Inside the vehicle, to gain access to the gearbox control lever housing, remove the control lever collar and mounting frame. Take a screwdriver with a blade approximately 4 mm in diameter and insert it into the locking hole in the side wall of the lever housing. |
| 2. If the screwdriver is inserted without difficulty, then the linkage is adjusted correctly and, therefore, is not the cause of poor gear shifting; Next, it would be best to remove the gear shift drive rod and inspect it for wear and damage (Section Removal, inspection and reinstallation of the gear shift drive). 3. If the screwdriver does not fit into the locking hole, the position of the rod is not adjusted correctly. |
| 4. At the point in the engine compartment where the selector rod passes through the bulkhead, loosen the selector rod pinch bolt (A) near the rubber coupling (B) to allow free play between the two halves of the selector rod. |
| 5. Move the gearbox control lever so that the tip of the screwdriver is inserted into the locking hole in the lever housing; Make sure that the lever is still in the fourth speed position. 6. In the engine compartment, tighten the pinch bolt on the gear selector rod to the required torque. 7. Remove the screwdriver from the locking hole and install the plastic plug. 8. Remove the screwdriver from the locking hole on the transmission control lever housing. 9. Reinstall the selector lever guard and mounting frame. 10. Before driving the vehicle, make sure that the gearbox control lever moves from the neutral gear position to all six gear positions. |
Algorithm for installing a short-stroke rocker on a Lada Priora
- To gain access to the bolts, the decorative cover must be removed from the knob box lever. The latter is not secured to the lever in any way; to remove it, it will be enough to pull strongly.
- We dismantle the gearbox lever rod from the cardan by loosening the clamp using a key set to “13”.
- To gain access to the lever, you must release the ball that blocks the engagement of reverse gear, which springs when engaged. Be careful! Do not pull the lever to get it released.
- The retaining ring is removed, then you need to remove the lever with the ball and spring inserted into the plastic case.
- Remove the lever with the rod through the interior. To make it more convenient, they can be separated.
- Remove the cardan. To do this, tighten the rubber boot with a “10” key. Then you need to unscrew the bolt that secures the cardan on the left side.
- It is noticeable in the photo that the cardan rods are different in length. This problem can be solved by shortening the Kalinovsky rod, taking into account the type of short-stroke link. Sometimes the rod does not go in completely, so the gearbox lever moves towards the handbrake. If you need to shorten it, cut off 1-2 centimeters.
Signs of a bad or falling apart gearbox driveshaft:
- creaking when moving the lever (forward or backward), since the components are not lubricated and there is no oiler, their service life is limited. A torn boot increases the likelihood of moisture penetration. The driveshaft rusts and creaks when rotating. The squeak is usually not heard when driving. The appearance of a squeak is a warning about the upcoming maintenance of the driveshaft and replacement of the boot;
- a ringing sound when moving the shift lever indicates excess clearance that changes the angle of rotation and movement of the cardan shaft;
- Vibration felt throughout the vehicle when moving forward indicates that the driveshaft is worn beyond normal. Manifested by a higher vibration frequency of the gear shift lever. Wear on the driveshaft causes damage to other components of the car.
The gearbox driveshaft is an important part of the car, affecting driving comfort and safety. To reduce wear on the cardan and boot over time, they should be replaced in a timely manner.
Before we consider how to properly install a short-throw rocker on a Priora with our own hands, let’s remember why this is being done.
The essence of a short-stroke rocker is that it reduces the travel of the gearbox lever when switching gears off or on. Moreover, gear shifting in the car becomes clearer.
Unlike the factory standard lever, the short-stroke rocker has slightly different bending angles. Thanks to improved geometry, the gear shifting process brings pleasure to sports driving enthusiasts.
As already mentioned, installing a Priora short-stroke rocker results in the gearshift lever reacting to your movement faster and more responsively, while the actual rocker travel will be less.
If you are a fan of sporty style and want to accelerate the car as quickly as possible, then you will need to change gears quickly. Again, here too a short-throw slide will come in handy.
Also check out
- Install the Kalinovsky cardan by applying lithol to its inner surface. Since the bolt is cone-shaped, screwing in is not difficult.
- The thrust should be installed through the interior. It's good if you have an assistant nearby. He will hold it by the elastic band in the cabin, at this time you need to stretch the traction.
Assembly is performed in reverse order
- First, we put the rod on the cardan shaft.
- Then you can begin assembling the reverse gear locking mechanism. Lubricate the spring ball.
- Adjust the gearshift lever.
- Tighten the clamp on the rod.
Changing crosspieces in steering cardan shafts
Steering cardan shafts are structural elements of the vehicle control system, which must be given attention in the event of such troubles as:
- difficulty turning the steering wheel;
- steering wheel play;
- knocks and extraneous noises.
There are two elements in the car under consideration. One cardan is located behind the engine shield under the hood of the car. It is adjacent to the steering rack. The second is located in the vehicle interior, or rather, at the driver’s feet. The external driveshaft is subject to more intense impacts because it operates in a harsh environment. However, the internal analogue periodically fails.
To install the parts in question, you must have keys of 10 and 12. During the process, the steering wheel must be fixed and locked in the central position, since without a cardan, turning it can lead to a break in the cable.
After fixing the steering wheel, loosen the boot clamp. Next, the fastening elements of the lower cardan on the rack are unscrewed, as well as the bolt that ensures the connection of the two structural elements in question.
The next step is to dismantle the lower cardan shaft, for which it must be moved sequentially up and down. The upper analogue is simply dismantled. You just need to unscrew the bolt that secures it.
The feasibility of replacing the structural parts of the steering column universal joint is determined by checking the mobility of the bearings and the play of the crosspiece. If critical defects or malfunctions are detected, you will have to purchase a new cardan, crosspiece or bearings, depending on which part has failed.
Attention!
If you first assemble the reverse gear locking mechanism, the long rod will not allow you to put the rod on the cardan shaft. The problem can be solved by shortening it. It is important not to forget to put the boot on the driveshaft.
Adjust the reverse gear locking mechanism, since the consequence of adjusting the scenes is that the mechanism does not match the plate to which it clings. The problem can be solved by removing the plate and adjusting the hook (it is a cutout on the mounting bracket). You can sharpen it with sandpaper or a file.
The photo shows the adjusted toe.
To complete the procedure, you need to put on a manual transmission cover with a knob.
Backstage repair and adjustment
In this section we will describe the replacement of all consumables, as well as all the adjustments to the Priora gearbox that can be carried out on a particular transmission.
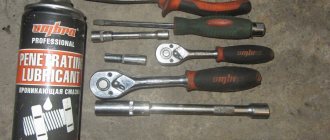
To repair a Priora gearbox of any type, you will need:
- pit;
- overpass;
- lift;
- jack with safety stands.
In addition, you will need the following tools:
- a set of spanners and open-end wrenches;
- flat and Phillips screwdrivers;
- ratchet with extension and set of bits.
The replacement takes place in several stages:
- We lift the car off the ground using a lift or by rolling it into a hole, but you can also get by by lifting the front of the car.
- We set the steering wheel at a right angle and fix it, and also fix the steering wheel; during replacement, movement of the wheels and steering wheel is not desirable.
- To access the steering shaft, remove the left (right) wheel. We go into the salon and unscrew the fastening bolt; after a slight effort, the steering shaft should come off the steering wheel.
- Under the car, carefully remove the upper and lower casings, check the amount of dirt on the crosspiece and steering shaft driveshaft; not all cars have them protected by a boot (purchase and installation of such rubber will cost 100-200 rubles).
- We find and unscrew the bolt on the crosspiece; you may have to use a WD tool. Once the bolt is removed, the steering shaft should easily come off the steering rack.
- Pull the shaft down and pull it out. Often the crosspiece mechanism is rusty and dirty; first of all, you will need to wash it.
- For flaring you will need a sprocket of the appropriate diameter; fix the shaft in a vice.
- Using a head (presumably a 8-pointer), we knock out the cross first in one direction (remove the bearing cup), and in the other direction (also remove the cup).
- Then we take a new crosspiece and insert it in the same order - we start one side first, and then the other, press it in using a vice (but not too tightly, the metal may wrinkle).
- We align both cups and roll them with a chisel and hammer.
Stories from our readers
“Fucking basin. "
Hi all! My name is Mikhail, now I’ll tell you a story about how I managed to exchange my two-wheeler for a 2010 Camry. It all started with the fact that I began to be wildly irritated by the breakdowns of the two-wheeler, it seemed like nothing serious was broken, but damn it, there were so many little things that really started to irritate me. This is where the idea arose that it was time to change the car to a foreign car. The choice fell on the melting Camry of the tenth years.
Yes, I had matured morally, but financially I just couldn’t handle it. I’ll say right away that I am against loans and taking a car, especially not a new one, on credit is unreasonable. My salary is 24k a month, so collecting 600-700 thousand is almost impossible for me. I started looking for different ways to make money on the Internet. You can’t imagine how many scams there are, what I haven’t tried: sports betting, network marketing, and even the volcano casino, where I successfully lost about 10 thousand ((The only direction in which it seemed to me that I could make money was currency trading on the stock exchange, they call it Forex. But when I started delving into it, I realized that it was very difficult for me. I continued to dig further and came across binary options. The essence is the same as in Forex, but it’s much easier to understand. I started reading forums, studying trading strategies. I tried it on a demo account, then opened a real account. To be honest, I didn’t manage to start earning money right away, until I understood all the mechanics of options, I lost about 3,000 rubles, but as it turned out, it was a precious experience. Now I earn 5-7 thousand rubles a day. I managed to get the car buy after half a year, but in my opinion this is a good result, and it’s not about the car, my life has changed, I naturally quit my job, I have more free time for myself and my family. You’ll laugh, but I work directly on the phone)) If If you want to change your life like me, then here’s what I advise you to do right now: 1. Register on the site 2. Practice on a Demo account (it’s free). 3. As soon as you get something on the Demo account, top up your REAL ACCOUNT and go to REAL MONEY! I also advise you to download the application to your phone, it’s much more convenient to work from your phone. Download here.
Product delivery options
Note! Below are the shipping methods available specifically for this product. Payment options may vary depending on the shipping method. Detailed information can be found on the “Delivery and Payment” page.
Parcel by Russian Post
Available payment methods:
- Cash on delivery (payment upon receipt)
- Using cards Sberbank, VTB, Post Bank, Tinkoff
- Yandex money
- QIWI
- ROBOKASSA
Shipping throughout Russia. Delivery time is from 5 to 12 days.
Parcel by Russian Post 1st class
Available payment methods:
- Cash on delivery (payment upon receipt)
- Using cards Sberbank, VTB, Post Bank, Tinkoff
- Yandex money
- QIWI
- ROBOKASSA
Shipping throughout Russia. Delivery time is from 2 to 5 days. More expensive than regular delivery by Russian Post, approximately 50%. Parcel weight up to 2.5 kg
Express Parcel EMS
Available payment methods:
- Cash on delivery (payment upon receipt)
- Using cards Sberbank, VTB, Post Bank, Tinkoff
- Yandex money
- QIWI
- ROBOKASSA
Shipping throughout Russia. Delivery time is from 3 to 7 days. More expensive than regular delivery by Russian Post, approximately 100%.
Transport companies
Available payment methods:
- Using cards Sberbank, VTB, Post Bank, Tinkoff
- Yandex money
- QIWI
- ROBOKASSA
Delivery is possible to any locality where there is a representative office of the transport company. Delivery time is from 2 to 10 days. Sending large parcels is approximately 50% more profitable than by Russian Post.
Pickup from our warehouse
Available payment methods:
- Cash upon receipt
- Credit, installments
- Using cards Sberbank, VTB, Post Bank, Tinkoff
- Yandex money
- QIWI
- ROBOKASSA
Pickup times must coincide with store opening hours.
The invention of devices that transmit rotation has long excited the minds of thinkers. The discovery of the wheel gave importance to the rational transmission of torque, ensuring (through varying amounts of energy with conflicting efficiency) the rotation of objects. The remote location of rotational elements has long been a problem area in transferring kinetic energy and converting it into rotational activity.
The placement of rotation elements in different planes required a smart solution to transmit a constant torque ratio. The direct connection through the shaft prevented the transfer of energy when the parts were positioned at right angles. Installing a gear drive requires a base, a housing, several shafts, and lubricating fluid to ensure smooth operation of the gears. In order to simplify the layout of the elements and provide more power during rotation, a clever and, most importantly, effective solution was introduced: allow the shaft located between the two objects to bend through a universal connection, reminiscent of two interlocking chain links. Historically, this has been the simplest solution, but cannot withstand heavy loads and significant friction.
Defective parts.
First of all, we carefully examine the shaft itself. The bearing journals should be smooth and shiny without the slightest signs of pitting, grooves, or cavities. If the reason for disassembling the gearbox was the destruction of the front bearing of the secondary shaft, most likely the shaft will have to be thrown away. In such cases, the teeth of the drive shaft gear are most often damaged:
In the photo, the arrow shows the place of greatest wear of the teeth; if such a shaft is installed, the gearbox will make a loud noise. One of the most common malfunctions is clogged ring gear teeth and hub failure. This leads to the transmission being knocked out:
Usually the coupling also suffers:
It is also necessary to carefully inspect the hub. If it’s broken, it’s immediately obvious, but it often happens when the hub is still intact, but the cracks have already started. This will not last long, it definitely needs to be changed. The arrows in the photo show the place where cracks appear:
In addition, there is often a lot of wear at the ends of the hub, in places of contact with the gear.
Principle of operation
Study the diagram below to understand how the short throw rocker works. The lever is installed in the neutral position, here it is indicated by the points “O” and “F”. To start the transmission, you need to move the rod - it will connect to the control gear at point “B” - at point “A”. After this, the handle will move to point “E”. Repairs and subsequent replacements are carried out in order to reduce the distance.
This can be done if the lever extends to point “H”. This move will increase the distance. On the diagram, "A" and "B" will become points "C" and "D". Replacing the standard rocker with a short-stroke one allows you to reduce the movement of the handle. We've sorted out the theory, now we can start the repairs.
Price issue
If you decide to replace the rocker seal at the same time as installing the rocker itself, this can be considered absolutely the right thing to do. Additionally, replacing the driveshaft will not cost much, but the efficiency of such a comprehensive repair will be much higher.
Short walker
Actions on your own, you only have to purchase the necessary parts and ordinary consumables. If you contact a car service, the minimum cost of the service will be 800-1000 rubles. That is, the savings are obvious.
The curtain itself costs about 400 rubles. From here it becomes clear why we did not advise buying a repair kit, but rather completely replacing the part. There will be no savings as such, but the difference as a result of the repair will be significant.
Sports
We noted that for the VAZ 2114 you can install a sports short-throw rocker. Outwardly they are quite similar, but the difference in work is felt immediately. On a sports unit, gears shift faster and smoother. It's all about the design of the backstage itself. Unfortunately, it is precisely because of this that the process of independent replacement becomes almost impossible.
If you decide to install a short-throw rocker on your VAZ 2114, contact trusted car services, or even better, a studio that specializes in tuning. Such events are classified as technical improvement, which is why no one understands this better than tuning specialists. Even official AvtoVAZ car services.
- Electrical equipment
- Engine
- Brake system
- Other
- Steering
- Transmission
- Suspension
- Tuning
- VAZ 2110 Other
- Engine
- Steering
- Electrical equipment
- Transmission
- Brake system
- Suspension
- Tuning
- Electrical equipment
- Steering
- Video publications
- VAZ tuning photo stream
- Operation and repair manuals