In a car service, replacement of CV joints, internal and external, is carried out with a minimum of discomfort for the car owner: quickly and at an affordable price. Carrying out such a responsible operation as replacing the outer or inner CV joint on a car, our craftsmen guarantee the exceptional quality of the work performed and the spare parts used.
Replacing a CV joint (replacing a grenade) - the design and principle of operation of this unit
CV joint - or constant velocity joint - is a device that transmits torque from the differential to the wheels. The CV joint consists of the following parts:
- Frame;
- Separator;
- Clip;
- Balloons;
- Clamps;
- Retaining rings;
- Protective cover (dust boot).
The spherical body has grooves for the balls, just like the CV joint cage. The cage is designed to hold the balls in position (just like any regular bearing). Thanks to its design, this joint can transmit rotation at almost any angle of deflection of the shafts (up to 350 degrees), and transmit it evenly. The boot also protects the internal surfaces of the hinge from moisture, dust and dirt, which increase friction and prematurely wear out this unit.
Prices for replacing the CV joint boot
| Name of works | Domestic cars | Foreign cars: | SUVs, minibuses |
| Replacing the drive assembly | from 1,000 rub. | from 1,500 rub. | from 1,500 rub. |
| Replacing the CV joint | from 1,000 rub. | from 1,500 rub. | from 1,700 rub. |
| Replacing the CV joint boot | from 1,200 rub. | from 1,500 rub. | from 1,600 rub. |
Replacing a grenade (CV joint) - signs of a malfunction of this unit
A malfunction of the outer CV joint and the inexorably approaching replacement of the outer CV joint will show the following symptoms:
- Distinct clicks from under the wheels when turning;
- Barely perceptible jerks at the moment when the car starts moving.
Replacing the outer CV joint on a Lada Granta ⋆ I Love My Lada
Depending on the manufacturer and quality of the CV joint, its service life ranges from 30 to 60 thousand kilometers. Replacement of the external grenade is usually done more often, especially on the right side. It is more susceptible to stress from bad roads. How to replace the outer CV joint in Grante and which one is better to buy, we will figure it out now.
When to change the CV joint, signs of malfunction
As was said, the external grenade fails after about 40 thousand mileage. This is evidenced by crunching, creaking and knocking sounds in the area of the drive shafts. To determine which side of the CV joint requires replacement, you need to turn the steering wheel all the way and drive off. In 90% of cases, a worn drive will manifest itself as a crunching sound. For control, you can turn it first in one direction, and then in the other direction, and turn it back. If the CV joint is worn out, a crunching sound will be heard immediately.
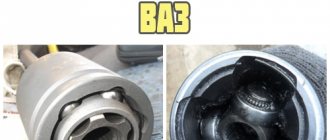
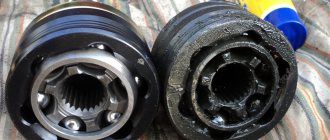
New and worn CV joint
This is the case when there are no visual signs of wear:
- Lubricant leaks near the outer joint.
- Cracks, tears on the boot.
- Lost or misaligned clamps.
- There is obvious play when turning the suspended wheel.
If there are visual signs of wear, we replace the CV joint on the Grant as soon as possible.
Choosing an outer CV joint for the Lada Granta
There are enough hinges from different manufacturers on sale, it’s bad that sellers treat them like all Zhiguli spare parts - everything is the same. In practice, for the first generation Grants there are two types of external (and internal) CV joints - for cars with manual transmission and for Grants with automatic transmission. In short, grenade 2215012-00 (21 teeth) is suitable for such vehicles.
VAZ CV joint
For Lada Granta with a manual transmission there is a CV joint with catalog number 2215012-86. In order not to be confused with numbers, let’s look at the differences between CV joints for Grants with automatic transmission and manual transmission:
- The spline connection in the outer joint has changed in size, the number of teeth is 21. A CV joint with 22 splines is suitable for a manual transmission.
- The geometric dimensions of the body have also been changed.
In particular:
- The length of the outer spline part for manual transmission is 76.5 mm, for automatic transmission - 77 mm.
- Case height (without spline) 55 mm for automatic and 52.2 mm for manual.
- The number of teeth for the ABS ring does not change and remains 43.
Therefore, before purchasing an outer CV joint, we first look at the number of splines on the inside of the joint body. Among the manufacturers on the market, AvtoVAZ, Belmag and Triall dominate. The price of an outer CV joint on a Lada Granta is around $20.
It is important that the kit includes a locking ring, molybdenum disulfide-based lubricant and a neoprene boot. It shouldn’t be too hard, but a boot that’s too thin won’t last long.
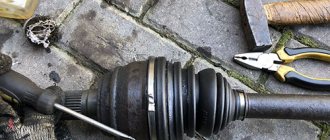
We change the outer CV joint of the Lada Granta with our own hands
There shouldn’t be any difficulties when replacing the CV joint yourself if you use simple instructions and have a basic set of tools. It’s also a good idea to have a puller on hand for side dishes of equal angular velocities. It doesn't seem to have an article number, but that's what it looks like.
Alternatively, you can use a simple impact puller with a welded hub nut, but any extra shock loads on the transmission will not be very useful for it.
- While the car is on the ground, unscrew the hub nut using a 30mm socket with a long wrench.
- Raise the car, remove the wheel and unscrew the hub nut.
- We unscrew the caliper without disassembling it.
- Unscrew the ball joint bolts.
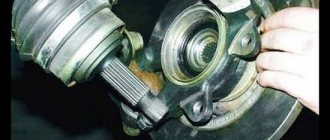
- We remove the hub from the CV joint and at the same time from the ball joint, and move it to the side.
- We loosen the clamps and move the boot further along the drive, closer to the gearbox.
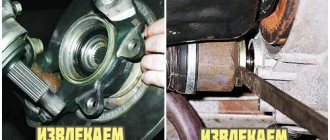
- Using a puller or hammer, we ask the CV joint to leave its location.
- Remove the retaining ring.
- We fill the internal cavity of the CV joint with the lubricant that comes with the kit.
- We put the remaining grease into a new boot and put it in place.
- Screw the nut onto the new CV joint and install it in place.
- With light blows of a hammer on the nut, we move the hinge all the way until the stopper snaps into place.
- We install the boot, check that it is without distortions and tighten the clamps.
We put everything back together in reverse order, core the hub nut and do a test drive.
Where is the best place to make a purchase?
If a grenade in a Priora car fails, then you need to start looking for a new spare part. There are many places where such parts can be sold in Russia. Therefore, the motorist should not have problems with the choice.
It is recommended to decide in advance on the place of purchase. In total, the Priora owner has three options:
- Visit a store that sells domestic and imported spare parts.
- Go to the car market.
- Consider offers from online auto parts stores.
The choice of location depends on preferences regarding the manufacturer and financial situation. If you want to purchase an original part from the AvtoVAZ plant, then it is better to make a purchase in a specialized store. Today, many people order auto parts from online stores. But you need to understand all the risks that a motorist faces when choosing this place of purchase:
- They may send you a defective part.
- They may send you a used spare part instead of a new one.
- They may ask you to transfer money and not send anything.
If you want to save money, the popularity of the manufacturer is not important, then you can visit the car market. Parts from little-known companies are sold here. You can stumble upon a Chinese counterfeit of a famous brand. Therefore, when choosing a car market as a place of purchase, you need to be careful.
Removing the right front wheel drive internal CV joint Lada Granta
Self-replacement of the CV joint boot on the Lada Kalina
Tools:
- 17 mm straight box spanner
- Driver for socket attachment
- Extension for the end attachment on the wrench
- 8mm wrench attachment
- 10mm wrench attachment
- High nozzle on the wrench 13 mm
- 17mm wrench attachment
- 19mm wrench attachment
- 30mm wrench attachment
- Torx wrench attachment E12
- Large flat screwdriver or spatula
- Large hammer
- Kerner
- Funnel
- Hose
- Technological capacity
- Metal brush
- Jack or ditch lift
- Stand
- Adjustable stop
- Wheel key
Parts and consumables:
- Right front wheel drive (replacement if necessary)
- Boot of the outer drive joint (replacement if necessary)
- Boot of the internal drive joint (replacement if necessary)
- Inner joint shank retaining ring
- Wood block
- Grease
- Rags
Notes:
Front wheel drives (CV joints) are often sold complete with boots and a retaining ring.
Carry out the work on an inspection ditch or overpass.
Carry out the work to replace the external and internal joints of the wheel drives, their dirt-proof covers, drive seals, as well as when dismantling the gearbox or power unit.
1. Remove the middle mudguard from the engine compartment.
2. Drain the oil from the gearbox.
3. Lift the front of the car from the right side and remove the wheel.
4. Unscrew the right front wheel hub bearing nut.
5. Remove the two screws securing the ball joint to the steering knuckle.
Note:
Turn the steering wheel to the extreme left position so that the steering rod output is at its maximum value. This will allow the outer joint housing shank to be removed from the wheel hub without disconnecting the tie rod end from the steering knuckle.
6. Using a 10 mm wrench or socket, unscrew the nut and two bolts securing the heat shield of the inner CV joint protective cover to the rear support bracket of the power unit and remove the shield.
7. Move the steering knuckle with the shock absorber strut to the side and remove the splined shank of the outer joint housing from the wheel hub.
8. Position the drive on the guy wire.
9. Install an adjustable stop under the transmission housing by placing a wooden block under the housing.
10. Using a 19 mm socket, unscrew the three bolts securing the rear support bracket of the power unit to the clutch housing.
11. Press the rear powertrain mount bracket down, insert a spade or large screwdriver between the drive inner joint housing and the clutch housing, and push the joint housing shank out of the drive gear spline.
Note:
Do not damage the protective ring of the drive oil seal located on the inner joint housing.
12. Remove the right drive, being careful not to damage the oil seal.
Note:
When removing both drives, after dismantling the first one, it is necessary to insert a clamp, for example, a wooden or soft metal roller with a diameter of 20 mm and a length of 150 mm, into the hole of the drive gear. Otherwise, the differential drive gears may become misaligned and the drives may not be able to be installed.
13. Before installing the drive, use a screwdriver to pry up the retaining ring of the inner joint housing shank, which secures the drive in the gearbox.
14. Remove the retaining ring.
15. Install a new ring into the groove of the inner joint housing shank. Reuse of retaining rings is not permitted.
16. Before installing the drive, center the retaining ring in the groove of the shank using grease.
17. Insert the splined shank of the outer joint housing into the hole in the wheel hub, install the washer and tighten (do not tighten) the hub bearing nut.
18. Insert the shank of the inner joint housing through the hole in the drive oil seal and, turning the shaft, align the splines of the shank with the splines of the drive gear.
19. Move the suspension arm down and with a sharp movement of the rack with the steering knuckle towards the gearbox, install the drive in place.
20. By pulling the inner joint housing towards you or prying it with a mounting blade, we make sure that the housing shank is fixed in the drive gear.
21. Carry out further assembly in reverse order.
The article is missing:
- Photo of the instrument
- High-quality photos of repairs
Let's summarize
As you can see, the work is quite simple and can be done by a beginner in car repair. The most important. determine exactly which grenade
worn out.
The price for replacing the internal and external grenades on a VAZ 2110 ranges from 2,000 to 3,000 rubles. The same price range for replacing a grenade with other domestic front-wheel drive VAZs.
Tools and materials
- a new CV joint (the grenade itself, without a drive) and oil for it;
- jack, hammer;
- wheel wrench, mount, pipe of appropriate diameter;
- set of keys and sockets, screwdriver;
- graphite ink.
Causes of grenade malfunctions and its diagnosis
Usually the CV joint does not break right away. You feel the car accelerating and hear a knock somewhere in the front suspension. Over time, symptoms worsen. Diagnostics is very simple: put the car on a jack and swing the CV joint of the wheel suspension. Do you feel any play? It's time to change the part.
There are 4 main reasons for premature CRS failure:
1) The part itself is of poor quality or defective;
2) The vehicle is used off-road;
3) The boot broke, dust and abrasive particles entered;
4) Aggressive driving style.
If you seek professional help, you will have to refuse. Replacement service costs an average of 1,500 rubles. for 1 CV joint.
How to determine a breakdown?
Removing and replacing the internal and external CV joints of the Lada Priora
The grenade is a ball bearing, the cages of which have transverse grooves. Due to this, the angle between the driven and driven axle shaft changes. Thus, the CV joint not only transmits torque, but also changes the angle between the axle shafts. In view of this, over time, it develops. In places where the parts do not fit tightly, backlash and extraneous noise are formed. In fact, this is accompanied by a characteristic crunch. It occurs due to large wear on the balls that move along the grooves. The crunch can appear both during straight-line movement and when turning. In the latter case, most likely, the external grenade of the Kalina requires replacement. This sign should not be ignored, since the bearing may fall apart at high speed.
Delivery
Free delivery by courier if there is courier delivery from Academy Plus in your city.
In Moscow, within the Moscow Ring Road, delivery cost is 250 rubles. When ordering from 3000 rub. — delivery is free. Please check with our managers for the possibility of delivery outside the Moscow Ring Road, as well as the possibility of delivery in other cities where Academy Plus is present.
Pickup from our stores in the cities where Academy Plus operates.
Transport companies with representative offices in Moscow. You can find out about prices and the possibility of order delivery to your city on the websites of these companies. If your city is not on the delivery list, contact our manager.
The order is dispatched after the money has been received in our bank account.
Replacing the boot of the outer CV joint
Ford focus hatchback 1.6 midnight sky logbook oil change in manual transmission ford focus
The process is the same for most front-wheel drive passenger cars. It is better to carry out work in a viewing hole. After purchasing new covers and (if necessary) clamps for them, prepare the tool:
- jack, wheel chocks and safety stands;
- keys (preferably heads) with a crank in accordance with your car model;
- hammer and wire brush for cleaning rust;
- mount;
- clean rags;
- special lubricant;
- gasoline for cleaning.
Drive the car into the pit, for insurance, engage 1st gear, raise the handbrake. Loosen the wheel bolts and, after removing the boot, unscrew the hub nut (usually a 30mm wrench). To do this, you need to open it up - remove the bends that fit into the groove. Place the car on a jack, place jacks and safety stands under the rear wheels and remove the wheel from the desired side. Further:
- if there is crankcase protection, it must be removed;
- unscrew the bolts securing the lower ball joint - usually there are two of them;
- turn the steering wheel all the way so that the CV joint becomes minimal in length;
- move the steering knuckle to the side and pull the drive out of the hub;
- remove the clamps and pull out the torn boot or cut it;
- remove old grease;
- knock the grenade off the shaft: the process is not easy, you need to hit its outer contour with a hammer, while simultaneously pulling the CV joint towards you with the other hand.
If you manage to do this, inspect the retaining ring at the end of the shaft: you may have broken it (you will have to replace it): if not, just fix the part. Now use a wire brush to clean the drive, especially where the boot was. Fill the grenade with lubricant (for example, CV joint-4 or "Hado"). Next, put the boot on the shaft. Then hammer the grenade back through the wooden spacer and pull the boot over it, secure it with clamps. Reassemble everything in reverse order.
What to do if the grenade does not go astray
Screw the hub nut directly into the drive: when tightened, it will push the grenade out. If things get tight, ask an assistant to hold the shaft with a gas wrench so that it does not turn. In the case when the grenade still does not come off the shaft (fanaticism is not welcome, since the bearings in the part located in the gearbox can be damaged), there is a second way to replace the boot, which involves completely removing the drive, but this will be discussed below , in the section on replacing the inner joint boot.
How to replace the outer CV joint boot without removing it
This is also possible, at least on domestic cars, but you will have to acquire (or borrow) a special device that stretches the boot. The device is a housing with movable arms attached to it and a connected hose for supplying compressed air. A rubber cover is put on them and they stretch it. All that remains is to pull the device through the grenade removed from the hub and release the levers. The process is worth watching in more detail in the video.
Homemade device
But it is possible to replace the boot without removing the CV joint: using improvised means. To do this, you will need a cone (for example, a fire extinguisher pipe) of a suitable size. The wide part of it needs to be put on the “disobedient” grenade. The boot is pulled onto the bell by turning it inside out. Pre-lubricate the CV joint on the outside. You will have to make an effort to push the boot through. After this, it remains to turn it out as expected and secure it.
Step-by-step instruction
- Loosen the wheel bolts, raise the jack and remove the wheel.
- Remove the cap and remove the hub nut using a thirty bit wrench. While unscrewing the nut, have an assistant press the brake pedal. You can also remove the nut while the car is on its wheels.
- Remove the washer behind the hub nut using a magnet.
- Unscrew the nut that secures the steering knuckle to the shock absorber. Seventeen essential nuts.
- Use a puller to squeeze your finger out of your ear. If you don't have a puller, you can hit the end of the ear where the finger is inserted several times with a hammer.
- Remove the two bolts securing the ball joint to the steering joint and move it to the side.
Remove the outer grenade from the wheel bearing groove.Install a container to collect the oil and remove the internal grenade from the manual transmission. To remove the grenade, insert the mounting lever into the cutout of the drive housing and manual transmission. Next, tap the lever with a hammer until the grenade begins to move.
Remove the inner grenade from the box and remove the drive shaft.
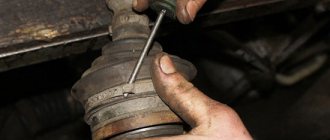
Remove the shoe from the grenade, first opening the latches. The clamps are opened with a slotted screwdriver.
Grasp the grenade slot with one hand and strike the outer shell of the grenade with the other. After two or three hits, the grenade will be in his hands.
- Remove the old barrel from the shaft and clean the splined part of the old oil.
- Fill the new joint with oil and, if necessary, replace the circlip on the shaft.
- Place the shoe on the shaft with the narrow side facing inward.
- Place the grenade until it stops in the retaining ring, and insert the extension into the tapered recess along the edge.
Hit the edge of the extension two or three times and the CV joint will sit on the landing pad.Put on the weight straps and secure them with blunt pliers.
Next, install the drive in the reverse order.
Tightening torques:
- Hub nut. 235 Nm.
- Ball bolts. 55 Nm.
- Steering gear nut. 30 Nm.
Step-by-step process for replacing the external and internal grenades of the VAZ 2110, 2111, 2112 with the following:
Replacing CV joints (constant velocity joints) on a Lada Granta VAZ 2190
Tools:
- Pliers
- Large flat screwdriver
- Small hammer
- Soft metal drift
- Vice with soft metal jaws
- Jack
Parts and consumables:
- CV joint grease-4
- Wood spacer
- Constant velocity joints
- Front wheel drive shaft valve
- Rags
- Gloves
Notes:
Replacing a CV joint or repairing it is a fairly common occurrence, the harbingers of which are knocking, crunching and crackling noises when turning the car’s wheels.
Work order:
1. Remove the front wheel drive from the vehicle as described here or here.
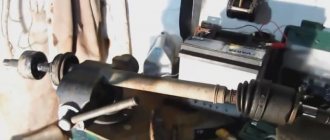
2. Clamp the drive shaft in a vice with soft metal jaws.
3. Squeeze the bent antennae of the inner collar of the inner CV joint boot with pliers.
4. Squeeze the clamp lock of the inner CV joint boot with pliers.
5. Remove the clamp.
6. Similarly, remove the outer clamp of the CV joint boot.
7. Slide the dirt boot over the shaft and turn it inside out.
8. Using a drift, knock the inner CV joint off the front wheel drive shaft, applying force to the CV joint cage.
9
Please note: there is a plastic buffer installed at the inner end of the front wheel drive shaft
10. Check for grease in the new CV joint. The CV joint should contain 80 cm3. SHRUS-4 lubricants.
11. When installing the CV joint, place it on the front wheel drive shaft with gentle hammer blows through a wooden spacer along the outer end of the shank along its axis until the hinge is fixed on the shaft. When installing the CV joint, make sure that no dirt gets into it.
12. Install the boot on the CV joint housing.
13. Install the outer and inner CV joint boot mounting clamps in the reverse order of removal.
14. If it is necessary to replace the boots, remove the CV joint from the front wheel drive shaft and remove the air release valve assembled with the casing from the boot, sliding the valve along the shaft. Remove the boot from the front wheel drive shaft.
15. To replace the valve, unscrew its casing and, having removed the valve from the casing, remove the valve from the front wheel drive shaft.
16. Then remove the valve cover from the front wheel drive shaft.
17. Install the valve and new CV joint boot in the reverse order of removal.
18. Having installed the CV joint, secure the boot with clamps.
19. To replace the outer CV joint, remove its outer and inner boot clamps in the same way as you did for the inner CV joint.
20. Slide the boot along the front wheel drive shaft and turn it inside out.
21. Using a drift, knock out the outer CV joint from the front wheel drive shaft, applying force to the CV joint cage.
22. Install an external CV joint on a Lada Granta VAZ 2190 car in the same way as installing an internal CV joint. The difference is that the outer CV joint needs to be filled with half as much (40 cm3) CV joint-4 lubricant as the inner CV joint.
The article is missing:
- High-quality photos of repairs
- Photo of the instrument
- Photos of parts and consumables
How does the part change?
To dismantle the old boot and install a new one, you will need an inspection hole or a lift. Obviously, such devices are not always available at home, so most often you have to use a jack.
Before starting the procedure, of course, you need to purchase a new boot. There is nothing better than the original part, but many modern manufacturers offer quite passable analogues. They often come with matching clamps.
You also need to stock up on the following ingredients and tools:
- lubricant;
- tripoid puller (if you don’t have one, you’ll have to use a hammer and chisel);
- wrenches 17 and 30 mm;
- hammer;
- pliers;
- screwdriver;
- metalworker's vice.
So, if everything is prepared, you can begin the procedure. Let's consider step by step how to replace the outer CV joint boot (the inner one is nearby, so replacing it is not a problem):
Inner CV joint
The inner CV joint, just like the outer one, is protected from the outside by a boot. Accordingly, if its integrity is violated, dirt and water enter the hinge, which leads to its failure. The methods for repairing internal CV joints in this situation do not differ from repairing external ones: they need to be washed, the lubricant replaced and the damaged boot replaced.
Another main problem with internal CV joints is play in the drive shaft on the gearbox side. Visually, the difference between the “normal” state and the play can be seen in the video below:
It is necessary to distinguish between two types of internal CV joint play:
- directly in the inner hinge;
- into the connection between the drive and differential.
Since it is impossible to visually determine the presence of backlashes, and not every car owner will regularly crawl under the car and “stagger” the internal grenade, it is necessary to be able to determine them differently. The most effective way to understand that backlashes have appeared in the internal CV joint is to observe the behavior of the car at speed. Accelerate the car to approximately 80-90 km/h and observe whether the steering wheel beats and vibrations appear in the body at this speed
Pay special attention to the vibrations of the front panel, in particular in the area of the pedals
Important! Accelerate to this speed, and then continue driving without changing speed. If you detect vibrations, then accelerate the car further.
Now the speed should be around 100-110 km/h. If vibrations disappear after acceleration, we can conclude that there are gaps in the internal grenade. It is necessary to remove it as soon as possible and make sure of this. If you have difficulty removing the CV joint drive, use the following video instructions:
If you detect vibrations, then accelerate the car further. Now the speed should be around 100-110 km/h. If vibrations disappear after acceleration, we can conclude that there are gaps in the internal grenade. It is necessary to remove it as soon as possible and make sure of this. If you have difficulty removing the CV joint drive, use the following video instructions:
The cause of backlash in the grenade is most often wear of the splined connection of the shaft and tripod. If the wear is minor, then there is a simple method for repairing such a malfunction. So, first of all, it is necessary to clean all elements from dirt and grease. Solutions of detergents with water and gasoline or kerosene will help you with this. After you have cleaned all the elements, look at the spline connection. If you find corrosion on them, treat them with a file.
Do the same with the splines on the shaft. To completely remove traces of corrosion, place the shafts and sprockets in a rust converter. Next, dry the parts and treat them with a degreaser. Then assemble all the elements onto the shaft, excluding the sprockets. Before doing this, apply Loctite 648 to the shaft and sprocket. It is a kind of “glue” for such connections.
Place the sprockets on the shaft and twist them a little until they are fully engaged. Now leave the entire structure motionless for 10 minutes. After which you can finally assemble the drive and install it back on the car. Such a repair will completely eliminate play in the spline joint.
Another problem that motorists face is tripod damage. In general, there are repair kits for the inner CV joint that will save you a lot of time. True, they won’t be cheap. If you don’t want to spend money, you can use the following method for repairing the internal CV joint:
- What winter oil is better to pour into the engine?
- How to change the inner CV joint on Kalina, Priora, Nexia
- Anti-gravel Body
- What to do if there is play in the inner CV joint
Drive replacement cost:
| Type of work | Price |
| Replacing the left drive | from 1500 rub. |
| Replacing the right drive | from 1750 rub. |
Where to change the drive of a Lada Granta in St. Petersburg:
Kupchino
– 245-34-84
Citizen
– 603-55-05
Bolsheviks
–
WhatAapp/Viber: 8-911-766-42-33
If you hear a crunching or knocking noise while turning, the outer joint is faulty. If these sounds occur when starting to move, when going up the road, or when idling, it is the inner joint. The tire on the problem wheel will wear out more. The intermediate bearing of the drive shaft may wear out in the shaft itself - then a hum will be heard from under the hood. Even if there are problems with the drive shaft, there are jerks when the drive wheels rotate, play in the internal CV joint, and a beating that radiates to the steering wheel. The drive shaft oil seal may leak or the boot may break. If the problem continues, you will have to replace the Lada Granta drive shaft.
Assembly procedure step by step
We carry out the entire list of assembly operations in a Lada Kalina car in strictly reverse order. During the procedure, it is necessary to take into account some nuances.
- First, we put the boot on the axle shaft. If this is difficult, then its surface can be lubricated with the grease supplied with the new hinge kit.
- Now we fill the same grease into the CV joint bearing, and the remainder into the internal cavity of the boot.
- We install the hinge on the axle shaft. We also use a hammer, applying a shock load to the body. The retaining ring should be replaced.
- When the “grenade” “sits” in its place, we push the boot, after squeezing it with our hands to remove excess air. We install clamps.
- We do the same when replacing the internal hinge.
- Now we install the axle shaft into the transmission housing until the shaft engages with the side gear. Don’t forget to fill the unit with oil afterwards.
- We insert the outer joint into the steering knuckle until it fully engages with the splined race of the hub. Screw on the central nut (do not tighten it).
- We return the ball joint to its place.
- We hang the wheel and do not tighten its fasteners too much.
- We lower the car (we do not unload the jack completely). Tighten all fasteners to the required torques. We remove the jack and stops. Replacement of the outer CV joint is complete.
The owner of LADA Kalina will spend no more than 3 hours of his time to complete the full list of replacement actions. We check the correct installation of the hinges. To do this, we start driving the car with the wheels turned out as far as possible. We observe the absence of crunching and other characteristic sounds from the axle shaft. Now you know how to change a faulty CV joint.
How to independently replace the internal grenade on VAZ cars
CV joint (constant velocity joint) is a mechanism that allows you to transmit torque between misaligned shafts. The device is actively used on front-wheel drive vehicles. On each shaft coming out of the gearbox there are two of them - internal and external. Repair is impossible; if the unit breaks down, it is replaced as an assembly.
- In what cases is it necessary to replace the inner CV joint?
- Replacing the inner CV joint with your own hands
- Boot replacement and repair
- CV joint repair
In what cases is it necessary to replace the inner CV joint?
Replacing the internal CV joint on front-wheel drive VAZ vehicles is required if the following symptoms are present:
- Crunching and knocking noises when driving and accelerating in a straight line;
- Vibration and shock when changing gears;
- Significant play when testing by hand;
- If the “grenade” fails completely, the vehicle cannot move further.
» alt=»»> The main reason for the malfunction of the VAZ “grenade” is the entry of water and dirt through the hole in the torn boot. The second possible cause of failure is a sharp press on the gas with the wheels fully turned, although in this case you risk killing the external rather than the internal grenade.
In addition to the above, replacing the internal CV joint on VAZ-2110 and other models may be necessary if the quality of the previously installed joint is poor.
Replacing the inner CV joint with your own hands
» alt=»»> The procedure for replacing a “grenade” is the same for the entire front-wheel drive VAZ line, starting with 2108 and ending with VAZ-2115, “Kalina”, “Priora”, “Grant”. Before removing the inner CV joint, the oil is drained from the gearbox. Then proceed according to the following algorithm:
- Unlock and unscrew the hub nut. To make the work easier, a piece of pipe about 1 meter long should be put on the key.
- The desired side of the car is hung on a jack or lift.
- Remove the wheel.
- Remove the washer located under the hub nut installation site.
- Disconnect the steering tip.
- The CV joint is removed from the hub.
- Using a pry bar, remove the drive and internal joint from the gearbox.
How to change the “grenade” with the drive removed? To do this, clamp the shaft in a vice, loosen the clamps and remove the boot. After this, the hinge is knocked off the splines with hammer blows.
The new CV joint should be hammered by applying light blows to its end with a hammer. For this it is better to use a wooden mallet. The “grenade” is first filled with a special lubricant.
Before installing a new constant velocity joint, it is necessary to clean its seat from old grease and install a new boot. Assembly is carried out in reverse order.
The repair is considered complete after successful sea trials. In this case, there should be no extraneous sounds from the drive side in all modes of vehicle movement.
Boot replacement and repair
The boot can be changed without removing the grenade if you have special equipment. His work is demonstrated on video. » alt=»»> If you do not have such a device, to remove and replace it, you must perform the above-described procedure for removing the drive and dismantling the hinge. The procedure is necessary if there is even minor through damage on the boot.
Temporary repairs to the CV joint boot can be made without removing it from the vehicle. To do this, you need to thoroughly clean and degrease the damage, then seal it with a piece of rubber and cyanoacrylate-based glue (superglue).
An alternative repair method is to seal the holes with silicone caulk. It should be remembered that it takes a day to completely polymerize.
CV joint repair
As mentioned above, the hinge cannot be repaired. Conventionally, one of the repair measures includes washing the “grenade” after driving with a damaged boot.
Washing is carried out at the same time when the damaged boot on the pomegranate is replaced. The hinge is carefully knocked off the shaft, inspected for damage and thoroughly washed to remove any dirt and grease in gasoline or kerosene.
After washing, the assembly is filled with lubricant and mounted in place, having previously installed the boot. The procedure makes sense only if there are no obvious signs of a joint malfunction.
A crunchy or knocking part definitely needs to be replaced, since wear forms on the working surfaces of the inner race, and it is no longer possible to stop the destruction. Continued operation of the vehicle may be dangerous for the driver and other road users.
Replacing a VAZ 2110, 2111, 2112 grenade with your own hands
On all domestic cars with front-wheel drive, the wheels are driven by a drive shaft on which constant velocity joints (grenades) are installed. Grenades are subject to heavy loads during turns and wear out over time. If the exit on the ball's tracks is too large, the grenade begins to crack and knock when turning.
In this article we will show the process of replacing the external and internal grenades of a VAZ 2110. The work is quite simple and does not require much time.