Payment for goods and downloading of the book in electronic form (PDF format) is made on the website.
To do this, you need to find the book you are interested in and click on the “Buy” button. The price of the book is indicated on the button.
For convenience, the price on the website for residents of Russia, Belarus and Kazakhstan is presented in rubles.
For residents of Ukraine in hryvnias, and for all other countries - dollars.
After clicking on the “BUY” button, a payment window will open where you can select a payment system with which you can pay for the selected book using any bank card (Visa, MasterCard, MIR, etc.)
When you click on the “Pay by bank card” button, the Portmone payment system will open, which is the easiest way to make a payment.
In addition, the website offers four payment systems for payment:
- Yandex (payment from any bank cards, Yandex Money account, QIWI Wallet, terminals, etc.);
- Portmone (payment from any bank cards, Portmone account);
- PayPal (payment from any bank cards, PayPal account);
- WebMoney (payment from any bank cards, payment from WebMoney wallets).
Payment via Yandex Cashier
After selecting payment via Yandex, the Yandex Cashier payment system will launch, where you need to select a convenient payment method (bank card, QIWI, Yandex Money account, etc.)
After specifying payment details and confirming payment, payment for the goods will occur.
If you have a bank card in a currency other than the ruble, then the money will be debited from the card at the rate of the Central Bank of Russia at the time of the purchase.
This payment method is optimal for residents of Russia, Kazakhstan and Belarus.
Official website of the Yandex Kassa payment system https://kassa.yandex.ru
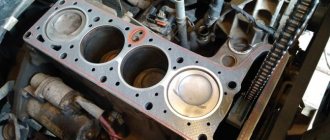
Purpose and structure of the cylinder head
Modern cars overwhelmingly use various types of fuel to perform work due to its combustion. Ignition of the air-fuel mixture occurs in an internal combustion engine.
When fuel detonates in the combustion chamber, the mixture “explodes” and gases are released, which push the piston to bottom dead center. In order for the engine to operate correctly, all exhaust gases are discharged into the atmosphere through the exhaust manifold. For this purpose, the engine design includes a gas distribution system.
The most important component of this mechanism is the cylinder head
The cylinder head of the timing mechanism is designed to provide a seal between the piston and the surface of the engine combustion chamber.
Depending on the design of the car engine, cylinder heads may be made of cast iron or lighter aluminum. The cylinder head is usually shaped by casting. Design features may vary, but basically the head contains parts such as:
- combustion chambers;
- valves (there are intake and exhaust valves, depending on their purpose - the intake valves allow access to the working mixture of fuel and air into the cylinder, the exhaust valves ventilate the cylinder by pushing the exhaust gases into the exhaust manifold with a piston);
- section of the gas distribution mechanism;
- cooling jacket;
- casting for injectors or spark plugs;
- oil channels.
A gasket is usually installed between the cylinder block and the head, which prevents the breakthrough of gases from under the combustion chamber, as well as oil and coolant from the channels connecting the cylinder head and the block itself.
About the forces acting on the cylinder head during engine operation
When a car engine is running, the head is exposed to high pressure (due to the compression stroke in the combustion chamber, the pressure can reach up to 15 atmospheres), high combustion temperature of the mixture (about 550-600 ºC), and vibration from the crank mechanism.
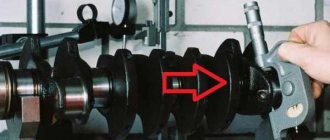
A gasket of a certain thickness is installed between the cylinder block and the head - when the head bolts are tightened, this thickness decreases (shrinks) and the cylinder head fits tightly to the engine body. But during tightening, the head tends to deform by thousandths of a millimeter, so the bolts are always tightened in a certain order.
Forces acting on the cylinder head during bolt tightening
In the process of tightening the bolts at their fastening points, the pressure on the surface increases significantly, which in turn leads to a V-shaped deformation of the “sole”. If the tightening order is not followed, as well as with an unregulated torque (force), installation of the head can lead to burnout of the gasket due to gas breakthrough, which will lead to more serious consequences.
Payment via Portmone
After selecting payment through Portmone, the payment system will launch, where you need to select the payment method: bank card or Portmone account.
The price in the Portmone payment system is converted into dollars at the exchange rate of the Central Bank of the country where you are located.
If you have a bank card in a currency other than the dollar, then the money will be debited from the card at the rate of the Central Bank of your country at the time of the purchase.
After specifying payment details and confirming payment, payment for the goods will occur.
Official website of the Portmone payment system https://www.portmone.com
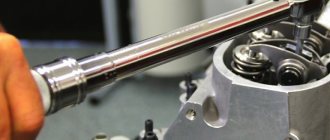
How to tighten the hub nut to the correct torque
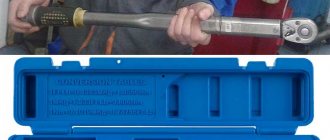
To tighten threaded connections, where it is recommended to maintain a certain torque, use special torque wrenches . Inside the tool there is a dynamometer with a scale or a special device with a limiter, which is activated when the required tightening force is reached. Keys also come with value intervals, for example 5-25 (minimum 5 N•m, maximum 25 N•m). The threaded connection is tightened until the arrow shows the required value or the limiter operates. There are also expensive and exact analogues - with an electronic display, but for the operation and repair of passenger cars a mechanical version is suitable.
The photo shows the main types of such keys.
- With preset torque, not adjustable.
- With preset torque value, adjustable.
- With tightening force indicator.
- With digital display of applied torque.
Watch the video on how to use a torque tool:
Payment via PayPal
After selecting payment via PayPal, the PayPal payment system will launch, where you need to select the payment method: bank card or PayPal account.
If you already have a PayPal account, then you need to log into it and make a payment.
If you do not have a PayPal account and you want to pay using a bank card via PayPal, you need to click on the “Create an Account” button - shown with an arrow in the picture.
PayPal will then prompt you to select your country and provide your credit card information.
After specifying the information required to make the payment, you must click on the “Pay Now” button.
Official website of the PayPal payment system https://www.paypal.com
Malfunctions: causes, elimination
Like all internal combustion engines with mechanical adjustment of valve clearances, the 11186 engine requires periodic adjustment of this characteristic. In addition, during operation, characteristic “diseases” of this particular version of the power drive were identified:
| Timing belt | 3/50 |
| battery | 1/20 |
| Valve clearances | 2/20 |
| Crankcase ventilation | 2/20 |
| Belts that drive attachments | 2/20 |
| Fuel line and tank cap | 2/40 |
| Motor oil | 1/10 |
| Oil filter) | 1/10 |
| Air filter) | 1 – 2/40 |
| Fuel filter) | 4/40 |
| Heating/Cooling Fittings and Hoses | 2/40 |
| coolant | 2/40 |
| Oxygen sensor | 100 |
| Spark plug | 1 – 2/20 |
| Exhaust manifold | 1 |
| Bend valves | broken timing belt | periodic wear monitoring |
| Ignition system interruptions | failure of the corresponding block | replacing the ignition module |
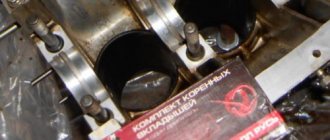
| Increased oil consumption | development of main liners |
stuck piston rings
When repairing piston and crankshaft engines, it is recommended to use original components from the AvtoVAZ manufacturer. Because only he uses special technologies for strengthening structural materials. From third-party companies, the metal may be “raw”; the resource of such consumables cannot be analyzed.
Payment via WebMoney
After selecting payment via WebMoney, the payment system will launch, where you need to select the payment method: bank card or WebMoney wallet.
If you already have a WebMoney wallet, then you need to log into it and make a payment.
If you do not have a WebMoney wallet and you want to pay in another way, you need to select any of the methods that WebMoney offers and make the payment
After specifying payment details and confirming payment, payment for the goods will occur.
Official website of the WebMoney payment system https://www.webmoney.ru/
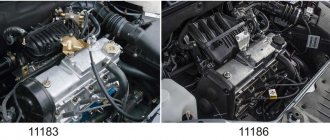
Review of the VAZ-21116 engine of the Lada Granta Liftback
The VAZ-21116 engine of the Lada Granta Liftback car has a displacement of 1.6 liters, eight-valve, based on the VAZ-2111 engine. It has a cylinder block increased in height by 2.3 mm and an original crankshaft.
The cylinder diameter remains the same - 82 mm, the piston stroke is increased to 75.6 mm, in contrast to 71 mm for the base engine. Oil nozzles are installed in the main bearing supports.
Fig. 12. Cross section of the VAZ-21116 engine of the Lada Granta with a volume of 1.6 liters.
1 — oil pan drain plug; 2 – engine oil pan 3 crankshaft; 4 oil filter; 5 - catalytic manifold; 6 — coolant pump; 7 - piston; 8 — oxygen concentration sensor; 9 — laying of the intake pipeline and exhaust manifold; 10 — inlet pipeline; 11 — nozzle; 12 — diagnostic fitting of the fuel rail; 13 receiver; 14 — bracket for fastening the tip of the cable sheath; 15 – cylinder head cover; 16 – camshaft bearing housing; 17 - camshaft; 18 — crankcase ventilation system hose; 19 — valve pusher; 20 — cylinder head; 21 bolts securing the head to the cylinder block; 22 - valve; 23 - candle; 24 — cylinder head gasket; 25 — upper compression ring; 26 — lower compression ring; 27 — oil scraper ring; 28 — piston pin; 29 — fitting for installing the oil level indicator; 30 — connecting rod; 31 flywheel; 32 cylinder block; 33 oil pan gasket; 34 — oil level indicator; 35 - oil intake
The cylinder head of the Lada Granta Liftback VAZ-2190 engine contains one camshaft, eight valves and eight valve tappets with adjusting washers. The camshaft supports are made in the head.
Two camshaft bearing housings are bolted to the upper plane of the head. The gas distribution mechanism is closed on top with a cap with an oil filler neck.
A camshaft position sensor is installed in the cylinder head plug, and a pin is installed at the rear end of the shaft for the sensor to detect the shaft position.
The camshaft and coolant pump are driven by a toothed belt from a toothed pulley mounted on the engine crankshaft. The tension of the belt and the direction of its movement along the pulleys is carried out by a tension roller.
Removing and installing the cylinder head of the VAZ-21116 engine of the Lada Granta Liftback
Work on removing the cylinder head of the Lada Granta:
– Drain the coolant from the engine.
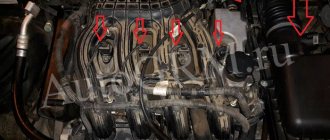
– Remove the ends of the high-voltage wires from the spark plugs.
– Remove the cylinder head cover.
– Remove the camshaft pulley.
– The cylinder head bolts are accessible with the camshaft installed, but a socket wrench with a special head is required.
– The cylinder head of the Lada Granta VAZ-2190 can be removed complete with a receiver and exhaust manifold. But if the head is removed to repair it, then it is better to first disassemble it.
– By removing the thermostat housing from the cylinder head studs.
– Unscrew the nut and bolt of the upper fastening of the rear timing belt cover.
– Evenly, in several steps, unscrew the 10 bolts securing the cylinder head.
– Pull the rear timing belt cover slightly to the side and remove the cylinder head.
– Remove the cylinder head gasket and remove the two guide bushings from their seats.
Work on installing the cylinder head of the Lada Granta VAZ-2190:
– We wash the cylinder head from dirt and deposits with kerosene or diesel fuel.
– Remove any remaining oil and coolant from the threaded holes of the cylinder block (under the cylinder head bolts).
– We clean the mating surfaces of the head and cylinder block from the remains of the old gasket, degrease the surfaces with a solvent.
– When installing the cylinder head, always use a new gasket. Oil should not come into contact with the surface of the gasket.
– Install the head guide bushings into the seats of the cylinder block.
– Place the gasket on the cylinder block, and the guide bushings should fit into the corresponding holes in the gasket.
– Install the head on the cylinder block. By slightly moving the head from side to side, we ensure that the guide bushings fit into the corresponding holes in the head.
Downloading a book
After successfully completing the payment (by any method) and returning to the KrutilVertel store from the payment system website, you will be taken to the successful payment page:
On this page you need to indicate your e-mail, where access to download the book will be sent.
If you are already registered on our website, then simply follow the link to your personal account.
The book you purchased will be in your personal account, from where you can always download it.
Please note that after making the payment, you need to return back from the payment system website to the KrutilVertel website.
If for some reason you did not return back to the site and closed the payment system tab with a message about the successful completion of the payment, please let us know - we will send you a letter indicating access to download the book.
Procedure
Having stocked up with everything you need, you can begin work.
The sequence of actions is as follows:
We put the Oka in the garage or on a flat area, immobilize it, remove the terminal from the battery; We drain the coolant from the cooling system (place a container under the drain plugs, unscrew them and wait until the liquid drains. Replace the plugs and tighten them); Remove the air filter housing. Cover the carburetor neck with a rag. We disconnect the throttle and air damper cables from it, remove the gas drive mechanism with the lever and its mounting bracket, as well as the fuel pipes and the wire of the XX solenoid valve;
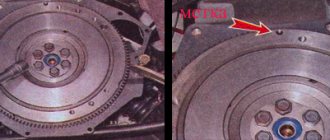
Remove the protective cover of the timing drive. We install marks on the crankshaft and camshaft
shaft (this is especially important during partial disassembly); Loosen the tension roller so that it loosens the tension of the drive, and remove the belt from the camshaft wheel; Disconnect the fuel pipe from the fuel pump. Unscrew the pump fasteners and remove it;
We disconnect the pipes from the valve cover, unscrew its fastening and remove it;
Unscrew the nuts of the spark torque sensor, disconnect the wires from it, and move it to the side
We also remove the high voltage wires from the spark plugs; Unscrew the mounting bolt of the auxiliary units housing;
We unscrew the fastening bolt of the camshaft gear and tighten it (carefully so as not to miss the key). We also dismantle the tension roller;
At the top, unscrew the fasteners of the rear timing drive cover and bend it to the side;
We unscrew the nuts securing the exhaust pipes and pull them off the studs;
We remove the pipe from the vacuum regulator; Unscrew the top bar used to tension the generator belt;
Disconnect the cooling system pipes coming to the head;
Then it all depends on why the cylinder head is removed. If you only plan to replace the head gasket, then there is no need to dismantle anything further. We simply unscrew the cylinder head mounting bolts and remove it from the block along with the installed camshaft and intake manifold, change the gasket and put everything back together. In this case, after assembly work, valve adjustment will not be required, since the camshaft. the shaft was not removed. But if everything is dismantled for repairs, for example, it is planned to replace valves at Oka, then we do not unscrew the fastening bolts yet, but continue to disassemble further;
Unscrew the camshaft bearing cover and remove it; We remove the camshaft; And only after that we unscrew the cylinder head mounting bolts, after which we dismantle it from the car;
And then repair work is already being carried out. But to do this, the intake manifold is first disconnected from the head. Then the pushers are removed along with the adjusting washers. Further, for disassembly, you will need a device for drying and drying the valves in order to remove them, after which repair work is carried out - replacing the valve guides, the valves themselves, grinding them in, etc.
Problems when paying with bank cards
Sometimes difficulties may arise when paying with Visa/MasterCard bank cards. The most common of them:
- There is a restriction on the card for paying for online purchases
- A plastic card is not intended for making payments online.
- The plastic card is not activated for making payments online.
- There are not enough funds on the plastic card.
In order to solve these problems, you need to call or write to the technical support of the bank where you are served. Bank specialists will help you resolve them and make payments.
That's basically it. The entire process of paying for a book in PDF format on car repair on our website takes 1-2 minutes.
If you still have any questions, you can ask them using the feedback form, or write us an email at [email protected]
How hard should you tighten the wheel nut on your car?
For each car, torque standards are established, since the tightening force for the locknut depends on the following factors: – Bearing dimensions; – Regulated axial clearance; – Diameter and thread pitch; The following are the force indicators for properly tightening the nut. The database will be gradually replenished.
Tightening torques for the front wheel bearing on a VAZ (LADA)
| No. | Automobile model | Force, N•m | Hub nut diameter/thread size |
| A | B | IN | G |
| 1 | VAZ 2101 – 2107, OKA | 196 – 199 | M18x1.5 |
| 2 | NIVA VAZ 21213 and 21214 | 196 – 199 | |
| 3 | Kalina, Granta, Priora, Largus, Vesta | 226–247 | M20x1.5 |
| 4 | VAZ 2108, VAZ 2109 – 2110, 2111 – 2115 | 226–247 |
Instructions for tightening cylinder head bolts
Tightening torques for threaded connections KAMAZ 5320 - 54115
The next tightening of the cylinder head must be carried out during each routine repair or maintenance of the power unit (change of oil or consumables). It is mandatory to carry out the procedure after intervention in the internal combustion engine structure, and additional tightening after 500-700 kilometers. It is not recommended and there is no need to climb into the mechanism anymore. After full tightening, the bolts sit firmly in their sockets and do not loosen due to vibration. Otherwise, leaks or burnout of the cylinder head gasket may occur, which can lead to major repairs.
Modern motors manufactured after 2010 do not require periodic tightening of the studs due to the updating of the device and mechanism.
Price issue
Changing the head gasket yourself will be quite inexpensive, since its cost ranges from 220 (for 8-valve engines) to 550 rubles (for 16-valve engines). In addition to it, you will need a gasket between the exhaust pipe and the catalyst, which costs no more than 100 rubles, and 10 new head bolts, costing 40–50 rubles each. Often the manifold gasket is damaged, which in this case must be replaced. A new part costs about 750 rubles. The total cost of spare parts will not exceed 1,500 rubles. It must be remembered that when disassembling and troubleshooting the engine, other parts may appear that need to be replaced.
Performing such work at a service station depends on the territorial location and ranges from 4 thousand rubles in small cities (Tula, Bryansk) and up to 10 thousand rubles in large cities (Moscow, St. Petersburg).
Replacing the bracket and extension of the front suspension of Lada Kalina
Typically, the bracket and brace are changed after they are deformed as a result of shock loads that occur during emergency situations or during operation on bad roads.
In some cases, it is not possible to visually detect the bending of the extension until it is removed.
In order to change the bracket and brace, you must use an overpass or a lift.
Using a 24mm wrench, unscrew the nut securing the extension to the lever, holding the extension with a 24mm wrench.
Remove the stubborn washer.
Using a 24mm spanner, loosen the nut securing the brace to the bracket.
Using a 17mm socket, unscrew the three bolts securing the brace bracket to the body.
We remove the rear end of the stretcher from the lever hole
We remove the huge washer.
At the rear end of the extension there are washers for adjusting the caster angle of the wheel steering axis.
Using a 24mm wrench, unscrew the nut securing the front end of the brace to the bracket
Remove the bracket and the huge washer from the stretcher
Behind the larger washer at the front end of the extension there are adjusting washers for the caster angle of the wheel rotation axis (in our case there are two washers)
The longitudinal extension has a catalog number: – 2108-2904270.
The longitudinal tension bracket assembly has a catalog number - 1118-2904049
We carry out the assembly in the reverse order, while in order to maintain the longitudinal inclination of the wheel rotation axis, we install the same number of adjusting washers at either end of the stretcher.
When installing the adjusting washer, it is necessary that the chamfer on its inner edge faces the extension.
We tighten the threaded connections of rubber-metal hinges when the car is on wheels.
The tightening torque of the wheel bolts is 65–95 Nm (6.5–9.5 kgcm).
– nuts for fastening the extension – 160 – 176.4 Nm (16.3 – 18 kgf m);
– bolts for fastening the extension bracket – 42.1 – 52.0 Nm (4.3 – 5.3 kgf m).
After replacing the longitudinal extension, you need to check the angles of the front wheels (alignment - destruction).
After driving 100 km, tighten the threaded connections again to the required torques.
Source: avtomechanic.ru