Payment for goods and downloading of the book in electronic form (PDF format) is made on the website.
To do this, you need to find the book you are interested in and click on the “Buy” button. The price of the book is indicated on the button.
For convenience, the price on the website for residents of Russia, Belarus and Kazakhstan is presented in rubles.
For residents of Ukraine in hryvnias, and for all other countries - dollars.
After clicking on the “BUY” button, a payment window will open where you can select a payment system with which you can pay for the selected book using any bank card (Visa, MasterCard, MIR, etc.)
When you click on the “Pay by bank card” button, the Portmone payment system will open, which is the easiest way to make a payment.
In addition, the website offers four payment systems for payment:
- Yandex (payment from any bank cards, Yandex Money account, QIWI Wallet, terminals, etc.);
- Portmone (payment from any bank cards, Portmone account);
- PayPal (payment from any bank cards, PayPal account);
- WebMoney (payment from any bank cards, payment from WebMoney wallets).
Payment via Yandex Cashier
After selecting payment via Yandex, the Yandex Cashier payment system will launch, where you need to select a convenient payment method (bank card, QIWI, Yandex Money account, etc.)
After specifying payment details and confirming payment, payment for the goods will occur.
If you have a bank card in a currency other than the ruble, then the money will be debited from the card at the rate of the Central Bank of Russia at the time of the purchase.
This payment method is optimal for residents of Russia, Kazakhstan and Belarus.
Official website of the Yandex Kassa payment system https://kassa.yandex.ru
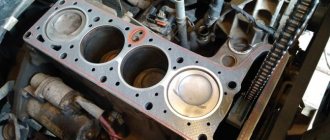
When Bolts Need Replacement
Before you begin tightening the bolts, you should inspect them. A visual assessment of the condition is not enough; it is necessary to check the fastener parameters. He must:
- have dimensions 12/120 mm;
- be with intact thread;
- have no curvature along the entire length.
Some mechanics recommend regularly screwing new bolts into the cylinder head. Others adhere to the rule that replacement should only be carried out if the fastener is screwed into the socket tightly. It is best not to skimp on bolts, since using a component that is obviously stretched increases the risk of its metal breaking. The consequences of this are almost unpredictable; in most cases, it will be possible to restore the operation of the power plant only with the help of specialists.
Payment via Portmone
After selecting payment through Portmone, the payment system will launch, where you need to select the payment method: bank card or Portmone account.
The price in the Portmone payment system is converted into dollars at the exchange rate of the Central Bank of the country where you are located.
If you have a bank card in a currency other than the dollar, then the money will be debited from the card at the rate of the Central Bank of your country at the time of the purchase.
After specifying payment details and confirming payment, payment for the goods will occur.
Official website of the Portmone payment system https://www.portmone.com
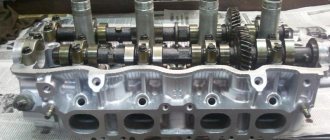
The correct tightening torque for the cylinder head on a VAZ-2107
The correct tightening torque is a guarantee of continued uninterrupted operation of the cylinder head. Thus, the attention paid by owners of VAZ-2107 cars to this nuance is completely justified. This question usually arises when the head gasket is changed. The last part costs a penny, but the efficiency and performance of the motor of the classic model largely depends on it. Read about everything in detail below.
- Reasons for proper tightening
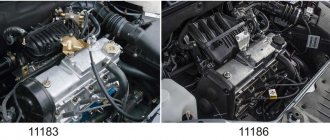
- Preparatory work
- Removing the cylinder head - important points
- The nuances of replacing the gasket
- Tightening on VAZ model 2107
Payment via PayPal
After selecting payment via PayPal, the PayPal payment system will launch, where you need to select the payment method: bank card or PayPal account.
If you already have a PayPal account, then you need to log into it and make a payment.
If you do not have a PayPal account and you want to pay using a bank card via PayPal, you need to click on the “Create an Account” button - shown with an arrow in the picture.
PayPal will then prompt you to select your country and provide your credit card information.
After specifying the information required to make the payment, you must click on the “Pay Now” button.
Official website of the PayPal payment system https://www.paypal.com
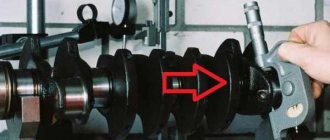
55 VAZ 2106 engine assembly To assemble the engine of a VAZ 2106 car you will need: a device for pressing in piston pins, a torque wrench, a hammer, a device for installing pistons into cylinders, keys “10”, “13”, “14”, “14”. 17", "19", "21", "22", "36" (or gas), socket heads "12" and "13" (or a special wrench for the cylinder head fixing bolts), screwdriver, mounting blade.Note When installing a piston with a connecting rod for VAZ 2106 engines produced before 1990, the piston and connecting rod must be aligned so that the mark “p” on the piston (shown by an arrow) is located on the side of the oil outlet holes on the lower head of the connecting rod.
On VAZ 2106 engines produced after 1990, there are no holes in the connecting rod and connecting rod bearings. The piston and connecting rod can be connected in any position.
Useful Tip Drawing. 4.8. Device for pressing in the piston pin: 1 - roller; 2 — piston pin; 3 - guide sleeve; 4 - screw; 5 - spacer ring To press in the piston pin, it is preferable to use a special tool (Fig. 4.8). If it is not available, you can choose an acceptable mandrel.
1. Place piston pin 2 (see Figure 4.8.) onto shaft 1 of the mechanism for installing the piston pin with spacer ring 5 put on it. Next, place guide sleeve 3 and secure it with screw 4 without clamping the screw.
2. Heat the connecting rod in an oven to a temperature of 240 ° C to expand its head. Remove the connecting rod from the oven and quickly clamp it into the clamps. Place the piston onto the connecting rod, making sure that the hole for the pin aligns with the hole in the upper head of the connecting rod. Using hand pressure, push the finger with the participation of the mechanism into the holes of the piston and connecting rod until it reaches the limit. Remove the device. After the connecting rod has cooled, lubricate the pin with engine oil through the holes in the piston bosses.
Note Press in the piston pin as soon as possible, since the connecting rod cools quickly and once cooled, the position of the pin cannot be changed. When installing the piston pin, being careful (the piston is heated by the connecting rod), press the piston boss against the connecting rod in the direction of pressing the pin.
3. Install the piston rings in the reverse order of removal. Caution When installing, do not open the rings more than necessary to avoid deforming or breaking them.
Note: 2 types of oil scraper rings can be used: 1 - consisting of an expander and two rings; 2 - consisting of an expander and one ring.
Dismantling the next type of ring is discussed in the subsection (see “disassembling the VAZ 2106 engine”). Installation is carried out in the reverse order of removal. In this case, install the ring so that the joint of the expander is located on the side opposite to the ring lock.
Install the lower compression ring with the groove facing down. If the ring is marked with a “top” or “top” mark, then install the ring with the mark facing up (toward the piston bottom).
4. Orient the piston rings. Place rings on the remaining pistons. Note Orient the piston rings as follows: — the lock of the outer compression ring must be placed at an angle of 30-45° to the piston pin axis; - lock of the lower compression ring - at an angle of approximately 180° to the axis of the lock of the outer compression ring; - oil scraper ring lock of the following type (or outer oil scraper ring lock of the first type) - at an angle of 30-45° to the piston pin axis between the compression ring locks; - lock of the lower oil scraper ring (first type) - at an angle of approximately 180° to the axis of the lock of the outer oil scraper ring; - expander lock - between the ring locks.
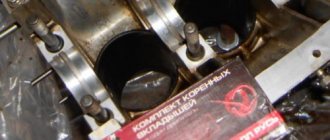
5. Place the upper main bearing shells (with grooves) in the bed of the VAZ -2106 cylinder block. note Install the liners so that the installation tab of the liner is aligned with the notch on the bed. Place liners of the greatest width (without groove) into the bed and cover of the middle bearing.
6. Lubricate the bearings with engine oil. 7. Place the crankshaft into the cylinder block. 8. Place the lower (without groove) liners into the main bearing caps. 9. Lubricate the crankshaft journals with engine oil. 10. Lubricate the liners in the crankshaft main bearing caps with engine oil. 11. Place the caps (except for the rear) of the main bearings and lubricate the thrust half-rings with engine oil.
Note Install the covers in the same block in accordance with the marks, orienting them in the same direction as before disassembly.
12. Install the rear (metal-ceramic, yellow) and front (steel-aluminum) thrust half-rings of the rear crankshaft support of the VAZ -2106.
Note Install the thrust half-rings with the grooves... ...towards the supporting surfaces of the crankshaft.
13. Place the rear main bearing cap and cap bolts, tighten them with a torque wrench with the torque given in Appendix 1 Tightening torques for threaded connections of a VAZ 2106 car. 14. Check the axial clearance of the crankshaft with a flat feeler gauge, moving the crankshaft to the limit with a mounting blade. The axial clearance must be 0.06-0.26 mm. The maximum permissible gap is 0.35 mm. If the gap is larger, replace the thrust half-rings with others, increased by 0.127 mm. 15. Check the assembly accuracy by turning the crankshaft several turns by hand. The crankshaft must spin easily and slowly.
16. Insert the connecting rod bolts (if they were removed) and bearings into the connecting rods, aligning the mounting tab of the bearing with the notch on the connecting rod. 17. Lubricate the cylinder bores, pistons, piston rings and connecting rod bearings with engine oil.
18. Place a device for compressing the rings on the piston and, by screwing in the screw, compress the rings, place the piston in the cylinder in accordance with the cylinder number marking on the connecting rod and press (for example, with the handle of a hammer) on the piston, displacing it from the mandrel into the cylinder. Place the pistons in the remaining cylinders of the VAZ -2106 in the same way.
Note When installing pistons into cylinders, the mark “p” on the piston must be turned towards the front section of the engine.
19. Place the connecting rod bearings into the connecting rod caps, aligning the mounting tab of the bearing with the recess on the cap. 20. Lubricate the connecting rod bearings in the connecting rod caps and the crankpins of the crankshaft with engine oil.
21. Place the connecting rod cover by connecting the connecting rod to the crankshaft journal and aligning the marks on the connecting rod and the cover. 22. Screw on the connecting rod bolt nuts without fully tightening them. Place the caps of the other connecting rods in the same way.
23. Tighten the nuts of the connecting rod bolts with a torque wrench to the torque given in Appendix 1 Tightening torques for threaded connections of a VAZ 2106 car. 24. Install the fasteners for the crankshaft rear oil seal, replacing the gasket. Center the fastener relative to the shaft flange using a special mandrel (if you don’t have one, center the fastener along the working edge of the oil seal) and tighten the six holder fixing bolts, aligning the plane of the holder with the plane of the block plug without distortion.
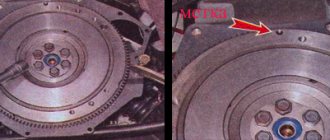
25. Place the flywheel (after fixing the front cover of the clutch housing) so that the mark (cone-shaped hole) near the rim is opposite the axis of the connecting rod journal of the 4th cylinder, and fix the flywheel by tightening its fixing bolts with the torque given in Appendix 1. Tightening torques for threaded connections. car VAZ 2106.
Drawing. 4.9. The procedure for tightening the cylinder head bolts of the VAZ 2106
26. Place the parts and pieces in a sequence similar to the following: sprocket on the crankshaft, oil separator, ignition distributor drive gear, oil pump drive shaft, oil pump (replacing the gasket), oil sump (replacing the gasket and not completely tightening its mounting bolts), head block (by replacing the gasket). Tighten the cylinder head fixing bolts in 2 steps in a certain order (Fig. 4.9): - in advance with a torque of 33.3-41.1b N•m (3.4-4.2 kgf•m) - bolts 1-10; - completely with a torque of 95.94-118.38 N•m (9.79-12.08 kgf•m) bolts 1-10 and a torque of 30.67-39.1 N•m (3.13-3.99 kgf •m) - bolt 11. 27. Place the sprocket on the VAZ-2106 camshaft assembled with the bearing housing, and rotate the shaft so that the mark on the sprocket is opposite the mark on the bearing housing. Remove the sprocket and, without changing the position of the shaft, place the bearing base on the cylinder head. Fix the body by tightening the nuts in a certain order (Fig. 4.10. with the torque given in Appendix 1.
Drawing. 4.10. The procedure for tightening the camshaft bearing base nuts on a VAZ 2106
28. Install the chain tensioner shoe. Rotate the crankshaft so as to connect the mark on the sprocket with the mark on the cylinder block. Place the chain on the sprocket without changing the position of the crankshaft. Install the limit bolt. 29. Place the chain on the oil pump drive shaft sprocket and, after tensioning the drive branch, place the sprocket on the shaft without completely tightening its fixing bolt. Attach a wire to the oil pump drive chain and lift the chain up in the drive cavity (or hook it on top and lift it up). 30. Place the chain on the camshaft sprocket, tension the drive branch and place the sprocket on the shaft, ensuring that the marks on the sprocket and the boss on the bearing housing converge and do not completely clamp the bolt securing it.” 31. Install the chain tensioner without clamping the cap nut. Rotate the crankshaft 2 turns in the direction of rotation to obtain the desired chain tension. Check the simultaneous alignment of the marks on the sprockets with the marks on the cylinder block and on the bearing housing. 32. If the marks do not match, reproduce the installation of the circuit. If the marks match, fully tighten the sprocket bolts, the chain tensioner cap nut, and bend the edges of the sprocket bolt lock washers. Adjust the gaps between the camshaft cams and the valve drive levers (see “adjusting the clearances in the valve drive”). Reinstall the head cover, replacing the gasket.
33. Install the VAZ -2106 camshaft drive chain cover with the crankshaft front oil seal, replacing the gasket. Align the fastener with the shaft flange using a special mandrel (if there is no mandrel, center the fastener along the working edge of the oil seal) and tighten the six bolts and three nuts that secure the cover. 34. Reinstall the remaining parts and pieces in the reverse order of removal.
Helpful Advice After assembling the engine, it is suggested to run it on a stand. Since this cannot be done outside of special repair organizations, after installing the engine on a VAZ 2106 vehicle, run it in according to a simplified cycle: 1. Make sure that the throttle valve drive is adjusted correctly, fill in oil and coolant, and check the tightness of all connections. 2. Start the power unit of the VAZ 2106 car and let it run without load in the next cycle.
Next page""""""
- 10. 11. 12. 13. 14. 15. 16. 17. 18. 19. 20. 21. 22. 23. 24. 25. 26. 27. 28. 29. 30. 31. 32. 33. 34. 35. 36. 37. 38. 39. 40. 41. 42. 43. 44. 45. 46. 47. 48. 49. 50. 51. 52. 53. 54. 55. 56. 57. 58. 59.60. 61. 62. 63. 64. 65. 66. 67. 68. 69. 70. 71. 72. 73. 74. 75. 76. 77. 78. 79. 80. 81. 82. 83. 84. 85. 86. 87. 88. 89. 90. 91. 92. 93. 94. 95. 96. 97. 98. 99. 100. 101. 102. 103. 104. 105. 106. 107. 108. 109. 110. 111. 112. 113. 114. 115. 116. 117. 118. 119. 120.121. 122. 123.124.125.126.127.128.129.130.131. 132.133.134. 135.136.137.138.139.140.141.142.143.144.145.146.147.148. 149.150.151.152.153.154.155.156.157.158.159.160.161.162.163.164.165.166. 167.168.169.170.171.172.173.174.175.176.177.178.179.180.181.182.183. 184.185.186.187.188.189.190.191.192.193.194.195.196.197.198.199.200.
coming
Payment via WebMoney
After selecting payment via WebMoney, the payment system will launch, where you need to select the payment method: bank card or WebMoney wallet.
If you already have a WebMoney wallet, then you need to log into it and make a payment.
If you do not have a WebMoney wallet and you want to pay in another way, you need to select any of the methods that WebMoney offers and make the payment
After specifying payment details and confirming payment, payment for the goods will occur.
Official website of the WebMoney payment system https://www.webmoney.ru/
General rules for performing work, methods used
There are a number of general rules that must be followed when installing the block head:
- It is important to strictly observe the tightening torque. For these purposes, a special tool is used - a torque wrench. It is not recommended to perform this operation with regular keys;
- The head bolts must be pulled smoothly, jerking is not allowed. Since the tightening force on the last approaches is significant, extending the wrench arm with a pipe can simplify the procedure and ensure smooth, uniform tightening;
- Before installing the bolts, you need to carefully inspect the condition of the threads on them. There should be no dirt or foreign particles on the coils.
- The threads of fasteners should be lubricated with engine oil before tightening. But you should not pour grease into the holes for the bolts (especially for “blind” holes), since in the future it will not allow the fasteners to be fully tightened.
Despite the fact that each engine has its own characteristics of tightening the cylinder head, the general technology of this operation is the same. In general, two methods are used to tighten fasteners:
- In several approaches, bringing the tightening force to the required value;
- Tightening the fasteners to a certain force (in one or more approaches), and then tightening the bolts twice to a certain angle.
The tightening method is selected based on the type of bolts.
The first method is used when using non-stretching bolts (these are not used now, but they can be found on old cars). But often this type of fasteners requires tightening after a certain period of engine operation in order to compensate for the shrinkage of the cylinder head gasket. But such fasteners are allowed for reuse, and more than once.
The second method of tightening the block is relevant for most modern cars. And all due to the use of tensile bolts (the so-called TTY type).
Such fasteners, due to elastic deformation, are able to compensate for thermal expansion of the head and shrinkage of the gasket, but for this they need to be put into deformation mode (in fact, just stretched a little).
To do this, it is necessary to tighten the bolts twice to a certain angle. On some cars this angle is 45 degrees, on others it is 90 degrees.
But after the elements are put into elastic deformation mode, they will no longer be able to return to their original state, and therefore their reuse is not allowed due to the high probability of destruction.
Downloading a book
After successfully completing the payment (by any method) and returning to the KrutilVertel store from the payment system website, you will be taken to the successful payment page:
On this page you need to indicate your e-mail, where access to download the book will be sent.
If you are already registered on our website, then simply follow the link to your personal account.
The book you purchased will be in your personal account, from where you can always download it.
Please note that after making the payment, you need to return back from the payment system website to the KrutilVertel website.
If for some reason you did not return back to the site and closed the payment system tab with a message about the successful completion of the payment, please let us know - we will send you a letter indicating access to download the book.
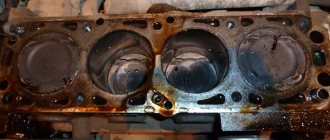
Basic faults
There is damage to the gasket in which the operation of the VAZ 2107 is strictly prohibited. But there are also breakdowns in which it is still possible to drive. So, here is a list of the main breakdowns:
- Destruction of the gasket between the lubrication and cooling channels. With such a breakdown, antifreeze begins to seep into the engine sump. Of course, mixing with engine oil occurs. If there is a suspicion of a gasket failure, then you need to remove the dipstick and check the lubricant level. It's also worth looking at the consistency of the oil. In this case, the antifreeze turns light brown. In the event of such a breakdown, it is strictly forbidden to even start the engine, as this can quickly lead to jamming.
- Destruction between the cylinders and the cooling system occurs if the cylinder head gasket is of poor quality. It is quite possible that there was a weak tightening torque of the VAZ 2107 cylinder head during assembly. Under pressure, the integrity of the gasket is destroyed. The result is that air gets into the engine cooling system, and something terrible happens in the expansion tank. The temperature rises, there are huge bubbles and seething in the tank. Of course, it is undesirable to continue driving in this case.
- Sometimes (much less often than in the two previous cases) destruction occurs between adjacent engine cylinders. The result is a significant decrease in compression and unstable engine operation.
- And, of course, one cannot help but mention the banal marriage. In this case, the cylinder head gasket of the VAZ 2107 simply collapses, literally before our eyes. In this case, you can see how antifreeze begins to leak between the cylinder head and the engine block. In this case, tightening the bolts has no effect. Most likely, there is unevenness in the gasket itself, which leads to a similar result.
And now you have decided that you really need to replace the gasket, your car has one or more symptoms. What to do? Arm yourself with keys and other tools, and then begin preparation.
Problems when paying with bank cards
Sometimes difficulties may arise when paying with Visa/MasterCard bank cards. The most common of them:
- There is a restriction on the card for paying for online purchases
- A plastic card is not intended for making payments online.
- The plastic card is not activated for making payments online.
- There are not enough funds on the plastic card.
In order to solve these problems, you need to call or write to the technical support of the bank where you are served. Bank specialists will help you resolve them and make payments.
That's basically it. The entire process of paying for a book in PDF format on car repair on our website takes 1-2 minutes.
If you still have any questions, you can ask them using the feedback form, or write us an email at [email protected]
Do-it-yourself engine tuning 2106
Increasing the engine capacity of the VAZ 2106
For all owners, sooner or later, the standard 75 power ceases to be enough, the car begins to seem sluggish, unresponsive, and the question arises of how to increase the power of the 2106 engine. The most economical and simple tuning is to bore the VAZ 2106 engine by 3 mm for an 82 mm piston. Sharpening will no longer be possible, the walls of the block become very thin, only the sleeve of the block remains. To obtain a more torquey engine and further increase the volume to 1.8 liters. you need to increase the piston stroke to 84 mm. Otherwise, the modernization, modification and boost of the 2106 1:1 engine repeats the modification of the 2103.
Engine from Priora to VAZ 2106
Got an extra prioromotor lying around in the garage? Don't rush to send it to the landfill, there is a better idea. Installing a 16 valve engine on a VAZ 2106 is one of the best ways to get reliable 100 hp, but at the same time the procedure is quite difficult, you will have to saw the engine shield with a grinder, digest the pan, install the crankshaft bearing 2101 on the eight-wheel, the original gearbox remains, the clutch is changed to Priorovskoe. In addition, the flywheel, exhaust system, cooling system and accelerator drive will require improvements. Doesn't it scare you? Then it's worth a try. Materials with step-by-step photo reports are widely available and will not be difficult to find. The situation is similar with the 2112 engine on the VAZ 2106; in any case, such a swap is better than squeezing the juices out of an old classic engine. All this can be done with Niva 1.7 and 1.8
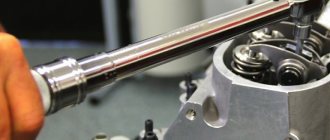
What you need to know about a torque wrench
The bolts are tightened in a certain sequence - from the center to the edges, one at a time. If you are not a motor mechanic with extensive experience and an experienced hand, then the main condition for the correct performance of the work will be the use of a torque wrench. This tool is widespread everywhere, it is easy to buy or rent - just look at the newspaper advertisements or go to your neighbor’s garage.
Torque wrenches come in different designs, but they are all designed to measure the tightening force of threaded connections. When choosing a key, you need to find out in what units the measurement is taken and whether it matches the car manufacturer’s instructions.
In the international SI measurement system, the tightening force is called newton meters, in Russia it is often called kilogram meters, for some foreign cars you can find measurements in pound-force feet. To avoid errors when converting one unit of measurement to another, you can purchase a key with different scales.
Table: how to convert measurements from newton meters to pound-force feet
| Newton meter | 10 | 50 | 100 | 250 | 500 | 1 000 | 2 500 | 5 000 |
| Pound-force-foot | 7.376 | 36.878 | 73.756 | 184.391 | 368.781 | 737.562 | 1 843.906 | 3 687.811 |
To make sure your actions are correct, you can use a protractor to monitor the angle of rotation of the bolt after tightening it with a torque wrench.
This is what a torque wrench looks like, allowing you to correctly determine the force for tightening threaded connections