The air filter of the Priora car (16 valves) ensures the purity of the air that is used to create the fuel-air mixture. The air on the road is not entirely clean, which is caused by dirt and dust, so the air filter on a Priora car is changed every 15-20 thousand kilometers - the price of this element is 200 rubles and more. (in city traffic it is usually changed every 30 thousand kilometers). You can change the air filter of a Priora car yourself - in short, the replacement is to unscrew 4 bolts, remove the air filter pipe and install a new part - for this it is not at all necessary to contact a technical center. In the article below you will find the article number of the factory part. Read the article to the end and you will learn everything about light machines!
Why change the air filter
The fuel-air mixture, which is created in the injector, enters the combustion chamber. In four strokes, all particles of dust and dirt that are mixed with air leave microcracks and small scratches on the walls of the chamber and on the piston. They basically “scratch” everything that comes their way. The air filter on the Priora is not installed for “beauty”: air flow passes through it. Its task is to contain the largest possible amount of dust and dirt and prevent them from getting into the engine. Those. it does not stand simply to allow air to pass through; he cleans it up to working condition.
Every time a worn consumable made a “mistake” when dirt penetrated inside the cylinder, the injector sent commands to increase the proportion of fuel in the fuel-air mixture. It became oversaturated, consumption increased. Not only is the engine life reduced due to such “impacts”, but the owner’s wallet is also thinner. Practice shows that timely replacement is cheaper than the cost of gasoline.
The damper drive does not work
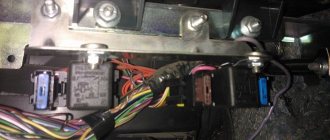
It is impossible to check whether the Priora recirculation valve is working (on cars with the Panasonic climate system) by viewing errors in the operation of the system - the corresponding codes are simply not provided. Therefore, it is necessary to perform the following actions in accordance with the algorithm described in the diagnostic card:
- Use a multimeter to measure the voltage level between ground and contact No. 1 going to the mode switch;
- if the obtained value corresponds to the on-board network voltage, there is an open circuit in the recirculation switch section;
- otherwise, you need to measure the voltage between ground and contact No. 2 of the recirculation button when it is pressed;
- if the measured value is equal to the on-board network voltage, the switch itself is faulty, and then it must be replaced;
- otherwise, use a multimeter to measure the state of the recirculation key;
- if the value is equal to the on-board network voltage, there is an open circuit in the area between the mode activation key and the SAUKU heater controller;
- if not, we proceed to measuring the voltage in the area between ground and contact No. 1 of the damper solenoid valve (the button for turning on the recirculation mode must be pressed);
- if the obtained value corresponds to the voltage of the on-board network, there is a break in the electrical circuit in this area;
- otherwise, there will be an open circuit in the ground circuit of the damper drive valve.
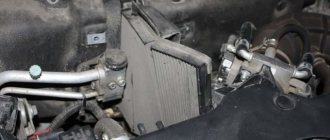
The pinout of the Priora recirculation button is described in detail in the circuit diagram of the Panasonic climate control system. If the recirculation malfunction is caused not by an open circuit or a breakdown of the solenoid valve itself, but by a malfunction of the damper, replacing it can be quite difficult for an unprepared car owner.
If you go to a car service center, it will cost a pretty penny (about 10 thousand rubles), since the technicians will tell you that you need to remove the entire stove, drain the antifreeze, and also remove freon from the air conditioning system. You can do this yourself, and without draining the antifreeze and pumping out the refrigerant. Therefore, it makes sense to describe the procedure for replacing the vacuum drive if the Priora interior air recirculation damper does not work:
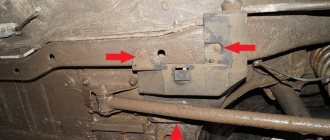
first you will need an L-shaped screwdriver - it is not sold in stores, but it is not difficult to make by bending any existing one made of fairly soft metal
We use it to unscrew the lower screw, which is located very inconveniently - there is a hole there large enough to stick your hand through and perform the necessary manipulations;
the top screw is hidden behind the plastic of the stove body - it needs to be drilled exactly opposite the screw; disconnect the damper rod, for which you need to pull it to the left with a little effort; now the drive is free, all that remains is to pull it out (pull it a little to the left and press in the direction of the engine compartment - it should fall down), you need to pull it out carefully, since it can cling to surrounding parts;
the procedure for inserting a new vacuum drive is also quite tedious - first we try to insert the valve into its normal place; the second step is to get the drive tube into the hole located in the lower part of the heater; put the hose on the valve itself; we tighten the screws in the reverse order (you will have to tinker with the bottom one, so you don’t have to tighten it - the valve will be held quite securely even without the bottom screw).. As you can see, you can replace the flap drive of the Priora recirculation system yourself
As you can see, you can replace the flap drive of the Priora recirculation system yourself.
How to replace the air filter on a Lada Priora - instructions
For Priora, this is an ordinary “consumable”. You need to know its location and be able to replace it, because this is the simplest operation for maintaining any car. To replace the air filter in question, you only need to follow a few steps:
- Open the hood. Find the black plastic box to the right of the engine; this is the housing. For your own convenience, you can remove the negative terminal from the battery and remove the wire block from the mass flow sensor (mass fuel flow sensor).
- The air filter housing cover is secured with four screws - unscrew them with a Phillips screwdriver and remove the cover.
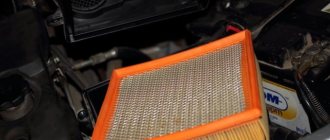
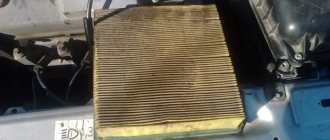
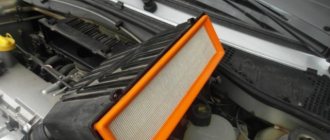
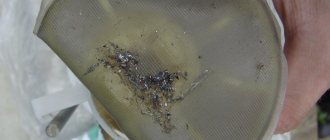
- Slightly move the corrugated air duct and remove the used consumable. Do this carefully: it is held in place by a rubber seal, so all movements should be smooth. Even if it seems clean and you don’t want to change it, do it: all the dust and dirt will not be visible to the naked eye.
- Vacuum the housing housing from sand and dust. Insert the new part tightly in place of the old one, making sure that the rubber is adjacent to the plastic casing.
- Place the cover and tighten the four screws. Connect the wire block and the negative terminal to the battery.
Now the fuel-air mixture will contain fewer dust and dirt particles. Priora will again be dynamic, fuel consumption figures will be encouraging, and the engine will not suffer any damage from the operation of the new consumables.
Door Removal Tools
Before starting the manipulations, you need to prepare the tools. To work you will need:
- heads for 10 and 13; key - “ratchet”; head extension; Torx T20 bit; adapter for nozzle; Phillips screwdriver.
Trim Removal Tools
This is a highly specialized tool, not every car owner has it. In this case, you may have to purchase new upholstery fasteners, since the old ones may break if they are exposed to inappropriate tools. You can try replacing the blades with a shoe knife or similar tool, but a good result is not guaranteed, since you can, again, break the fasteners or scratch the upholstery.
Filter models - analogues
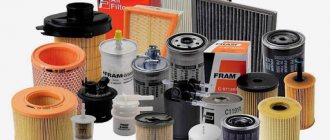
Air filters produced by the following manufacturers are suitable for the VAZ 2170 Priora:
- Nordfil - AN1014;
- TSN - 9140;
- Filtron – УТ000072199;
- Motor-superUT000072199;
- Bosch - 1 457 429 061;
- Knecht (Mahle Filter) - LX 220;
- Fram - CA3399;
- Kolbenschmidt - 50 013 059.
Filters from these manufacturers are sold at the same price. Their quality can be assessed by the “mesh”: if it is too dense, it will create air resistance, and the volume entering the injector will noticeably decrease - fuel consumption will increase again, Priora will not be so fast and dynamic.
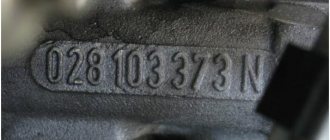
Original
Most car owners prefer to buy and install original spare parts. When the Lada Priora is released, a LADA air filter under article number 21120110908082 is installed at the factory. A filter from the BIG brand can also be installed out of the box. You can find it by catalog number GB-320.
The price of the original air filter for the Lada Priora injection engine (16 valves) is from 200 to 400 rubles.
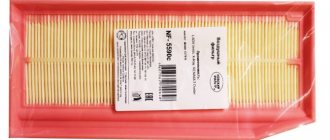
Please read the packaging carefully before purchasing. Make sure that the box is made of high quality, it contains only official logos, and there are no extraneous images or inscriptions. Check the filter for damage, including torn bellows. This way you will avoid buying a fake at the price of the original.
Part Features
The Priora air filter is presented in the form of a small black plastic box with a streamlined shape. Upon visual inspection, you can distinguish a corrugation and a wide pipe, which is directed towards the engine.
The Lada Priora air filter is located in the central part of the hood, directly in the front area, and contains 16 valves. The external environment has a detrimental effect on it - chips and cracks appear. In most cases, this unit must be dismantled for updating due to deformation or replacement of cleaning elements. The air filter is attached to the metal base using rubber supports.
Regularly checking and installing the air filter is an important step that should never be skipped. If the housing breaks down, there is a possibility that air flows will enter not only the motor, but also through the cracks formed. Stones can get into such holes, which will subsequently be directed into the engine. For this reason, the integrity of the cleaning part and the box is important.
Installing the air filter takes only 15-20 minutes, after which the engine runs much better. Manufacturers recommend replacing and installing a new block every 30,000 kilometers traveled.
Filtron - 354 rubles
The filter is not made in the most accurate way, with flashes, although the side of the frame is closest to the original design. There are stiffening ribs. The sizing is high quality and complete. The paper is darker than other filters, which may indicate heat treatment.
Sakura — 710 rubles
The most expensive of the tested filters and the only one that was additionally wrapped in cellophane. Plastic frame without stiffeners, just like Mahle. As in the case of Bosch, thin paper was used, but everything was done carefully, with minimal fraying and complete sizing.
Champion - 510 rubles
High quality and carefully made filter. A complete copy of the original both in terms of seal and plate. The first thing that catches your eye is white paper (this is the original color of the raw material with acrylic impregnation; any color shade indicates the use of phenolic impregnation or heat setting).
Paper impregnation can be acrylic (white) or phenolic (yellow). Dark color means the filter has been heat set to hold its shape. True, the last parameter is more relevant for fuel and oil filters, where the working surface directly interacts with a dense liquid.
Also check out
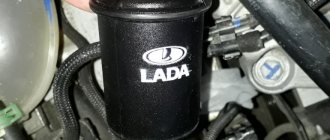
- It takes 10-15 minutes for the oil to drain. At this time, you can replace the oil filter located at the rear of the engine. Dismantle it. It is better to use a special key for this. If this is not the case, you can use the old method - punching the housing with a screwdriver. When the screwdriver is inside the filter, the handle will act as a shoulder with which you can unscrew the filter.
Changing engine oil on LADA Priora yourself
How to change Lada Priora engine oil
- Before installing a new oil filter, you need to fill it halfway with engine oil, which will later be poured into the engine. In addition, drop oil onto the oil seal (O-ring) several times so that it is not damaged when tightening. The filter be filled with oil to prevent “oil starvation” of the engine. This is necessary for the empty filter to fill with oil; it will take several seconds, during which the engine will run “dry”, which will have an adverse effect on it.
Changing Priora yourself
- Screw in the new filter exactly along the threads, avoiding distortions.
- Install the drain plug and pour about 3 liters of oil into the neck.
Changing Priora engine oil yourself
- After a few minutes, use the dipstick to check the oil level. The photo shows what it should be like. Exceeding the norm may adversely affect the mass air flow sensor or rubber seals.
How to change the oil in a LADA Priora engine
- Place the wheel and lower the car from the jack. Start the engine and check the car in action. In this case, the oil pressure light should not light up.
The oil level should be monitored regularly. After some time it may darken, but this only means it contains a large amount of detergent additives. You should remember the oil change date, and in addition, remember the oil label and the manufacturer that produces it.