Budget segment car manufacturers rarely equip their cars with fog lights. This fate befell Vesta and X-Ray in the minimum configuration, but many owners solve this problem by buying non-original Lada Vesta PTFs.
The market for auto parts and additional equipment sells many parts from unofficial manufacturers. Their purchase and installation allows you to save money, but there may be a risk of a factory defect or poor-quality assembly, in which case it is necessary to choose equipment from trusted manufacturers with a guarantee.
Over the 5 years of production of the Lada Vesta, some models of foglights have already proven themselves well during long-term use and are in high demand among owners.
How do fog lights work?
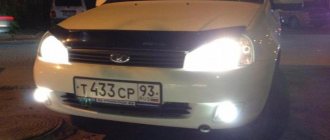
The presence of fog lights in a car gives the driver the opportunity to feel calmer while driving in poor visibility and fog. Due to the location of the PTF in the lower part of the bumper and below the level of the head light (and fog, as you know, spreads above half a meter from the road), the light passes through the curtain and is visible to other road users.
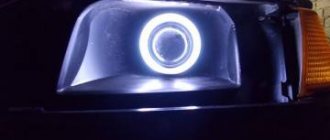
LED fog lights for Vesta. Photo source: https://www.drive2.ru/l/476399147935597172
Also, such headlights have a clear cut-off line due to their placement and the shape of the reflector, and the light-optical design has a screen of direct rays that prevents light from scattering and reflecting from small drops.
Which fog lights to choose for Vesta
Owners of Lada models: Vesta, SW Cross from 2022, X-ray are faced with the lack of standard foglights in all trim levels except Comfort Winter, Luxe and Exclusive. According to forecasts, restyled cars will also not have PTF. Owners of the “classic start” and “comfort” versions have to select and install the necessary equipment themselves. So far, no leader has been identified on the market, so the choice of model depends on the budget and specific wishes. Among the popular brands of foglights on Vesta are:
- Wesem;
- Gamma;
- Luch;
- NSP
- Valeo;
- Vestatec;
- "Osvar"
- "SeViEm" ("Sivy").
In addition to the brand, the owner needs to choose the light source of the headlights. There is no definite correct option here either, since many people prefer to install halogen lamps due to affordability, but LED LED lamps are considered more technologically advanced. Opinions agree on one thing - xenon and bi-xenon with a bi-module, installed in Vesta fog lights, not only do not work according to the standards, but also blind oncoming traffic, so their installation is prohibited by law.
There is also a choice between single-mode and dual-mode headlights, which are often represented by diode lensed PTFs. When turned on they shine with a rich white light, but when turned off and re-activated they switch to yellow diffused lighting.
Light bulbs for VAZ 2114 foglights: choosing the right one
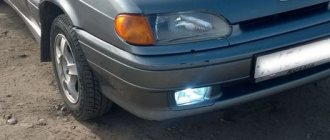
High-quality fog lights significantly help the driver in poor visibility, in particular when, due to fog, the light from the main optics is completely reflected, forming a “white wall”.
And their correct operation depends on what kind of bulbs you installed in the fog lights of the VAZ 2114. The VAZ 2114 is not equipped with standard fog lights. But the market now offers a very wide selection of different options that can help solve this problem:
- Ready tuning bumper with PTF.
- The bumper is from the older model 2115 with sockets for fog lights.
- Installation of ready-made PTF and facing elements.
Installation of ready-made PTF with facing elements is extremely popular. When choosing PTFs, pay attention to their power and the types of lamps that can be installed.
Types of light bulbs in PTF
Several types of light bulbs are used for lighting:
- LED;
- halogen;
- gas-discharge.
Halogen light bulbs are the most common. They are considered quite effective and do not blind oncoming traffic. At the same time, such bulbs in the fog lamps of the VAZ 2114 have a short resource and become very hot. Sudden cooling of heated glass can lead to cracks and chips. If, in pursuit of illumination, the driver has installed lamps that are too strong compared to the standard power, this leads to the control unit overheating and the headlights automatically turning off.
LED light bulbs are becoming increasingly popular. They are distinguished by a wide color range, sufficient brightness and efficient power consumption. LEDs heat up slightly and do not overheat the working area of the headlight. Therefore, during long-term operation of the PTF, the headlights do not melt and do not fail. Headlights with such bulbs do not blind oncoming cars. But LED lamps are more expensive than halogen lamps. Careful selection of lamps is also necessary: they are not suitable for all types of headlights.
High power LEDs require a special cooling system.
Gas discharge or xenon lamps are considered the most powerful and efficient. The regulations have strict restrictions on the use of HID lamps. By law, these lamps are used only in headlights marked “D”, equipped with automatic leveling. Their installation and replacement is more complex than the installation of halogen and LED options. If installed correctly, their service life will be about 3 years.
Significant disadvantages of xenon lamps are the high price and the fact that if one of the bulbs burns out, both lamps will need to be replaced.
If both lamps burn out at once, the reason may be that the lamp power is too high. It happens that fuses blow if you drive into the water and the PTF suddenly cools down. Therefore, first check the fuses, the condition of the lamps, and only if they are really burned out, replace them with new ones.
Replacing halogen lamps with analogues
When traveling long distances, the quality of light from halogen lamps may not suit the driver for various reasons. Usually they are replaced with LED or gas-discharge bulbs in the PTF VAZ 2114. However, there are no strict restrictions on the installation of LED bulbs. Conditions and restrictions must be taken into account when installing xenon.
Before upgrading a halogen lamp, it is removed and the base size and brightness are determined. An LED lamp is purchased with a similar base and a brightness of at least 1000 lm. Otherwise, the effect of the replacement will tend to zero.
Types of bases in PTF VAZ 2114
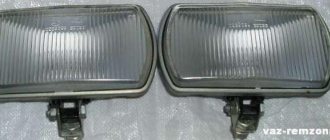
What base is in the fog lights of the VAZ 2114? Depending on the type of PTF, light bulbs can have 2 types of sockets - H3 (H4) and H11. PTF "Kirzhach" uses lamps with H11 socket. On non-standard PTFs, for example, Bosch, there are lamps with an H3 (H4) socket.
How to replace a lamp
Before replacing the light bulb, you need to buy a new one with the same parameters. It is better to choose reliable brands from well-known manufacturers. Before replacing, it is better to lift the car on a lift or jack, or place it over a hole.
- Remove the negative terminal from the battery.
- We find the fog lamp power supply.
- Slide the rubber protection along the headlight.
- Disconnect the connector and block.
- We move the spring clips away from the headlight reflector (we remove the loops of the clips from the hooks).
- We take out a light bulb with a wire.
- We connect and install a new lamp.
- We assemble the headlight.
- Checking the operation of the new light bulb.
The old light bulb is removed along with the wire. The new bulb should have exactly the same wire as the old one.
Useful video
You can glean additional interesting information from the video below:
If you have already changed the bulbs in the VAZ 2114 foglights, the process will only take a few minutes. On some models, the PTFs are combined with head optics, so to replace the lamp you need to disassemble the main headlights.
Review of Manufacturer Prices
Lada Vesta fog lights vary in characteristics and price. Often the difference in cost can be due to the popularity of the brand, as is the case with Valeo. For information, you can refer to the site with reviews, the DiaLUCH catalog with detailed photos or videos, reviewers, for example, Kulagin. There are prices and article numbers of different PTF models:
- for PTF Wesem on Vesta, sellers ask from 1650 rubles (article number - 46100);
- Gamma – 980 (GM-FL-15432);
- "LLC Luch" - 1650 (132532123);
- NSP – 1900 (nsp07261500097r);
- Valeo – 3800 (088358);
- "Osvar" - 1940 (36020374300000);
- "SeViEm" - 1700 (261500097).
All prices indicated are approximate and are calculated for a set of 2 headlight brackets, wires and trims, chrome or plastic. It is better to find out how much the price of fog lights for Vesta will be in stores.
Selection of headlights and necessary materials
PTF Valeo
The highest quality option is the original PTF produced by Valeo (article: FCR220029), costing up to 3000 rubles. for a set of 2 pieces. You can buy fog lights from Dlaa, which will cost half as much. If you decide to install xenon, then you can’t give unambiguous advice - rely on your own experience.
The next thing you can’t do without is the brackets on which the headlights will be mounted. For two pieces you need to pay about 700 rubles.
Next on the list is a kit for connecting PTF to Vesta. This includes the following:
- button on/off fog lights;
- contact relay;
- wires with plastic corrugation, all necessary connectors and adapters for connection;
- fuse 16 amp.
PTF connection kit
This set costs about 600 rubles.
Additionally, PTF lining is purchased (800 rubles for 2 pieces), if there is no desire to cut through the original one.
Cost of installation kit for connecting PTF
Many drivers, wanting to install additional equipment on their car, try to save money and do not turn to official dealers, but do everything themselves. To ensure that installing a PTF on a Vesta with your own hands does not turn out to be a failure, auto tuning companies or additional production companies. equipment and other components are produced in mounting kits. They include detailed instructions for proper installation and connection of headlights, wiring harnesses, connection board, standard center console switch button and power relay.
The following sets are common:
- set with article number 235816;
- “Assemble it yourself” set with active block (7ml19121801302);
- kit "DiaLUCH" (pv273-v1).
Using catalog kits helps you avoid buying counterfeits, gives you an understanding of headlights, and teaches you how to do it yourself, which can save you money.
About the standard set of fog lights
Have you decided to install the PTF yourself and want to maintain the warranty? At the moment, the only such way is to partially re-equip Vesta to a higher configuration; for this you will need to buy:
| Catalog number | Name | Approximate price, r |
| 261500097R (similar to FCR220029) | Anti-fog headlight | 3,000 (for 2 pieces) |
| 8450006983 | Front wiring harness assembly | 13 000 |
| 8450006277 | Left fog lamp bracket | 260 |
| 8450006276 | Right fog lamp bracket | 260 |
| 8450006924 | Steering column switch module | 6 800 |
| 231A08052R | Additional body electronics unit | 3 380 |
| 8450030715 | Instrument panel wiring harness | 22 100 |
It is worth noting that this cost does not include work on removing/installing parts. If you have an amount of 60-70 thousand rubles, then you can contact an official dealer about installing a PTF.
The main problem is that the electrical circuits of modern cars (including Vesta) differ from those used on earlier models (for example, Grant, Kalina or Priora). The standard PTF control on Vesta is implemented via a steering column switch, which does not have fixed positions for their activation. In addition, the signal to turn on the PTF from the lever does not go directly to the headlights, but goes first to the additional EMM body electronics unit, which is only available in the luxury package. And the indication that the fog lights are turned on in the instrument cluster works using a CAN bus signal.
Therefore, the easiest and cheapest way to install PTF on Vesta with minimal intervention in the electronics of the car is to use a separate circuit for connecting them, using a separate control button. This is discussed in more detail below.
How to turn on the fog lights on Vesta
Depending on the configuration of the Vesta, the foglights will be controlled differently. In the top version of the car, you can activate their operation by turning the ring on the left steering column switch. When you turn one notch, the headlights start working, and when you turn two, the front and rear lights start to work.
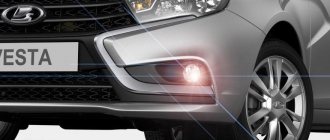
Fog lamp. Photo source: https://spares63.ru/catalog/optika_vaz/protivotumannye_fary_vaz/protivotumannye_fary_na_lada_vesta/protivotumannye_fary_na_lada_vesta_xray_original.html
In trim levels where there is no PTF in the database, owners have a choice of how to connect the PTF. The most common option is to connect via a button on the center console. For this purpose, the installation kits contain a block of buttons and a frame so that the owner himself can assemble and adjust the operation of the headlights. Another option for non-luxury versions is to buy a steering column switch assembly from the top-end Vesta.
Difficulties with installation
In this respect, Vesta is strikingly different from other models - Granta, Kalina and others. It is no secret that car owners do not want to lose their warranty, so they often turn to the dealer for installation. However, the price for such a service is excessive - it usually ranges from 64,000-70,000 rubles!
Dealer installation is too expensive.
The reason for the high cost is that in order to install PTF and maintain the right to warranty service, it is necessary to retrofit the sedan to a top-end configuration. Such measures involve the purchase of a whole set of components, some of which are quite expensive:
| Component | vendor code | Price, rub.) |
| Fog lights (2 units) | 261500097R (as an analog – FCR220029) | 3000 |
| Brackets (2 units) | 8450006276 and 8450006277 | 520 |
| Steering column switch module | 8450006924 | 6800 |
| Wiring Harness (Front) | 8450006983 | 13000 |
| Dashboard Wiring Harness | 8450030715 | 22100 |
| Add. electronics unit | 231A08052R | 3380 |
As you can see, the amount is impressive, even without taking into account the cost of the work.
The reason for this high cost is the complexity of installation, since the design of Vesta’s electronic equipment is strikingly different from those used on Priors, Kalinas and Grants. In the top version, sedans are equipped with fog lights, but they are controlled via a steering column switch, and it does not have a fixed position indicating the inclusion of fog lights.
Connection in the cabin is carried out according to all the rules - via the steering column switch.
Another complication is the additional electronic unit of the EMM type, which is available exclusively in the Luxury package. It is this that first receives information about turning on the PTF, and not directly to the headlights, as before. After this, via the CAN bus signal, information about the headlights being turned on is displayed on the dashboard.
Naturally, this option is too complicated and expensive, so car owners are not satisfied with it, and they are looking for a way to install it themselves.
How to adjust PTF on Vesta
A new car usually doesn't need any adjustments, but over time something goes wrong and the light hits the road unevenly. To correct this situation, the designers have provided the ability to adjust the PTF light level using an adjusting screw, accessible through a hole in the bumper. You can do this yourself by following the procedure:
- Place the car with the light on opposite the wall at a distance of about 5 meters.
- Place an assistant in the front seat or place a load weighing 70 kg.
- You need to make markings on the wall or place a screen to adjust the light.
- Cover one of the fogs with a sheet of cardboard to properly adjust the second one.
- Turn the adjusting screw through the hole in the bumper and align the upper limit of the light with the horizontal marking line.
- The same operation with the second fog.
If the adjustment is unsuccessful, you need to check the correct installation of the bumper, the housing of the fog lights and the light bulbs themselves and, if necessary, replace them.
Beginning the installation of the lighting kit
We remove the front bumper, carefully cut out holes with a diameter of 76 millimeters in the places where the plugs are located.
Requires a 76 mm cutter
A sharp knife with a harder blade or a metal crown of the appropriate size will come in handy. We insert the headlights into the holes, securing them to the right and left brackets using self-tapping screws 15–20 millimeters long.
We install a switch button inside the car; you can use a standard VAZ one from LADA 2114, placing it next to the vertical adjustment wheel for the optics. You can draw a conclusion to the standard switch from Vesta, which will be without fixation, located just below the audio system.
Installation of PTF lamp wiring.
We lead the wiring from the headlights through a metal corrugated box to the hole located in the area where the pedals are located. From there we draw output to the button.
How to install fog lights on Vesta with your own hands
Replacement or initial installation of PTF on Vesta should be carried out in specialized workshops, but if it is not possible to go there, then you can do the work yourself:
- Remove the button cover on the central panel above the climate control and dismantle the board.
- Replace the board with a four-button one and install all the buttons in place, including the new one for controlling the fog lights
- Remove the bumper by unscrewing 2 screws on the fender liners, 4 screws near the wings and the same number in front of the protection below.
- Next, unscrew the 2 screws numbered and 5 under the hood, but leave one to hold the bumper.
- By removing the clips under the headlights and disconnecting the ambient temperature sensor, you can unscrew the last screw of the bumper and remove it completely.
- In place of the plugs, install the cladding assembly.
- Attach the brackets to the press washers, and the headlights themselves to the screws, but the bottom one should be shorter so as not to damage the frame.
- First install the bumper and, using a set of radio components and electrics, connect the wiring according to the formula.
- Install a square-shaped relay, pulse if desired, into the fuse block, making a tap from fuse f10.
- Finally install the bumper.
When performing these operations, inexperienced car enthusiasts may encounter a number of problems.
↑ Preparing seats and attaching headlights
Markings are applied to the plastic bumper in accordance with the dimensions and configuration of pre-purchased fog lights. Many online sites offer a quick preview of the product before adding it to the cart; this is very convenient: you can make sure that the PTF lining matches and that it is equipped with all the necessary connectors for connecting to the on-board network. The insertion process itself is extremely simple: this is done using a special circular crown or using a regular stationery knife.
Important
When cutting holes in the bumper, you must act carefully and carefully so as not to damage the main structure and for personal safety.
The video below clearly shows how the headlight is attached to a specially installed bracket using self-tapping screws. There is no point in dwelling on this separately; additional information can be found in the comments thread (or leave your comment with a question). Connecting fog lights For installation into the on-board network, you will definitely need a set of wires to connect the PTF on the Lada. There will be no need for major alterations in the interior or on the center console; the only caveat is the installation of a clock button for controlling the fog lights on. The wiring is started through standard holes in the body (near the pedals), then you need to follow a certain sequence of actions so as not to spoil or burn anything. The voltage to power the relay (+12V) is supplied directly from the battery; a 16A fuse must be included in the open circuit. The relay is located in any convenient place - under the hood and in the cabin. The button can receive voltage from the fuse block (dimensions or cigarette lighter). There is another connection method that is simpler than adjusting the rear disc brakes or the transmission maintenance system, repairing the radiator for the Lada Xray. It is borrowed from the factory design of the Vesta sw cross in the luxury configuration. You will definitely need to select a steering column switch from Renault from the products with quick viewing; using it instead of standard Lada spare parts allows you to block the inclusion of PTF with side lights. The modification boils down to powering the headlights from a different group of contacts, but this will require soldering skills and experience in installing radio components. Cost of the kit The price of PTF does not depend on the lining, engine power and year of manufacture of the car. It is unlikely that you will be able to save significantly; the cost of headlights at dealers varies slightly by region, just like for radiator grilles for Datsun or Largus. Approximately, it amounts to 50 thousand rubles (without the cost of work) when installed according to the standard scheme (with steering column shift). In return, the car owner will receive the advantage of confident driving even in February or August, regardless of weather conditions. Fog lights are just as important as a working brake system and a working transmission; this rule applies to all cars, including new ones. Recently, many owners, both the elderly Lada Priora and the relatively young Vesta, have been striving to change and improve something in their car: install various accessories on the trunk, replace the radiator grilles, and also adapt a hinged roof rack for the Granta. This also applies to self-installation of PTF, Kalina body electronics unit or brake adjustment. It’s easy to purchase the necessary spare parts online: just write a request, and a manager will contact the client within an hour. After agreeing on the purchase, the cladding parts are added to the cart and sent to form the order. It is also easy to keep track of news about Lada Vesta by adding the comparison page and saving contacts in your browser bookmarks. And self-selected, installed spare parts save money, increase self-esteem and inspire confidence in your own abilities.
Fog lights on the Lada Vesta are an integral part of the appearance and a necessary detail. Their main purpose is to provide the driver with good visibility of the road, even in conditions such as fog, heavy rain, snowstorm, etc.
On most of the latest models of the domestic automobile industry, PTFs are not installed by the factory on all modifications, but special holes and fastenings are provided for their installation. The exception is the Lada Vesta model. Factory fog lights are not suitable for everyone. Also, the quality of their lighting is average. Therefore, many owners of this model try to replace the factory headlights with better ones.