According to many years of experience of various car enthusiasts, replacing the cylinder head of a VAZ 2109 is most often associated with problems arising with the gasket. But there may be others that can cause the engine to overheat or even seize.
Every driver can repair and modify the cylinder head on a VAZ 2109, but special tools and a little knowledge of the operating principle of this unit are required. Recently, tuning of this unit has become increasingly popular, due to which the power of the car increases. Carrying out tuning yourself is possible if you have experience in such work. Working with valves and actuators requires specialized knowledge and skills.
What kind of oil should I use and how much?
Owners of the VAZ 21099 (and its modifications with 1.3 and 1.5 liter engines) often fill in semi-synthetic oils with a viscosity of 10W-40. A smaller part (but still there is one) prefer to use synthetics with a 5W-40 class.
The manufacturer recommends maintenance every 15,000 km. In practice, owners try to change the engine oil at 8-10 thousand. If you choose something in between these numbers, it will be the “Golden Mean”, but of course everyone decides for themselves.
When purchasing, be guided by a filling volume of 4 liters, because... the engine consumes a little more than 3 liters at a time. Do not forget to leave at least 0.5 liters for daily monitoring and, if necessary, topping up the level in the engine.
The choice of a particular company is not important; for “Ninety-Ninth” you can buy both oils from the middle and low price ranges. Here are some of the many products on sale today.
- G-energy 10w40;
- Totachi Touring 5w40;
- Sibi MOTOR 5W40;
- Motul 5W40 300V;
- Eni i-sint 10w40 and many others.
Along with the fluid, the oil filter also needs to be changed. Today, many manufacturers are available for sale at low prices.
- 0 451 103 274 BOSCH ~$4;
- 2108-1012005 AG Auto Parts ~ $1.5;
- 2108-1012005 WIX ~ 2.5$;
- MANN W914/2 ~ 5$;
... and a large number of other filters that can be found on the Internet today.
Assembling the cylinder head of a VAZ 2109 Lada Samara
- Repair manuals
- Repair manual for VAZ 2109 (Lada Samara) 1987+.
- Cylinder head assembly
| Valve pusher with installed shim. | |
| The position of the cams of the first cylinder when installing the camshaft on the cylinder head supports. |
Warnings
Before installing the camshaft, place wooden blocks under the cylinder head to avoid damage to the valves.
The intake manifold and exhaust manifold gaskets are supplied as replacement parts and are made of different thicknesses, so when installing new gaskets, make sure they are the same thickness.
Do not over-tighten the spark plugs as this may cause cracks in the spark plug insulator. The tightening torque of the spark plugs is 31-39 N m (3.1-3.9 kgf m).
EXECUTION ORDER↓ Comments ↓1. Description of the car 1.0 Description of the vehicle 1.1 Appearance 1.2 Engine compartment 1.3 General data 1.4 Technical characteristics 1.5 Passport data 2. Vehicle operation 2.0 Vehicle operation 2.1 Safety rules and operating recommendations 2.2 Side doors 2.3 Trunk lid 2.4 Opening and closing the hood 2.5 Luggage compartment 2.6 Adjusting the front seats 2.7 Controls 2.8 Interior ventilation and heating 2.9 Eliminating fogging or frosting of windows 3. Vehicle maintenance 3.0 Vehicle maintenance 3.1 Checking the tightness of the engine and gearbox seals 3.2 Checking the tightness of the cooling system 3.3 Checking the tightness of the fuel system 3.4 Replacing the coolant 3.5 Replacing the oil filter and engine oil 3.6 Replacing the air filter filter element 3.7 Checking and adjusting the generator drive belt 3.8 Replacing the belt generator drive 3.9 Cleaning and flushing parts of the crankcase ventilation system 3.33. Replacing lamps 4. Car care 4.0 Car care 4.1 Car washing 4.2 Caring for and restoring body paint 4.3 Body lubrication 4.4 Cleaning drainage holes 4.5. Car storage 4.6 Preparing for winter use 4.7 Tips for starting the engine in severe frost 4.8 What is useful to buy for winter 4.9 Tips for winter use of the car 5. Problems along the way 5.0 Malfunctions along the way 5.1. Engine 5.2. Checking electrical equipment 5.3 Extraneous knocking noises appeared 5.4 Vibration and shock on the steering wheel 5.5. Brake problems 5.6 Wheel puncture 6. Chassis 6.0 Chassis 6.1. Front suspension 6.2. Rear suspension 7. Steering 7.0 Steering 7.1 Steering wheel 7.2 Steering column 7.3 Steering mechanism 7.4 Replacing steering rods 8. Brake system 8.0 Brake system 8.1 Front wheel brake 8.2 Rear wheel brake 8.3 Wheel cylinder 8.4 Brake drive 9. Electrical equipment 9.0 Electrical equipment 9.1 Relay and fuse box 9.2. Generator 9.3. Starter 9.4. Lighting and light signaling 9.5. Heater 9.6. Windshield wipers 9.7 Sound signal 9.8. Ignition system 9.9 Instrument panel (high) 10. Body 10.0 Body 10.1 Replacing the front buffer 10.2 Replacing the rear buffer 10.3 Replacing the radiator trim 10.4 Replacing the front fender 10.5 Removing and installing the hood 10.6 Adjusting the hood 10.7 Adjusting the hood lock 10.8 Front door 10.9 Rear door 11. Engine and its systems 11.0 Engine and its systems 11.1 Removing and installing the engine 11.2 Adjusting the clearances in the valve drive 11.3. Power supply system 11.4. Lubrication system 11.5. Cooling system 11.6. Exhaust system 11.7 Complete disassembly of the engine 11.8 Cylinder block. Inspection, troubleshooting and repair 11.9 Piston with connecting rod. Disassembly, troubleshooting and assembly 11.10. Cylinder head 11.15. Carburetor adjustment 12. Transmission 12.0 Transmission 12.1 Gearbox and differential. Main components and parts 12.2 Removing the gearbox 12.3 Installing the gearbox 12.4 Adjusting the clutch drive 12.5 Disassembling the gearbox 12.6 Inspecting and troubleshooting gearbox parts 12.7. Secondary shaft of the gearbox 12.8 Primary shaft of the gearbox 12.9. Differential 12.16. Clutch drive 12.17. Front wheel drive 13. Applications 13.0 Appendices 13.1 Appendix 1. Basic data for adjustments and monitoring 13.2 Appendix 2. Fuels and lubricants and operating fluids 13.3 Appendix 3. Tightening torques for threaded connections 13.4 Appendix 4. Service book 13.5 Appendix 5. Vehicle electrical diagram |
Removing the cylinder head on a VAZ 2109
- Disconnect the negative terminal from the battery.
- Drain the coolant into a plastic container.
- The exhaust pipe should be disconnected from the exhaust manifold.
- Remove the receiver with the throttle assembly (VAZ-2111). You also need to dismantle the carburetor (VAZ 21083), intake and exhaust manifolds (but you can do without this).
- If the work is performed on a VAZ 2111, you need to disconnect the “mass” wires attached to the left end of the head. Remove the fuel rail with fuel pipes and injectors.
- Disconnect the high voltage spark plug wires. Then we disconnect the coolant sensor connectors and remove the oil pressure level.
- On the VAZ-21083 the housing of the auxiliary units must be removed.
- Next, the housing of the auxiliary units, the distributor sensor, and the fuel pump are dismantled.
- First remove the timing belt. Then remove: the tension roller and the spacer washer. Next, you need to remove the camshaft timing pulley.
- Unscrew the rear mounting nut securing the timing cover to the cylinder head.
- Remove the cylinder head .
- Use a Phillips screwdriver to loosen the clamps, then you need to disconnect the hoses from the cylinder head exhaust pipe one by one.
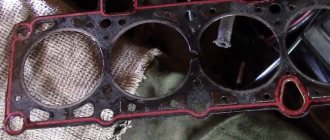
How to remove the cylinder head on a VAZ 2109. Replacing the cylinder head gasket with your own hands
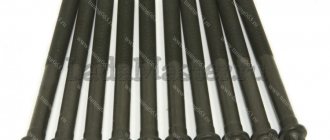
- Unscrew the 10 bolts that secure the cylinder head using a 10mm hexagon.
How to remove the cylinder head on a VAZ 2109. Replacing the cylinder head gasket with your own hands
- Remove the screws and washers.
How to remove the cylinder head on a VAZ 2109. Replacing the cylinder head gasket with your own hands
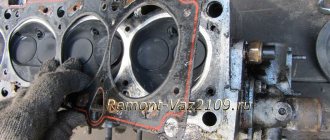
- Remove the cylinder head with gasket.
How to remove the cylinder head on a VAZ 2109. Replacing the cylinder head gasket with your own hands
VAZ 2109, 2108, 21099 - replacing the cylinder head gasket, video
Replacing the cylinder head gasket (Cylinder Head) in the engines of VAZ 2109, 2108, 21099 cars, do it yourself. Quite a labor-intensive procedure. If you are not confident in your abilities, then it is better not to start. The video is given without comments; the entire process of replacing the cylinder head gasket is described step by step below. For example, we have a carburetor engine VAZ 2108.
1. Disconnect the negative from the battery terminal. 2. Disconnect the wiring from the sensor responsible for the coolant temperature. 3. We pull out the wire from the sensor responsible for oil pressure. 4. Set the piston of the first cylinder to the TDC and compression position. 5. Drain the coolant. 6. Remove the thermostat. 7. Remove the muffler exhaust pipe from the exhaust manifold. 8. Remove the air filter. 9. Pull out the front camshaft drive belt cover. 10. Pull out the block head cover. 11. To prevent the camshaft gear from turning, insert a screwdriver against the pin, then loosen the bolt securing the camshaft gear. 12. We remove the drive belt from the camshaft gear, tension roller, and water pump toothed pulley, then move the belt to the side. 13. We unscrew the bolt securing the camshaft gear; it must be removed together with the washer. 14. Using two screwdrivers or other tool convenient for you, remove the gear from the camshaft
This procedure can damage the camshaft seal, so be careful. 15
Disconnect the fuel hose from the pump. 16. We take out the hoses and drive from the carburetor, the choke drive rod and the throttle drive cable. 17. Disconnect the high-voltage wire coming out of the ignition distributor cover. 18. Use a screwdriver to press out the spring clamp, while disconnecting the block with low-voltage wires from the ignition distributor terminal. 19. Disconnect the vacuum corrector tube of the ignition distributor. 20. Pull out the vacuum booster hose from the engine intake pipe. 21. Disconnect the radiator from the water cooling jacket pipe. 22. Disconnect the heater hose by loosening the clamp. 23. In the same way, disconnect the heater hose corresponding to the outlet.
Video of replacing the cylinder head gasket on VAZ 2109, 2108, 21099:
All these points for removing the cylinder head gasket on the VAZ 2109, 2108, 21099 are shown in detail in the video. As you already understand, the work is not easy and will require you to have professional knowledge in auto repair. The cylinder head gasket is almost the same, with the exception of some details that change on injection engines.
Video “How to remove the head on a VAZ car”
In this video, the master will show you how to correctly and quickly remove the cylinder head on a VAZ 21099 with your own hands. On a VAZ 2109 car, the head is removed in the same way.
Recent Entries
Judging by VW Group vehicles, there's no end in sight for owners
The Kangarooing problem with manual 1.5 TSI Evo cars has been going on for seven months; VW admits the problem but has no solution
Tesla Model 3 sets new electric car cannonball launch record
BYD - ADL celebrate over 100 double decker bus sales in UK
Cooling immersion battery concept for electric vehicles
Categories
Test Drive
Repair of the Cylinder Head of the VAZ 2109 Video
Main repair of cylinder block on VAZ 2109 at home
According to many years of experience of various car owners, replacing the cylinder
VAZ 2109 in most cases is associated with problems with gaskets. But there will be others that will cause the engine to overheat, as it is called, even seize.
Any driver can repair and refine the cylinder head on a VAZ 2109, but special tools and some knowledge about the operating mechanism of this unit are required. Nowadays there is more and more tuning of this unit, which increases the power of the car. Home setup. option if you pass if you have experience in similar work. Working with valves and cylinders requires special knowledge and skills.
What is a cylinder head
The VAZ 2109 cylinder head is a special block, the main purpose of which is to close the cylinders
. Directly attached to the block using special bolts. The cylinder head is important because it is a direct participant in numerous processes during engine operation. The cylinder heads of automobile transmissions produced today are quite complex and assembled with a large number of parts.
When is the time to change?
- The cylinder head may need to be replaced or repaired if you notice increased fuel consumption or decreased power from the powertrain.
- In addition, malfunctions in the cylinder head system can result from improper assembly and installation of valves and cylinders.
- If you constantly fill your car with low-quality gasoline, do not be surprised that over time this system will begin to fail and will need to be repaired.
- Cracks in the block cannot be eliminated by any other means than completely replacing this element.
- A symptom indicating a problem in the cylinder head may be white smoke coming from the exhaust pipe, which is caused by antifreeze entering the engine cylinders.
White smoke from the exhaust pipe
If oil stains appear on the surface of the coolant in the tank, this also indicates the need for repair of the unit. This is due to the fact that oil somehow began to get into places where it shouldn’t be. It is not uncommon, but sometimes, exhaust gases begin to leak through the gasket. There is no other choice but to remove the head and replace the gasket. Removing the head may be necessary when adjusting the VAZ 2109, modifications, problems with plugs, exhaust bolts or cylinder holes.
Stages of work
As we already said, the replacement process is simple, but if you decide to take it for the first time, it is better to invite someone with experience in this business. You may also need help if you decide to improve the performance of your VAZ 2109 engine by tuning it using channels. Replacing forks also needs some extra help. In this case, some skill is required to remove the old plugs and install the new ones correctly.
Cylinder head repair
VAZ car
2108-
2109
. Replacement of burnt valves. Replacing guides.
collar; screwdriver.
Process
Before you start removing and repairing the VAZ cylinder head 2109
, To carry out any preparatory work, it is necessary to follow the order.
Breeding
- First of all, remove the air filter housing.
Disconnect the hoses and wires from the carburetor or injector.
Next, remove the pants from the manifold. We are hiring a distributor. Unscrew the valve cover. Remove the carburetor and manifolds. To unscrew the bolts on the head of a VAZ 2109, most likely you will need a clamp and a hexagon, because the bolts are tightened with decent force.
The pipe is like a lever. Remove the washers that secure the head.
Remove the VAZ 2109 cylinder head from the power unit. Remove the gasket. Gasket that has expired and requires replacement
settings
Experienced setup, refinement and customization supervisors
VAZ 2109 will help you fully unleash the power of your device. You've probably heard a lot about it, read about it, or even watched videos online. Typically, when tuned, the channels become dull and smooth, which reduces turbulence and reduces power. The valves are replaced with larger ones and rubbed into the seats. An adjustment may also mean replacing the standard valve guides with bronze ones.
Shut-off valves
The circuit is controlled as follows:
the assembled head lies on its side;
If fluid does not flow through the valves, it means the job was done efficiently and the valves are flushed correctly. After troubleshooting, you can begin installing the head.
Puff
Reassembling the unit if you strictly follow the instructions for dismantling work will not pose any particular problems.
An incredibly important aspect of replacing the cylinder head gasket and all other activities associated with removing the head is the correct adjustment and tightening of the bolts.
Tightening the bolts is done strictly with a torque wrench, which will allow you to control the tension torque.
Here are some guidelines for using this specialized wrench and checking the current tension condition:
- Place the holder in the zero position. This will indicate that now the key data is equal to the moment of the original position;
- Look at the torque tool readings as you begin to tighten the bolts;
- Rotate the holder, monitor the indicators;
- If the torque does not change, the fastener may be stretchable, which is normal. This is exactly what should happen;
- If the torque increases rapidly, bolt movement should be achieved. That is, the stretch of the holder is small, it needs to be stabilized.
Golden rules of tightening
To properly reassemble the cylinder head, you need to adhere to the golden rules:
- Strictly follow the tightening torque data corresponding to the VAZ 2109;
- Make adjustments only using a torque wrench. Other tools do not allow you to get the desired result;
- To install the cylinder head, use only serviceable bolts that meet the requirements of your engine installed on the VAZ 2109;
- Before work, make sure that the holders are in good condition.
Checking the bolts
Also check out
- When disassembling the valve mechanism, it is necessary to place a wooden block under the valve plate.
- Dry the valve. Remove it from the cylinder head guide bushing.
- Using a key “13”, unscrew the 2 nuts securing the inlet pipe.
- Remove the gasket and pipe.
Assemble and install the cylinder head in the reverse order.
Recommendations :
- Valve stems with engine oil. The same applies to guide bushings.
- Before installation, remove dirt, oil, and remnants of the old gasket from the surface of the cylinder block.
- The cylinder head gasket should be replaced using two special centering bushings.
- Install the mounting screws; the diagram below shows 4 steps on how to tighten them.
- The first tightening torque of the screws is 20 N.m (2 kgf.m);
- The second - with a moment of 69.4–85.7 N.m (7.1–8.7 kgf.m);
- The third - with an extension of 90°;
- The fourth is to turn the screws 90°.
Also check
- When removing the valve train, place a block of wood under the valve plate.
- Enter the valve. Remove it from the cylinder head guide sleeve.
- Unscrew the 2 nuts securing the inlet pipe using the “13” wrench.
- Remove the gasket and pipe.
Reassemble and install the cylinder head in reverse order.
Recommendations :
- The valve is connected to the engine oil. The same applies to guide bushings.
- Before installation, remove dirt, oil, and old gasket remnants from the surface of the cylinder block.
- Replacing the cylinder head gasket is then followed by two special central bushings.
- Install the mounting screws, the diagram below shows 4 ways to tighten them.
- The first tightening torque is 20 nm (2 kgf);
- The other is with a torque of 69.4–85.7 Nm (7.1–8.7 kgf);
- The third is with 90° coverage;
- Fourth, turn the screws 90°.
READ How to Unlock Radio Opel Vectra
Removing the cylinder head from the cylinder block
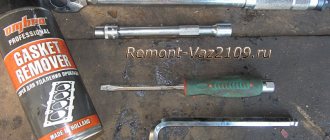
To remove the cylinder head from the cylinder block, you will need tools. Some of them can be found in almost every garage (screwdrivers, keys), some can be made from scrap materials (knob lever), bought or borrowed. It is necessary to have a torque wrench that ensures that bolts and nuts are tightened to a predetermined torque. As long as the torque resistance of the bolt to tightening does not exceed the specified value, the wrench works, and as soon as the resistance reaches the specified value, the tool will begin to slip through the ratchet.
To remove the cylinder head from the block, it is necessary to free the engine from the interfering attachment. The procedure is as follows:
- remove the air filter;
- if the engine is carburetor, disconnect the carburetor; if it is an injection engine, disconnect the injector;
- disconnect the pants from the manifold;
- remove the distributor;
- unscrew the cylinder head cover;
- remove the carburetor and manifolds.
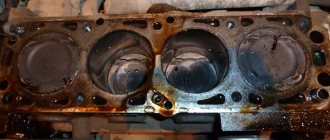
Now proceed to dismantling the cylinder head. Start unscrewing the bolts. Use a crank lever, as the bolts are tightened with great force, and also become stuck under thermal and mechanical loads. Place the amplifier lever on the knob and remove the bolts. Remove the lever from the knob and unscrew all 10 bolts. Carefully lift the head and remove it from the block.
The gasket may remain stuck to the block or the head, do not fight for its integrity, because it is being replaced. Fight for the safety of the contact surfaces of the head and block. In difficult cases, the stuck fragments should be soaked with a special compound.
After completely removing all gasket fragments, degrease the surfaces of the block and head with gasoline.
Ridiculous cases
If the engine seizes, signs of thickened oil may indicate sugar entering the system. Similar consequences occur when stirring a raw egg, which, when the motor is running, will certainly heat up and weld all the channels. How the latter substance enters the system is known only to the owner of the car.
Sugar can be poured into the fuel by ill-wishers through the refueling hatch. There are many substances that change the composition of the oil. It happens that a driver may mistakenly pour a mixture that is lethal to iron into the engine neck.
A malfunction where coolant penetrates into the oil can also lead to jamming of the rubbing metals. This can be noticed when measuring the level using the dipstick. The changed composition is noticeable to the eye and to the touch: by color, viscosity, and the presence of foam. A whitish tint indicates a loss of oil quality.
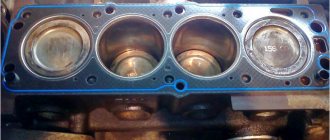
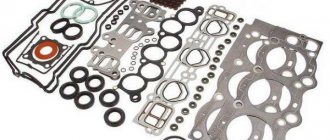
Replacing the cylinder head gasket for a VAZ 2109
The cylinder head gasket is the most important gasket in the engine. Any inaccuracy during its installation or, moreover, manufacturing, leads to the inevitable death of the engine. Without exaggeration, we can say that the head gasket delimits the engine lubrication system, the cooling system and seals the combustion chambers. If you give the gasket some slack, the engine will at least knock or jam.
Why do we need and what are head gaskets made of?
The cylinder head gasket must be replaced when the head is removed. The gasket, although expensive, is a consumable item and cannot be restored or reused. The gasket has to withstand enormous loads. Both thermal and mechanical. The temperature in the combustion chamber can reach 1200°C, and in the VAZ 2106 it is no less than 1000°C, so the requirements for the material from which the gasket is made are very high.
The heat-resistant gasket is made of asbestos-containing material, which does not collapse or change its structure when exposed to high temperatures. Asbestos was banned for use in automotive technology, so it is now being replaced with new materials, but more often than not, the asbestos content is simply not indicated on the packaging of the gaskets. Ceramic gaskets are expensive, so they are used only on expensive cars, to which the nine has nothing to do.
In addition to the thermal load, the gasket must withstand the severe pressure that forms in the combustion chamber, as well as ensure sealing of the oil channels and cooling system channels. To do this, the head gasket must have a certain elasticity and strength. Tensile strength is given to it by reinforcing materials, which most often are thin steel wire.
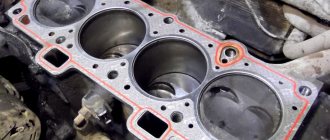
Signs of a broken gasket on a VAZ 2109
There are no regulations for replacing the gasket, since a good and well-made part can serve for quite a long time until the head is dismantled. But it is necessary to monitor its condition, and the difficulty is that damage to the gasket rarely manifests itself externally. Oil drips and antifreeze drips may not always indicate gasket damage. But there are a number of unconditional signs that the gasket needs urgent replacement.
- Suspension in the engine crankcase. This is determined by checking the oil level. Instead of clear or even dark oil, a watery, dark brown suspension appears on the control dipstick. The coolant can be forced into the lubrication system, where it mixes with the oil, but the mixture may not be homogeneous and looks like a suspension. The first sign of antifreeze leakage into the crankcase is an increasing oil level.
- Oily spots in the coolant expansion tank. The same story - oil got into the antifreeze, but it cannot dissolve there, so it looks like stains on the surface. This is also a signal that the gasket is broken.
- A drop in compression in a particular cylinder or in two adjacent ones. Most often this happens when the gasket is simply of poor quality and burns out in the place where the cylinder is sealed. It can burn out anywhere, along the perimeter of the combustion chamber - both outside the block and into the channels. External burnout can be heard immediately by sound. Therefore, such a nuisance must be eliminated immediately.
How to replace the VAZ 2109 block gasket
Replacing the cylinder head gasket of a VAZ 2109 is carried out according to the same scenario as on the eight, on VAZs of the tenth series, since the engine designs of these cars differ very slightly from each other. We will present the procedure for replacing the gasket schematically, since there is no need to describe the unscrewing of each bolt, and everyone has a Murzilka in the glove compartment. We will dwell only on the most important points that cannot be neglected in order to avoid failure of the entire motor.
Adjusting the bolt torque
In order to do everything correctly and avoid mistakes, you must strictly adhere to certain rules and follow the order of execution.
Tightening should only be done with a special torque wrench, which allows you to control the tightening torque.
Torque wrench
First, using a torque wrench, set the holder to the zero position. This means that the device data is equal to the moment of the original position. Then, you need to look at the indicator of the device when starting the fastener. Rotating the holder, we monitor the indicators. If the moment has not changed, this means that the fastener can be stretched and this is normal, as it should be. If the torque increases rapidly, bolt movement must be achieved. This indicates low stretch of the holder. This means stabilization is needed.
While the vehicle is running, the bolts that secure the cylinder head are constantly experiencing various impacts. They constantly heat and cool, which over time leads to the destruction of the structure of the fasteners.
For all power units there are specific rules that must be followed during operation:
- Strictly follow the data specified in the practical manual for the VAZ 2109.
- Adjustment is carried out only with a torque wrench. The use of another device will not allow this work to be performed correctly.
- Use only good bolts. Replacement bolt kit
- When starting to work, be sure to check the condition of the holders.
- Strictly adhere to the tightening torque values recommended by the manufacturer.
The most important data regarding adjustments is in the annotation for each specific car. As a result, you must carefully study and adhere to what is written in it. During operation of the vehicle, you must strictly comply with all manufacturer's requirements and systematically diagnose the car. Correct and smooth operation of the VAZ 2109 power unit prevents the need to adjust the cylinder head holders.
Since the cylinder head of the VAZ 2109 is a complex unit, it is necessary to carry out repair work only with absolute confidence in your actions. Strictly observing the order of work. If a deviation in the operation of the motor is detected, immediately carry out diagnostics. This will avoid more expensive repair work.
Required Tools
- torque wrench;
- caliper or ruler.
Tightening diagram
The cylinder head tightening pattern is the same as on traditional models and you need to start from the center. It takes place in four steps.
The diagram according to which the VAZ 2109 should be pulled
- tightening torque 2.0 kgf/m
- tightening torque 7.5 - 8.5 kgf/m
- turn it 90 degrees.
- turn it again by 90 degrees.
To make it clearer, let’s describe this process in more detail:
- Using a torque wrench, tighten the bolts in the sequence shown in the figure to 2.0 kg/cm.
- Then we go around the second circle and reach 8 kgf*m.
- Next, twist it 90 degrees.
- We go around the second circle, twisting another 90 degrees.
Proper lift
Attention! On 16-cl power units, bolts can be reused, but if their length is no more than 95 millimeters.
Otherwise it changes. The length is measured along with the washer. Do not try to replace the torque wrench with another device, otherwise the consequences may be unpredictable.
Reasons for increased engine oil consumption by a car engine
Using the example of carburetor engine 21083 of a VAZ 21083 (21093, 21099) car, we will try to identify the culprits for increased engine oil consumption. We will also find out what can be done about this problem.
For the carburetor engine 21083 of VAZ 21083, 21093, 21099 cars, the maximum permissible oil consumption is 1 liter per 10,000 km. If this norm is exceeded, you should look for the reasons for the increased oil consumption.
The reasons may be different, but first of all you should start with a visual inspection of the engine seals (oil seals, gaskets, etc.) since even a small and unnoticeable oil leak ultimately leads to a periodic drop in its level in the car’s engine sump. Also, it is worth noting that measuring the oil level should be carried out on a level surface (preferably always on the same one); a warm engine should be allowed to cool for half an hour so that the oil flows down.
Reasons for increased oil consumption by the engine 21083 of VAZ 21083, 21093, 21099
Oil leaks through engine seals
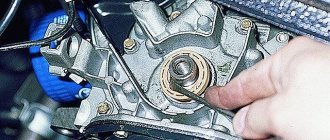
Inspect places where oil may leak from the car engine: front and rear crankshaft oil seals, valve cover gasket, camshaft oil seal. Replace worn seals.
The crankcase ventilation system is clogged
Excessive pressure is created inside the engine, which squeezes oil through its seals. Clean and rinse the elements of the crankcase ventilation system.
Occurrence (coking) of piston rings, or their sedimentation after engine overheating
In this case, a large volume of gases breaks into the engine crankcase, again creating excess pressure there, which, as in the first case, squeezes the oil through the engine seals. In addition, some of the oil not removed by the oil scraper rings burns in the combustion chambers. Fill the cylinders with 10 cm/cube of motor oil mixed with acetone and kerosene in equal parts. Let stand for several hours (you can leave it overnight). Then let the engine run for a while. The rings should decarbonize. Piston rings that have settled and cannot be decoked will have to be replaced.
After decoking, it is necessary to replace the engine oil with new one.
Broken or worn piston rings
The consequences will be the same as in the previous case. The cause of the malfunction can be identified by measuring the compression in the engine cylinders. In those where there is no required standard (compression less than 9 kg/cm), the rings may be faulty. Pour 10 cm/cc of engine oil into the cylinders and measure the compression again. If the compression has increased, change the rings or decarbonize them. If it remains the same, the valve stem seals are faulty. Replace broken and worn rings.
Worn or damaged valve stem seals
The malfunction can be identified using the method described above - by measuring compression. Inoperative caps should be replaced.
The following pattern can also be observed: when the piston (rings, cylinders, pistons) are worn, there is constant smoke from the muffler, when the oil seals are worn, only when the gas is overloaded.
Worn valve stems and/or valve guides
Perhaps the engine has a long service life, or low-quality engine oil or low-quality parts were used during repairs. This implies either a major overhaul of the valve mechanism or replacement of the engine block head.
Wear of the piston group (cylinders and rings)
After one hundred thousand kilometers, the 21083 engine may require a major piston overhaul. Under gentle operating conditions and compliance with maintenance and repair requirements, this period can be extended to 200-250 thousand kilometers. In any case, a worn piston will constantly reduce the oil level in the engine sump.
Notes and additions
Signs of a malfunction of the piston as a whole or the piston rings and (or) oil seals of the engine are: increased smoke from the breather of the ventilation system, bluish smoke from the muffler, crankcase, unevenness (popping) of the smoke stream coming out of the breather, heavy oiliness of the spark plugs, oil in the air filter housing .