Burnout of the gasket under the cylinder head on VAZ 2109-2108 cars is the most common reason why the head has to be removed from the engine, and accordingly with further repairs, or rather, replacement of the gasket. If this problem is not noticed in time, it can lead to quite sad consequences, since the engine can overheat and even jam.
The procedure itself for removing the cylinder head and replacing its gasket is not complicated, but at the same time it requires certain technical skills and a small number of tools, the list of which is given below:
- Hex or similar bit with adapter for use with wrench
- Torque wrench - in this case I used the Ombra model with a range from 10 to 110 Nm, which is quite enough
- Flat screwdriver
- Extension
- Gasket Remover
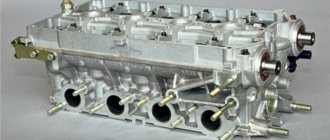
Procedure for replacing the cylinder head gasket on a VAZ 2109-2108
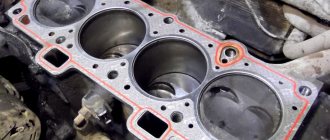
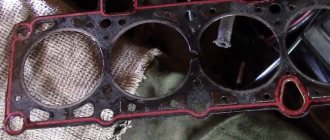
The gasket may remain either on the surface of the head or stick to the block itself. You can try to remove it by hand without using any tools, and if that doesn’t work, you can carefully pry it off with a flat-head screwdriver without damaging the surface of the part.
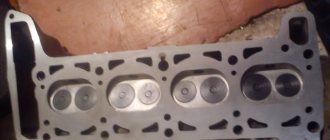
Carefully inspect the surface of the cylinder head and if pronounced traces of corrosion are found on it, especially in close proximity to the coolant channels, then it is necessary to repair it: milling, grinding, etc. If everything is normal, then we remove traces of the old gasket using special means:
We wait a few minutes until the whole thing has cooled down and remove the residues that have not succumbed to the chemicals, if any remain, with a razor blade. Then we wipe everything dry and you can even degrease it so that no foreign traces remain on the surface:
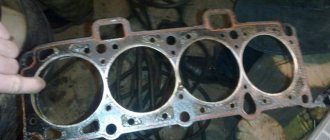
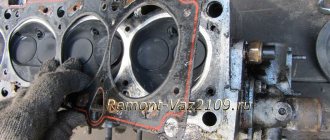
The engine block also needs to be cleaned and then a new gasket installed on it. It is important that the holes in the gasket coincide with the guides, which are located at the corners of the block:
Replacement
To change the gasket, you will need to dismantle the assembly, get rid of the worn cylinder head gasket and reassemble the structure in the reverse order, following the recommendations regarding the tightening torques of the cylinder head bolts. We will tell you about all this in more detail.
- Disconnect the wiring from the coolant temperature sensor and emergency oil pressure sensor.
- Remove the thermostat, just remember to drain the coolant first.
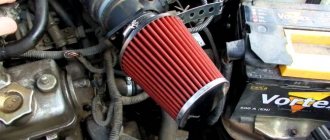
- Remove the air filter housing. There is no need to remove the carburetor, because it will not interfere with replacing the gasket.
- Disconnect the exhaust pipe from the exhaust manifold.
- Remove the camshaft drive gear after first setting the piston of the first cylinder to the TDC position. Now you can remove the protective casing of the camshaft drive belt, loosen the gear fixing bolts, securing the gear from turning.
- Remove the camshaft drive belt. Then you can completely unscrew the mounting bolts and remove the gear.
- Press the latch to disconnect the wiring block from the ignition distributor.
- Similarly, turn off the central high voltage.
- Loosen the clamps to remove the fuel supply hose from the fuel pump.
- Disconnect the throttle and air damper drive rods from the carburetor.
- Disconnect the power supply from the solenoid valve.
- Remove the vacuum booster hose from the intake pipe fitting.
- Disconnect the tube from the vacuum ignition corrector.
- Loosen the tension on the clamps to remove the interior heating hoses from the pipes.
- Remove the cylinder head. Using a socket with an extension, the mounting bolts are unscrewed.
- Rock the head a little jerkily, then remove the element.
- Remove the old gasket, clean it of any remaining rubber seal and other contaminants. Wipe dry thoroughly, after which you can reassemble.
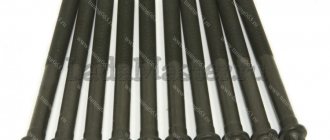
- Before assembly, check whether the length of the cylinder head bolts is within the normal range. Ideally, their length is 135.5 millimeters. If the bolts have lengthened during use, then all bolts will have to be replaced.
Replacement procedure
Reinstalling the head
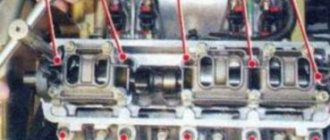
Now you can carefully install the cylinder head in its place, making sure that at this moment the gasket does not slip out or move to the side. Of course, the guides fix it, but you should still be extremely careful.
Next, we will need a torque wrench, since the bolts will have to be tightened with a certain torque. It is also worth keeping in mind that the tightening order must be observed. The diagram below shows the sequence in which to twist:
Now regarding the force with which it is necessary to tighten the bolts. This should be done in 4 steps:
- First, a torque of 20 Nm
- Second reception with a torque of 75-85 Nm
- Tighten each bolt another 90 degrees.
- Finally turn it 90 degrees.
After this, all that remains is to install all the equipment removed from the car, fill in the coolant, connect all the sensors, wires and hoses and check the work done. Usually everything becomes visible immediately after pouring antifreeze. If wet marks appear at the junction of the head and block, you can take everything back and do the whole job again! But I hope that this will not happen in your practice! Happy renovation!
Puff
Reassembling the unit if you strictly follow the instructions for dismantling work will not pose any particular problems.
An incredibly important aspect of replacing the cylinder head gasket and all other activities associated with removing the head is the correct adjustment and tightening of the bolts.
Tightening the bolts is done strictly with a torque wrench, which will allow you to control the tension torque.
Here are some guidelines for using this specialized wrench and checking the current tension condition:
- Place the holder in the zero position. This will indicate that now the key data is equal to the moment of the original position;
- Look at the torque tool readings as you begin to tighten the bolts;
- Rotate the holder, monitor the indicators;
- If the torque does not change, the fastener may be stretchable, which is normal. This is exactly what should happen;
- If the torque increases rapidly, bolt movement should be achieved. That is, the stretch of the holder is small, it needs to be stabilized.
Golden rules of tightening
To properly reassemble the cylinder head, you need to adhere to the golden rules:
- Strictly follow the tightening torque data corresponding to the VAZ 2109;
- Make adjustments only using a torque wrench. Other tools do not allow you to get the desired result;
- To install the cylinder head, use only serviceable bolts that meet the requirements of your engine installed on the VAZ 2109;
- Before work, make sure that the holders are in good condition.
Checking the bolts
Tightening diagram
In addition to observing the required tightening torques for the cylinder head mounting bolts, one more rule must be observed here.
Returning the bolts to their places is carried out strictly according to the diagram below.
Tightening sequence
Next, do the work according to the table, and you will do everything right.
Tightening is performed in four circles, following the sequence of work with the mounting bolts indicated in the diagram.
| Tightening circle | Your actions |
| First round | All bolts are tightened using a torque wrench according to the diagram with an applied torque of up to 2.0 kg/cm m |
| Second round | Tightening in the second circle is carried out even according to the diagram, but the torque is applied up to 8 kg/cm m |
| Third circle | Each bolt on the third installation circle must be tightened 90 degrees. |
| Fourth circle | The fourth and final round of tightening the cylinder head bolts requires re-tightening the fasteners an additional 90 degrees. |
Make sure your bolts meet the specifications before following the instructions and diagram. Otherwise, even the most correct, strictly observed tightening will not give any result.
Step-by-step scheme of work
The procedure and torque for tightening the cylinder head of a VAZ 2109 with various types of engines was initially established at the manufacturer’s factory and written in full and step by step in the book. According to the diagram, the procedure for pulling the cylinder head of a VAZ 2109 should be done with 2 central bolts.
How to properly tighten the cylinder head of a VAZ 2109:
Process
Before proceeding with the removal and repair of the VAZ 2109 cylinder head, it is necessary to carry out some preparatory work in accordance with the order.
Removal
- First of all, remove the air purifier housing.
- Disconnect the hoses and wires from the carburetor or injector.
- Next, you need to disconnect the pants from the manifold.
- We remove the distributor.
- Unscrew the valve cover.
- Remove the carburetor and manifolds.
- To unscrew the head bolts on a VAZ 2109, you will most likely need a wrench and a hexagon, because the bolts are tightened with decent force.
Tuning
Qualified adjustment, modification and tuning of the VAZ 2109 head will help to fully reveal the capabilities of your power unit. You've probably heard a lot about this, read or even watched videos on the Internet. Typically, when tuning, the channels are bored and smoothed, thereby reducing the turbulence that reduces power. The valves are changed to larger ones and ground into the seats. Tuning may also involve replacing standard valve guides with bronze ones.
Valve lapping
Lapping control is carried out as follows:
- the assembled head lies on its side;
- liquid is poured into the collector holes (ordinary water can be used).
If the liquid does not flow through the valves, this means that the work was done efficiently and the valves were ground in correctly. After all faults have been eliminated, you can begin installing the head.
Installation
- Begin assembly by installing a new gasket. Attention! The holes in the gasket must coincide with the guides, which are located at the corners of the block.
- You need to install the head carefully, do not move the gasket from its place at this moment.
- We insert the bolts into their places and begin tightening with a torque wrench.
- Next, we install the dismantled equipment, injector or carburetor, in reverse order. Fresh coolant is added. Wires and hoses are connected.
Attention! This operation requires some knowledge and skills. Therefore, before performing it, you should know that the bolts need to be tightened according to a certain pattern and with a certain force. It would be useful to read additional material on this topic and watch video instructions.
When is it time to change?
- There may be a need to replace or repair the cylinder head if you begin to notice that fuel consumption has increased or the power of the power plant has decreased.
- Incorrect assembly and installation of valves and cylinders can also lead to malfunctions in the cylinder head system.
- If you constantly fill your car with low-quality gasoline, then do not be surprised that over time this system will begin to malfunction and will need to be repaired.
- A crack that appears in a block cannot be eliminated in any other way than by completely replacing this element.
- A symptom indicating problems in the cylinder head may be white smoke coming from the exhaust pipe, this is caused by antifreeze getting into the engine cylinders.
Characteristic signs of engine malfunction
The engine of a VAZ 2109 car together with the gearbox is one unit, which is attached to three elastic rubber-metal supports located in the area of the engine compartment. The car enthusiast can detect some faults on his own. No special diagnostics are required.
All of the above faults require repair. For some, periodic preventive maintenance will be enough, while others can only be corrected with a major overhaul. Also, in order for all parts and components to work properly, the car must be maintained all the time.
If such work is carried out regularly, major repairs will not be necessary, and the service life will increase by several years. Periodic maintenance of the VAZ 2109 car.
Completing all these processes ensures normal engine operation without unexpected repairs. If serious damage does occur, you will need the help of experienced professionals. The reason for a major overhaul may be:
Features of repair of the cylinder head and suspension of the nine
1 — tie rod end; 2 — ball joint of the tie rod end; 3 — rotary lever; 4 - lock nut; 5 — steering rod; 6, 8 — inner tie rod ends; 7 — bolts securing the steering rods to the rack; 9 — bracket for fastening the steering mechanism; 10 — steering gear support; 11 — protective cover; 12 — connecting plate; 13 — locking plate; 14 — silent block; 15 - damping ring; 16 — rack support sleeve; 17 — rack; 18 — steering gear housing; 19 — coupling coupling bolt; 20 - lower flange of the elastic coupling; 21 — upper part of the facing casing; 22 - damper; 23 — steering wheel; 24 - ball bearing; 25 — steering shaft; 26 — lower part of the facing casing; 27 — steering shaft mounting bracket; 28 — protective cap; 29 — roller bearing; 30 - drive gear; 31 - ball bearing; 32 — retaining ring; 33 — protective washer; 34 - sealing ring; 35 — bearing nut; 36 — boot; 37 — sealing ring of the stop; 38 — retaining ring of the stop nut; 39 — rack stop; 40 - spring; 41 — stop nut; 42 — ball joint pin; 43 — protective cap; 44 — ball pin insert; A - mark on the boot; B — mark on the steering gear housing; C - surface of the ball joint; D - surface of the swing arm
If the front suspension begins to work poorly, the relationship between the chassis and the body of the VAZ 2109 is disrupted. Such a malfunction requires immediate repair of the suspension. Further operation of the vehicle is prohibited. It is very dangerous to drive a car that has damaged steering rack.