By clicking on the “Submit Order” button, I confirm that I agree with the terms of the privacy policy and have read the public Offer Agreement.
Cylinder head mounting bolts for VAZ 2108, VAZ 2110 vehicles. Even if the cylinder head is removed once, the mounting bolts may stretch out. If the length of the bolt exceeds 135.5 mm, it must be replaced with a new one. It is better to replace the cylinder head bolts as a set.
The order of tightening the block head (cylinder head)
The order and tightening torques of the cylinder head bolts on a VAZ.
This order is necessary in order to correctly dock the cylinder head and cylinder block. To avoid distortions and excess metal tension.
Diagram and procedure for tightening the cylinder head on a VAZ 2101 - 07 (classic)
The cylinder head bolts are tightened in two steps.
First run: bolts 1 - 10 are tightened to a torque of 3.5 - 4.1 kgf*m.
Second pass: the same bolts, but tightened with a torque of 10.5 - 11.5 kgf*m
Bolt 11 is tightened last, with a torque of 3.5 - 4.0 kgf*m.
The procedure for tightening the block head of VAZ 2108 - 09, Samara.
The tightening order is similar to the classic one, also starting from the center.
But it is carried out in 4 steps.
1. Bolts are tightened to a torque of 2.0 kgf*m
2. Tighten to a torque of 7.5 - 8.5 kgf*m
3. The bolts are turned 90 degrees.
4. Once again turn 90 degrees.
The procedure for tightening the block head of 16-valve VAZ engines.
Same as everyone else, from the center.
1st dose - 2.0 kgf*m
Step 2 - tighten the bolts 90 degrees
Step 3 - tighten the bolts again by 90 degrees.
Attention! On 16-valve engines, reuse of cylinder head bolts is allowed, BUT if their length without head does not exceed 95 mm. If the bolt length is more than 95 mm, it must be replaced.
The length is measured with a washer.
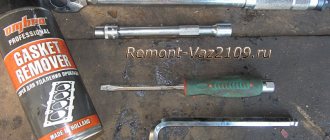
To work you need to use a torque wrench
Its cost is from 600 rubles, more professional ones from 1300 or more.
Cars of the VAZ line using the 21083 engine
The 21083 engine was used to equip the following models of the VAZ manufacturer:
- 2108 – three-door hatchback;
- 21083 – three-door hatchback;
- 2109 – five-door hatchback;
- 21093 – five-door hatchback;
- 21099 – sedan;
- 2113 – three-door hatchback;
- 2114 – five-door hatchback;
- 2115 – sedan.
That is, the entire line of front-wheel drive cars produced before 2013 was equipped with these internal combustion engines.
The process and procedure for tightening cylinder head bolts on a VAZ 2109
Repairing a cylinder head cannot be called a simple procedure, which requires certain skills and some experience. Repairs require special tools. As a rule, during this work the gasket is changed and the cylinder head tightening torque is adjusted: VAZ 2109 in our case. In order for the adjustment to be performed correctly, you must strictly follow the instructions. With a competent approach, you will successfully carry out the adjustment, achieving the desired result.
The majority of today's cars do not need tightening of the head bolts, but on the VAZ 2109, it is required at least to undergo maintenance.
If moisture begins to accumulate in those places where the block comes into contact with the cylinders, then this is a sure sign that urgent tightening of the bolts is required. Moisture in the above areas is a sign of a lubricant leak. The main reasons for tightening bolts are:
- damage to the cylinder head due to engine overheating;
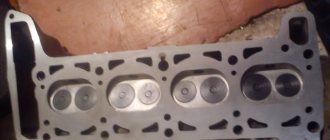
Cylinder head
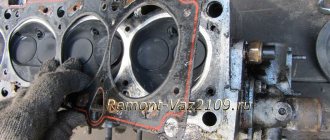
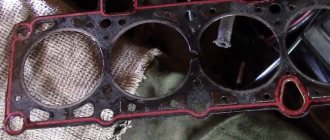
- loss of tightness of the cylinder head gasket;
- the mileage specified in the instructions has been completed.
Malfunctions: causes, elimination
The main problems of this type of internal combustion engine are:
| Malfunction | What caused | Remedy |
| Gasoline consumption has increased | clogging of the fuel system and attachments | flushing fuel lines, pump, carburetor |
| Engine won't start | ignition system failure, carburetor blockage or misadjustment | diagnostics of electronics, adjustment of quality and quantity screws |
| The motor "troits" | gasket breakdown, compression change | replacing consumables, restoring compression |
Specifically, the modification of the 21083 engine is characterized by burnt-out valves that cannot cope with the temperature conditions of the internal combustion engine. This design flaw is “treated” by tuning existing units.
Adjusting the bolt torque
In order to do everything correctly and avoid mistakes, you must strictly adhere to certain rules and follow the order of execution.
Tightening should only be done with a special torque wrench, which allows you to control the tightening torque.
Torque wrench
First, using a torque wrench, set the holder to the zero position. This means that the device data is equal to the moment of the original position. Then, you need to look at the indicator of the device when starting the fastener. Rotating the holder, we monitor the indicators. If the moment has not changed, this means that the fastener can be stretched and this is normal, as it should be. If the torque increases rapidly, bolt movement must be achieved. This indicates low stretch of the holder. This means stabilization is needed.
While the vehicle is running, the bolts that secure the cylinder head are constantly experiencing various impacts. They constantly heat and cool, which over time leads to the destruction of the structure of the fasteners.
For all power units there are specific rules that must be followed during operation:
- Strictly follow the data specified in the practical manual for the VAZ 2109.
- Adjustment is carried out only with a torque wrench. The use of another device will not allow this work to be performed correctly.
- Use only good bolts.
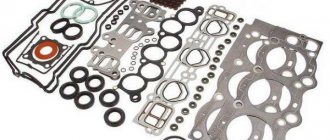
Replacement bolt kit
The most important data regarding adjustments is in the annotation for each specific car. As a result, you must carefully study and adhere to what is written in it. During operation of the vehicle, you must strictly comply with all manufacturer's requirements and systematically diagnose the car. Correct and smooth operation of the VAZ 2109 power unit prevents the need to adjust the cylinder head holders.
Since the cylinder head of the VAZ 2109 is a complex unit, it is necessary to carry out repair work only with absolute confidence in your actions. Strictly observing the order of work. If a deviation in the operation of the motor is detected, immediately carry out diagnostics. This will avoid more expensive repair work.
Required Tools
Tightening diagram
The cylinder head tightening pattern is the same as on traditional models and you need to start from the center. It takes place in four steps.
The diagram according to which the VAZ 2109 should be pulled
- tightening torque 2.0 kgf/m
- tightening torque 7.5 – 8.5 kgf/m
- turn it 90 degrees.
- turn it again by 90 degrees.
To make it clearer, let’s describe this process in more detail:
- Using a torque wrench, tighten the bolts in the sequence shown in the figure to 2.0 kg/cm.
- Then we go around the second circle and reach 8 kgf*m.
- Next, twist it 90 degrees.
- We go around the second circle, twisting another 90 degrees.
Proper lift
Attention! On 16-cl power units, bolts can be reused, but if their length is no more than 95 millimeters.
Otherwise it changes. The length is measured along with the washer. Do not try to replace the torque wrench with another device, otherwise the consequences may be unpredictable.
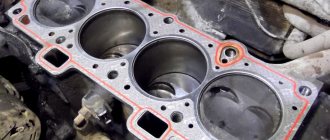
Tightening the cylinder head bolts
Tightening the cylinder head bolts must be done in a strictly defined order - this is necessary for its correct mating with the cylinder block, so that excessive metal stress and distortions do not occur.
Cylinder head tightening diagram for VAZ cars (classic)
Tighten in 2 passes.
FIRST: tighten bolts 1 to 10 - tightening torque 3.5 - 4.1 kgcm.
SECOND: tighten the same bolts again - tightening torque 10.5 - 11.5 kgcm.
AFTER TWO APPROACHES, tighten bolt number 11 - tightening torque 3.5 - 4.0 kgcm.
Scheme for tightening the cylinder head on VAZ 2108 cars | VAZ 2109
Tighten in 4 passes.
FIRST: tighten bolts 1 to 10 - tightening torque 2.0 kgcm.
SECOND: tighten the same bolts again - tightening torque 7.5 - 8.5 kgcm.
THIRD: tighten all bolts 90°.
FOUR: re-tighten all bolts 90°.
Cylinder head tightening diagram on 16 valve VAZ engines
Tighten in 3 passes.
ONE: Tighten all bolts using a torque of 2.0 kgcm.
SECOND: tighten all bolts 90°.
THREE: re-tighten all bolts 90°.
Important! On 16 valve engines, it is permissible to use the cylinder head mounting bolts a second time, but only on the condition that their length without the head is NOT more than 95 mm, otherwise the bolt must be replaced. You need to measure the length using a washer.
How to make sure that the bolt is tightened properly?
When tightening a bolt, once the metal has reached its "yield point", the tightening torque will remain constant. This will show the torque wrench.
When should a bolt be replaced?
If the tightening torque has already been increased to 20 kgcm, but the bolt cannot be tightened, it means that it is too strong, and this bolt needs to be replaced. If the bolt does not turn and the tightening torque is constantly decreasing, then this bolt must also be replaced.
Article: 2108-1003271Н/О, additional articles: 091177, 2108-1003271
Order code: 070909
- Buy with this product
- show more
- Buy analogues
- Passenger cars / GAZ / GAZ-31051 drawing
- » href=»/catalog/gaz-4/legkovye_avtomobili-30/gaz_3105-139/golovka_cilindrov-97/#part87529″>Bolt M12x1.25 cylinder head fasteningEngine / Cylinder head
- Passenger cars / VAZ / Lada Granta 21901 drawing
- » href=»/catalog/vaz-3/legkovye_avtomobili-30/lada_granta_2190-1236/blok_cilindrov_i_golovka_bloka-70/#part2980780″>Cylinder head boltEngine / Cylinder block and cylinder head
- Passenger cars / VAZ / VAZ-21082 drawings
- » href=»/catalog/vaz-3/legkovye_avtomobili-30/vaz_2108-18/blok_cilindrov_i_golovka_bloka-59/#part27483″>Bolt M12x1.25x135Engine / Cylinder block and cylinder head
- » href=»/catalog/vaz-3/legkovye_avtomobili-30/vaz_2108-18/blok_cilindrov_i_golovka_bloka-60/#part27519″>Bolt M12x1.25x135Engine / Cylinder block and cylinder head
- Passenger cars / VAZ / VAZ-210991 drawing
- » href=»/catalog/vaz-3/legkovye_avtomobili-30/vaz_21099-79/blok_cilindrov_i_golovka_bloka-75/#part35929″>Bolt M12x1.25x135Engine / Cylinder block and cylinder head
- Passenger cars / VAZ / VAZ-21111 drawing
- » href=»/catalog/vaz-3/legkovye_avtomobili-30/vaz_2111-11/blok_cilindrov_i_golovka_bloka-91/#part44391″>Bolt M12x1.25x135Engine / Cylinder block and cylinder head
- Passenger cars / VAZ / VAZ-21152 drawings
- » href=»/catalog/vaz-3/legkovye_avtomobili-30/vaz_2115-65/blok_cilindrov_i_golovka_bloka-63/#part52665″>Bolt M12x1.25x135Engine / Cylinder block and cylinder head
- » href=»/catalog/vaz-3/legkovye_avtomobili-30/vaz_2115-65/blok_cilindrov_i_golovka_bloka-64/#part52698″>Bolt M12x1.25x135Engine / Cylinder block and cylinder head
- Passenger cars / VAZ / VAZ-2110, 2111, 21121 drawing
- » href=»/catalog/vaz-3/legkovye_avtomobili-30/vaz_2110__2111__2112-415/blok_cilindrov_i_golovka_bloka-105/#part1302360″>Bolt M12x1.25x135Engine / Cylinder block and cylinder head
- Passenger cars / VAZ / VAZ-21142 drawings
- » href=»/catalog/vaz-3/legkovye_avtomobili-30/vaz_2114-647/blok_cilindrov_i_golovka_bloka-8/#part1668871″>Bolt M12x1.25x135Engine / Cylinder block and cylinder head
- » href=»/catalog/vaz-3/legkovye_avtomobili-30/vaz_2114-647/blok_cilindrov_i_golovka_bloka-7/#part1668801″>Bolt M12x1.25x135Engine / Cylinder block and cylinder head
- Passenger cars / VAZ / Lada Kalina 1117, 1118, 11191 drawing
- » href=»/catalog/vaz-3/legkovye_avtomobili-30/lada_kalina_1117__1118__1119-1048/blok_cilindrov_i_golovka_bloka-69/#part2612025″>BoltEngine / Cylinder block and cylinder head
- Passenger cars / VAZ / Lada Priora 21701 drawing
- » href=»/catalog/vaz-3/legkovye_avtomobili-30/lada_priora_2170-1643/blok_cilindrov_i_golovka_bloka-114/#part3647577″>Cylinder head boltEngine / Cylinder block and cylinder head
- Passenger cars / VAZ / VAZ-21091 drawing
- » href=»/catalog/vaz-3/legkovye_avtomobili-30/vaz_2109-9/blok_cilindrov_i_golovka_bloka-75/#part31990″>Bolt M12x1.25x135Engine / Cylinder block and cylinder head
- Passenger cars / VAZ / VAZ-21101 drawing
- » href=»/catalog/vaz-3/legkovye_avtomobili-30/vaz_2110-10/blok_cilindrov_i_golovka_bloka-91/#part40083″>Bolt M12x1.25x135Engine / Cylinder block and cylinder head
- Passenger cars / VAZ / VAZ-21121 drawing
- » href=»/catalog/vaz-3/legkovye_avtomobili-30/vaz_2112-12/blok_cilindrov_i_golovka_bloka-91/#part48699″>Bolt M12x1.25x135Engine / Cylinder block and cylinder head
- Passenger cars / VAZ / VAZ-1111 “OKA”1 drawing
We specify the tightening torque of the cylinder head bolts during the installation process
The cylinder head (cylinder head) is the most important component in the car engine system. The process of tightening the cylinder head bolts will be within the capabilities of a car enthusiast with certain skills. To work, we need a special tool and self-confidence. The instructions provided will help you cope with the task and avoid common mistakes.
First, let's determine in what cases it is necessary to tighten the bolts.
Most modern cars do not require cylinder head bolts to be tightened. On earlier car models (for example VAZ 2109), it is necessary to tighten the bolts in a timely manner in order to successfully pass the technical inspection.
As a rule, the accumulation of moisture in the places where the block comes into contact with the cylinders indicates the need to tighten the bolts. The reason for the appearance of moisture in these places may be a leak of lubricant. There are several most popular reasons for tightening bolts, including:
- Violation of the block head structure. Such consequences most often result from engine overheating.
- Cylinder head gasket leak. This fact also indicates the need to tighten the bolts. It is recommended to adjust the tightening torque after passing a certain mileage and without fail, after repairing the cylinder head.
Reason for engine modification
The working volume of the cylinders can be increased to a certain value, so the modification is aimed at compacting the mixture. For this, camshafts with special valves with increased lift are used. In addition, the modification concerns the elimination of inaccurate joining of the manifold channels and the cylinder head.
Since the head of the engine block of domestic VAZ cars is very far from perfect, the turbulence that occurs inside the cylinders significantly slows down the flow of the mixture. The parameters of the Lada 21083 can only be improved by tuning the internal part of the cylinder head.
To do this you need the following tools and materials:
- open-end wrenches;
- set of heads;
- electric drill;
- sandpaper;
- set of cutters;
- pliers;
- graphite lubricant.
The procedure for eliminating inconsistencies in the cylinder head is as follows.
| Objects | Actions |
| First, tuning is directed to the manifold gaskets. | Quite often it happens that the fastening of the collectors in the Lada 2108 is not done very well. Because of this, they have a slight offset relative to the cylinder head collector plane. To make such a block more perfect, two holes need to be drilled along the edges of the manifold and cylinder head. |
| Next, two pins are pressed into the block. | They must be of the appropriate size. |
| After this, a manifold is put on the working unit of the VAZ car. | Since drilling is done without a gasket, the holes in it are made separately. |
| Sometimes modifications to VAZ engines involve reducing the weight of the valves. | They are replaced both on machines of brand 2108 and in models 21083. Instead of old heavy parts, other valves are installed in the block, in which part of the metal is ground off on both sides of the plates. In addition, the VAZ valve stem is also made thinner. |
When reducing the diameter of the rods, replacement of the guide bushings is required. Such tuning does not require large material costs.
How to adjust the tightening torque of VAZ 2109 bolts.
Before starting work, you must familiarize yourself in detail with the original instructions for the car (VAZ 2109). The included manual will tell you the details of tightening the bolts according to the manufacturer's requirements. Depending on the specific brand of car, the work may include important details. It is necessary to pay tribute to the manufacturer's advice and take them into account during the work.
In order to properly tighten, you need to acquire a certain set of knowledge. To successfully tighten the bolts, you can take into account:
- The procedure for tightening the cylinder head bolts is according to the VAZ 2109 manufacturer’s diagram.
- Moment of tightening force.
- Knowledge of bolts that need to be adjusted.
Since most modern cars do not provide additional tightening, the bolts have certain characteristics. In this case, the manufacturer implies exclusively factory adjustment of the bolts. Therefore, after repeated exposure, the structure of the bolts is disrupted. With outside intervention, the bolts quickly become unusable. Subsequently, they may rupture.
In order to avoid adjusting the bolts, on earlier car models (VAZ 2109 or similar models), it is necessary to properly repair the cylinder head. Work on the cylinder head requires a mandatory replacement of the cylinder head gasket. In this case, it is necessary to use gaskets to prevent shrinkage. This way you can eliminate the need to retighten the bolts.
If tightening the bolts is still required, you must strictly follow the manufacturer’s recommendations. When carrying out work, it is necessary not to deviate from the original instructions. For correct adjustment, it is necessary to strictly and confidently follow the sequence.
Tuning methods
Several types of tuning are used:
- “chipping” – installation of an electronic analogue of a mechanical regulator, power increases by a maximum of 15%;
- replacing the air filter - options with reduced resistance are used, an exhaust manifold with the same length of pipes and a 52 mm throttle.
The manufacturer does not recommend turbocharging the 21083 engine, as this significantly affects the service life for the worse.
Thus, modification 21083 was not the best internal combustion engine option for VAZ cars. However, a noticeable advantage is the safety of the valves in the event of a timing belt break, an improved Ozone carburetor and an increase in power by 6 hp. With.
Article rating:
Head height of VAZ 21083 Link to main publication
Related publications
- Pressure in the wheels of VAZ 2110
Compliance with the tightening torque of the cylinder head bolts.
Please go to the plugin admin page to Paste your ad code OR Suppress this ad slot .
To control the process, it is necessary to follow a certain technique. In this way, the process can be controlled, preventing errors. To do this, you need to use a special key. A torque wrench will allow you to control the tightening torque.
First of all, using a torque wrench, set the holder to the zero position. This means the readings of the device are equal to the moment of the initial position of the holder. Now, you need to pay attention to the device indicator at the moment the fastener starts. We begin to twist the holder and look at the indicators. If the moment remains unchanged, then the fastener is tensile. This is the norm. If the torque increases sharply, it is necessary to achieve movement of the bolt. This fact indicates insufficient stretching of the holder. In such a situation, adjustment is made after stabilization.
To control the process, you need to understand the following:
- If, when tightening the bolts, the torque increases, the holder is durable and there is a need to replace it.
- If there is a decrease at the moment of tightening, the fastener is damaged and also needs to be replaced.
During operation of a VAZ 2109 car, the cylinder head bolts are constantly exposed to destructive forces. During operation, the holders constantly heat up and cool down. This thermal effect gradually destroys the structure of the fasteners. Understanding the difficult operating conditions of bolts, you should take seriously the recommendations for their replacement.
Basic rules for adjusting cylinder head holders.
tightening cylinder head bolts
Regardless of the characteristics of the engine of a particular car, there is a general number of rules that must be followed during work. It is necessary to strictly follow the parameters specified in the manufacturer's instructions. The work should be carried out using a torque wrench. Using an analogue may lead to undesirable results. Only bolts that are in good working order can be tightened. Before starting work, carefully check the condition of the holders. Tightening torque indicators must be strictly taken into account and not deviate from those specified by the manufacturer. When repairing the cylinder head of a VAZ 2109, you should follow the tightening instructions specified in the included instructions.
Most of the particularly important features of bolt adjustment are indicated in the instructions for a particular car. Therefore, it is necessary to carefully study the operating and maintenance manual of the machine. When operating a vehicle, comply with the manufacturer's requirements and regularly maintain the vehicle. Correct engine operation prevents the need to adjust the cylinder head holders.
cylinder head tightening wrench
Since the cylinder head has a complex structure, it is necessary to carry out repairs only with full confidence in your knowledge. If problems arise in the operation of the car engine, it is necessary to promptly carry out professional diagnostics. Thereby, you will prevent large-scale car repairs and high costs.
A short video about how not to repair the cylinder head:
Repairing the cylinder head is a complex procedure that requires a sufficient amount of knowledge and certain experience. To carry out repairs, special equipment is used, which is usually available only in specialized service centers. Repairing the cylinder head involves changing the cylinder head gasket and adjusting the torque of the bolts. For correct adjustment, you must strictly follow the requirements specified in the instructions reviewed. Follow the manufacturer's specifications and use quality tools. With a careful approach, you can successfully make adjustments, obtaining the desired result. Happy renovation!
Do-it-yourself cylinder head broaching
Previously, pulling the cylinder head was a mandatory item during the first maintenance, but then the situation changed. Even relatively modern VAZ engines. Broaching the cylinder head is mainly required today for older models of VAZ, UAZ, Moskvich, etc. engines.
The main reason that prompts a car owner to think about the need to tighten the cylinder head is “wet” at the junction of the head and the block. This indicates an existing oil leak.
There may be several reasons. The most traditional: failure of the cylinder head gasket. warping of the cylinder head as a result of engine overheating unnoticed by you, or initially incorrectly tightened cylinder head bolts. If you had a capital repair done at a car service center.
In fact, many craftsmen recommend it after repairing the cylinder head. in a thousand km. adjust the tightening torque.
Maintenance
The classic internal combustion engine design in combination with a transverse engine arrangement under the hood of front-wheel drive cars is subject to the following maintenance regulations:
| Maintenance object | Time or mileage (whichever comes first) |
| Timing belt | replacement after 100 thousand km |
| Battery | 12 months/20 thousand km |
| Valve clearance | 24 months/20 thousand km |
| Crankcase ventilation | 24 months /20 thousand km |
| Belts that drive attachments | 24 months /20 thousand km |
| Fuel line and tank cap | 24 months /40 thousand km |
| Motor oil | 12 months/10 thousand km |
| Oil filter | 12 months/10 thousand km |
| Air filter | 21 – 24 months /40 thousand km |
| Fuel filter | 48 months/40 thousand km |
| Heating/Cooling Fittings and Hoses | 24 months /40 thousand km |
| Coolant | 24 months /40 thousand km |
| Oxygen sensor | 100 thousand km |
| Spark plug | 12 – 24 months /20 thousand km |
| Exhaust manifold | 12 months |
The accompanying instructions contain a description of the parameters; the manufacturer strongly recommends following the maintenance procedure for engines 21083.
How to tighten cylinder head bolts
From studying. It is by studying the Repair Manual for your car, preferably the original one. It is there that the manufacturer indicates everything that is necessary to tighten the cylinder head. And you need to know:
- the procedure (diagram) for tightening the cylinder head bolts;
- what tightening torque is required;
- what bolts are used to tighten the cylinder head.
Bolts for tightening the cylinder head are a special matter. The fact is that in modern engines, bolts with special characteristics are used for the cylinder head. So-called “spring” bolts, which, due to their properties, do not require additional tightening after initial tightening at the factory.
Moreover, when trying to tighten the cylinder head bolts, due to the “fluidity” of the metal, they will be pulled out. As a result, you may end up with a broken bolt.
When repairing the cylinder head, it is necessary to install gaskets that do not shrink. This eliminates the need to tighten the cylinder head bolts.
But, if you have already decided that you absolutely need to tighten the cylinder head bolts, then you should do it with the “manual” from the manufacturer and using a torque wrench. Movement to movement, number to number. Amateur performance based on reserve is not needed here.
Engine 21083 is a problematic version of Auto VAZ
The appearance of the 21083 engine is due to the need to increase the power of the serial 2108 internal combustion engine of the AvtoVAZ manufacturer. To achieve this, the designers increased the size of the cylinder, but “forgot” to design the intake manifold for the changed conditions.
As a result, cracks open in the exhaust manifold, the bosses become jammed, and the plane of the head is pressed through. Acceleration to 100 km/h occurs in 14 seconds, but the revs are too high for the resulting torque.
Cylinder head tightening control
For peace of mind, and since you decide to tighten the head bolts, there is a method for controlling the tightening torque of the cylinder head bolts. Naturally, using a torque wrench.
A moment equal to the moment the bolt breaks is applied to the bolt. After starting the turn, you need to control the moment of starting. If it does not increase, then everything is in order, the bolt has begun to stretch.
If the moment begins to increase, it means that the bolt has not reached the yield point. Here you need to tighten the cylinder head bolt until the tightening torque stabilizes.
When checking the tightness of the cylinder head bolts, pay attention to two features. If a moment of 20 kgcm is applied to the bolt, but the yield moment has not been reached, then the bolt must be replaced, since it has increased strength.
If, at the moment of tightening the bolt, you see that the torque decreases, then this means the destruction of the bolt, and it definitely requires replacement.
Such requirements for the cylinder head bolts are explained simply: they operate in a constant heating-cooling mode.
Read all other features and recommendations required for tightening the cylinder head bolts in the specific Manual for a specific vehicle.
Good luck, and may your DIY cylinder head bolt tightening be successful.
Disassembly and assembly of the cylinder head
Disassembly. If only one part needs to be replaced, then you do not have to completely disassemble the cylinder head and remove only what is necessary for replacement.
Place the cylinder head on the stand, disconnect the hose from the warm air intake, unscrew the nuts and remove the carburetor with the spacer, the carburetor heat shield, and then the intake pipe and exhaust manifold (the warm air intake is removed at the same time).
Remove the engine cooling jacket outlet pipe. Unscrew the coolant temperature gauge sensor, oil pressure warning light sensor and spark plugs.
Unscrew the nuts and remove the fuel pump with gaskets, spacer and pusher. Disconnect the auxiliary unit housing from the cylinder head.
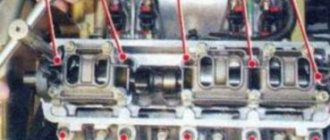
Rice. 2.54. Dismantling the cylinder head: 1 – cylinder head; 2 – camshaft; 3 – rear camshaft bearing housing; 4 – gasket; 5 – cylinder head cover; 6 – front camshaft bearing housing; 7 – oil seal
Remove bearing housings 3 and 6 (Fig. 2.54) of the camshaft. Remove camshaft 2 from the cylinder head supports and remove oil seal 7 from it.
Rice. 2.55. Details of the valve drive mechanism: 1 – valve; 2 – guide sleeve; 3 – retaining ring; 4 – oil deflector cap; 5 – spring support washer; 6 – internal spring; 7 – outer spring; 8 – spring plate; 9 – crackers; 10 – adjusting washer; 11 – pusher
Rice. 2.56. Compression of valve springs: 1 – device 67.7823.9505
Remove the valve pushers 11 (Fig. 2.55) from the holes of the cylinder head with adjusting washers 10. Free the valves from the crackers 9, compressing the valve springs with tool 67.7823.9505 (Fig. 2.56). Remove the springs with plates. Turn the cylinder head and remove the valves from the bottom. Remove the oil seals from the guide bushings and the spring support washers.
Assembly. Install the spring support washers. Lubricate the valves and new oil seals with engine oil (old ones are not allowed). Using mandrel 41.7853.4016, press the caps onto the guide bushings. Insert the valves into the guide bushings, install the springs and spring retainers.
Compressing the springs with tool 67.7823.9505 (see Fig. 2.56), install the valve cotters. Insert valve pushers with adjusting washers into the holes of the cylinder head.
Rice. 2.57. Camshaft bearing housing installation sleeves
Clean the mating surfaces of the cylinder head and bearing housings from old gasket residue, dirt and oil. Install the installation bushings (Fig. 2.57) of the camshaft bearing housings.
Rice. 2.58. Position of the cams of the first cylinder when placing the camshaft in the cylinder head supports
Lubricate the bearing journals and cams of the camshaft with engine oil and place it in the cylinder head supports in such a position that the cams of the first cylinder are directed upward (Fig. 2.58).
Rice. 2.59. Applying sealant to the surface of the cylinder head
On the surface of the cylinder head mating with the bearing housings, in the area of the outer camshaft supports, apply sealant type KLT-75TM or similar sealant type TB-1215 (Fig. 2.59).
It is allowed to start the engine no earlier than 1 hour after applying the sealant.
Install the bearing housings and tighten the nuts in two steps:
Rice. 2.60. Procedure for tightening the camshaft bearing housing nuts
1. Pre-tighten the nuts in the sequence shown in Fig. 2.60, until the surfaces of the bearing housings touch the cylinder head, making sure that the mounting sleeves of the housings fit freely into their sockets.
2. Finally tighten the nuts to 21.6 N·m (2.2 kgf·m) in the same sequence.
Immediately after tightening the bearing housing nuts, carefully remove any remaining sealant squeezed out of the gaps during tightening in the areas adjacent to the cylinder head cover gasket and the accessory housing. Left untreated polymerized sealant residues in these areas will result in oil leakage through the seals.
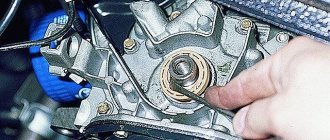
Using mandrel 67.7853.9580, press in a new camshaft oil seal, having previously lubricated it with engine oil.
Install the cooling jacket outlet pipe with gasket and the accessory housing with the O-ring.
In accordance with the instructions in the “Fuel Pump” chapter, install the heat-insulating spacer with gaskets, the pusher and the fuel pump.
Rice. 2.33. Installation of the intake pipe and exhaust manifold: 1 – exhaust manifold; 2 – bracket for the supply pipe of the coolant pump; 3 – inlet pipe; 4 – warm air intake
Place gaskets on the cylinder head studs and install the exhaust manifold and intake pipe. Secure them with nuts together with warm air intake 4 (see Fig. 2.33).
Install the carburetor heat shield, spacer and carburetor. Secure it with nuts and close the carburetor with the technological cover.
Wrap the spark plugs and coolant temperature gauge and oil pressure warning light sensors into the cylinder head.
Adjust the valve clearances after installing the cylinder head on the engine.
Performance characteristics of motor 21083
In theory, the technical characteristics of the ICE 2108 should have satisfied the travel modes of the three-door hatchback VAZ 2108. In practice, tuning was required to increase power, and a little later, a reduction in volume to 1.1 liters for supplies of the Eight for export to countries with special performance requirements ICE.
Moreover, the model 2108 was designed by the Germans from the Porsche concern for a 5-speed manual transmission; the budget of the manufacturer AvtoVAZ was not enough for a larger budget, so the engine was boosted by domestic designers, the result was the 21083 engine with a volume of 1.5 liters, and then the 21081 with a volume of 1.1 liters.
For the latter option, a special input manifold was created, just like for an export-spec engine. The intake manifold from 2108 was mounted on modification 21083, which was initially incorrect, since the needs for the quality of the fuel mixture for the formed engine were not met. The manual included the same requirements regarding what kind of oil to pour, and the regulations for replacing coolants remained the same.
At the output, the engine characteristics were as follows:
| Manufacturer | AvtoVAZ |
| Engine brand | 21083 |
| Years of production | 1992 – 2003 |
| Volume | 1499.8 cm 3 (1.5 l) |
| Power | 50.3 kW (72 hp) |
| Torque | 106 Nm (3400 rpm) |
| Weight | 127 kg |
| Compression ratio | 9,9 |
| Nutrition | carburetor |
| Motor type | in-line |
| Number of cylinders | 4 |
| Location of the first cylinder | TVE |
| Number of valves on each cylinder | 2 |
| Cylinder head material | aluminum alloy |
| Intake manifold | from 2108 or 21081 |
| An exhaust manifold | scheme 4/2/1 (spider) |
| Camshaft | upper |
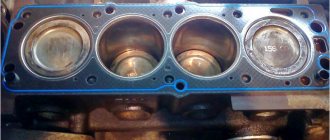
| Cylinder block material | cast iron |
| Cylinder diameter | class A – 82 – 82.01 mm class B – 82.01 – 82.02 mm class C – 82.02 – 82.03 mm class D – 82.03 – 82.04 mm class E – 82.04 – 82.05 mm |
| Pistons | 82 mm |
| Rings | two symmetrical lugs, chrome plated, compression 1.5 mm and 2 mm thick, oil scraper 3.95 mm |
| Piston diameter | class A –81.94 – 81.95 mm class B – 81.95 – 81.96 mm class C – 85.96 – 81.97 mm class D – 81.97 – 81.98 mm class E – 81.98 – 81.99 mm |
| Crankshaft | high-strength cast iron, high-frequency hardening of bearing journals and connecting rods, long crank radius |
| Number of main bearings | 5 |
| Piston stroke | 71 mm |
| Fuel | AI-91 |
| Motor weight | 127, kg |
| Environmental standards | Euro 2 |
| Fuel consumption | highway – 7 l/100 km combined cycle 8.6 l/100 km city – 10 l/100 km |
| Oil consumption | 0.7 l/1000 km |
| Engine oil for 21083 | 5W-30 and 10W-30 |
| Engine oil volume | 3.5 l |
| Operating temperature | 80° |
| Motor life | declared 125,000 km, real 200,000 km |
| Adjustment of valves | washers |
| Cooling system | forced, antifreeze/antifreeze |
| Coolant quantity | 7.3 l |
| water pump | plastic impeller |
| Candles for 21083 | A17DVRM or FE65CPR |
| Gap between spark plug electrodes | 0.5 – 0.6 mm |
| Timing belt | 111 teeth, belt width 19 mm |
| Cylinder operating order | 1-3-4-2 |
| Air filter | Nitto, Knecht, Fram, WIX, Hengst |
| Oil filter | catalog number 90915-10001 replacement 90915-10003, with check valve |
| Flywheel | ring width 20.9 mm, surface for clutch disc 196 mm in diameter |
| Flywheel mounting bolts | M10x1.25 mm, length 26 mm |
| Valve stem seals | Corteco, Reserve, Elring, SM |
| Compression | cylinder pressure from 11 bar, pressure difference in individual cylinders within 1 bar |
| Oil temperature | 80°С |
| Tightening force of threaded connections | spark plug – 31 – 39 Nm flywheel – 62 – 87 Nm clutch bolt – 55 Nm bearing cap – 70 – 84 Nm (main) and 44 – 54 Nm (connecting rod) cylinder head – 4 stages 20 Nm, 71 Nm + 90° + 90° |
From the given characteristics it is clear which engine oil is recommended by the manufacturer. Despite the design flaws, the 21083 engine has low consumption of gasoline and other operating fluids.