Lighting
Light bulbs, Headlight lamp, Halogen lamps, Xenon lamps, LED lamps, PTF lamp, Rear PTF lamp, Tail lamp lamp, Brake lamp, License plate lamp, Brake lamp, Reversing lamp, Parking lamp, Turn signal lamp, Instrument panel lamp, Trunk lamp, Engine compartment lamp, Interior lamp, Heater backlight lamp, Headlight, Left headlight, Right headlight, Xenon headlight, Headlight washer, Headlight washer pump, Headlight washer nozzle, Headlight range control, Additional headlight, Finder headlight, Headlight ignition unit, Sensor ground clearance, Headlight mount, Headlight cover, Headlight reflector, LED headlight, Headlight glass, Fog light (PTF), Fog light, PTF mount, Fog light, PTF frame, Tail light, Reversing light, Brake light, Running lights, Side lights , Reflector (reflector), Side marker, Parking lights, Turn signal, Side turn signal, Rear turn signal, Front turn signal, Repeater, Lamps, License plate light, Trunk light, Door light, Engine light, Dashboard light, Interior light, Rotating light
What is a fuel sensor
Advertisements
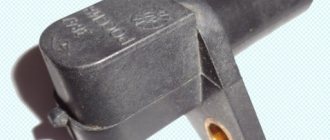
This small device is a rheostat with a resistor, which is assembled from nichrome components. The changing part of the rheostat in contact with the liquid moves using a lever with a float.
At the opposite end of the lever there is another contact, which, when in a specific position, closes a circuit that controls the start of production of spare fuel. The reserve balance ranges from 4 to 6.5 liters.
Sadly, this device (see photos at the beginning) is considered one of the elements that often fails. In some cases, replacing the fuel sensor may not be necessary, you just need to perform minor maintenance.
Device
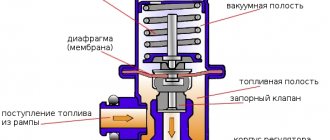
The regulator includes two cavities - fuel and vacuum. Inside the vacuum there is a membrane that reacts to the air pressure coming from the power unit. Inside the fuel cavity there is fuel under high pressure.
The force of fuel pressure is resisted by a valve device. If the pressure is excessively high, the excess is returned back through the relief means.
How the regulator works
The fuel regulator ensures that the difference in influence on the membrane is maintained on both sides, that is, both cavities. Only under such conditions can the engine function normally.
The sensor serves to maintain pressure differences regardless of the current engine speed. Fuel injection will not be possible if the pressure in the manifold is equal to or greater than that in the injectors. Injectors are required to have higher pressures.
If everything works well, the following processes are observed:
- The vacuum in the suction cavity of the manifold is reduced during quiet operation;
- In response to this pressure, the fuel in the rail and its supply to the injectors increases.
The principle of operation of the level sensor on the VAZ-2110
Operating principle of the fuel level sensor.
The vast majority of fuel level sensors in inexpensive cars have a similar design. The operation of the device is based on the principle of measuring the resistance of a simple rheostat.
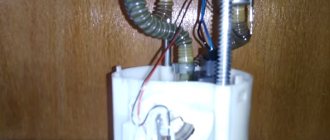
VAZ fuel pump devices.
The stationary part of the device consists of nichrome contact tracks, and the moving part is a contact that cuts off part of the track, thereby changing the output resistance. As a result, we have a system that converts the sensor resistance into the amount of fuel indicated on the instrument panel. A spoke and a float are attached to the movable contact, which moves depending on the amount of gasoline in the tank.
The photo shows the scale of the fuel level sensor.
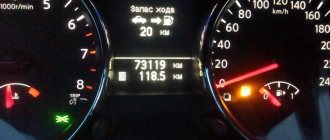
On the tenth VAZ family, the sensor is mounted in the same block with the fuel pump, fuel module. The sensor is capable of signaling a low fuel level (4–6 l), giving the unwary driver a chance to make it to the gas station.
To replace the fuel level sensor, they try to find original spare parts with article number 21101–3827010, 21102–3827010 or 2112–3827010. The price of a sensor assembled with a spoke and a float ranges from 350 rubles (Tochmash enterprise) to 420 (SEPO, Cartronic, Motorika).
It is better not to purchase spare parts of dubious origin. In any case, the new device must be compared with the old sensor.
Other fuel level sensor options
Potentiometric FLS has a number of limitations in its scope of application. Thus, it cannot be used on cars that use methyl, ethyl alcohol or biodiesel as engine fuel. This is due to the fact that such fuel acts more aggressively on electrical contacts and leads to their premature wear.
As an alternative, various non-contact sensors, such as MAAPS or an inactive magnetic position sensor, are used to measure the amount of fuel in the vehicle tank. The MAAPS sensing element does not come into contact with the fuel.
It has the following operating principle. Such a sensor determines the amount of fuel remaining in the tank using a float connected to a permanent magnet via a lever. The magnet moves along a sector on which a large number of plates of various lengths are deposited with rays. Electrical signals are formed in the plates under the influence of a magnetic field (different in each plate), depending on what signal the sensor gives, the remaining fuel is determined.
Purpose and location of FLS
The FLS is located in the fuel module, which also includes a fuel pump and fuel filter.
Its main purpose is to monitor the fuel level in the gas tank.
The design of the device includes:
- float;
- dielectric plate with a located rheostat;
- the rod on which the contact slider is located.
Why doesn't the fuel level sensor work? Common causes and repair methods
Probably many people have had to face the question: why doesn’t the fuel level sensor work? And the following situation also happens: after starting the engine, the sensor shows that the tank is empty, and while driving, the value on the sensor reaches the desired level. The following option is also possible: the needle is stuck at zero, but in fact there is still half a tank or the values on the dashboard are constantly changing. It can be very difficult without a sensor working properly, especially on long trips. You need to constantly keep in mind the moment of the last refueling and its volume, and keep a canister of fuel in the trunk just in case. Due to the mass of inconveniences caused by one sensor, we will look into the problem in this article. Why does the fuel level sensor not work? What is the reason for the breakdown? In this article we will try to describe possible options for sensor failure, as well as the reasons for the failure in readings. The most commonly encountered sensor can be considered potentiometric. This prevalence is due to its simplicity, low cost and clarity of the obtained values. However, it also wears out very quickly, and oxidation of the tracks is possible. Due to the high prevalence of this type of sensor, we will consider possible failure problems using its example. Sensor readings fluctuate. The reason for inconsistent sensor values is wear of the contact tracks on the board. The tracks wear out due to the constant impact of the fuel sensor slider. One option to solve this problem with minimal losses is to bend the slider so that it is higher than the worn-out area on the board. However, if a significant area has been wiped, then tucking the problem will not solve the problem. In this case, you need to replace the sensor with a new one. Before replacing the sensor, you need to study the instructions and read there information about its resistance
This is very important, because for one brand of car there may be sensors with different resistances, and if you install an indicator with an incompatible resistance, it will be very difficult to navigate the readings. The best option is to remove the old device and take it to the store.
The fuel level sensor is “lying” The fuel level indicator can either underestimate or overestimate the practical values of the amount of fuel. With such symptoms, adjusting the sensor may help. There are two types of adjustment for this type of malfunction.
- First: move the float pin to two extreme positions, while the arrow on the indicator should also fall into the two extreme positions 0 (empty) and 1 (full). If in the extreme position of the pin the arrow does not set to “0” or “1”, then it is necessary to bend the pin so that it remains movable and adjust with the bent axis;
- Second method: disassemble the instrument panel and get to the fuel level sensor itself, remove the arrow from it and reconnect the wires to the sensor. Start the car and let it sit for about 10 minutes. Then set the pointer axis to the extreme position “1” and connect the pointer.
If the sensor is stuck at “0”, you need to disassemble the dashboard and again get to the fuel indicator, find the contact wires going to it. There will be nuts that need to be unscrewed, cleaned with sandpaper (to prevent oxidation) and put back, tightened tightly
It is also necessary to inspect and clean all the masses on the body (special attention to the mass under the handbrake). With this problem, it may also be possible that the float is jammed in the tank.
Well, as the most common option, the fuel level sensor fails. How to find out: the problem is in the sensor itself or in the indicator? Take a multimeter and measure the resistance on the sensor (checking the indicator):
- if the tank is full, then the approximate resistance value will be about 7 ohms or less;
- if about half the tank, then the resistance ranges from 108 to 128 Ohms;
- if the tank is empty, the value on the multimeter will register approximately 315 to 345 ohms.
Sensor check:
- disconnect the wires going to the sensor;
- connect the resistance (R=330 Ohm) and add a resistor (R=10 Ohm) to the series circuit;
- start the car;
- We begin to change the resistance on the resistor with the slider: from 0 to 10 Ohms;
- the arrow on the sensor should float from “empty” to “full”.
*it’s also easy to check the ignition coil with a multimeter. So, depending on the failed part (sensor or indicator), we replace it with a new one. Thus, the article discusses the topic: why the fuel level sensor does not work. When such a part fails, there are many possible causes, from the simplest to the very complex. AutoFlit.ru
FakeHeader
Comments 60
A friend has the same problem. Let's figure it out. The pink wire is intact, when shorted to ground it shows above the maximum, when shorted through a resistor on the fuel pump chip at the pink to black tank (from the instrument to ground intended for the pump) it shows more than half the tank. It doesn't ring on brown. We are looking for where he goes there
Hello. Have you solved this problem? The priest just has the same problem. What turned out to be the reason?
the sensor itself died, and it had Priorovsky
By chance there is no on-board computer of the “STATE” type? If there is one, unplug the plug, wait and put it back in and you will be happy. There was such garbage 1200 km from home. The state is down.
He doesn’t have it on the Kalina, I have it on the Priora
check the entire circuit first. without a sensor, as already written here, close it to see if it shows a full tank at all. check the operation of all arrows. Is she even alive? and then further on and you’ll go looking for
Last week it stalled on the way home. The arrow constantly fell, but then showed zero and half the tank. For two days my neighbor (an experienced driver) tried to revive the car. Then we towed it to a mechanic we knew. He barely turned the ignition key and immediately checked the fuel pump, price issue.... Then he gave me a souvenir from the fuel pump, completely clogged.
It was the same thing, they diagnosed the same thing, but it turned out there was no mass) Check your old fuel pump
We checked that it was not shaking and the mesh was clogged with debris.
Connect the sensor wire at the gas tank to ground and look, it should show a full tank. But it fell somehow strangely, not to 0.
tried connecting the 2 wires between each other that are in the photo, but it didn’t work
Well, I should have started with this, I shouldn’t have bought the sensor. Then close them with the chip, if it doesn’t work, then on the tidy.
The only thing left to do is rummage through the wires. I had a similar thing, but after completely removing the fuel module and disassembling it, everything became fine
Well, yes, the reason may be in the wires, because... For some reason, on the fuse block he was heating up the preheater on the stove at speed 4 and melted everything there to hell. And I transferred these wires to him into empty sockets under this front. Maybe there's something wrong there
Everything there is very flimsy, you need to be very careful and very careful)
This is similar crap, only the needle sometimes goes up, sometimes it doesn’t, the light lights up as it should, the on-board indicator also shows the level correctly.
How did the story end? or is it not over yet?
Not finished, let's go to an electrician
It's sad... be sure to post how the story ends.
Maybe the float of gasoline has drunk and is now sinking? see if it's gurgling?
Exactly! I had something like this once)
It was so. When installed in the tank, the contact moved away from the track and the sensor did not show anything. I solved it by bending the tab on the sensor in the tank
In my opinion, judging by the photo, the path is broken in the left 1/3 (bright place). Check: wipe the path with a dry cloth, wipe it with a school eraser (eraser) again. (Not sandpaper!) Pull the fuel pump out of the tank (so that gasoline does not leak) and turn on the ignition. smoothly raise the float up and down. The arrow should slowly rise and fall. if it doesn’t work, use a piece of wire to bridge the 2 pink leads from the sensor. The arrow should rise. If yes, replace the sensor. Bite off 2 pink wires closer to the sensor, put the sensor in your pocket and in the store)) (pick up the same one) Solder the new sensor to the wires.
I replaced the sensor, I replaced it with a new one, I took an old photo, there were no changes
Using a tester, you can measure the voltage on the sensor wires only by removing the plug, without removing the fuel pump
FLS repair at Kalina
The fuel level sensor does not always need to be replaced; in some cases, cleaning helps. To check the condition of the component and find out whether replacement is necessary, it is necessary to dismantle the fuel pump and remove the FLS from it.
If upon visual inspection it is noticeable that the contacts have oxidized or a coating has formed on them, a fine sandpaper will help. In addition to cleaning the sensor contacts, it is necessary to carry out preventive cleaning of other elements with which it comes into contact during operation. Upon completion, all surfaces are wiped with a dry cloth.
It is advisable to check the operation of the float - it also affects the readings and can cause incorrect data to appear.
After installing the fuel pump in place, the readings should become adequate, however, if this does not happen, you can reboot the control unit by disconnecting the negative terminal from the battery.
After a few minutes, the block resets to zero and the readings become normal. Otherwise, the FLS will need to be replaced, for which you will again have to dismantle the fuel pump, remove the failed component and install a new one in its place.
The replacement procedure is not too complicated, however, if you have questions, you should contact the service.
Removing or replacing the fuel sensor on a VAZ-2110
To dismantle the fuel module and remove the FLS from it using a 17 wrench, unscrew the fittings of the fuel supply and return pipes. We take the tubes to the side.
Then, using a socket head No. 7, unscrew the nuts securing the clamping ring. Since the nuts are usually very tight and may be oxidized (rusted), WD-40 (or a similar product) is used, and their tightening can be loosened by light blows of a hammer on a non-sharp chisel or the handle of a flat-head screwdriver, the “tip” of which is placed on the edge of the nut.
Then, using a screwdriver, we remove the pressure ring from the hatch. We remove the module by carefully removing the FLS float from the hole in the gas tank, being careful not to bend the sensor lever. To do this, tilt the module slightly.
Using a Phillips screwdriver, unscrew the 2 screws securing the FLS to the fuel module. Disconnect the FLS wires from the module connectors. If this is difficult to do on an assembled module, then disassemble it: bend the clamps of the two tubular guides from the pump side (bottom of the module), and then separate the upper and lower parts of the module.
The removed FLS can be inspected and, in case of repairable faults, repaired and replaced, or immediately replaced. We install the FLS in the reverse order of dismantling. During assembly, it is recommended to apply petrol-resistant sealant to the pressure ring and the seals underneath it.
Before closing the hatch of the body opening above the fuel module, you should check the tightness of the fuel line connections. To do this, after connecting the battery ground, turn on the ignition for 5 seconds, while observing whether there is a gasoline leak.
Before purchasing a new sensor, you need to find out the markings of the one installed on the VAZ-2110 - it is better to replace a failed device with the same model. Experts do not recommend choosing a sensor “by eye”, because there are a dozen types of FLS, differing in resistance values. If you don’t guess with the right modification, then the indicator arrow on the dashboard may “float”. The catalog number is printed on the sensor body.
Main symptoms and causes of failure
There are obvious discrepancies between the speedometer and tachometer, and besides, the car is driving at first speed!
This happens both while driving and when the car is just standing still.
For such a malfunction to make itself felt, it doesn’t matter how long the car has driven
Also, in some cases, a sensor may light up, which indicates a malfunction of the power steering. It would seem that these malfunctions have nothing in common, but the speed of a car has been measured electronically for a long time.
Speed sensor
Thanks to electronics, the car can regulate the fuel supply itself. The sensor operates based on the Hall effect. It transmits rotation impulses from the wheel to the controller. If the car is coasting and the speed is no more than 20 km. hour, the system will automatically stop supplying fuel.
Various sensors can be installed on the Lada Kalina. They have the same seats, but are different from each other. In the event that a sensor on a car breaks down, it will be impossible to measure the speed of the vehicle. This will also affect the deterioration of engine performance.
- 1118-3843010.
- 1118-3843010-02.
- 1118-3843010-04.
1118-3843010-04 - the most common speed sensor article number
Symptoms of a broken speed sensor
The sensor must be replaced if the following malfunctions occur:
- The speedometer needle jumps or freezes.
- Mileage does not count.
- Power steering does not work.
- The arrow that shows the fuel level in the tank (tank volume on a station wagon) jumps.
- The light comes on, indicating that the engine needs to be checked.
Repair methods
Inspecting the speed sensor connector
Another reason why the speed sensor does not work may be a wet connector. As a result, the contacts on it begin to oxidize. To avoid this, you need to cover the contacts with sealant.
Dirt deposits on the speed sensor, in this case it is also recommended to check the condition of the oil in the gearbox
It is also not recommended to immediately change the speed sensor when a malfunction is detected. Initially, it is necessary to identify the cause of the malfunction. Clean all contacts and check the device with a tester. Only after identifying the exact cause of the malfunction can it be changed.
Replacing the sensor
To change the speed sensor you do not need any special knowledge. Anyone can do this kind of work on their own. To do this you need:
- Turn off the ignition.
- Remove the air filter.
- Disconnect the wires.
- Unscrew the device mount.
Removing the speed sensor
Sometimes simply cleaning the contacts can help. In the case when the car has an eight-valve engine, the replacement is a little more complicated than with a 16-valve engine. In this case, you will also have to remove the corrugation that is attached to the filter. The sensor itself is located on the gearbox housing.
Failure of the speedometer itself (instrument panel)
The speed sensor may not always be the reason why the speedometer does not work. The reason may also be in the instrument panel. Here we must remember that it is impossible to repair it or replace some parts on it separately. They just change it completely.
If the car's warranty has already expired, then try replacing the speed sensor yourself, but before that, check the signals at its contacts with a tester. There is nothing complicated about this, and most sensors can be checked yourself!
Lighting
Light bulbs, Headlight lamp, Halogen lamps, Xenon lamps, LED lamps, PTF lamp, Rear PTF lamp, Tail lamp lamp, Brake lamp, License plate lamp, Brake lamp, Reversing lamp, Parking lamp, Turn signal lamp, Instrument panel lamp, Trunk lamp, Engine compartment lamp, Interior lamp, Heater backlight lamp, Headlight, Left headlight, Right headlight, Xenon headlight, Headlight washer, Headlight washer pump, Headlight washer nozzle, Headlight range control, Additional headlight, Finder headlight, Headlight ignition unit, Sensor ground clearance, Headlight mount, Headlight cover, Headlight reflector, LED headlight, Headlight glass, Fog light (PTF), Fog light, PTF mount, Fog light, PTF frame, Tail light, Reversing light, Brake light, Running lights, Side lights , Reflector (reflector), Side marker, Parking lights, Turn signal, Side turn signal, Rear turn signal, Front turn signal, Repeater, Lamps, License plate light, Trunk light, Door light, Engine light, Dashboard light, Interior light, Rotating light
FLS repair at Kalina
The fuel level sensor does not always need to be replaced; in some cases, cleaning helps. To check the condition of the component and find out whether replacement is necessary, it is necessary to dismantle the fuel pump and remove the FLS from it.
If upon visual inspection it is noticeable that the contacts have oxidized or a coating has formed on them, a fine sandpaper will help. In addition to cleaning the sensor contacts, it is necessary to carry out preventive cleaning of other elements with which it comes into contact during operation. Upon completion, all surfaces are wiped with a dry cloth.
It is advisable to check the operation of the float - it also affects the readings and can cause incorrect data to appear.
After installing the fuel pump in place, the readings should become adequate, however, if this does not happen, you can reboot the control unit by disconnecting the negative terminal from the battery.
After a few minutes, the block resets to zero and the readings become normal. Otherwise, the FLS will need to be replaced, for which you will again have to dismantle the fuel pump, remove the failed component and install a new one in its place.
The replacement procedure is not too complicated, however, if you have questions, you should contact the service.
FLS design
The FLS is a rheostat with nichrome resistance. The float lever is responsible for the movement of the adjustable contact, and the latter’s console is equipped with a contact point. When the contact is in a certain position, a circuit is completed and an indicator on the dashboard lights up, indicating that the tank needs to be refilled.
The Kalina fuel level sensor fails after a certain mileage. Incorrect data will indicate the need for repair. The reason for this is the thinning of the contact, which occurs for natural reasons - due to friction of the slider.
Checking the speed sensor
First you need to find out whether there is grounding and 12 V voltage in the contacts. These contacts are wired, and the contact with pulse signals is tested by torsion.
The voltage between the pin and ground should be in the range from 0.5 V to 10 V.
Method 1 (check with a voltmeter)
- We remove the speed sensor.
- We use a voltmeter. Let's find out which terminal is responsible for what. We connect the incoming contact of the voltmeter to the terminal that outputs pulse signals. We ground the second contact of the voltmeter to the engine or machine body.
- By rotating the speed sensor, we determine whether there are signals in the operating cycle and measure the output voltage of the sensor. To do this, you can put a piece of tube on the sensor axis (twist at a speed of 3-5 km/h). The faster you rotate the sensor, the higher the voltage and frequency in the voltmeter should be.
Method 2 (without removing from the car)
- Place the car on a jack so that one wheel does not touch the ground.
- We connect the contacts of the sensor with a voltmeter.
- We rotate the wheel and diagnose whether voltage appears - if there is voltage and frequency in Hz, then the speed sensor is working.
Method 3 (check with a control or light bulb)
- Disconnect the pulse wire from the sensor.
- Using the control, we look for “+” and “–” (after turning on the ignition).
- We hang one wheel as in the previous method.
- We connect the control wire to the “Signal” wire and rotate the wheel with our hands. If “-” lights up on the control panel, then the speed sensor is working.
If you don’t have a control at hand, you can use a wire with a light bulb. The test is carried out as follows: connect one side of the wire to the battery positive. Another signal to the connector. When rotating, if the sensor is working, the light will blink.
Connection diagram
Checking the DS with a tester
Preparation for removing or replacing the fuel sensor on the VAZ-2110 and Lada Kalina
Replacing the FLS on a VAZ-2110 and Lada Kalina is possible only after preliminary dismantling of the fuel module. It is advisable that during work the tank is filled with gasoline to no more than half.
The procedure for preparatory operations for the VAZ-2110 and Lada Kalina is the same:
- Remove the lower part of the rear seat.
- We bend the protective mat and sound insulation of the body above the fuel module hatch.
- We clean the hatch cover and the body around it from dust and debris.
- Using a Phillips screwdriver, unscrew the 4 screws securing the hatch cover to the body.
- Remove the cover.
- We remove accumulated dirt and dust from the fuel module.
- Having released the connector block lock, disconnect the connector with wires from the fuel module body.
- We relieve the gasoline pressure in the fuel line - turn on the starter for 10–15 seconds so that it rotates the crankshaft during this time (if the engine starts, then wait until the gasoline from the fuel line is exhausted and the engine stalls itself), and then turn off the ignition.
- We disconnect the “ground” of the car with a button or by disconnecting the battery terminal.
Main malfunctions in the sensor operation
If the sensor does not display the fuel level correctly, you can judge that a certain breakdown has occurred and needs to be repaired. Modern sensors that record the fuel level, like all vehicle parts, fail from time to time. In this case, it is necessary to repair the fuel level sensor.
Malfunction in indicators
The main sign of a sensor failure is the display of false data displayed on the pointer. Based on its “behavior,” certain conclusions can be drawn regarding the resulting breakdown. Here are the most basic types of breakdowns and their causes:
The indicator is at zero, regardless of the fuel level
The problem is that the float stop is broken. The pointer moves, but still drops to the zero mark. In this case, you need to pay attention to the general condition of the device winding, as well as the reliability of the contact between the sensor and the current collector. Fluctuations in fuel quantity indicators. This malfunction indicates sufficient wear on the contacts. When starting the engine, the fuel gauge does not rise above the zero mark. Such a malfunction is directly related to the electronics of the vehicle
Here it is important to check the wires for possible breaks and the degree of reliability of the connection. It is important to ensure the overall integrity of the fuse. The low fuel light does not come on. This problem is often associated with device failure. The fuel level sensor is lying
In such a situation, it will be necessary to check the float for the level of tightness
This problem is often associated with device failure. The fuel level sensor is lying. In such a situation, it will be necessary to check the float for the level of tightness.
According to modern traffic regulations, operating a car with a faulty indicator is strictly prohibited. Problems that arise with sensors must be eliminated as promptly as possible.
Mechanical and functional malfunction
Along with problems that are expressed in incorrect indicators, sensor failure can manifest itself in the following malfunctions:
- loss of tightness of the built-in float;
- strong bending of the wire holder;
- violation of the general tightness of the housing and the resulting decrease in the level of resistance;
- mechanical break of the variable resistor;
- loss of tightness at the point where the device is attached to the fuel tank.
After the float loses proper tightness, the control device, with a full tank, will indicate an incomplete fuel level. If there is a sufficiently strong loss of tightness, the indicator will immediately show the minimum fuel level. In this case, the actual quantity will not matter. To fix this problem, you will need to remove the sensor and replace the float. If it is not possible to purchase a float, you will need to completely replace the entire device.
Quite often, the sensor fails due to long-term movement over rough or uneven terrain. Repeated impacts on the tank will cause serious damage to the wire holder of the built-in float.
With such bends, the behavior of the indicator will directly depend on where the holder was bent. If the bend is directed upward, the parameters will always be increased, if downward, the parameters will be underestimated. If the breakdown involves such a bend, you just need to straighten the wire holder and give it its original shape.
Often the seal of the sensor housing is broken. This happens after an accident has occurred, as well as after long-term use of low quality fuel. If gasoline gets into the device, it will malfunction and, as a result, cause incorrect sensor readings. These malfunctions can only be eliminated by completely replacing the device.
If the variable resistor breaks, this will cause the sensor to always show a full or completely empty tank. Similar signs can be observed in the process of a break in the signal wire running from the sensor to the display unit. Before removing the sensor, you will need to connect a variable resistor with a resistance level of 100 - 200 Ohms to the car body and to the signal contact. As you rotate the knob, you need to make sure that the sensor readings change. In this case, the malfunction can only be eliminated by completely replacing the device.
This is interesting: Updated Subaru Forester
The main sign of a complete loss of tightness at the installation site of the device is the appearance of the smell of gasoline in the cabin.
Article: 9P5.139.031, additional articles: DUT-K
Order code: 116283
- Buy with this product
- show more
Fuel level sensor 9P5.139.031 (DUT-K)
The fuel level sensor (FLS) is used as part of the electric fuel pump module and is designed to determine the fuel level and signal the minimum fuel level in the car’s gas tank.
- Operating ambient temperature: −40°C…+80°C
- Working environment, motor gasoline: Premium-95 GOST R51105 or AI-95 GOST 2084
- Float movement cycles with full amplitude: 2·10 6
- Supply voltage (constant) of the sensor through the fuel level indicator, nominal: 13.5 V
- Supply voltage (constant) of the sensor through the fuel level indicator, operating: 6…15 V
- EBN module: 1118-1139009-10
- Applicability: VAZ "Kalina" for pump 1118-1139009-10
Information used: JSC "Utes"
- There are no reviews for this product yet.
The series of articles “Crystal VAZs, or typical breakdowns of domestic cars” talks about typical problems and malfunctions of cars produced by the Volzhsky Automobile Plant. Today we will talk about the front-wheel drive Samara family, as well as its modern analogues.
The operation of the fuel sensor does not directly affect the safe operation of the vehicle. However, its incorrect readings can indirectly contribute to the creation of not only unpleasant moments on the road, but even an emergency situation. A faulty sensor must be replaced.
Advertisements on NN.RU – Auto
A specialized company for the conversion of trucks produces extensions for man man, iveco and iveco truck tractors.
With us you can not only extend the frame to fit a body of 5.1 m, 6.2 m, 7.5 m, 9 m for Maz Zubrenok, Maz, Kamaz, Ural, Zil, Mitsubishi, Nissan.
The company offers you to upgrade the Fiat Ducato Fiat Ducato basic version for a solution.
Wide selection of hydraulic pumps and hydraulic motors of all series. Axial piston hydraulic motor. Splined shaft, reverse rotation. Analogs - (many. Price: 1,000 rub.
If you heard Dmitry Bykov on the radio, read his columns, books, articles, came to lectures, you do not know him. He is a poet.
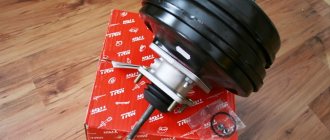
Replacing the fuel pump Kalina
Before replacing, read the operating manual to study the location of the fuel system element, the specifics of the adjacent fuel lines and types of fasteners
When working, it is important to follow the outlined algorithm so as not to disrupt the functioning of the fuel supply system. Damage to the fuel line or improper assembly of the fuel module can lead to engine damage and even a car fire.
To carry out the work, the car owner will need:
- pliers;
- hammer;
- screwdrivers for flat and Phillips slots.
Sequence of replacing the fuel pump Lada Kalina
Before starting work, you need to “de-energize” the Kalina by disconnecting the battery terminals. Repair procedures should be carried out away from fire and places where sparks could be generated.
- We dismantle the rear seat and floor trim;
- Under the seat there is a fuel tank cap secured with 4 “cross” bolts. Unscrew;
- Now the car owner has access to the top cover of the fuel pump;
- Now you need to “unhook” all the plugs and fittings from the pump. To remove the power plug, press the latch upward and pull the plug to the side. The power plug itself is located on the left side of the fuel pump cover;
- To remove the fittings, you must use pliers. The locking clamp is pressed out by hand, after which the fitting itself is removed using pliers. The main thing is not to confuse the fittings: the lock on the top is green, the lock on the bottom is metal;
- After dismantling the fittings, clean the fuel pump cover as much as possible - dirt will not get into the gas tank;
- Removing the fuel pump cover retaining ring: take a flat-head screwdriver, place it against the outline of the ring and lightly tap it with a hammer so that the ring moves clockwise. The latch should pop out and the cover will be accessible;
- Open the cover and carefully pull the pump up so as not to damage the adjacent elements. Additionally, make sure that no sand gets into the tank;
- We take the new pump and carefully immerse it in the technological hole. We attach the lid. Next, assembly is carried out in reverse order.
Power system Lada Kalina / Lada Kalina (VAZ 1118, 117, 1119)
Basic data for monitoring, adjustment and maintenance
| Fuel (according to GOST 51105-97) | Gasoline "Premium-95" |
| Fuel tank capacity, l | 50 |
| Pressure developed by the fuel pump, not less than, kPa (bar) | 320 (3,2) |
| Fuel module | 1118-1139008-10 |
| Fuel rail | 1119-1144010, 1119-1144010-01 |
| Operating fuel pressure in the fuel rail, kPa (bar) | 378-390 (3,8-3,9) |
| Fuel injectors | SIEMENS VAZ 20735 |
| Adsorber | 1118-1164010 |
| Air filter element | 2112-1109080 |
| Intake module | 2111-1008600 |
| Throttle assembly | 2112-1148010 |
Tightening torques for threaded connections
| Name of units and parts | Tightening torque, Nm (kgf-m) |
| Fuel module mounting nuts | 1,0-1,5 (0,1-0,2) |
| Fuel line tube end nut | 20,0-34,0 (2,0-3,4) |
| Fuel rail mounting bolts | 9,0-13,0 (0,9-1,3) |
| Throttle assembly nuts | 14,3-23,1 (1,5-2,3) |
| Intake module mounting nuts | 20,0-24,0 (2,0-2,4) |
Throttle assembly: 1 - throttle valve drive sector; 2, 4 — fittings for connection to the engine cooling system; 3 — crankcase gas supply fitting; 5 — throttle position sensor; b idle speed regulator; 7 — fitting for connecting to the adsorber; 8 — throttle valve; 9 — throttle body pipe
The power system consists of a fuel tank, a fuel module, a fuel filter, a fuel rail with injectors, an air filter, fuel lines, air ducts, a throttle assembly, an intake module, and a gasoline vapor recovery system.
The air entering the engine cylinders is cleaned of dust by an air filter. The air filter is installed in the engine compartment on three rubber supports. The filter element is replaceable and made of special paper. To prevent contaminated air from leaking into the intake tract, there is a sealing edging at the top of the element. To replace the filter element, the filter cover is removable. The purified air passes through the mass air flow sensor through the air duct to the throttle valve.
The throttle valve regulates the amount of air entering the engine cylinders. The damper drive from the gas pedal is a cable drive. The damper rotates on an axis in the housing (pipe). The throttle body is secured to the intake module flange with studs. The housing has a channel for coolant. The channel is connected to the cooling system by rubber hoses. Circulating coolant through the throttle body prevents the body's internal air cavities from freezing in the winter. The housing contains fittings for connection to the adsorber and the engine crankcase ventilation system.
The throttle body with the throttle position sensor and idle speed control installed on it form the throttle assembly.
The fuel supply is stored in a tank with a capacity of 50 liters. The fuel tank is steel, welded from two stamped parts. The tank is suspended from the bottom of the car on two steel clamps. The filler neck of the fuel tank is located on the right side of the vehicle and is closed with a plug. Fuel from the tank is supplied by an electric submersible fuel pump.
New Lada: Buy Stabilizer struts Lada Granta / Kalina-2, Datsun 21928 (24mm) SS-20 (with rubber bushings) for 645 rub.
The pump is installed in the fuel tank. To access the pump, there is a hatch with a cover in the bottom of the car under the rear seat cushions.
A strainer is installed on the inlet pipe of the fuel pump, which traps small solid particles of debris that enter the fuel tank along with gasoline. The pump is supplied with voltage at the command of the computer when the ignition is turned on. If no attempt is made to start the engine, then after 2-3 seconds the ECU will turn off the fuel pump.
From the pump, through the corrugated tube of the fuel module (see below), gasoline enters the fuel line and then into the fuel filter, where the fuel undergoes more thorough cleaning.
Fuel pump: 1 - protrusion for attaching the strainer; 2 — fuel intake pipe for connecting a strainer; 3 - body; 4 — electrical connector block; 5 - outlet (discharge) pipe for connection to the fuel module cover with a corrugated tube
The fuel filter is made of paper, installed in a non-separable metal housing.
Fuel filter: 1 — inlet pipe; 2 - body; 3 — fuel flow direction arrow (painted on the filter housing); 4 - outlet pipe
The purified fuel flows through the fuel line into the fuel rail.
The fuel rail holds four injectors and supplies fuel to them. The connection between the ramp and the injectors is sealed with rubber rings. The ramp is secured to the cylinder head with bolts.
The fuel pressure regulator is a bypass valve that maintains a working pressure of 378-390 kPa in the system (fuel line), necessary for the proper operation of the injection system.
Adsorber: 1 — tube connecting the adsorber to the separator; 2 adsorber body; 3 - pipe for connecting the internal cavity of the adsorber with the atmosphere; 4 - tube for connecting the adsorber to the adsorber purge valve
In accordance with current environmental requirements, the car is equipped with a fuel vapor recovery system; the above-fuel space of the tank is connected to the atmosphere not directly, but through the elements of this system. The system consists of a separator, an adsorber, an adsorber purge valve, connecting tubes and hoses. The separator is mounted under the left rear fender of the car. In the separator, gasoline vapors are partially condensed and returned back to the fuel tank through the filler pipe.
From the separator, non-condensed gasoline vapors flow through tubes and connecting hoses into the adsorber, which prevents the vapors from entering the atmosphere. An adsorber is a container where gasoline vapors are absorbed by activated carbon. When the engine operates at a high crankshaft speed, the ECU sends a signal to open the canister purge valve, and gasoline vapors are sucked into the intake module receiver.
The adsorber is mounted on the fuel tank on the left and covered with a protective screen.
Location of engine power system elements in the engine compartment:
1 — intake module; 2 — throttle assembly; 3 — air supply hose to the throttle valve; 4 — air filter; 5 — air intake; 6 — fuel rail; 7 — throttle valve drive cable; 8 — diagnostic fitting of the fuel rail Note. Engine with decorative trim removed.
Main malfunctions in the sensor operation
If the sensor does not display the fuel level correctly, you can judge that a certain breakdown has occurred and needs to be repaired. Modern sensors that record the fuel level, like all vehicle parts, fail from time to time. In this case, it is necessary to repair the fuel level sensor.
Malfunction in indicators
The main sign of a sensor failure is the display of false data displayed on the pointer. Based on its “behavior,” certain conclusions can be drawn regarding the resulting breakdown. Here are the most basic types of breakdowns and their causes:
The indicator is at zero, regardless of the fuel level. The problem is that the float stop is broken. The pointer moves, but still drops to the zero mark. In this case, you need to pay attention to the general condition of the device winding, as well as the reliability of the contact between the sensor and the current collector. Fluctuations in fuel quantity indicators. This malfunction indicates sufficient wear on the contacts. When starting the engine, the fuel gauge does not rise above the zero mark. Such a malfunction is directly related to the electronics of the vehicle
Here it is important to check the wires for possible breaks and the degree of reliability of the connection. It is important to ensure the overall integrity of the fuse. Low fuel light does not light up
This problem is often associated with device failure. The fuel level sensor is lying. In such a situation, it will be necessary to check the float for the level of tightness.
According to modern traffic regulations, operating a car with a faulty indicator is strictly prohibited. Problems that arise with sensors must be eliminated as promptly as possible.
How does the device work?
To understand the problem yourself, you need to understand how the fuel level is measured and information is transmitted to the device indicator. The circuit implemented in most vehicles includes the following main elements:
- a float made of lightweight polymer is immersed in the gas tank and is often combined with the pump block;
- gasoline sensor – lever-type potentiometer (otherwise known as rheostat);
- pointer arrow with scale;
- connecting wires.