One of the problems that often happens with a Lada Kalina car is incorrect fuel level readings. As a rule, this is due to a malfunction or failure of the fuel level sensor. Moreover, you don’t always need to change it, you can try to clean it - in most cases this helps. In other words, repairing the sensor consists of cleaning it.
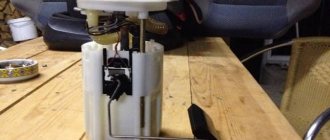
In order to get to the Lada Kalina fuel sensor, you need to remove the fuel pump. First, disconnect the negative terminal from the battery, lift the back seat, bend the noise suppressor and remove the cover by unscrewing the four screws. After this, disconnect the fuel hoses of the fuel pump by pressing the clamps inward and disconnect the power plug.
Then we turn the pressure ring counterclockwise and remove it. Now you can get the fuel pump. Under its top cover there is a contact connector, which is held on by a latch. Press the latch and remove the connector. Then we remove the terminal from the pressure regulator, simply moving it up along the slide, and remove the contact connector from the fuel level sensor. Now you can press out the two clamps that secure the fuel level sensor to the fuel pump bulb and remove it.
Some sensor contacts may be coated or simply oxidized, but it is better to clean everything. To do this you need to use a sandpaper. Also, for preventive purposes, it is better to clean all the contacts that we have freed. After cleaning, wipe them with a dry cloth. In order not to remove the fuel pump once again, it is worth checking the float.
It happens that gasoline gets into it and it doesn’t float well - this causes incorrect fuel level readings. You just need to remove the float from the handle, pour gasoline into a small container and lower it into it. If it is more than half immersed in gasoline, then you need to install a new one. Before installing a new one, it is also better to check it - there is always a risk of manufacturing defects. The entire assembly is carried out in reverse order.
If, after assembling and installing the fuel pump, the fuel level readings remain the same, this may be due to the control unit. You can try disconnecting the negative terminal from the battery again and wait a few minutes. The control unit will reset and everything should fall into place.
The operation of the fuel sensor does not directly affect the safe operation of the vehicle. However, its incorrect readings can indirectly contribute to the creation of not only unpleasant moments on the road, but even an emergency situation. A faulty sensor must be replaced.
Fuel level sensor on viburnum does not work
One of the problems that often happens with a Lada Kalina car is incorrect fuel level readings. As a rule, this is due to a malfunction or failure of the fuel level sensor. Moreover, you don’t always need to change it, you can try to clean it - in most cases this helps. In other words, repairing the sensor consists of cleaning it.
In order to get to the Lada Kalina fuel sensor, you need to remove the fuel pump. First, disconnect the negative terminal from the battery, lift the back seat, bend the noise suppressor and remove the cover by unscrewing the four screws. After this, disconnect the fuel hoses of the fuel pump by pressing the clamps inward and disconnect the power plug.
Then we turn the pressure ring counterclockwise and remove it. Now you can get the fuel pump. Under its top cover there is a contact connector, which is held on by a latch. Press the latch and remove the connector. Then we remove the terminal from the pressure regulator, simply moving it up along the slide, and remove the contact connector from the fuel level sensor. Now you can press out the two clamps that secure the fuel level sensor to the fuel pump bulb and remove it.
Some sensor contacts may be coated or simply oxidized, but it is better to clean everything. To do this you need to use a sandpaper. Also, for preventive purposes, it is better to clean all the contacts that we have freed. After cleaning, wipe them with a dry cloth. In order not to remove the fuel pump once again, it is worth checking the float.
It happens that gasoline gets into it and it doesn’t float well - this causes incorrect fuel level readings. You just need to remove the float from the handle, pour gasoline into a small container and lower it into it. If it is more than half immersed in gasoline, then you need to install a new one. Before installing a new one, it is also better to check it - there is always a risk of manufacturing defects. The entire assembly is carried out in reverse order.
If, after assembling and installing the fuel pump, the fuel level readings remain the same, this may be due to the control unit. You can try disconnecting the negative terminal from the battery again and wait a few minutes. The control unit will reset and everything should fall into place.
If your Kalina has problems related to the fuel level indicator in the tank, then the following reasons may contribute to this:
- Failure of the instrument panel, or more precisely, the element that is responsible for the arrow of the fuel level indicator
- Failure of the FLS - fuel level sensor, which most often happens
In this case, we will consider the second problem in more detail, since it is the FLS that is most often the reason for the failure of the normal operation of the gasoline level needle in the tank. Of course, all this can be done with your own hands without extra effort and any special tools. As for the tool, we will need the following:
- pliers
- flat screwdriver
- hammer
Most of what is listed above is necessary to remove the pump from the Kalina gas tank. As for replacing the fuel level sensor, only one flat screwdriver will be enough.
DIY diagnostics
To find the reason why the fuel level sensor does not work, you will need a multimeter (we recommend reading how to use a multimeter) and a tester. The first step is to determine whether the cause of the breakdown is in the sensor located in the tank or in the indicator. To do this, remove the connector connected to the fuel section (located at the gas tank flap, which in most cases is accessible from the passenger compartment). Using the wiring diagram of your car model, determine which wire goes to the dashboard indicator. Turn on the ignition, then apply negative potential to the corresponding pin of the connector through the test lamp. If the pointer arrow quickly points upward, then the problem is in the sensor. For further diagnostics it is necessary to remove the fuel section. A multimeter will measure the resistance of the potentiometer.
If there is no reaction, the problem is in the wiring going to the dashboard, or in the indicator itself inside the dashboard. A broken wire can be checked by measuring the resistance of the wire with a multimeter. But you can check the contacts for “stray” resistance only when checking the wire under load. If you still cannot understand the principle of operation of the sensor, the essence of diagnostic methods and troubleshooting, we recommend entrusting the work to a professional auto electrician. For a visual representation, we recommend watching the videos attached to the article, which show methods for diagnosing the main faults of the fuel level sensor.
How does the device work?
To understand the problem yourself, you need to understand how the fuel level is measured and information is transmitted to the device indicator. The circuit implemented in most vehicles includes the following main elements:
- a float made of lightweight polymer is immersed in the gas tank and is often combined with the pump block;
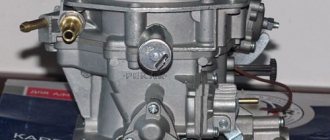
- gasoline sensor – lever-type potentiometer (otherwise known as rheostat);
- pointer arrow with scale;
- connecting wires.
In many modern cars, an electronic control unit is connected to the system.
The classic rheostat is an open coil of high resistance wire. A lever equipped with a contact and attached to the float rises or falls with the level of fuel in the tank, and the contact moves along the turns of the winding. The classic scheme works simply:
- The rheostat and the pointer device are connected in series in the circuit, both are powered from the vehicle's on-board network.
- When moving the float with the lever, the resistance of the potentiometer changes.
- A change in resistance causes an increase or decrease in the current in the circuit, to which the indicator arrow reacts. The scale is graduated according to the resistance values corresponding to the filling of the gas tank.
Conditions for correct operation
If you have not previously encountered electrical devices and do not know how the fuel level indicating system works, familiarize yourself with the following concepts:
- variable resistance (rheostat) is a device with which you can adjust the value of resistance. The greater the resistance in the circuit, the less current flows in it;
- Fuel level indicator (FLU) is an element of the instrument panel that indicates the amount of fuel in the tank. Can be analog or electronic;
- Fuel level sensor (FLS) is a meter located in the tank.
Most systems for indicating the fuel level in a tank operate on the same principle. There is a float in the tank, on the counterpart of which there is a sliding contact. The sliding contact moves along a plate with contacts (resistive substance), rigidly fixed to the meter body. Moving the sliding contact changes the resistance value, thereby increasing or decreasing the amount of current passing in the circuit. The lower the resistance, the more current flows in the circuit and the more the fuel level indicator needle deviates.
How much does it cost to check and repair a part?
Fuel level sensors are precision instruments that are used to refuel a vehicle in a timely manner. Repair of the fuel meter must be carried out in a timely manner for the safe and comfortable use of the vehicle.
Replacing a fuel level sensor in Moscow from Yudu contractors is inexpensive - look at the approximate prices in the price lists to navigate the offers and choose the most profitable one. The cost of replacing a fuel level sensor depends on the following criteria:
- make and model of the car (VAZ, Moskvich, Gazelle and other brands of domestic or foreign production)
- meter type
- cost of new car sensors
- urgency of repair work
Yudu contractors install high-quality fuel level sensors on cars and provide a guarantee for the work performed. Experienced specialists will replace the sensors after a complete check of the fuel system.
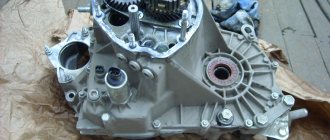
Removing or replacing the fuel sensor on Lada Kalina
Dismantling the fuel module and removing the FLS from it on the Lada Kalina:
- By squeezing the spring clamps of the fuel line tips, we disconnect the gasoline supply and return pipes from the module, and then move them to the side.
- Applying light blows with a hammer to the bit attached to the module’s pressure ring, we turn the latter counterclockwise.
- Using a screwdriver, pry the pressure ring out of the hatch.
- We remove the module by carefully removing the FLS float from the hole in the gas tank, being careful not to bend the sensor lever. To do this, the module is tilted slightly.
- We bend the clamps of the two tubular guides from the pump side, and then slide the module cover.
- We disconnect the wires going to the pump from the output contacts of the gasoline pressure regulator, which is installed in the module cover (remove their tips).
- Having released the connector lock installed on the module cover, disconnect the block with wires.
- Using a slotted screwdriver on the connector of the fuel pump protruding from the module body, release the retainer securing the wire block.
- Carefully disconnect the block with wires from the pump.
- At the FLS located on the side of the module body, we release 2 clamps for its fastening.
- We move the FLS along the grooves of its seat on the module and remove it.
The dismantled Lada Kalina FLS is immediately replaced or inspected and repaired in case of repairable defects. We install a repaired or new FLS and assemble the module in the reverse order. Carefully insert the lever with the float into the hole in the gas tank, put the fuel module in place and orient it so that the arrow marked on the module cover points backward (along the direction of the car), and the fixing protrusion of the cover fits into the groove of the flange of the tank hole.
We install the pressure ring, and then turn it clockwise all the way. After making sure that the module is securely fastened, we connect the connector with wires and fuel pipes. We connect the battery ground. Turn on the ignition for 5 seconds to check the tightness of the fuel line connection. Reinstall the hatch cover, and then the lower part of the rear seat.
Thank you Dislike Micloff 06 Oct 2015
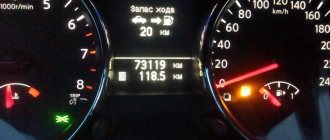
Folks, my topic is also from the realm of science fiction.
When I get into the car in the morning, the sensor shows the correct amount of gasoline. As it heats up, the arrow rises to its maximum value. It’s not clear where to put so much gasoline)))
you can clearly see how it rises, I changed the sensor, no change, they turned it to a hundred, supposedly the whole assembly needs to be changed, but the toad is strangling me to give eight for such nonsense.
where to look? maybe a ground or a wire? Well, it’s not comme il faut to stand on the highway and beg, because the needle may show the maximum, but this is not observed in the tank.
P.S. When cold or if it sits, the data is more or less correct
The most basic reasons for incorrect fuel level display on the VAZ-2112 instrument panel
It happens that the fuel level sensor fails, but there can be many reasons why the fuel level needle is lying, and in this article we will look at the most basic of them.
Fuel level surges
When the fuel level readings “jump”, showing one value or another, the malfunction may lie in the “abrasion” of the circuit board tracks on the fuel level sensor (located on the fuel pump in the gas tank - approx.). They are most often erased due to the impact of the slider on them. This problem can be solved by bending its base to the track, but if they are worn out too much, you will have to replace them together with the float.
Common problems
The fuel volume control system in the gas tank is susceptible to the following malfunctions:
- the pointer indicator lies at zero regardless of the amount of fuel remaining in the tank;
- the device does not display the fuel level correctly - it is lying up or down;
- the needle “jumps” or changes readings in a short period of time;
- The yellow minimum fuel indicator indicator does not light up.
Reference. In some domestic car models, the fuel sensor is lying from the factory. An example is the Chevrolet Niva SUV of the first releases, where the device greatly underestimates the actual level of gasoline. The driver, guided by the sign, pulled into a gas station, only to discover that the tank was full to the top.
There are several reasons why the needle drops to zero:
- Sticking or jamming of the lever.
- The float lost its seal and sank to the bottom.
- An electrical circuit is broken due to oxidized contacts or a wiring problem.
- Failure of the indicator itself or the lever sensor - potentiometer.
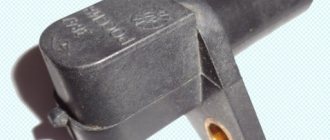
Replacing DS
Replacing a faulty speed sensor is easy. Even a novice motorist can easily cope with this operation. If the car has a 16-valve engine, then the whole procedure takes no more than half an hour and does not require special devices. With an 8-valve power unit, you must first remove the corrugation that is connected to the air filter.
The sensor is attached to the gearbox. It is located next to the speedometer drive. To remove it, you will need a wrench.
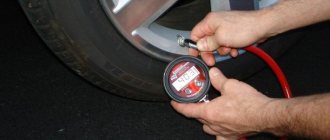
Checking the fuel level sensor with a multimeter
After a visual inspection, a check with a multimeter may also be necessary. In other words, to understand why the fuel sensor is not working, the specified sensor is also checked in ohmmeter mode.
The fact is that the resistor can change resistance over time, which leads to incorrect sensor readings. Resistance should be checked with the tank empty, 50% full and full. If it is determined that the resistance is not normal, it is better to immediately install a new sensor.
We also add that if, after installing a new FLS, the sensor does not accurately determine the fuel level in the tank, this is often due to the fact that the resistance deviates from the nominal one. In fact, we can say that the wrong sensor is installed.
As a rule, when choosing, it is important to consider that although fuel level sensors are visually similar, they usually have different resistance values. In fact, this is what leads to errors.
For this reason, you need to purchase a sensor that has the required resistance.
Fuel level sensor float and other problems
In cases where the fuel level indicator does not work, in some cases it is directly related to the float. Floats can be of two types:
- hollow float made of plastic or thin metal;
- the so-called “foam” float, which is made of a porous base;
In the first case, the float may gradually wear out and become damaged; the fuel level indicator needle gradually fails to reach the maximum when filling a full tank.
Fuel can get inside the hollow float, causing the level sensor to show incorrect data. To fix the problem and carry out repairs, it is necessary to replace the float of the fuel level sensor in the tank.
You also need to understand that if the fuel sensor is lying, you should not exclude the possibility of mechanical damage to the gas tank itself. If the tank is damaged, then the float may simply jam.
As a rule, in this case the pointer works accurately, but the range is very limited. The fuel level arrow may also be “stuck” in only one position. In fact, the problem is not the most harmless and often requires a complete replacement of the gas tank to solve it.
By the way, often when buying a used car, you can hear from the seller that the fuel pump screen was recently cleaned or the fuel pump was replaced, after which the fuel level sensor, etc., stopped working.
At the same time, the seller claims that there is simply no time to fix such a minor breakdown. In fact, if the fuel level sensor in a car does not work, this can be caused either by a failure of the sensor itself or the float, or by deformation of the gas tank. Naturally, changing the tank is quite expensive.
We also note that if the FLS does not indicate the fuel level correctly, the bending of the lever may also be the cause. In this case, the pointer arrow is not able to reach the extreme marks.
Malfunctions
For what reasons may the fuel level indicator not work:
- lack of good contact on any part of the circuit (breaking off wires, oxidation at the junctions of connectors, cracks at soldering points);
- malfunction of the instrument panel indicator (for example, broken solder joints);
- disconnecting the float from the sliding contact;
- fuse burned out;
- lack of contact between the resistive track and the sliding contact. The reason may be the formation of oxides and deposits on surfaces, weakening of the pressure of the sliding contact on the resistive layer, and abrasion of the tracks of the resistive layer.
The pointer is lying and works intermittently
Reasons why the gauge incorrectly shows the fuel level in the tank:
- the presence of additional resistance in the circuit (oxidation at the connectors, poor ground contact, formation of oxides, deposits on the resistive layer and sliding contact);
- Float casting defect, causing it to fill with fuel. Failure is extremely rare, but still possible, as is bending of the float rod due to mechanical impact during unqualified repairs;
- formation of deposits on the guide post (typical only for tubular type sensors). In this case, the movement of the float will be difficult.
The arrow always shows a full tank if the system has:
- the float has separated from the sliding contact (in this case, the slider will always be in the extreme position);
- the wire going to the indicator has a short to ground somewhere, which causes the resistance in the circuit to decrease.
A twitching arrow of the UUT indicates partial abrasion of the resistive track of the potentiometer. This will also cause interruptions in the operation of the pointer. Since the car is most often used with a fuel tank filled to 40-60%, it is in this range that abrasion of the resistive layer occurs most quickly. Therefore, the pointer can only work properly when the position of the sliding contact falls on an intact resistive layer.
Feasibility of repair
p, blockquote 39,0,0,0,0 —>
Repair of fuel level sensors is performed only in exceptional situations. It is almost impossible to completely restore contact zones. There are restoration methods using resistive glue and spot soldering. All methods are short-lived, and most importantly, after repair, the sensor data is not entirely correct. Depending on the number of repaired zones, its accuracy is lost by 20-50%.
p, blockquote 40,0,0,0,0 —>
Video - repairing the fuel sensor in the tank of a Toyota Haice 3L: 0.11
p, blockquote 41,0,0,1,0 —>
p, blockquote 42,0,0,0,0 —>
It is advisable to replace the sensor with a similar new one or a used one from another car of the same brand. It is important that it completely matches the parameters of the “native” sensor. This can be checked even without the help of a multimeter, without installing the sensor. Just put the connector on it and turn on the ignition. Next, tilt the lever to the upper position. The indicator on the dashboard should show a full tank. This way you can select a sensor from another car brand.
p, blockquote 43,0,0,0,0 —>
Warning: All operations with the fuel level sensor removed and the gas tank shaft open should be performed in a well-ventilated area, preferably in the open air, with the car doors open. The tank space should be insulated with a plastic bag to localize fuel vapors.
p, blockquote 44,0,0,0,0 —>
p, blockquote 45,0,0,0,0 —>
p, blockquote 46,0,0,0,0 —>
Advertisements on NN.RU – Auto
Conversion of a cargo-passenger gazelle, an all-metal gazelle, an autoline into a cargo gasel 3302 gas 33023 gazelle-farmer includes c.
Lengthen Kamaz under a body 7.5 m Lengthen Maz Zubrenok, Maz under a body 9 m Re-equipment of the chassis of an extended truck.
A specialized production enterprise for the conversion of trucks invites you to: 1. Lengthen the frame, re-extend it.
In a short time and at a high technical level, you can: 1. Lengthen the frame (chassis) to the required wheelbase of the tow truck. 2.
Very soon Nizhny Novgorod will celebrate its 800th anniversary. Preparations for the celebrations are already being discussed in full in the region, but the authorities have decided.
If you didn’t get to the sea this summer, then there’s no need to worry too much: the resorts of Russia and the surrounding area are holding their breath before the velvet season.
Nizhny Novgorod cemeteries are littered with garbage. Townspeople who decided to visit the graves of their ancestors complain about this (and not for the first time).
Imagine, you wake up in the morning, open the curtains, bright sunlight bursts into your apartment, and outside the window is a stunningly beautiful landscape.
Brakes
Brake pads, Drum pads, Pad wear sensor, Pad repair kit, Pad spacer, Rear pads, Handbrake pads, Front pads, Brake linings, Brake discs, Rear brake discs, Front brake discs, Brake drum, Rear brake drum, Drum bearing, Brake hoses, Brake pipes, Brake caliper, Caliper repair kit, Rear caliper, Caliper guides, Front caliper, Caliper piston, Caliper boot, Caliper bracket, Hydraulic accumulator, Vacuum brake booster, ABS, ABS unit, ABS sensor, Vacuum pump, Brake pedal, Switch Brake Light, Air Brakes, Parking Brake, Handbrake Cable, Brake Cylinder, Master Cylinder, Brake Reservoir, Brake Service Cylinder, Rear Brake Cylinder, Front Brake Cylinder, Brake Cylinder Repair Kit