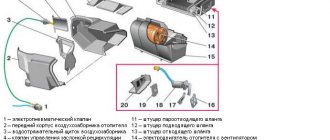
The instrument panel serves to inform the driver about all important processes occurring in his car. It is by using the scales, indicators, symbols and lamps located on this device that the person sitting behind the wheel is able to monitor the performance of components and systems. For the shield to function correctly as a single system, it requires regular diagnostics. It consists not only of scanning by connecting electronic reading devices to the computer, but also by visually monitoring the performance of all specified components of the dashboard (lamps, etc.).
So that the owner of the Lada Kalina, namely the instrument panel of this model we will talk about today, can easily navigate this complex device, the manufacturer kindly agreed to complete the car with the appropriate instructions. It is enough to familiarize yourself with its postulates and all the secrets of the dashboard will be revealed to you, then the instrument panel will not seem like something incredibly complicated.
The manufacturer did his best when developing the design of such a thing as the instrument panel on the Lada Kalina car. It is unlikely that you will be able to find owners dissatisfied with the “interface” of the device. The dashboard is painfully informative and primitive in terms of perceiving symbols and managing some of them.
Now let's move on to a more detailed consideration of the structural components of such an important element of the car as the dashboard. Many car owners will find a full description of the icons useful.
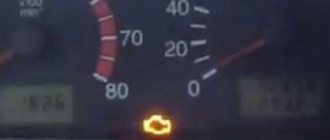
What does the Check Engine icon mean on Kalina?
When the check light is on on Kalina 1, the engine is first tested. Perhaps this is where the problem lies and urgent emergency maintenance will need to be performed. In situations where the engine is normal, but there is a signal, you need to check the quality of the fuel.
Important! If the check light comes on after refueling in a new place, it is enough to check the quality of the fuel. When it is low, the warning system lights up, the solution is simple - fill it with good fuel.
The check engine icon looks the same in different cars
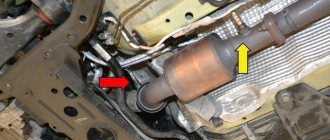
If the check light on Kalina 8 valves comes on, the reasons can be sought in the fuel supply system. Even minimal failures, failure of the tank cap or catalyst lead to serious malfunctions over time. It is easy to identify such problems; the main thing is to regularly carry out visual inspections.
The signal indicator is located on the instrument panel in the area of the revolution counter. It looks like a rectangle, inside of which there is a corresponding inscription. If the simplest tests do not help determine the cause, routine diagnostics are needed.
Important! If the blinking goes away on its own, then the problem has gone away too.
Description of the instrument panel: part 1
The instrument panel consists of control and measuring devices and is mounted on a panel. The combination of indicators is designed to display the driving characteristics and general condition of the vehicle. As mentioned above, the instrument panel contains 23 elements.
Tachometer. Its function is to indicate the crankshaft speed. If the instrument panel backlight is red, it means the engine is operating in dangerous mode.
Brake force fault indicator. During ignition, the lamp may light up red several times. If it flickers in other cases, repair is necessary.
Indicator indicating battery status. When the lamp glows red, this indicates a lack of battery charge.
Turn signals (left and right). They flash when turned on during a particular turn.
The speedometer indicates the speed at which the car is moving.
Emergency lubricant pressure in the engine. This lamp should go out immediately after the engine starts.
Handbrake indicator. The instrument panel contains this lamp to indicate the activation of this mode.
Running self-diagnosis, reading error codes, erasing errors (check engine)
Hello, tell me how to reset the error: Before starting the engine, I disconnected the air flow sensor (the connector on the air filter cover), and then I forgot to connect it and started the engine, after which it shows an error on my panel - the Engine System Malfunction Warning Light (orange) came on. . I turned the sensor back on, but the icon did not go out. How can I reset this error? Thanks in advance for your answer
Try this: To check 1. Turn on the ignition (without starting the engine), count for 3 seconds. 2. Quickly (within 5 seconds) press the gas pedal all the way 5 times 3. Immediately after the last press (release the pedal completely), count 7 seconds. 4.Press the pedal all the way and hold it until the CHECK (MI indicator) starts flashing. 5.Release the pedal and read the codes
four series of 10 flashes code 0000 - no problems detected if, for example, code 0102 - looks like this: 10 flashes // 1 flash // 10 flash // 2 flash. // — pause after reading the last error, everything repeats in a circle until you turn off the ignition.
We erase the errors that we received during check 0. Before performing step 1, the ignition must be turned off for at least 10 seconds 1. Turn on the ignition (without starting the engine), count 3 seconds. 2. Quickly (within 5 seconds) press the gas pedal all the way 5 times 3. Immediately after the last press (release the pedal completely), count 7 seconds. 4. Press the gas pedal all the way and keep it pressed until the “check” blinks in four series of 10 flashes
If the check engine light comes on on the dashboard of a Lada Kalina with an 8-valve engine, this is a fairly common occurrence. The reasons for the appearance of such an alarm signal are different, and there are many of them and most owners have already become familiar with them. Many car owners are interested in the question of how to reset a check.
In our material we will try to determine the main factors affecting the activation of this lamp. To identify the causes, you can use the diagnostic service of the service center. It is also possible to determine the influencing factor in independent mode. And how to reset a check.
Lada Kalina model: immobilizer, removal and disabling of the IMMO function
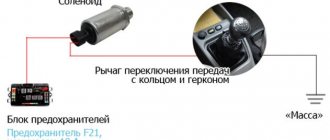
First of all, if we consider the emergency shutdown of the immobilizer, you need to know where the immobilizer is located on Kalina, as well as how to disable the immobilizer with your own hands. In short, the immobilizer control unit on the Lada Kalina is located under the instrument panel (in the area of the central air duct of the interior ventilation and heating system).
There is also an antenna installed in the ignition switch for reading the signal (it has the shape of a ring). The transponder chip is installed in the head of the key. The key tag is read automatically when the driver inserts the key into the ignition.
To get to the immo control unit, you need to prepare a cross-head screwdriver, plastic spatulas for removing decorative elements of the interior, as well as an extension with a universal joint, and a head for cross-head screws to remove the block.
For example, when disassembling Kalina 1 without air conditioning:
- First you need to disconnect the battery, open the ashtray, unscrew the 4 screws securing the case, and remove it from the special socket.
- Next, remove the 2 plugs located on the side of the emergency light button. Then you need to unscrew the 2 fastening screws under the plugs.
- Then the temperature and airflow direction switches are removed. Now you can pull the central cladding towards you by carefully removing its latches.
- Afterwards, you need to disconnect the electrical connectors connected to the elements on the cladding.
- Remove the standard unit, secured with two screws in a plastic case under the central air duct;
- Next, you need to press the latch and disconnect the connector from the unit.
This information may be useful if problems arise with the unit, as well as when installing additional equipment, the need to integrate an immobilizer crawler, etc.
We also recommend reading the article about what to do if the alarm blocks the engine from starting. From this article you will learn what can be done when, as a result of a malfunction or error, the car alarm blocks the engine from starting, how to reset errors, etc.
For example, to disable the immobilizer with your own hands, you may need to remove the control unit, put a key or tag in it, or integrate a separate emulator block to bypass immo without a key. This may be required when installing an alarm system with auto start.
- Let us add that there are also other methods of disabling, which depend on the type of control unit (ECU) on a particular car. For example, a Bosch M7.4 unit can be flashed so that the engine starts without problems; a key with a mark is not needed. In this case, the immobilizer icon will light up and then go out after the engine starts.
In turn, the Bosch 7.9.7 unit will require resoldering of the resistor, after which the firmware is carried out. However, if the block is January 5.1 or January 7.2, removing the immobilizer function from the block is somewhat more difficult. In short, you need to unsolder and reflash the EEPROM flash memory, integrate separate circuits, etc.
Of course, in such cases it is better to entrust the Lada Kalina immobilizer to experienced specialists who have certain skills and knowledge, as well as experience in performing such work. Otherwise, there is a risk of damaging electronic devices with all the ensuing consequences.
Other engine and system malfunctions
- Compression in the engine cylinders is low.
- The cylinder head gasket is damaged.
- The engine control system is faulty.
- The valves of the gas distribution mechanism are burnt out and leaky.
- The exhaust system is leaking.
- The valve clearances are not adjusted (8-valve engines only).
- The hydraulic pushers are faulty.
- The engine air filter is dirty.
- Vacuum hose connections are leaking.
Have you encountered power failures or observed unstable engine operation? What was the reason? We solve similar power unit problems in the comments or on the forum. Let us remind you that along with misfires, other engine malfunctions may appear, for example, floating speed.
Found an error? Select it and press Ctrl+Enter..
Many Lada Kalina car owners have encountered the “CHECK” icon lighting up on the instrument panel. This is primarily due to the fact that the engine has failed. Not everyone knows how to determine a malfunction, so in this article we will look at the causes and possible solutions to the problem.
What malfunctions can there be and how to fix them?
When operating a VAZ Kalina, the following problems arise related to the operation of the immobilizer:
- The engine starter turns the crankshaft, but there is no spark in the cylinders. The immobilizer indicator on the instrument cluster lights up. Symptoms indicate desynchronization of the control unit and key. For repairs, the keys must be retrained. If the problem does not go away, then you should look for a fault in the electronic circuits of the controller or keys.
- “Floating” malfunctions during immobilizer operation. One of the common causes is liquid filling the connector pad. For repairs, you need to remove the unit and dry the electronic circuits. A faulty controller must be replaced.
- The power supply to the control unit does not work due to the failure of the fuse located in the mounting block (in the passenger compartment). On Kalina-1 cars, an insert with a rating of 10 A is used; on the later Kalina-2, the part was changed to 15 A. If the fuse fails repeatedly, it is recommended to conduct a detailed analysis of the car’s electronics.
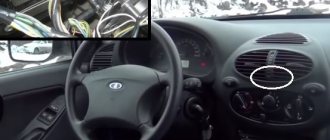
Diagnostic process
Instrument panel with which you can perform diagnostics
So, diagnostic operations using the dashboard are not complicated and almost every Kalina car owner is able to cope with this on their own. Following the step-by-step instructions described below, you can carry out diagnostics on any generation of VAZ 1117-1119.
Now let's move directly to the process of performing diagnostic operations:
- We reset the daily mileage indicator. For this purpose, there is a special button on the instrument cluster. Using the daily mileage button we reset the indicator
- Do not release the button and turn to position I. Insert the key into the ignition and turn to position 1
- If everything is done correctly, then all the arrows on the instrument cluster will begin to move from the initial position (zero indicators) to the final ones. Instrument arrows move from the beginning to the final control point
- Using the button on the wiper switch handle, we switch the information screen.
- First of all, the tachometer and sensors are checked for functionality.
- In the second case, the software version will be displayed on the screen. Often, as practice shows, this is version 3.0 or 3.2. The instrument panel screen shows the software version (in this case UEr 3.0)
- In the third case, error codes that are present in the ECU will appear. Errors received during the diagnostic process. There are 8 and 4 errors in photo 6.
- Now let's decipher the errors that can pop up on the dashboard screen:
Decoding instrument panel readings
2
— the on-board network voltage exceeds the norm;
3
- An error has been detected in the fuel level sensor. Occurs if there is an open circuit in the sensor within 20 seconds.
4
— an error has occurred in the coolant temperature sensor. Appears if an open circuit is detected within 30 seconds.
5
— an error has been detected in the outside temperature sensor in the vehicle. If there are no sensor readings within 20 seconds, “-C” appears);
6
- detected;
7
— emergency oil pressure;
8
— error or malfunction of the brake system;
9
— low battery charge;
E
— determination of an error in a data packet stored in EEPROM.
Now all that remains is to compare all the errors that popped up on the screen with those listed above.
How to activate the immobilizer?
Often, a VAZ Kalina car reaches its owner with an inactivated immobilizer. To carry out the independent activation procedure, you need both car keys (with a red mark and a regular one). A prerequisite is that the doors are closed (until the limit switch is activated).
To ensure the correctness of the immo activation procedure on Kalina, it is recommended to refuel the car, since the low fuel level signal is identical to the sound during programming.
Activation on Kalina-1
The training procedure on Kalina-1 is as follows:
- Take the training key with the red mark and insert it into the ignition switch.
- Turn the key to the ignition switch point. Since the immobilizer is not active, after six seconds the control indicator on the instrument cluster should turn on. If this does not happen, the system is in an active state and further steps are not performed.
- Turn off the ignition, and the immobilizer indicator will switch to rapid flash mode. The flashing mode lasts six seconds, which are allocated to the owner to install a regular key in the ignition switch.
- Turn the lock cylinder to the activation position. The correctness of the procedure is confirmed by the alarm buzzer sounding three times. The absence of a sound indication indicates that the time interval allocated for installing the key has been exceeded, or that the immobilizer is faulty. The option of “training” the standard key to work with a device from another car cannot be ruled out.
- Wait 5-6 seconds, the buzzer should sound two more times. Then you need to turn off the ignition and remove the key from the lock.
- After this, the owner has six seconds at his disposal, during which he must turn on the ignition with the key with a red mark. During this time, the immobilizer indicator light flashes on the instrument cluster.
- After turning on the ignition, the buzzer should sound three times. Wait a few seconds until the second series of beeps sounds (two separate beeps).
- Turn off the ignition, leaving the key in the lock. After some time, a single signal will be sent by the buzzer, and the warning lamp on the instrument panel will begin to flash with increased frequency. Up to 15 seconds pass between turning off the ignition circuits and the indicator switching to the accelerated flashing mode. The time interval depends on the model of the immobilizer control unit installed on the car.
- After this, within 10 seconds you need to turn on the ignition briefly (for 3 seconds).
- Turn off the ignition. The alarm should sound three times. This confirms the successful completion of programming.
- Wait until the indicator on the instrument cluster stops blinking. Then you should remove the red key, programming the devices is completed.
Activation on Kalina-2
On Kalina-2 the procedure is different:
- When you turn on the ignition with the key with a red mark, three short beeps will follow from the buzzer. After the third signal passes, the ignition is turned off and the key is removed from the lock. Important - if the car was operated with a red key, the immobilizer will not make sounds. In this case, you need to wait a few seconds and move on to the next step.
- Within 5-6 seconds, insert a regular key and activate the ignition circuits again. Three beeps will sound, followed by a pause followed by two more beeps.
- Change the keys in the lock (within 6 seconds). After turning on the ignition with the red key, three signals will be given, then two more.
- Turn off the ignition, leaving the key in the lock. A buzzer will sound, after which the key will be turned to the ignition switch position. The car's standard horn will sound, indicating that the regular key has been stored in memory.
- Turn off the ignition. The indicator on the instrument cluster will go off. Otherwise, we are talking about device failure or programming error.
The procedure for activating the immobilizer on the VAZ Kalina, as well as Priora and Grant is shown in a video from the channel “avtodopka. ru".
"Check Engine" - the show of intuition begins
Many Kalinovites, when the check signal comes on, begin to panic and immediately go to a car service center. But not everything is as bad as it seems at first glance, and the reason may lie on the surface. So, let's look at why the check engine light is on on the Lada Kalina and the reasons for the mysterious effect:
- Failure of one of the power unit sensors.
- Throttle.
- Injectors.
- Fuel pump and filter.
- Air filter.
- Spark plugs and high-voltage wires.
- Petrol.
- ECU.
The engine icon is on on the viburnum panel, what is it?
The main elements on the dashboard of a car are the tachometer, speedometer, fuel level and coolant temperature. In modern cars, the instrument panel has a large number of different indicators informing the driver about the condition of the car and its possible malfunctions.
In this article we will talk about the indicator in the form of a red exclamation mark on the Lada Kalina car, namely, you will get the answer to why the red exclamation mark lights up in the car and so frightens drivers who do not know its purpose.
When you start the engine, the Check light comes on - what should you do? Well, first you should calm down and try to find the cause of the problem yourself.
Why does the Check Engine light come on?
Often there can be a lot of reasons; for your convenience, I have divided them into two groups according to degree of complexity:
Minor damage that you can fix yourself:
- Spark plug fault
- Rupture of wire armor
- Failure of ignition coils
- Incorrectly filled gasoline: that is, for your car brand, the manufacturer recommends filling 98 gasoline, but you filled it with 95. The engine starts to stall , the on-board computer reads this as an engine malfunction and the Check Engine indicator light comes on.
We recommend that you read the article: why the check engine does not light up when you turn on the ignition and how to fix it
Serious breakdowns requiring a visit to a service station:
- Oil pressure drops (in this case, two Check Engine sensors and an oil sensor light up)
- Failure of the catalyst, in which case you will need expensive repairs. Mostly the catalyst fails on cars
- Fuel pump failure.
- Faulty injectors.
CHECK ENGINE
—
Check Engine Check - There's nothing fun or enjoyable about those two words. There is also not much logic that can be derived from this phrase, at least not logic that we understand. What does “Check Engine” mean? Is it something more or less specific? No is not. That's because the Check Engine Light means there's something wrong with our engine, and we can't know 100% what it is under the hood that caused that proverbial light to come on. In general and most common cases, Check Engine means that you will have to communicate with car service workers; in the worst case, if your car is far from young, Check Engine may even mean an upcoming major repair.
Designation of icons on the panel of the Kalina car and other VAZ models
When the engine starts, the lights come on for a few seconds. While driving, blinking of these symbols indicates a problem with the engine or ABS system.
The designation of the icons on the panel of the Kalina car is red, yellow, green or blue. These symbols are informational, warning, and indicate a malfunction.
Dashboard of the car "Kalina"
On the car panel there are several instruments showing the operating status of the engine, speed, coolant temperature, and the amount of fuel in the gas tank. Modern VAZ models also have an on-board computer.
Tachometer
This device is located on the far left of the panel. It shows the number of revolutions of the crankshaft per unit of time. The numbers on the dial are in multiples of 1000. Values starting at 5000 rpm are placed in the red zone. It shows a dangerous operating mode.
Speedometer
The device with the largest scale. Located in the center of the panel. Shows vehicle speed. The value is kilometers per hour. The pointer dial is graduated with numbers from 0 to 200.
The icons on the panel of the VAZ Kalina car in the form of two green arrows located on top of the speedometer indicate left and right turns. When the driver switches on the selected direction of travel, the lights begin to blink.
Coolant temperature dial gauge
The calibration of this device is from 60 to 130 degrees Celsius. Operating temperature is from 90 to 105. Next is the red zone, warning the driver of overheating.
The readings on the device come from a temperature sensor. If the coolant overheat reaches 105 degrees or higher, the arrow will move into the red zone and the driver will hear a buzzer. It is not recommended to operate the car in this case.
Fuel quantity indicator
The dial of this device has three values - 0, 0.5 and 1. These numbers show the fuel level in a tank designed for 50 liters. When the arrow of the device is in position 0, an icon is turned on, schematically depicting a gas station. This means that there are less than 7 liters of gasoline left. When the symbol lights up, the buzzer sounds.
The check is flashing, Kalina is trotting, help!
Moderator: Kolya Taran
Re: the check is flashing, Kalina is trotting help!
Leo777 » 08 Oct 2022, 17:59
Re: the check is flashing, Kalina is trotting help!
La_Coste » 08 Oct 2022, 18:02
The underground passage is important. And everyone must remember: Better 1000 times - underground, Than once - for good!
Selling Belaz after an accident. From the stocks: the right wheel is dirty.
Re: the check is flashing, Kalina is trotting help!
Lexa » 08 Oct 2022, 18:16
Re: the check is flashing, Kalina is trotting help!
leopold » 08 Oct 2022, 19:40
Re: the check is flashing, Kalina is trotting help!
Roman » 08 Oct 2022, 21:19
Re: the check is flashing, Kalina is trotting help!
Lexa » 08 Oct 2022, 21:21
Re: the check is flashing, Kalina is trotting help!
Roman » 08 Oct 2022, 21:33
Re: the check is flashing, Kalina is trotting help!
Lexa » 08 Oct 2022, 21:56
Re: the check is flashing, Kalina is trotting help!
leopold » 08 Oct 2022, 23:17
Re: the check is flashing, Kalina is trotting help!
Roman » 09 Oct 2022, 06:45
Re: the check is flashing, Kalina is trotting help!
leopold » 09 Oct 2022, 07:32
Re: the check is flashing, Kalina is trotting help!
Roman » 09 Oct 2022, 09:04
in terms of mechanics: maybe someone at one time set the valve incorrectly + wear on the guide and the valve with the plane did not fit completely, some kind of micro gap that was constantly growing, I had this, but due to wear on the guide it was 16kl
Added after 2 minutes 11 seconds: but even then it was constantly tripping until I changed the valve guides
Re: the check is flashing, Kalina is trotting help!
by leopold » 09 Oct 2022, 10:19
Re: the check is flashing, Kalina is trotting help!
Roman » 09 Oct 2022, 14:31
Re: the check is flashing, Kalina is trotting help!
KiSH » 10 Oct 2022, 09:49
Peculiarities
As a rule, stable activation of the check sensor occurs suddenly. During normal operation of all units controlled by this system, the indicator lights up briefly when the engine starts, and then goes out. Prolonged illumination indicates certain problems that are quite difficult to identify on your own. Why the check light is on on Kalina 8 and 16 valves is best to find out from specialists at a service station. This is especially true if the presented DIY troubleshooting methods did not produce results.
How to disable the immobilizer with your own hands?
There is an option to temporarily disable the immobilizer, which may be required when installing an alarm system with auto start.
To install the bypass system, use:
- A control unit with a key or tag embedded in it. A key or chip is inserted into a device located deep in the dashboard. When autostart is activated, the alarm relay activates the unit and the engine starts, bypassing the main circuit.
- Blockless immobilizer bypass unit. A separate control device is installed that emulates an ignition key with a chip.
Another way to disable the immobilizer on Kalina depends on the type of ECM (control unit).
Bosch M7 4 block
Before you begin performing an operation on a car with a Bosch M7.4 unit, you must prepare:
- a computer or laptop with Winflashecu v.1.14 preinstalled (the distribution is available for free download);
- adapter and cord K-Line, for example, VAG-COM 409.1;
- pre-downloaded software for the unit with disabled immobilizer support;
- several wires with different lengths.
SOLVED. Trouble engine flashing CHECK VAZ 2110
Engine jammed
,
the check is flashing
, the engine does not pull, it jerks. I turn off the ignition. , I start it again and it's fine.
Similar news
Which Engine Should I Pour Oil Into Gasoline... In the economic motor oil market, there are many different brands that offer their fuels and lubricants. Which manufacturer has products that differ in additive package, base material (mineral, synthetic or semi-synthetic), viscosity and other parameters. Alas, at the moment we are interested in the scope of implementation: for gasoline...
After an Oil Change, the Engine Started to Run Louder... Why did the engine start to run louder after an Oil Change? List of probable circumstances When drivers wonder why after an oil change the engine began to run louder. Similar things happen sometimes, which often frightens car owners. After all, engine noise does not predict anything good. Often any sounds from the unit indicate that it is necessary to sternly...
Troubleshooting methods
Now that all the causes have been identified, we can begin to consider troubleshooting. But, before we begin, it is worth noting that a car enthusiast needs to have an idea of the design features of the engine if he wants to fix the problem himself. Otherwise, go directly to a car service center, in order to avoid other problems that, due to lack of experience, car enthusiasts usually create for themselves.
Sensors
Often, the reason why the check light on Kalina may come on is the failure of one of the sensors. Possible ones that are worth checking right away include: mass air flow sensor, idle speed control, crankshaft position sensor, oxygen sensor and coolant temperature sensor.
You can determine the cause by going through each sensor separately and using a tester to check their functionality.
But, there is a simpler and more effective way to determine the malfunction of a particular sensor, namely connecting to the electronic engine control unit. Here you can look at the errors and, by deciphering them, determine where the problem is.
Throttle
A clogged throttle valve can often cause the check engine light to come on because not enough air is supplied to the power unit. The solution to the problem is cleaning. This process can be carried out using carburetor cleaning fluid or VD-40 fluid.
The part is removed from the car and cleaned, after which it is installed in place. It is also recommended to check the throttle position sensor, which may have failed.
Injectors
One of the common reasons for the “check” icon to appear on the dashboard is a malfunction of one or more injectors that do not spray the fuel mixture properly. So, it is worth dismantling all the elements and checking them using a special stand.
If there is none, then you can use the traditional method by pouring flushing fluid into the fuel supply pipes and activating the injectors using the battery. This way it will be clear which injector is not working well. But, experienced auto mechanics recommend cleaning and checking the nozzles on a stand, since the effectiveness of the procedure is higher.
Fuel pump and filter
Another cause of the malfunction may be a malfunction of the gasoline pump or its filter. Lack of power or contamination of the filter elements leads to the fact that an insufficient amount of fuel will enter the power unit to form an air-fuel mixture.
This can also cause such a well-known automotive effect as engine tripping.
The malfunction can be cured by checking the functionality of the gasoline pump, as well as by replacing the filter inside the gasoline pump. It is also worth looking at the fuel filter, which could become clogged when pouring low-quality gasoline.
Air filter
A clogged air filter can cause insufficient air in the combustion chambers. So, to check this element, it must be dismantled, which is done quite simply. By inspecting the filter element, you can find out how dirty it is and whether the product needs to be replaced. So, after replacement, the check signal from the dashboard may disappear.
Spark plugs and high voltage wires
Wiring is also often the reason why the check icon lights up on the panel. This happens when the spark plug is inoperative or there is a breakdown in one of the high-voltage wires.
It is recommended to check spark plugs on a special spark plug stand. But, if there is none, then you can use the generally accepted “old-fashioned” methods. But high-voltage wires are checked using a conventional multimeter, where the resistance along each wire should be about 5 ohms. If a broken part is found, it must be replaced.
Petrol
But, in addition to the above reasons, the problem may lie on the surface. Thus, ordinary low-quality gasoline can cause the “Check Engine” icon to appear on the car’s dashboard. To eliminate the breakdown, it is necessary to drain the low-quality fuel and flush the fuel supply system. But, if you drive for a long time on such fuel, the batteries may fail, which should also be checked when flushing.
ECU
The last reason is the accumulation of errors or “failed” firmware of the electronic engine control unit. To fix this problem, it is recommended to contact a professional car service center. Also, with the help of “brain” errors, you can determine why the check engine light came on. But where can I get the codes deciphered? Let's look at what code that means:
- 0102 Low signal level of the mass air flow sensor
- 0103 High signal level of the mass air flow sensor
- 0112 Low level of intake air temperature sensor
- 0113 Intake air temperature sensor high level
- 0115 Incorrect coolant temperature sensor signal
- 0116 Incorrect coolant temperature sensor signal
- 0117 Coolant temperature sensor signal low
- 0118 High signal level of the coolant temperature sensor
- 0122 Low signal level of the throttle position sensor
- 0123 Throttle position sensor signal high
- 0130 Incorrect signal from oxygen sensor 1
- 0131 Low signal level of oxygen sensor 1
- 0132 Crankshaft sensor 1 signal high
- 0133 Slow response of oxygen sensor 1
- 0134 No signal from oxygen sensor 1
- 0135 Oxygen sensor 1 heater fault
- 0136 Oxygen sensor 2 short to ground
- 0137 Low signal level of oxygen sensor 2
- 0138 High signal level of oxygen sensor 2
- 0140 Oxygen sensor 2 break
- 0141 Oxygen sensor 2 heater fault
- 0171 Mixture too lean
- 0172 Mixture too rich
- 0201 Open injector 1 control circuit
- 0202 Open injector 2 control circuit
- 0203 Open injector 3 control circuit
- 0204 Open injector 4 control circuit
- 0261 Short to ground injector 1 circuit
- 0264 Short to ground injector 2 circuit
- 0267 Short to ground in injector 3 circuit
- 0270 Short to ground in injector 4 circuit
- 0262 Short circuit to +12V injector 1 circuit
- 0265 Short to +12V injector 2 circuit
- 0268 Short to +12V injector 3 circuit
- 0271 Short circuit to +12V injector 4 circuit
- 0300 Many misfires
- 0301 Misfire in cylinder 1
- 0302 Misfire in cylinder 2
- 0303 Misfire in cylinder 3
- 0304 Misfire in cylinder 4
- 0325 Open circuit of the knock sensor
- 0327 Low signal level of the knock sensor
- 0328 High signal level of the knock sensor
- 0335 Incorrect crankshaft position sensor signal
- 0336 Crankshaft position sensor signal error
- 0340 Phase sensor error
- 0342 Low phase sensor signal
- 0343 Phase sensor signal high
- 0422 Low neutralizer efficiency
- 0443 Canister purge valve circuit malfunction
- 0444 Short circuit or break in the adsorber purge valve
- 0445 Short to ground of the canister purge valve
- 0480 Cooling fan 1 circuit malfunction
- 0500 Invalid speed sensor signal
- 0501 Invalid speed sensor signal
- 0503 Speed sensor signal interruption
- 0505 Idle air control error
- 0506 Low idle speed
- 0507 High idle speed
- 0560 Incorrect on-board voltage
- 0562 Low voltage on-board network
- 0563 High voltage on-board network
- 0601 ROM error
- 0603 External RAM error
- 0604 Internal RAM error
- 0607 Detonation channel malfunction
- 1102 Oxygen sensor heater resistance low
- 1115 Faulty oxygen sensor heating circuit
- 1123 Rich mixture at idle
- 1124 Lean mixture at idle
- 1127 Rich mixture in Partial Load mode
- 1128 Lean mixture in Partial Load mode
- 1135 Oxygen sensor heater circuit 1 open, short circuit
- 1136 Rich mixture in Light Load mode
- 1137 Lean mixture in Low Load mode
- 1140 Measured load differs from calculation
- 1171 Low level CO potentiometer
- 1172 High level CO potentiometer
- 1386 Detonation channel test error
- 1410 Canister purge valve control circuit short circuit to +12V
- 1425 Canister purge valve control circuit short circuit to ground
- 1426 Canister purge valve control circuit open
- 1500 Open circuit in the fuel pump relay control circuit
- 1501 Short circuit to ground of the fuel pump relay control circuit
- 1502 Short circuit to +12V fuel pump relay control circuit
- 1509 Overload of the idle speed regulator control circuit
- 1513 Idle air control circuit short circuit to ground
- 1514 Idle air control circuit short circuit to +12V, open
- 1541 Fuel pump relay control circuit open
- 1570 Invalid APS signal
- 1600 No connection with APS
- 1602 Loss of on-board voltage to the ECU
- 1603 EEPROM error
- 1606 Rough road sensor incorrect signal
- 1616 Rough road sensor low signal
- 1612 ECU reset error
- 1617 Rough road sensor high signal
- 1620 EPROM error
- 1621 RAM error
- 1622 EEPROM error
- 1640 EEPROM Test Error
- 1689 Invalid error codes
- 0337 Crankshaft position sensor, short to ground
- 0338 Crankshaft position sensor, open circuit
- 0441 Air flow through the valve is incorrect
- 0481 Cooling fan 2 circuit malfunction
- 0615 Starter relay circuit open
- 0616 Starter relay circuit short circuit to ground
- 0617 Starter relay circuit short circuit to +12V
- 1141 Faulty oxygen sensor heater 1 after the converter
- 230 Fuel pump relay circuit malfunction
- 263 Injector driver fault 1
- 266 Faulty injector driver 2
- 269 Injector 3 driver fault
- 272 Faulty injector driver 4
- 650 Check Engine Lamp Circuit Malfunction
Gasoline pump
The vagaries of the fuel pump are often observed, especially in winter. The starter works, but the Kalina car refuses to start, the fuel pump cannot be heard, and an exclamation mark may flash on the dashboard.
First of all, check the pressure in the fuel system. To do this, open the hood and look for the cap on the ramp with the injectors. You can see the nipple there - if you press it, fuel should spray out. If it splashes, then the problem is not with the fuel pump.
Another reason is the relay. There is a cover in the transmission tunnel on the passenger side. It contains power coils. To eliminate the malfunction, just knock or warm them up.
If the fuel pump does not work, then you need to get to it and check the voltage. If the multimeter shows about 12 V, then the fuel pump is working. If not, then it is worth checking the fuses, as well as the relays.
Replacing the device
Sooner or later, everything falls into disrepair, and the coolant sensor in the Lada Kalina also faces the same fate.
If any problem does occur, the device cannot be repaired; it is simply replaced. But don’t worry about this, this procedure is not complicated, it can be done independently, or you can turn to professionals for help.
If you are sure that the problem is still in the coolant sensor, proceed with replacement
. First you need to drain the coolant, then remove the air filter. Next, the plastic clip opens and the sensor harness connector is separated. After this, the element can be easily removed from the thermostat housing. Installing a new device occurs the other way around: the element is first screwed into place where it should be, and only then fixed with all the clamps. The latest thing is to replace the antifreeze.
Naturally, when performing actions, you must follow all safety rules and be careful not to harm your property or yourself. As you can see, the procedure is actually not complicated.
, but if after this, malfunctions are observed in the operation of the car, and the engine in particular, it is worth contacting a service station and completely checking other systems.
Causes of malfunctions and solutions
The most common immobilizer malfunctions are:
- Lack of communication between the control unit and the vehicle and the key. Re-activating the blocker or replacing the battery in the key remote can help correct the situation.
- Wetting of the internal parts of the unit. The element must be dismantled and dried. If after this the system continues to operate incorrectly, the device must be replaced.
- Power supply circuit broken, fuse broken. The latter is located in the dashboard mounting block. The part needs to be inspected and replaced.
If, after replacing all the failed elements, the immobilizer continues to work incorrectly, the car must be taken to a car service center. Diagnostic and repair work will be carried out here.
How to reset a check on Kalina yourself
It is not recommended to reset errors yourself if the Lada Kalina check engine light is on. The error information will disappear. In a car service, if something happens to the engine after the reset, they will not be able to determine what kind of malfunction caused the engine to stop working. This means that you will have to completely disassemble the motor. It's an expensive endeavor.
However, if the car owner is sure that the wires were simply shorted after washing the car (this happens), then he can do the following at his own peril and risk:
- Turn the ignition key, but do not start the engine.
- Open the hood and remove the terminal from the positive terminal of the battery.
- Wait about 5 or 10 minutes.
- Reinstall the positive battery terminal. Close the hood.
- Turn off the ignition and turn it on again. Now start the engine and get ready to start driving.
The check lamp should disappear from the panel.
Setting a secret code
The APS-6 module, if it has been activated, cannot be taken and turned off for the entire duration of further use. But there is a procedure for setting the code that you will later use to start the engine. If you set the code once, you can start the engine with a blank, but you will have to enter the code value with the gas pedal. Here we will look at how to set a value that is thought up in advance and consists of 6 decimal digits. Read carefully.
Setting the code is always combined with the operation of “writing” the keys. That is, you will need all the keys that you plan to use. This also applies to the “training” key.
Red mark on the training key
The ignition switch is equipped with three marks: 0, I, II. You will move the key between the first two. Close all doors and follow these steps:
- Place the training key in the lock, move it to position I, and after 6 seconds again to position 0 (the lamp with the “machine” will begin to blink);
- Change the key to “normal”, turn on the ignition (position I), wait for the sound signal;
- If multiple keys are used, perform “step 2” for each of them, first removing the “previous” key;
- Reinstall the training key in the lock, move it to position I. After the sound signal, turn off the ignition (position 0), wait for the signal and move the key to position I. The horn will sound, the “dimensions” will blink;
- The learning key remains in the lock and the ignition is on. Wait a minute until the Check Engine light goes off;
- Start dialing: short presses set the first digit, and the transition to the next digit is initiated by a long press (until the “Check Engine” goes out);
- After dialing the 6th digit, the Check Engine light does not go out. Wait 12 seconds, release the gas pedal, remove the learning key.
Congratulations on successfully completing the secret sequence.
Be aware that the numbers in the code sequence can take values from “1” to “9”. Zero is excluded.
How to check the performance of the DTOZH?
Taras Kalenyuk
auto RU
In order to independently determine the serviceability of a thermistor-type measuring device, you need to acquire a multimeter and a thermometer that can withstand high temperatures.
You need to dismantle the device according to the instructions described above, and then connect it to a multimeter, previously set to ohmmeter mode.
Coolant is poured into a pre-prepared container, and the DTOZH and thermometer are placed there.
The antifreeze begins to heat up, and the owner looks at the resistance readings on the ohmmeter screen and at the thermometer, comparing the data with the plate to assess the accuracy of the device. Device data may vary from model to model, so it is best to use the instructions included with your existing device.
One thing remains unchanged - in devices with a negative coefficient, the resistance readings will fall with increasing temperature.
We recommend to buy
Comments and reviews
Ivan Ivanovich Baranov
Experience working at a service station:
View all answers
Avtozam.com - your assistant in car repair and maintenance
Your use of this website constitutes your agreement that your use is at your own risk.
I was driving calmly from Kamensk Uralsky home from my studies and suddenly the check engine light came on! The car drives as it did, there are no problems with the work at all... the question is what to do?! there is no on-board computer... should I go for diagnostics or contact the authorities? For now I'm leaning towards diagnostics at the service center. It really bothers me that this lamp is on! some travel with it for 2 years, but I can’t! and further! When testing the tidy (hold the odometer button for 3 seconds and without releasing it, turn on the ignition), the following error codes appear (as I think) or what can you tell me?
Mileage 23900 km
EMUR breakdowns
It is worth remembering that if the electromechanical power steering malfunctions, the failure index will be indicated by the symbol “C”. What problems may arise:
- “1011” - there is no connection of the sensor to rotate the steering wheel and its power steering unit;
- “1013” - the generator is subject to excessive voltage, the power level has gone beyond the permissible limit;
- “1021” - the torque controller is faulty, it is recommended to conduct a thorough inspection of the device;
- “1031” - no signal from the controller system, incorrect position of the steering wheel shaft;
- “1041” - incorrect position of the rotor type mechanism, the control panel unit could not detect it;
- “1050” - the electric motor of the pumping system has broken. There may be a short circuit inside the winding. It is recommended to carefully inspect the damaged area;
- “1070” - pronounced problems in the operation of the EUR control module.
There is a separate category of errors, marked as “E” - a breakdown and error are detected in the data packet, which are stored in the EEPROM.
Video “Disabling the immobilizer unit”
The channel Useful tips from Shurani demonstrates disabling the APS 6 immobilizer unit on Kalina.
There were several reasons why the Lada Kalina does not start, the starter does not turn, and the immobilizer is blinking. There are several reasons and each of them can cause different damage, but we will consider them all.
The video shows a problem with the immobilizer on Kalina:
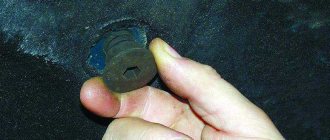
Check the fuel filler cap
Many drivers, in most cases, when the “check engine” indication appears, will think about serious problems in the car’s engine, but will not even think to check the tightness of the fuel system, which may be compromised due to a defect or an insufficiently tightened fuel tank cap. This is a very common reason for the appearance of the “Check” engine icon.
Reason for the error: Leakage of the fuel system due to the passage of air through the filler cap of the fuel tank will increase the vehicle's fuel consumption, to which the vehicle's diagnostic system will generate an engine error by turning on the "Check engine" indication on the vehicle's instrument panel.
What needs to be done: If, when the “Check” indication appears, your car has not lost power, and there are no audible signs of engine damage (engine knocking, humming, creaking, etc.), then first check the gas tank for leaks. Your gas cap may be cracked or not tightened enough. If the cap was not tightened enough, then after tightening it all the way, continue driving the car for a while to see if the engine error disappears. To prevent a check engine light from appearing for this reason, check your fuel filler cap regularly. Remember that the cover must be replaced with a new one periodically!
Indicators included in the panel
The Kalina dashboard consists of 23 main elements. These include:
- rotation speed meter;
- indicator showing battery charge;
- speed meter;
- indicator displaying lubricant pressure in the engine;
- temperature indicator;
- turn signals;
- fuel level sensor in the tank;
- hand brake;
- daily mileage reset;
- reserve fuel quantity lamp;
- computer display.
Check light is on, video diagnosis) — Lada Kalina Hatchback, 1.6 l., 2010 on DRIVE2
Please help, the check light comes on, full description:
There is a viburnum on a cable with a 1.6 16kl engine. From Priora with Bosch M7.9.7+ controller.
Initially, the car began to have trouble starting in cold weather and the check light came on.
At that time it was still under warranty, I went to the PSSS, they diagnosed one of the injectors as dirty, I did not agree with them, I always filled in good gasoline.
In general, after discussions, we carried out another diagnostic and found the ECU filled with antifreeze, they changed it and the problem went away. But a few days later the check light came on again, there was no longer a guarantee, I went to the diagnostician and they counted errors:
0300 Random or multiple misfires detected 0301 Cylinder 1 misfire detected
0302 Misfire detected in cylinder 2
The errors were cleared, I was advised to change the spark plugs, it turned out the officials screwed in 3 different types of spark plugs
candles that were replaced by the officials
I installed NGK BCPR6E -11, changed the oil, all filters, the mesh in the fuel pump, it was quite clean
fuel pump mesh
and everything worked perfectly, everything was clean in the gas tank too)
gas tank
I didn’t drive the car for a couple of days, and the problem repeated itself, the check light came on, you can see everything in the video. If you warm up the car, it can work perfectly without a check.
Can anyone advise me to check or see what?
Thanks in advance to everyone who responded!
## the problem has been solved, more details here: www.drive2.ru/l/660985/
Mileage: 45000 km
What the instrument panel looks like on the Lada Kalina: overview of icons
The control and ergonomics of the domestic VAZ model are at a fairly high level relative to the cost of the car.
The instrument panel of the Lada Kalina is located behind the steering wheel and has a number of indicators that display the actual state of the vehicle systems. The appearance of the panel is distinguished by its individual design. It combines practicality and good design. The dashboard contains the main symbols and icons, arranged in a sequence convenient for the driver to understand.
What do the icons on Kalina's dashboard mean?
- 1 – standard tachometer. The dial indicator is divided up to 7000 rpm with a threshold of 500 rpm;
- 2 – Check the engine. A standard lamp found on all modern cars. Indicates a serious engine breakdown and the need for urgent repairs;
- 3/9 – indicators indicate the turn signals are turned on;
- 4 – the oil pressure in the engine has greatly decreased;
- 5 – ABC is faulty and usually goes out when you turn the key;
- 6 – immobilizer operation indicator;
- 7 – the indicator has a simple meaning, it indicates that the motor is overheating;
- 8 – parking brake status indicator;
- 10 – the battery symbol shows the battery charge status;
- 11 – odometer;
- 12 – indicator of the state of the exchange rate stability system;
- 13 – the need to shift to a higher gear is not established in most versions;
- 14 – high beam indicator lamp;
- 15/17 – indicator of normal operation of stern/front fog lights;
- 16 – low beam indicator;
- 18 – daily mileage reset key;
- 19 – standard display;
- 20 – icon indicating that the doors are closed correctly;
- 21 – critical drop in fuel level in the gas tank;
- 22 – an exclamation mark inscribed in the tire profile indicates a punctured wheel;
- 23 – if the lamp goes out after starting the engine, the power steering is working normally;
- 24 – requirement to fasten seat belts;
- 25 – exclamation mark is used only in some vehicle configurations;
- 26 – airbag operation indicator.
The badges are only relevant for hatchback and sedan versions of certain versions. Depending on the year of manufacture and configuration, the symbol designation may differ from the nominal value.
Instrument panel Lada Kalina: description of lamps and indicators
The description of each element should be considered separately:
- 2 – the lamp indicates to the driver that there is a serious breakdown in the engine that requires urgent intervention;
- 3/9 – green lamps; if the indicator is blinking, the corresponding turn signal is on;
- 4 – the indicator lights up red, warning of a serious decrease in the oil level in the engine crankcase;
- 5 – the ABS system is faulty and requires driver intervention;
- 6 – if the icon lights up, the immobilizer is enabled;
- 7 – light indicator of engine overheating;
- 8 – the handbrake is raised, movement is impossible;
- 10 – red battery icon indicates a critical drop in charge;
- 12 – the exchange rate stability system does not work, the car can continue to move only with the help of mechanical stabilizers;
- 14 – light elements operate in high beam mode;
- 15/17 – fog lights are turned on for the front and rear of the car, respectively;
- 16 – low beam is on;
- 20 – one or more doors may not be closed;
- 21 – fuel runs out – the car is in storage;
- 22 – the ABS system triggered due to a tire breakdown;
- 23 – electric power steering fault indicator;
- 24 – seat belts are not fastened;
- 26 – the airbag is disabled or does not work.
Light indicators on the tidy are divided into three groups based on color.
- Green/blue – notification type indicators. The lights indicate that the on-board lighting or other devices are turned on and are not responsible for errors or malfunctions.
- Yellow/orange - icons warn the driver about the need for increased attention. There may be minor problems or the need for service.
- Red – the indicators flash only in the event of a breakdown or the need for urgent driver intervention in the vehicle’s on-board systems.
Tidying when the ignition is turned on
When the ignition is turned on, Kalina's tidy displays the self-diagnosis procedure for on-board systems. After turning the key in the lock cylinder, all the indicators on the panel light up and go out after the engine starts.
What is shown on the car display
In normal operating mode, the on-board computer display shows two indicators.
- Current temperature outside.
- Vehicle mileage in kilometers.
In diagnostic mode, the display shows information about errors or malfunctions of the vehicle.
Error codes
Self-diagnosis mode displays certain codes. Due to the simplicity of the design of the diagnostic unit, digital values only indicate the area where the fault occurs. The most popular encodings:
- 2 – there is a short circuit in the on-board network with a critical increase in voltage;
- 3 – open circuit or malfunction of the float in the gas tank;
- 4-5 – error or breakdown of the antifreeze or ambient temperature sensor, respectively;
- 6 – the motor is very overheated;
- 7 – too low oil pressure in the engine boat;
- 8 – the brake system is not working properly;
- 9 – the battery is faulty or severely discharged;
- E – standard error of the firmware data package;
- 0 – no errors – all on-board systems are operational.
Specialization : Graduated from the State Automobile University, worked for 20 years at GAZ-56, now I drive a Zhiguli.