VAZ offers Kalina-2 cars with two interior trim options. The first is used in luxury trim levels (where a media center is installed), the second is an integral part of the “Norma” and “Standard” trim levels. We will talk about what methods exist for dismantling the climate control module panel and the radio panel. Moreover, one of the considered options is suitable for the “Lux” configuration, the other – for more affordable versions (Norma, Standard). The dismantling methods in the two indicated cases are noticeably different. Let's start looking.
How to remove the center console on Kalina-2
VAZ offers Kalina-2 cars with two interior trim options. The first is used in luxury trim levels (where a media center is installed), the second is an integral part of the “Norma” and “Standard” trim levels. We will talk about what methods exist for dismantling the climate control module panel and the radio panel. Moreover, one of the considered options is suitable for the “Lux” configuration, the other – for more affordable versions (Norma, Standard). The dismantling methods in the two indicated cases are noticeably different. Let's start looking.
Console Kalina2 2DIN (2 parts)
Console Kalina 2 with box, for tape recorder 2 DIN (2 parts) for VAZ 2194 2192 cars
Attention! Adapter frame for 1DIN is not included
for tape recorder 2 DIN (2 parts) weight: 0.83 kg. dimensions:28x28x14 cm
Payment to Sberbank VISA card
The most convenient and profitable payment method for you. Payment can be made through the Sberbank Online system, through a payment terminal (Sberbank ATM), provided that you have a card from this bank. If you are not a client of this bank and you do not have a card, then you can top up your balance at any bank branch through an operator; they will accept cash payment and top up your balance. Commission from 0 to 1%
How to remove the center console in a luxury package
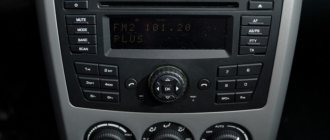
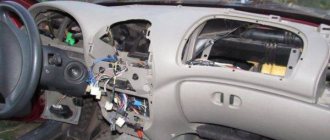
Let's say it was decided to dismantle the panels located on the center console. You can see that there are two of them. One is the front panel of the air conditioner, the second protects the radio and contains air duct grilles in its design. These two parts are not connected to each other. However, it will not be possible to remove the radio panel unless you first remove the climate control panel. Below it are metric screws (A, B) that secure the media center shield from below.
Central console of Kalina-2, Luxury package
The question arises, why are we even talking about how to dismantle the center console, since after this the car can be removed from warranty? Usually the shield is removed to install additional equipment (for example, a rear view camera). But connecting any equipment, the use of which has not been agreed upon with the dealer, will void the vehicle warranty. If you haven't changed your mind yet, continue reading.
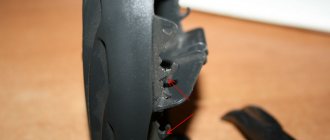
The climate control shield is held in place by 4 clips, which are located on the bottom and top sides of the part closer to the corners. Having disconnected even two clips (1, 2 or 3, 4), you can try to pull the panel towards you to dismantle it. But if you have no experience working with such a mount, it is better not to try - you may scratch the outer surface of the shield. In fact, all you need to do is use a flathead screwdriver (some people use a thin-bladed knife and a screwdriver).
To dismantle the climate control panel, you do not need to first remove the control knobs located on it, if we are talking about the “Lux” package. The same applies to the “Norma with climate control” package. In all other versions, a stove control unit is used, the design of which does not allow removing the shield without first dismantling the handles. Be careful.
If the climate control panel is removed, all that remains is to unscrew two bolts and just as carefully remove the media center panel. Additionally, this part is secured with nine clips:
- Two clips are located at the level of the border of the air duct grille;
- Three clips on each side board are located at equal distances;
- Three more clips can be found on the top side (the windows they fit into are circled in the photo).
Based on the information listed above, you can try to dismantle it yourself, but it is still better to entrust this work to a specialist. It is advisable not to use a hammer, chisel, or grinder when performing any actions, as shown in this video. However, here we are talking about the “Norma” configuration, which we will talk about further.
Product quality guarantees
We guarantee the quality and functionality of the products presented in our catalog. If you encounter any problems during installation, please contact us and describe the situation, as well as attach photos/videos. In case of a manufacturing defect of a product, we guarantee the exchange of low-quality goods at our expense.
We guarantee the quality of painting of all products, namely that the paint will not peel off during the first wash. When ordering painted products, please note:
- Do not wash new painted products for 3-4 weeks (during this time the varnish crystallizes);
- Do not wash using high-pressure installations of the “Karcher” type at close range (especially areas highlighted in matte black, since there is no varnish coating).
- When painting parts, high-quality paint and varnish coatings are used, the color is completely identical to the color of the factory enamel. But please note that the shade may not match, because... The paintwork of a car changes color under the influence of sunlight and other factors.
Warranty period: The warranty period is determined by the manufacturer and is calculated from the date of receipt of the goods by the buyer. The warranty period is indicated in the product description; if for some reason it is missing, you can contact the manager for this information.
Exchange and return procedure Upon receipt of the goods, the Buyer is obliged to carry out an external inspection of the goods for mechanical damage and other visible defects, as well as check the conformity of the received goods with the ordered ones. If any deficiencies are found, it is necessary to draw up a report signed by a representative of the cargo carrier.
Claims regarding the quantity, completeness of the goods and external defects made after the goods have been transferred to the Buyer (after the buyer has left the point of delivery of goods/branch of the Russian Post/point of delivery of the transport company), not confirmed by a Certificate signed by the representative of the cargo carrier, are not subject to satisfaction.
Before sending the goods, the buyer has the right to refuse to receive the goods at any time. The full cost of the order (product and shipping costs) is returned to the buyer. If the goods have been transferred to the delivery organization, the Buyer will be refunded the cost of the order (goods) minus the costs of delivering the goods. The Russian Post commission for paying for an order by cash on delivery is non-refundable.
The return period for goods of good quality is 7 days from the day following the day of receipt of the goods.
Returned goods of proper quality must not have traces of installation, use, or visible damage. All tags and labels must be preserved on the product, and the complete set of the product must be preserved.
Products of good quality that are made individually for the buyer cannot be returned. Such products include products covered with leather and leather substitute, and custom-painted parts.
The costs of returning the goods (delivery, packaging and other costs) of proper quality to the Seller’s warehouse are borne by the Buyer.
Refunds for the cost of goods transferred by the Buyer to the Seller are made within 10 (ten) calendar days from the date of receipt of the goods by the Seller. The day of refund is considered to be the day the funds are debited from the Seller’s current account.
Refunds are made: - to the Buyer’s bank card, if the order was paid from a bank card; — by cashless transfer to the bank account specified by the Buyer, if the order was paid by cash on delivery.
Upon receipt of a product of inadequate quality, the Buyer has the right to demand a replacement of the product with a similar one, ask for a discount in proportion to the defects of the product, terminate the sales contract and receive the cost of the product back.
The deadline for filing a claim for goods of inadequate quality is 7 days from the day following the day of receipt of the goods.
If a product is found to be of inadequate quality, the Buyer must file a claim for the return of the product, describing in detail the defects found in the product, and attaching photographs (or video recordings) confirming the defects of the product (except for cases where the defects of the product are not visually visible), and send the application - claim and attached materials to the Seller by email
The period for consideration of a claim is 10 days from the day following the day the claim was received.
The Seller has the right to demand the return of goods of inadequate quality (delivery costs are paid by the Seller), or to leave the goods with the Buyer (if the costs of delivering the goods exceed the cost of the goods).
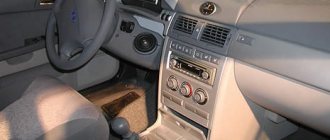
Dismantling the console containing the stove control unit
As you know, some trim levels of the Kalina-2 car do not have climate control. Here the driver can only control the operation of the stove. The stove control panel is held in place by 4 clips. In general, the mount used here is the same as in versions with climate control, but you won’t be able to remove the control unit panel unless you first remove the three control knobs.
Central console of Kalina-2, Standard equipment
Let's say we managed to dismantle the stove control unit panel. Then, all that remains is to remove the top flap, which is adjacent to the air ducts. This part itself needs to be pulled towards you from below, but first you need to unscrew two screws (they are circled in the figure). You won’t be able to simply grab and pull out the panel; you need to tighten the side clips with a screwdriver. In fact, the entire process is shown in the video we've posted below.
Any device of standard size 1 DIN can be installed in the compartment intended for the radio. You don't need to dismantle anything to do this. It is difficult to imagine a situation in which it is really necessary to remove the center console panels, if we consider the “Normal” or “Standard” equipment. However, you can use the information provided here. Remember that the owner performs all actions at his own peril and risk.
Removing the car dashboard
The torpedo mounts are hidden here.
If you are tormented by squeaks while driving and you are thinking about how to disassemble the front panel of a Lada Kalina car, the following instructions will be useful to you.
To dismantle the torpedo you will need the following tools:
- Phillips screwdriver with short handle;
- slotted (minus) screwdriver with a short handle;
- tubular wrench 10;
- marker.
In addition, you will need a bit of patience and accuracy when performing the work.
Algorithm of actions when disassembling and removing a torpedo.
- First you need to bend the rubber seals of the front doors from the A-pillars.
- After this, you need to remove the plastic covers of the front pillars. Each of them is held on by 3 clips. Use a slotted screwdriver as leverage.
- Next, you need to unscrew the screws securing the upper front (in the direction of travel) panel trim. There are 2 of them: one on the right, the other on the left, both are located near the racks.
- After this, you need to remove the upper front trim by carefully pulling it towards you. It is secured not only with self-tapping screws, but also with clips at the front. When removing the panel, try not to lose them.
- Then you need to unscrew all the screws and remove the trim on the side air ducts.
Disassembled torpedo
Now you can begin dismantling the center console.
- First you need to remove the ashtray. To do this, just pull it all the way back (in the direction of travel of the car) and unscrew the 4 screws that secure it to the console.
- Then you need to pry with a screwdriver and pull out the plugs located to the right and left of the alarm button.
- After this, you need to unscrew the 2 screws located under the plugs and securing the center console from below.
- Now you should carefully pull the console towards you and disconnect all the wiring from it, having previously marked with a marker what is attached where. If you don't have a marker, you can take a picture with your phone of which wires go where.
- After dismantling the center console, you need to unscrew 2 bolts and 5 screws and remove the steering column cover.
- Then you need to unscrew 2 screws and remove the outer trim of the instrument cluster.
- Next, you need to unscrew all the instrument panel mounting nuts from above using a 10 mm wrench.
- After this, you need to tear off the lock washers on which the heater air duct is seated, unscrew the remaining screws securing the dashboard, and remove it by pulling it towards you.
During installation, you need to attach the torpedo to the air duct with self-tapping screws.
Return to contents
How to remove the center console on Kalina-2
VAZ offers Kalina-2 cars with two interior trim options. The first is used in luxury trim levels (where a media center is installed), the second is an integral part of the “Norma” and “Standard” trim levels. We will talk about what methods exist for dismantling the climate control module panel and the radio panel. Moreover, one of the considered options is suitable for the “Lux” configuration, the other – for more affordable versions (Norma, Standard). The dismantling methods in the two indicated cases are noticeably different. Let's start looking.
How to remove the center console in a luxury package
Let's say it was decided to dismantle the panels located on the center console. You can see that there are two of them. One is the front panel of the air conditioner, the second protects the radio and contains air duct grilles in its design. These two parts are not connected to each other. However, it will not be possible to remove the radio panel unless you first remove the climate control panel. Below it are metric screws (A, B) that secure the media center shield from below.
Central console of Kalina-2, Luxury package
The question arises, why are we even talking about how to dismantle the center console, since after this the car can be removed from warranty? Usually the shield is removed to install additional equipment (for example, a rear view camera). But connecting any equipment, the use of which has not been agreed upon with the dealer, will void the vehicle warranty. If you haven't changed your mind yet, continue reading.
The climate control shield is held in place by 4 clips, which are located on the bottom and top sides of the part closer to the corners. Having disconnected even two clips (1, 2 or 3, 4), you can try to pull the panel towards you to dismantle it. But if you have no experience working with such a mount, it is better not to try - you may scratch the outer surface of the shield. In fact, all you need to do is use a flathead screwdriver (some people use a thin-bladed knife and a screwdriver).
What kinds of mounts are there for radio tape recorders?
Different manufacturers use different types of fasteners:
- Using fixing elements on the side of the device;
- Using elastic latches;
- Using bolts or screws.
With clamps, a frame is used that is inserted into the “shaft”. The side walls of the car radio have special recesses, and there are tongues on the frame.
To dismantle the head unit you need keys. With them you can easily straighten the tabs or bend them. But this type of fastening has a drawback - the frame can become deformed.
The second type of fastening is more reliable - it involves the use of elastic latches. They can be seen on the side and top walls. These latches fit into special seats in the frame, the simplest and most reliable way to mount the radio.
In some car models, in order to ensure reliable fastening of the multimedia system and to eliminate the risk of failure due to vibrations, installation is carried out to the dashboard, or rather to the power elements. The dashboard is held on the pipe using metal corners. Such fasteners are used in premium cars Mazda and Toyota.
The option of installing a radio in this way is considered additional, but car audio installers often remove the corners, and installation is carried out without fixing elements. This option is not reliable.
Single- or double-din radios are mounted in the dashboard tunnel without any additional fixation. It is customary to mount the device on the center console.
The media system is latched with ordinary plastic latches. This is a screwless fitting - you can see this even on the Lacetti.
With this installation, the radio simply hangs and is not able to withstand even minor shock loads. There are holes on the sides of the device, but most motorists do not know what they are for.
It turns out that these holes are made for reliable installation of the device to the dashboard using corners.
This is a factory fastener that complements the standard fastener.
Dismantling the console containing the stove control unit
As you know, some trim levels of the Kalina-2 car do not have climate control. Here the driver can only control the operation of the stove. The stove control panel is held in place by 4 clips. In general, the mount used here is the same as in versions with climate control, but you won’t be able to remove the control unit panel unless you first remove the three control knobs.
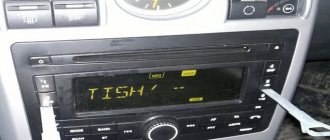
Central console of Kalina-2, Standard equipment
Let's say we managed to dismantle the stove control unit panel. Then, all that remains is to remove the top flap, which is adjacent to the air ducts. This part itself needs to be pulled towards you from below, but first you need to unscrew two screws (they are circled in the figure). You won’t be able to simply grab and pull out the panel; you need to tighten the side clips with a screwdriver. In fact, the entire process is shown in the video we've posted below.
Any device of standard size 1 DIN can be installed in the compartment intended for the radio. You don't need to dismantle anything to do this. It is difficult to imagine a situation in which it is really necessary to remove the center console panels, if we consider the “Normal” or “Standard” equipment. However, you can use the information provided here. Remember that the owner performs all actions at his own peril and risk.
Sound insulation of Kalina panel/dashboard
| The disease of Russian cars is rattling, crickets and squeaks, and the LADA Kalina panel is no exception; it is also made of inexpensive plastic, like the rest of the interior elements. Let's figure out how to soundproof Kalina's instrument panel without removing or dismantling it. |
If you decide to make soundproofing for Kalina yourself, then you will have to buy:
- Anti-creak (modelin).
- Vibrating material (for example, STP).
- Plastic clamps.
- Hot-melt gun and hot glue.
- Bitoplast or splen, optional.
How to remove the center console (panel trim)
The photo shows the general diagram of the fastenings of the central panel trim of the new Kalina. in red are clips that simply snap off under force. Blue - fastening screws that should be removed with a screwdriver.
- Remove the control unit for the heater and air conditioner by unsnapping the 4 clips around the perimeter;
- Remove 2 screws securing the top cover;
- Remove the top panel trim by snapping 3 clips on each side;
- We remove the overlay from the upper engagement with the panel.
How to remove the radio on Lada Kalina 2
To remove the MMC of the new Kalina, first remove the plastic panel trim (see above), and then remove the fastening screws.
Now you can familiarize yourself with the sticker on which the radio model is indicated, and based on this, select the appropriate firmware. You can also disassemble the MMC to replace the standard amplifier chip with a more powerful analogue. Don't forget that you can connect a rear view camera or amplifier to the standard radio.
Source
Operation algorithm
Started:
The front door seal will need to be bent and pulled towards you very carefully; The decorated plastic casing must be removed from the front roof pillar. This is easy to do - just remove the 3 clips that secure the trim; Now you will need to find two screws securing the air vent grilles, as well as the trim in front of the glass. The screws are on both sides, and to unscrew them you will need a shaped screwdriver (preferably with a short handle); Unscrew them and take out the ashtray; After that, putting your hand under the ashtray, pry up the two side plugs with a screwdriver. They are located on both sides of the emergency system key; This is done due to the fact that under the plugs there are two screws that are responsible for fixing the “beard” from below. We pull the lower part towards ourselves, but very carefully. You will also need to disconnect all the chips, not forgetting where they were; We also remove the casing on the steering wheel and dashboard. The latter is held in place by 2 black self-tapping screws; We also unscrew the panel from above, using a 10-mm head. Here the panel is secured with 7 or 9 screws, depending on the specific car; At the windshield, the heater air duct sits on lock washers. It is better not to remove them, as the plastic rods will simply come off. For this reason, we tear them ourselves, and instead of them we install self-tapping screws during assembly; The steering wheel doesn’t need to be removed at all, although the panel comes out with some effort. But in order to reduce time, you can take such an adventure; The time has come to completely remove the torpedo, but we’re not in a hurry yet. We carefully check all areas where the screws holding the panel could remain and unscrew them. We pay special attention to the side parts and niches; Carefully pull out the torpedo. It will come off easily if there is nothing holding it.
Let us note right away that it is easier to remove the panel through the passenger door. As for the method of draining the coolant and removing the stove, everything is done almost the same, except with some nuances.
After soundproofing has been completed, we install the panel in place. Don't forget to first pass the block with wires for the switch. We also insert the glove box light in advance using the appropriate holes.
Thus, the operation can be considered completed. Having learned how to remove a torpedo on Kalina, you can safely take on this work, even without the help of an assistant. On the other hand, an extra pair of hands certainly won't hurt.
Installation of the Luxe central console from Lada Kalina on Lada Granta
Cars of the Lada Kalina family in the Luxe configuration have a center console with a visor, which allows you to place a multimedia system. Currently, this console is not produced by the factory, but you can install it yourself on the Lada Kalina in the “Standard” or “Norma” configuration, as well as on the new Lada Granta FL family.
The modification process depends on which instrument panel (dashboard) is installed on your car.
Removing and installing the Kalina instrument panel
- Driver for socket attachment
- 8mm wrench attachment
- High nozzle on the wrench 10 mm
- Knob attachment 13 mm
- Open-end wrench 10 mm
- Torx wrench (asterisk) T-20
- Medium Phillips screwdriver
- Medium flat screwdriver
- Wide 6 liter capacity
Parts and consumables:
Removing the instrument panel assembly with the heater is performed when it is necessary to replace the heater radiator, remove the heater fan electric motor, and also to remove the heater assembly.
1. Disconnect the wire terminal from the negative terminal of the battery.
Torpedo Granta dorestayl
The panel from Kalina began to be installed on the pre-restyling Granta immediately before the release of the updated Lada Granta FL family.
If the dashboard of your car is like in the left photo, then you will need to replace a number of parts of the instrument panel (dashboard) with parts from the Lada Kalina dashboard:
- 21925-5325011-00 Instrument panel VAZ-21925 Luxury with air duct SB AVTOVAZ OJSC
- 21920-7905020-00 USB cable 2192
- 21925-5326014-00 Overlay for the instrument panel console LUX
- 21920-5326014-00 Instrument panel console trim NORMAL - lower, depending on the climate unit
- 21920-5303014-00 Glove box body 2192
- 21920-3710010-00 Hazard switch
- 21920-5303016-00 Cover of the glove box of the instrument panel
- 21920-5325322-00 Fuse box cover
This is a global alteration of the car interior, which cannot be called rational.
After this, you can begin installing the center console according to the instructions below.
Delivery by transport company (cash on delivery, no prepayment)
Advantages:
- the cost of delivery of heavy and large-sized orders is much cheaper than that of Russian Post;
- There are practically no restrictions on the weight and dimensions of cargo;
- There is a wooden crate service - this is an additional guarantee of the integrity of the order.
Disadvantages: unfortunately, there are branches only in cities.
The estimated cost of delivery for an order up to 30 kg is 450 rubles.
List of transport companies with which we cooperate:
- TC "PEK" (cash on delivery service available);
- TC "Business Lines";
- TC "Energia";
- TC "KASHALOT" (KIT) (cash on delivery service available);
- TC "SDEK" (cash on delivery service available);
- TC "DPD";
- TC "ZhelDorExpedition";
- TC "VOZOVOZ";
- TC "Baikal-Service".
To send your order by transport company:
- Place an order in our online store by phone or on the website (registration is not necessary);
- After we receive it, our manager will contact you by phone to clarify the cost, delivery time and your wishes. Next, we will pack your order carefully and then send it to you;
- You will receive a shipment tracking number from us via SMS or email (if available). You can monitor the status of the order coming to you using our tracking service, as well as independently, on the transport company’s website using the track number. After the order reaches your locality and the manager of the transport company contacts you, you need to receive the order at their office or order home delivery;
- Upon receipt from the transport company, you pay the cost of delivery and order.
The cost of delivery is calculated based on the volume, weight of the selected product and the distance from the city of Tolyatti.
To send an order you must:
- indicate full name recipient;
- Your locality and region;
- series, number of passport or driver's license;
- Your phone number (contact).
TC "Business Lines" - Urgent delivery of goods from 1 kg throughout Russia.
The exact cost can be found on the official website of the delivery service - https://www.dellin.ru TC "PEK" - Guaranteed safety of cargo for the entire duration of cargo transportation, clear information support, delivery of goods throughout almost the entire territory of Russia, Belarus and Kazakhstan in optimal time and accurately calculated cost of services.
The exact cost can be found on the official website of the delivery service https://pecom.ru/ru/calc TC "SDEK" - Low tariffs compared to foreign courier companies, while the quality of the services provided meets modern international logistics requirements. Developed network of own representative offices. The exact cost can be found on the official website of the delivery service https://www.cdek.ru/calculator.html
TC "ZhelDorExpedition" - Serves only large cities and towns.
The exact cost can be found on the official website of the delivery service - https://www.jde.ru/branch TC "Energia" - Cargo transportation in Russia, the CIS and China.
The exact cost can be found on the official website of the delivery service https://nrg-tk.ru TC "KASHALOT" (KIT) - Delivery of cargo from 1 kg to 20 tons throughout Russia and Kazakhstan. The exact cost can be found on the official website of the delivery service https://tk-kit.ru/calculate
Torpedo Kalina or Granta FL
The following are instructions for cars with such a dashboard:
- instrument panel trim (21925-5325182)
- central air ducts (or intermediate air duct housing for the monitor for Lada Kalina 2) (2195-8104209/08)
- solar radiation sensor (21920-8121300)
- multimedia display (article 21920-7900100, make sure you have an interface cable)
- multimedia equipment (21920-7900200 or navigation 21920-7900300)
- Remove the instrument cluster, glove compartment, center trim and air ducts (move back a couple of fasteners from above).
- Install the air ducts, modifying the fastenings in place (for example, use furniture corners).
As a result, the air ducts should go down a little:
- Install the screen and multimedia system on standard mounts.
- Connect the display to the multimedia unit.
- Attach the solar radiation sensor to the frame.
- Install the center console.
Source
Removing the instrument panel assembly with heater
Using a high 10mm head, unscrew the nut securing the heater to the front panel.
We take out the cabin filter (see “Replacing the filter element of the ventilation and heating system”). Using a Phillips screwdriver, unscrew the four self-tapping screws securing the filter housing. We unscrew the nuts securing the steering column and lower the column to the floor (see “Removing the electric power steering column”). Disconnect the wire ends from the brake light switch (see “Removing the brake light switch”). Remove the floor tunnel lining (see “Removing the floor tunnel lining”).
We disconnect the seven wiring harness blocks behind the relay and fuse box.
Using a 13mm socket, unscrew the bolts securing the console brackets to the floor tunnel on both sides.