The Lada Kalina car is a fairly popular model, which has recently been actively in demand in the secondary market. In general, the car is quite simple and reliable, but there are some “childhood diseases”.
In the case of this car, it was the Kalina stove and the cooling system as a whole that turned out to be not entirely finalized. For this reason, owners are often faced with the fact that the engine is warmed up, but the stove on Kalina blows cold or slightly warm air, the engine itself overheats, antifreeze leaks appear, etc.
Moreover, such problems can be eliminated at minimal cost. The main thing is to take into account the nuances and scope of modernization work in advance. Next, we will look at what to do if the Kalina heater does not work well, the engine cooling system (ECS) becomes airy, overheating occurs, etc.
The main causes of malfunction of the Kalina cooling system
As mentioned above, the engine cooling system on Kalina has certain shortcomings that can be eliminated. In fact, the Kalina 1 cooling system turned out to be the most problematic, although there are also complaints about the Kalina 2 SOD.
In any case, if there is overheating, airing of the system or the Lada Kalina stove does not heat, modification of this system is simply necessary. At the same time, you should not immediately change the Lada Kalina thermostat to a “hotter” one when the stove is cold, cut in fittings and “tees” for quick modification of the CO itself, etc., without understanding all the issues.
The fact is that the VAZ-1118 can experience both general malfunctions that are common to all cars, and problems of an individual nature. First of all, among such “diseases” one can highlight frequent airing of the engine cooling system. The result of air ingress is a clear deterioration in the efficiency of the system, as well as poor operation of the stove.
Owners note the following signs of air in the cooling system:
- the stove does not blow warm air at idle, low and even medium speeds;
- the motor overheats, although the temperature gauge shows normal;
- there is a feeling of “emptiness” in the pipes, there is no dense filling;
As a rule, there are several reasons for the formation of an air lock, starting from poor tightness in the area of connection of the pipes and ending with problems with the cooling radiator or heater radiator. At the same time, many people often overlook the expansion tank cap.
Please note that on Kalina this is a weak link, the valve mechanism of the expansion tank cap is not reliable, sticking of the “suction” valve causes airing, and malfunctions of the excess pressure relief valve cause depressurization of the radiators. Of course, it is better to change the cover.
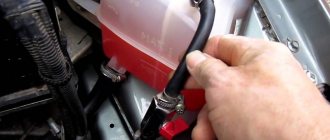
Even at the initial stage, you should know how to ventilate the Kalina cooling system. If the throttle drive is mechanical, with the engine warm, loosen the clamp on the throttle assembly heating fitting. On versions with an electronic gas pedal, it is necessary to unscrew the filler plug and also remove the upper thin hose from the thermostat, after first removing the air filter housing.
Next, you need to wait until the antifreeze appears and put the tube in place. Next, you need to warm up the car until the thermostat opens, and then repeat the steps described above a couple more times.
In the event that the problem cannot be solved by deaerating and replacing the cover, the system needs a complete diagnosis. If, as part of the diagnostics, no obvious problems are identified, then revision will be required.
Which car is right for you
If after reading the article you still cannot compare Kalina and Granta liftback and have not decided which car is best for you, pay attention to the most basic nuances:
- Exterior of the car. It is of no small importance, because every day it is you who drives the car, and not someone else.
- Price. Think carefully about what you are willing to pay for and what doesn't seem necessary. Based on this, choose the appropriate package
- Specifications. Decide what is more important to you - power and speed, or comfort and maneuverability on difficult roads? And perhaps the size of the trunk and the space in the cabin? Do you want to show off your car’s dynamic design to your friends and fly through the city at night, or just comfortably get from point A to point B? Only by thoughtfully and truthfully answering these questions can you choose the car that will completely satisfy you in all respects and will become a real “friend on wheels” for you!
Engine cooling system: SOD Kalina and modification
Let us note right away that correct modification begins with the fact that it is necessary to slightly change the distribution of antifreeze flows in the cooling system of the VAZ-1118 Kalina. This will reduce the intensity of airing due to the jamming of the compensation valve of the expansion tank cap.
Please note that simply removing the valve from the cover, as many suggest, is strongly not recommended, as the engine may overheat. It would be better to lower the fan switch-on temperature in the firmware to 98 degrees.
Another method is to embed an adapter into the radiator inlet pipe where the TM-108 sensor from a VAZ 2109 is installed, which is also not recommended. Although these methods are often discussed on specialized forums, they are offered by some car owners and garage specialists, experienced craftsmen still advise going the other way. A more correct method involves upgrading the cooling system on Kalina with both a mechanical throttle and an electronic one.
In general terms, you need to do the following:
- you need to drain the coolant, and then put a plug in the pipe that connects the large cooling circle and the expansion tank;
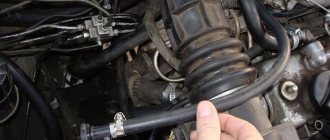
- then the free fitting is connected to the lower heater hose through a tee. The VAZ 2110 tee is suitable for these purposes;
- the next step is to plug the distant hose (thin outlet hose) designed to heat the throttle assembly;
- then the released fitting must be connected through a suitable tube to the expansion tank. To do this, you need to cut another “nipple” into the upper cavity. You can also connect via a tee to connect to a thin input;
- then you should fill in the coolant, a little higher than that, start the engine and warm up the unit until the fan turns on. The final stage will be to de-air the system and adjust the level of antifreeze or antifreeze.
This modernization allows for steam removal through a small circle, and aired liquid can be collected at the highest point of the cooling system. By the way, as for the version with an electronic gas pedal, in this case the thin thermostat fitting is connected to the top of the expansion tank.
Again, you can connect through a tee or drill in an additional fitting. In this case, the standard tube from the thermostat must be plugged. Next, you need to disconnect and plug the lower hose of the expansion tank of the cooling system, then connect an additional line from the tee. In turn, the tee cuts into the heater return.
We also recommend reading the article on how to replace the Lada Kalina alternator belt tensioner with your own hands. From this article you will learn how to check the belt tensioner of the Kalina generator, as well as how to replace the belt and generator belt tensioner on Kalina with your own hands.
The result of such actions will be active de-airing of the cooling system, the stove will heat normally at different speeds, and the engine temperature will always remain at a normal level, regardless of the mode and load on the engine.
At the same time, it is quite obvious that if the thermostat on the Lada Kalina is working properly, it is not necessary to change it. In other words, it is not the cause of overheating or a cold stove. In turn, a more comprehensive improvement of the cooling system of the Lada Kalina allows us to solve a number of problems.
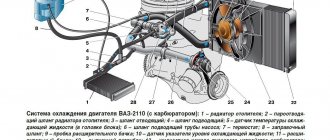
Functional range of elements of a car cooling system
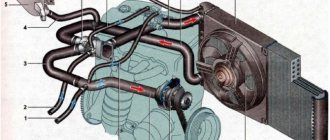
The standard cooling system consists of the following elements:
- sensors – determine t° in certain auto mechanisms; one of the management elements of the system;
- pump – makes it possible to circulate liquid in the SOD; operates in a forced mode;
- pipes – coolant moves through them;
- expansion tank - compensates for the volume of antifreeze, since due to temperature fluctuations it narrows and expands;
- radiator - a device that discharges excess heat into the environment;
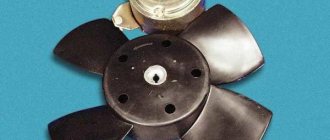
- fan – activates the cooling process by forcing air; With its help, the cooling intensity increases;
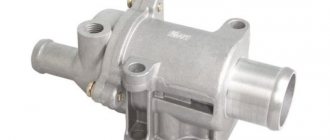
- Thermostat - although small, is a very important element that regulates the amount of antifreeze; provides a “comfortable” temperature regime throughout the entire system.
Operating principle
The cooling system operates in a self-regulating mode, which is aimed at maintaining optimal temperature in the power unit. If the oil temperature rises significantly, the system does everything to ensure that the temperature inside the engine decreases.
What's the result?
Taking into account the above information, it becomes clear that if the stove does not heat or the engine overheats, the Kalina thermostat is not always the cause of the problems. Of course, when such symptoms appear on Kalina, the thermostat and coolant level should be checked first. However, it often happens that the thermostat is working, as well as the antifreeze level is normal.
We also recommend reading the article on how to replace the cabin filter on a Lada Kalina with your own hands. From this article you will learn when and why it is necessary to replace the cabin filter on Kalina, as well as how this procedure is performed, which cabin filter to choose, etc.
In this case, the cause is precisely air locks. Moreover, attempts to “expel” air from the engine cooling system using standard methods often do not yield results. For this reason, improvements to the system itself are necessary to eliminate the possibility of an air lock forming in the future.
Finally, we note that the only disadvantage of the method of improving the Kalina SOD discussed above is that the engine may take longer to warm up. Moreover, against the background of the problems that arise when the standard system is aired (overheating of the internal combustion engine, cold stove, etc.), such a drawback practically does not manifest itself at all, even in the cold season.
So where should you start?
The first thing you need to do is check the antifreeze level in the system. To do this, open the hood and look at the expansion tank. Ideally, it should be filled to ½ of the total volume. If necessary, add coolant to this level.
If you find an antifreeze leak, then inspect the engine compartment of the car - there may be leaks here.
Antifreeze for VAZ Kalina 1119
| The table shows the type and color of the required antifreeze for filling into the VAZ Kalina 1119, produced from 2004 to 2013. Print |
| Year | Engine | Type | Color | Lifetime | Recommended Manufacturers |
| 2004 | for all | G12 | red | 5 years | MOTUL Ultra, MOTUL Ultra, G-Energy |
| 2005 | for all | G12+ | red | 5 years | Chevron, AWM, G-Energy, Lukoil Ultra, GlasElf |
| 2006 | for all | G12+ | red | 5 years | Chevron, G-Energy, Freecor |
| 2007 | for all | G12+ | red | 5 years | Havoline, MOTUL Ultra, Lukoil Ultra, GlasElf |
| 2008 | for all | G12+ | red | 5 years | Havoline, AWM, G-Energy |
| 2009 | for all | G12+ | red | 5 years | Havoline, MOTUL Ultra, Freecor, AWM |
| 2010 | for all | G12+ | red | 5 years | Havoline, AWM, G-Energy, Freecor |
| 2011 | for all | G12+ | red | 5 years | Frostschutzmittel A, VAG, FEBI, Zerex G |
| 2012 | for all | G12++ | red | from 5 to 7 years | Freecor QR, Freecor DSC, Glysantin G 40, FEBI |
| 2013 | for all | G12++ | red | from 5 to 7 years | FEBI, VAG, Castrol Radicool Si OAT |
The data in the table is close to those recommended by the VAZ
For diesel and gasoline engines the parameters will be the same! When purchasing, you need to know the shade - Color and Type of antifreeze allowed for the year of manufacture of your Kalina 1119. Select the manufacturer at your discretion. Do not forget - each type of liquid has its own service life. For example, for a VAZ Kalina (Body 1119) 2004, with any type of engine, a carboxylate class of antifreeze, type G12 with shades of red, is suitable. The approximate period of the next replacement will be 5 years. If possible, check the selected fluid against the vehicle manufacturer's specifications and service intervals.
Important to know Each type of liquid has its own color. There are rare cases when the type is tinted with a different color
The color of red antifreeze can be from purple to light pink (green and yellow have the same principles). Mixing liquids from different manufacturers is possible if their types meet the mixing conditions.
- G11 can be mixed with G11 analogues
- G11 cannot be mixed with G12
- G11 can be mixed G12+
- G11 can be mixed G12++
- G11 can be mixed G13
- G12 can be mixed with G12 analogues
- G12 cannot be mixed with G11
- G12 can be mixed with G12+
- G12 cannot be mixed with G12++
- G12 cannot be mixed with G13
- G12+, G12++ and G13 can be mixed with each other
- Mixing antifreeze with antifreeze (traditional class coolant, type TL) is not allowed. No way!
- Before completely changing the type, rinse the radiator with plain water
- At the end of its service life, the liquid becomes discolored or becomes very dull.
- Antifreeze and antifreeze - very different in quality
- Antifreeze is the trade name for the traditional type (TL) of old-style coolantAdditionally
autogener.ru
We change it to a 16-valve modification
As noted, to complete the procedure in full, you will need to dismantle the starter unit
If this important manipulation is neglected, spilled liquid may penetrate into the starter unit through the open hole, causing its breakdown.
- We turn off the power supply to the LADA Kalina starter by disconnecting the block with cables from the solenoid relay on the unit body.
- On the positive terminal of the unit, remove the protective cap, then use a “13” key to unscrew the fixing nut, remove the terminal with the wire and move it to the side.
- Now you can use the same key to unscrew the 3 bolts that hold the unit to the block. We take out the starter.
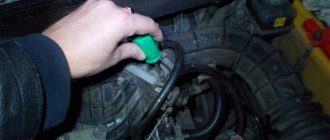
- Next we move on to unscrewing the plug and dumping the refrigerant into the container.
- Having completed this stage of the process, screw the plug into its original place. The torque should not exceed 30 Nm.
- Using the previously indicated method, we drain the liquid from the radiator assembly.
After installing the plugs, we proceed to filling the system with the indicated liquid. We perform this action through the neck of the expansion tank. After this, we install the starter, start the power plant and, by pressing on the pipes, help the fluid begin circulating in the circuit faster. At the same time, we check the level using the marks on the tank. It should be located between the “Min” and “Max” marks. The antifreeze replacement has been successfully completed.