Fans of classic “sixes” periodically have a question: “How to set the ignition on a VAZ 2106?” Of course, in those days they had never heard of automatic adjustment of angle and torque, so everything had to be done by hand. Today you will learn how to set up the ignition on a VAZ 2106 and not make mistakes.
Setting up the ignition of a VAZ 2106
Licked from the site.
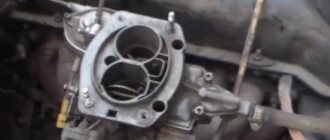
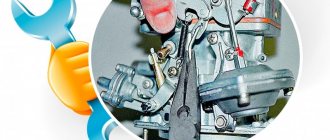
Very good instructions. The ignition distributor (distributor) is removed from the VAZ 2106 car for repair or replacement. The engine of the VAZ 2106 model has a distributor of type 30.3706. To distinguish it from distributors of other models, a mark (ring groove) is made on the shank. To remove the distributor from a VAZ 2106 car you will need: a spark plug wrench, a bit, two “7” keys, a “13” wrench, and a screwdriver. 1. Remove the tip from the spark plug of the first cylinder and unscrew it. 2. Close the spark plug hole with your finger.
3. Turn the crankshaft until the compression stroke begins in the 1st cylinder (air will begin to escape through the spark plug hole). Then, while continuing to turn the crankshaft, align mark d on the crankshaft pulley (highlighted with chalk) with the middle mark b (if you are using gasoline with an octane rating of 92 or 95) or the extended mark c (if you are using gasoline with an octane rating lower than 92). Reinstall the spark plug of cylinder 1 and connect the high-voltage wire to it.
4. Disconnect the hose from the vacuum ignition timing regulator. 5. Remove the high-voltage wires from the sockets of the distributor cover.
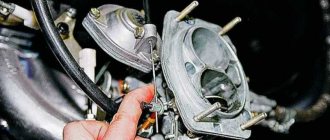
6. Unscrew the nut securing the distributor, remove the spring washer and plate. 7. Remove the distributor from the engine
8. Turn over the distributor and, holding the lower nut, unscrew the nut securing the low voltage wire; remove the washer and wire. 9. Unfasten the holders and remove the cover from the new distributor.
10. Install high-voltage wires into the cover of the new distributor in accordance with the operating order of the engine cylinders. NOTES The operating order of the engine cylinders is 1-3-4-2. The distributor rotor rotates clockwise. Cylinder numbers are marked on the distributor cap and on the engine cylinder head.
11. Connect the low-voltage wire to the new distributor.
12. Turn the rotor of the new distributor to a position in which its outer contact (shown by the arrow) will be directed towards the contact of the 1st cylinder on the distributor cover. NOTE
When the outer contact 2 of the rotor coincides with mark a on the cover, it simultaneously coincides with the head of screw 1 on the distributor body.
13. While holding the distributor shaft from turning, insert it into the socket on the cylinder block so...
14. ...so that the line passing through the spring latches is approximately parallel to the axis of the motor. 15. Secure the distributor in this position to the cylinder block without completely tightening the nut. Connect the hose to the vacuum regulator. 16. After installing the distributor on a VAZ 2106 car, check and, if necessary, adjust the ignition timing (see “Checking and adjusting the ignition timing”).
Source
Selecting an electronic ignition kit
Since the “sixes” were equipped with three types of engines (volume 1.3, 1.5 and 1.6 liters), the BSZ kits for them differ in the design of the distributor. The engine has 1.3 liters. (model VAZ 21063) there is a distributor with a shortened shaft, and in 1.5 and 1.6 liter engines. (VAZ 21061 and 2106, respectively) this shaft is equally long. The electronic ignition kit contains the following:
- distributor with catalog number 38.3706–01 for a 1.3 liter power unit. or 38.37061 - for 1.5 and 1.6 liter engines;
- high voltage coil marked 27.3705;
- electronic control unit, marking - 36.3734 or 3620.3734;
- connecting wires.
Attention! When buying a contactless kit for the “classic” Zhiguli, do not confuse it with products intended for the Niva VAZ 2121; the distributors are very similar in appearance. But the “Nivov” part differs in technical characteristics and is marked as follows: 3810.3706, 38.3706–10 or 038.3706–10. Setting it to “six” is strictly not recommended.
Kit for installing contactless ignition
Of the manufacturers selling their ignition kits in the Russian Federation, the most popular among motorists are spare parts from the SOATE company from Stary Oskol. It is worth noting that the new spark plugs of the A-17DVR brand, installed on classic VAZs with electronics, are not included in the delivery package; they will have to be purchased separately. To experience the full results of the replacement, it is also recommended to install new high-voltage wires if you have not replaced them in the recent past.
Despite the fact that the oil pump is one of the most reliable components in VAZ 2106-2107 cars, sometimes it also fails. In order to replace it, it is recommended to study this material:
Installing the ignition on a VAZ 2106
I must say “how to set the ignition on a VAZ 2106” - this is a fairly common question. How to do this and what you need for this is in the article. I must say “how to set the ignition on a VAZ 2106” - this is a fairly common question. How to do this and what you need for this is in the article.
Let's start with the fact that it is simply impossible to set the ignition on the injector. This system has an engine control unit, which, judging by the indicators from the phase sensor and crankshaft position sensor, supplies voltage to the ignition system. Therefore, it is impossible to adjust the ignition on the injector. Not at all.
Recommendations
There are main symptoms by which one can judge that it is necessary to set the ignition on the VAZ 2106:
- Fuel consumption is too high. With late ignition, the dynamics of the car decreases. In order for the car to accelerate as before, it needs more fuel-air mixture.
- Dynamics is lost: with late ignition, the mixture ignites after the piston has already moved down due to the inertia of the flywheel.
- Popping sounds in the muffler. In this case, the explosion follows, and it takes some time for the gases to expand. When the piston reaches bottom dead center, the next stroke will be the exhaust stroke. In this case, part of the fuel explosion will escape into the exhaust pipe, which is the cause of the popping noise.
- Increased engine noise. If the engine noticeably rattles or detonates, you need to turn on the ignition. In this case, the piston only goes up, and the ignition goes towards it. This makes the engine run rough with unpleasant sounds when running.
How to set the ignition on a VAZ 2106 - procedure
First, you will need to install the ignition mark. The crankshaft can be rotated either using a ratchet or using a special wrench using the nut. On the front cover of the engine and on the crankshaft pulley there are ebbs and notches, the combination of which corresponds to different ignition timing:
After the installation of the ignition mark is completed, you must immediately set the required gap in the contacts, naturally, where they exist. To do this, remove the distributor slider and unscrew the breaker fixing screw.
Before setting the gap, it is advisable to clean the contacts with sandpaper (600-800)
Well, now we go directly to the ignition installation of the VAZ 2106. We unscrew the distributor mount (nut 13), and then pull it out of the housing.
Now you need to insert the distributor into place, taking into account several mandatory points:
How to adjust the position of the distributor
If detonation is heard slightly or is absent altogether, then you should turn the distributor. So you need to adjust the ignition until the process settles down to one and a half seconds.
It is worth telling several possible situations of development of events when carrying out this procedure.
So, the ignition order of the VAZ 2106 is as follows:
- When detonation is very fast, that is, disappears after a few seconds, this indicates a normally performed adjustment. If it is after five seconds, then there is no need to make any adjustments.
- Prolonged detonation. To slow down this process, you need to stop and loosen the distributor body, and turn it one compartment forward. Continue these steps until the process continues for the desired period of time.
- No detonation occurs. This is not the correct “symptom”. In this situation, you need to turn the distributor towards minus.
Ignition adjustment of VAZ 2106
Setting the ignition is half the battle, because then it needs to be adjusted. After starting the engine, you need to warm it up, accelerate to 40 km/h in third gear, then turn on fourth and press the gas pedal about halfway, maybe three-quarters, but not to the floor. There are a couple of scenarios for the development of events, each of which requires its own solution.
How to set the ignition on a VAZ 2106 video:
Source
When the car asks for an "angle"
Fireworks to everyone! This post will talk about setting the ignition timing. As you remember, I complained that the car did not drive from the bottom and started firing only after 3 thousand revolutions. After replacing the carburetor the situation improved, but not much. The bluntness on the lower parts remained.
There is such a wonderful person, his name is Nail Poroshin, almost every modern owner of a carburetor VAZ knows him. He uploads quite interesting videos about the repair and modification of carburetors and the ignition system.
Well, I came across a couple of his videos, where they came to him with a similar problem as mine. In general, the issue turned out to be late ignition and lack of advance angle. After looking at the setup, I started doing the same. By turning the distributor counterclockwise, I made the ignition earlier. Ignition is considered ideal when, at a speed of 50 km/h in 4th gear, when you press the gas pedal to the floor, 2 light knocks of your fingers “poke-poke” appear and the car accelerates. My ignition is late and there are no sounds at all. With early ignition there is detonation in the form of prolonged knocking.
After the first test setting of the distributor, I went for a ride. When I pressed the gas, the engine sound immediately changed and became angrier. And I immediately felt the arrival, the car began to accelerate faster and gain momentum. The bluntness has already become not up to 3 thousand, but up to 2 thousand. So far I have no detonation, which means there is still room for adjusting the angle, approximately right up to the golden center, before these 2 light knocks. Also, when adjusting the ignition, the idle speed increases, they will also need to be adjusted.
Source
You don’t know anything about adjusting the ignition!
Greetings to VAZ car enthusiasts on the RtiIvaz.ru blog! You don’t know anything about ignition adjustment, which is why you need to read the auto article further.
Stable engine operation, its efficiency, throttle response, and power depend on the correct installation of the ignition. The ignition adjustment itself is necessary in order to ignite the fuel-air mixture in a strictly defined sequence, depending on the order of operation of the cylinders.
For self-service, owners of these models need to remember that on VAZ 2105, 2106-07 cars the cylinder operating order is 1-3-4-2.
The operation of adjusting the ignition on VAZ 2105 and VAZ 2106-07 cars may be required in several cases. This must be done after a medium or major overhaul of the engine, replacing the block gasket, valve burnout, replacing the timing chain or belt, replacing the camshaft and other similar cases associated with partial disassembly of the engine.
To set the top dead center and adjust the ignition, there are special marks on the engine in its upper and lower front parts that must be aligned. Location of marks on VAZ 2106 and VAZ 2105 engines for adjusting the ignition system.
Checking the ignition angle while the vehicle is moving
It is best to check the functionality of the ignition system after any adjustment while driving. This is due to the design features of the distributor and the octane number of the gasoline used. It happens that the ignition angles set according to the marks do not provide sufficient dynamics and throttle response. Adjusting by ear according to the beginning of detonation will help:
- We accelerate the car to a speed of 45-50 km/h on a flat section of the road;
- We turn on direct transmission (fourth on the VAZ 2106) and press the gas pedal all the way;
- A characteristic ringing sound (detonation) should appear, which will disappear after 2-3 seconds, and the acceleration will be smooth and powerful without failures;
- If detonation does not disappear throughout the entire acceleration, then the ignition angle is “early”;
- The complete absence of ringing and sluggish dynamics indicate a delayed spark in the cylinders;
- We adjust the position of the distributor in place, turning it by 3-5 degrees;
- When the adjustment is completed, the position of the distributor body relative to the block is marked with a mark or paint.
Ignition adjustment work should be carried out regularly. The service interval for a simple contact ignition system is 15,000 km, for an electronic one - twice as long. The condition of the spark plugs and high-voltage wires is also regularly checked. All setup operations can be easily done independently; a garage is not needed for this. The skill of independently repairing the ignition of a VAZ 2106 will always come in handy on a long journey or in winter, when problems arise with starting.
Didn't find the information you are looking for? on our forum.
VAZ 2106 – timing chain
Upper marks: one mark in the form of a hole is applied to the camshaft sprocket from the inside, the second mark is a boss in the form of a protrusion at the end of the camshaft bed. To perform this operation, the valve cover must be removed.
The lower marks on the front engine cover are cast into 3 marks - one long and two short, and on the crankshaft pulley there is a molded boss on the inside (you can easily feel it with your hand) and a mark on the end of the pulley. The long mark corresponds to the top dead center, and the two short marks are the ignition timing marks.
The first short mark (the middle of the three) corresponds to an ignition advance of 7.5 degrees, this is actually the factory tolerance for installing the ignition when using AI 92-95 gasoline. The second short mark corresponds to an ignition advance of 10 degrees.
When assembling the engine during a major overhaul, the crankshaft is oriented along the internal marks. This is a mark on the sprocket (risk) of the crankshaft and a boss on the cylinder block, which are combined.
Then the timing chain is installed and the marks on the camshaft sprocket and its bed are aligned. The crankshaft is turned two turns and the alignment of the marks is checked again. If all marks match, then install the front engine cover, crankshaft pulley and valve cover.
When installing the distributor (ignition distributor), the above-mentioned valve timing marks are set, and the distributor slider, after installing it, should point with the spacer plate at the 4 cylinder wire socket in the distributor cover.
VAZ 2105 – timing belt
Upper marks: one mark “E” is located on the cover of the first journal of the camshaft, and the second “F” is applied to the camshaft pulley. In order to “get” to the marks, you need to remove the timing belt protective cover. The lower marks are similar to the VAZ 2106-07 (the designation of the marks “C” on the pulley and “D” on the cover, while three long and two short marks are marked on the protective cover of the timing belt).
Video of adjusting the ignition of VAZs for any purpose
To check and adjust the ignition using an ohmmeter, do the following:
A similar adjustment of the ignition angle can be performed using a control lamp, but care must be taken since this operation is performed with the ignition on.
One wire from the lamp is connected to ground, and the second wire is connected to the distributor bolt, as is the case with an ohmmeter.
Further everything is the same as using an ohmmeter. The correct installation of the ignition is checked during a test drive. To do this, the engine is started, warmed up to operating temperature and a test drive is made to check and adjust the ignition. The following steps are performed:
The car accelerates to 50 km/h and the gas pedal sharply sinks into the floor. If everything is set correctly, you should hear 3-4 finger clicks. If the clicking of the fingers is longer, then this indicates that the ignition is set early; if there are no clicks at all, then the ignition is late.
With early ignition, the distributor must be turned clockwise, and with late ignition, counterclockwise and repeat the tests again.
Next, look at the video to see what electronic ignition looks like on a VAZ 2101, 2106, 2107 and contact:
All these installation and inspection work, ignition adjustments are carried out provided that the timing chain or belt is tensioned with the correct tension. And you also need to make sure that the engine valve clearances are adjusted, right.
Source
Preparing to replace the BSZ
The work of removing the old ignition and installing a new one does not require any special tools, devices or devices. An inspection ditch is not needed, and the entire operation can be carried out outdoors in good daylight. It is enough to have the following tools:
- a 13 mm open-end wrench for unscrewing the distributor fastening nut;
- using 10 and 8 mm wrenches, remove the coil;
- flat and Phillips screwdriver;
- pliers;
- electric or hand drill with a drill to match the diameters of the switch mounting screws.
Advice. To make the work easier, rent or from a friend a socket wrench with a long handle, which fits onto the ratchet nut and is used to rotate the crankshaft manually.
It is much more convenient to turn the crankshaft with this key
To get started, perform several preliminary disassembly steps:
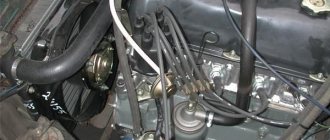
- Open the hood and disconnect the negative battery terminal.
- Remove the high-voltage wires from the spark plugs and distributor cap.
- Unscrew the spark plugs.
- Place a screwdriver into the spark plug hole of cylinder 1 and turn the crankshaft until the piston reaches TDC. In this case, the mark on the shaft pulley will be opposite the longest mark marked on the cylinder block.
First thing you need to do is disconnect the battery
Advice. If you do not have a wrench for the ratchet nut, the crankshaft can be turned by rotating the suspended rear wheel of the car. Don't forget to secure the car with wheel chocks, release the handbrake and engage 4th or 5th gear.
When the 1st piston is at TDC, the marks on the pulley and block must match
Having matched the marks and prepared new parts, you can proceed to the main stage of work.
Details of setting up the ignition system on the VAZ 2107 are presented here:
The device of the ignition system of the VAZ 2106
The ignition system (IS) of a gasoline engine is designed to create and timely supply pulse voltage to the spark plugs.
Composition of the ignition system
The VAZ 2106 engine is equipped with a battery-contact ignition system.
The ignition system includes:
The ignition includes low and high voltage circuits. Low voltage circuits include:
The high voltage circuit includes:
Purpose of the main elements of the ignition system
Each SZ element is a separate unit and performs strictly defined functions.
Accumulator battery
The battery is designed not only to ensure the operation of the starter, but also to power the low voltage circuit when starting the power unit. During engine operation, voltage is supplied to the circuit not from the battery, but from the generator.
Switch
The switch is designed to close (open) contacts of a low-voltage circuit. When you turn the ignition key in the lock, power is supplied (cut off) to the engine.
Ignition coil
The coil (bobbin) is a step-up two-winding transformer. It increases the voltage of the on-board network to several tens of thousands of volts.
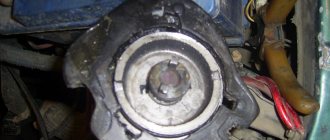
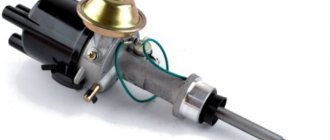
Distributor (distributor)
The distributor is used to distribute the pulse voltage coming from the high-voltage winding of the coil to the rotor of the device along the contacts of the top cover. This distribution is carried out by means of a slider having external contact and located on the rotor.
Breaker
The breaker is part of the distributor and is designed to create electrical impulses in a low-voltage circuit. Its design is based on two contacts - stationary and movable. The latter is driven by a cam located on the distributor shaft.
chopper capacitor
The capacitor prevents the formation of a spark (arc) at the breaker contacts if they are in the open position. One of its outputs is connected to the moving contact, the other to the stationary one.
High voltage wires
Using high-voltage wires, voltage is supplied from the terminals of the distributor cover to the spark plugs. All wires have the same design. Each of them consists of a conductive core, insulation and special caps that protect the contact connection.
Spark plug
The VAZ 2106 engine has four cylinders, each of which has one spark plug. The main function of spark plugs is to create a powerful spark that can, at a certain moment, ignite the combustible mixture in the cylinder.
Operating principle of the ignition system
When you turn the ignition key, current begins to flow through the low-voltage circuit. It passes through the contacts of the breaker and enters the primary winding of the coil, where due to inductance its strength increases to a certain value. When the breaker contacts open, the current instantly drops to zero. As a result, an electromotive force arises in the high-voltage winding, increasing the voltage tens of thousands of times. At the moment such a pulse is given, the distributor rotor, moving in a circle, transmits voltage to one of the contacts of the distributor cover, from which voltage is supplied to the spark plug through a high-voltage wire.
Maintenance of contact type distributor
In order to repair the distributor yourself, you need to understand its structure and the purpose of all its parts. The operating algorithm of the mechanical distributor is as follows:
- The rotating roller periodically presses the cam onto the spring-loaded movable contact, as a result of which the low voltage circuit is broken.
The gap between the contacts appears as a result of pressing the cam on the spring-loaded pusher - At the moment of rupture, the secondary winding of the coil generates a pulse with a potential of 15-18 kilovolts. Through an insulated wire of large cross-section, current is supplied to the central electrode located in the distributor cover.
- A distribution contact rotating under the cover (in common parlance - a slider) transmits an impulse to one of the side electrodes of the cover. Then, through a high voltage cable, current is supplied to the spark plug - the fuel mixture ignites in the cylinder.
- With the next revolution of the distributor shaft, the sparking cycle is repeated, only voltage is supplied to another cylinder.
In the old version, the unit was equipped with a manual octane corrector (item 4)
In fact, 2 electrical circuits pass through the distributor - low and high voltage. The first is periodically broken by the contact group, the second is switched to the combustion chambers of different cylinders.
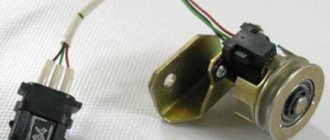
The design of the distributor, operating in conjunction with the electronic ignition system, is identical to the design of a mechanical distributor. There is also a plate with a bearing, a slider, a centrifugal regulator and a vacuum corrector. Only instead of a contact group and a capacitor, a magnetic Hall sensor is installed plus a metal screen mounted on the shaft.
In a contactless distributor, the main role is played by a magnetic sensor that sends signals to the switch
How a contactless distributor works:
- The Hall sensor and permanent magnet are located on a movable platform, and a screen with slots rotates between them.
- When the screen blocks the magnet field, the sensor is inactive and the voltage at the terminals is zero.
- When the roller turns and passes through the slot, the magnetic field reaches the sensor surface. At the output of the element, a voltage appears that is transmitted to the electronic unit - the switch. The latter gives a signal to the coil, which produces a discharge that goes to the distributor slider.
In an electronic ignition system, spark generation is carried out by a switch and a coil; the distributor only determines the moment the discharge is applied to the spark plugs
The non-contact distributor is more reliable in operation - the Hall sensor and bearings become unusable much less often due to the lack of mechanical load. A sign of meter failure is the absence of a spark and complete failure of the ignition system. Replacement is easy - you need to disassemble the distributor, unscrew the 2 screws securing the sensor and pull the connecting connector out of the groove.
The magnetic sensor is attached with two screws to the bearing pad
Malfunctions of the remaining elements of the distributor are similar to the old contact version. Troubleshooting methods are described in detail in the previous sections.
Diagnosis of ignition system faults
In order to save time and money, it is recommended to check the functionality of the VAZ 2106 ignition system in a certain order. For diagnosis you will need:
Battery check
If the engine does not start at all, that is, when you turn the ignition key, you cannot hear the click of the starter relay or the sound of the starter itself, the test should begin with the battery. To do this, you need to turn on the voltmeter mode on the multimeter with a measurement range of 20 V and measure the voltage at the battery terminals - it should not be lower than 11.7 V. With lower values, the starter will not start and will not be able to crank the crankshaft. As a result, the camshaft and distributor rotor, which drives the breaker contact, will not begin to rotate, and sufficient voltage for normal sparking will not form in the coil. The problem is solved by charging the battery or replacing it.
Checking the switch
If the battery is in good condition and the relays with the starter operate normally when starting, but the engine does not start, you should check the ignition switch. In order not to disassemble the lock, you can simply measure the voltage on the low-voltage winding of the coil. To do this, you need to connect the positive probe of the voltmeter to the terminal indicated by the signs “B” or “+”, and the negative one to the ground of the car. When the ignition is turned on, the device should show a voltage equal to the voltage at the battery terminals. If there is no voltage, you should “ring” the wire going from the contact group of the switch to the coil, and if it breaks, replace it. If the wire is intact, you will have to disassemble the ignition switch and clean the switch contacts or completely replace the contact group.
Checking the coil
After making sure that voltage is supplied to the primary winding, you should evaluate the performance of the coil itself and check it for a short circuit. This is done as follows.
Sometimes the coil works, but the spark is too weak. This means that the voltage generated by it is not enough for normal sparking. In this case, check the coil windings for opens and short circuits in the following order.
If the actual winding resistance values differ markedly from the standard values, the coil should be replaced. In VAZ 2106 cars with a contact type ignition system, a B117A type bobbin is used.
Table: technical characteristics of ignition coil type B117A
| Characteristics | Indicators |
| Design | Oil-filled, two-winding, with open magnetic circuit |
| Input voltage, V | 12 |
| Low voltage winding inductance, mH | 12,4 |
| Resistance value of the low-voltage winding, Ohm | 3,1 |
| Secondary voltage rise time (up to 15 kV), μs | 30 |
| Pulse discharge current, mA | 30 |
| Pulse discharge duration, ms | 1,5 |
| Discharge energy, mJ | 20 |
Checking the spark plugs
The most common cause of ignition system problems is spark plugs. Candles are diagnosed as follows.
The engine may run unstably due to an incorrectly set gap between the spark plug electrodes, the value of which is measured using a set of flat feeler gauges. The gap size regulated by the manufacturer for a VAZ 2106 with contact-type ignition is 0.5–0.7 mm. If it goes beyond these limits, the gap can be adjusted by bending (bending) the side electrode.
Table: main characteristics of spark plugs for the VAZ 2106 engine
| Characteristics | Indicators |
| Gap between electrodes, mm | 0,5–0,7 |
| Heat index | 17 |
| Type of thread | M14/1.25 |
| Thread height, mm | 19 |
For VAZ 2106, when replacing, it is recommended to use the following spark plugs:
Checking high voltage wires
First, the wires should be inspected for damage to the insulation and observed in the dark with the engine running. If any of the wires in the engine compartment breaks down, sparking will be noticeable. In this case, the wires need to be replaced, preferably all at once.
When checking wires for wear on the conductor, its resistance is measured. To do this, connect the probes of a multimeter to the ends of the wire in ohmmeter mode with a measurement limit of 20 kOhm. Serviceable wires have a resistance of 3.5–10.0 kOhm. If the measurement results are outside the specified limits, it is recommended to replace the wires. For replacement, you can use products from any manufacturer, but it is better to give preference to companies such as BOSH, TESLA, NGK.
Rules for connecting high-voltage wires
When installing new wires, you should be very careful not to confuse the order of their connection to the distributor cover and to the spark plugs. Usually the wires are numbered - the insulation indicates the number of the cylinder to which it should go, but some manufacturers do not do this. If the connection sequence is broken, the engine will not start or will become unstable.
To avoid mistakes, you need to know the order of operation of the cylinders. They work in this order: 1-3-4-2. On the distributor cover, the first cylinder is necessarily indicated by the corresponding number. The cylinders are numbered in order from left to right.
The wire of the first cylinder is the longest. It connects to pin “1” and goes to the spark plug of the first cylinder on the left. Then the third, fourth and second cylinders are connected clockwise.
Checking the slider and contacts of the distributor
Diagnostics of the VAZ 2106 ignition system involves a mandatory check of the slider and distributor cover contacts. If they burn out for one reason or another, the power of the spark may noticeably decrease. No tools are required for diagnosis. It is enough to disconnect the wires from the distributor cover, unfasten the two latches and remove it. If the internal contacts or slider have slight burn marks, you can try cleaning them with a file or fine-grained sandpaper. If they are very burnt, it is easier to replace the lid and slider.
Checking the breaker capacitor
To check the serviceability of the capacitor, you will need a test lamp with wires. One wire is connected to the “K” terminal of the ignition coil, the other to the wire going from the capacitor to the breaker. Then, without starting the engine, the ignition is turned on. If the lamp lights up, the capacitor is faulty and must be replaced. The VAZ 2106 distributor uses a capacitor with a capacity of 0.22 μF, designed for voltages up to 400 V.
Construction and repair of a contactless distributor
The purpose of the distributor in the VAZ 2106 car is to regulate the timely supply of spark to the spark plugs. Those who are at least a little familiar with the structure of the engine know that the power stroke in the cylinders occurs alternately.
Each engine has its own operating order. For example, in a VAZ 2106, the cylinders operate in this order 1-3-2-4. At the moment of the working stroke, when the piston is in the upper position, the distributor should give a spark.
Otherwise, without it, there would be no uninterrupted operation of the entire mechanism.
Device
The distributor of the VAZ 2106 car has a rather simple device compared to other engine components and mechanisms. The very first thing that will catch your eye when examining the distributor is its cover. It has 5 holes - 1 in the center and 4 at the edges. They are intended for contacts of spark plugs and starter.
Also, near one of the outer holes, the number “1” must be marked. It distinguishes the contact of the first cylinder from the other contacts. This makes it possible to set the candles in the correct order.
Usually, in a VAZ 2106, there is a fourth one opposite the contact of the first spark plug, a second one on the left, and a third one on the right, respectively.
Very often, the engine may operate unstably due to the fact that the spark plugs have earlier, or vice versa, late ignition. This significantly affects the speed and power of the car.
In order to set the ignition, you need to loosen the screw and turn the distributor along its own axis - first to the left, and then to the right. You need to move it literally a couple of millimeters, and check the ignition every time.
If the car starts up without problems and does not choke at high speeds, then you can congratulate yourself - the installation is complete. Inside the distributor there are such parts as:
- Rotor;
- fist;
- Breaker;
- Movable contact;
- Capacitor.
Exploitation
Since we are talking about an electrical device, it tends to break down often. In this case, some parts will need to be replaced. The VAZ 2106 engine distributor device has mainly disposable parts in the form of contacts and other similar mechanisms. How can you tell if parts need to be replaced or if the distributor is working properly?
A more severe case is when the car stalls while driving. This already indicates a more serious breakdown. Most often, this happens when the contacts are almost at the end of their service life and cannot withstand the loads. In this case, the faulty device should be replaced and the ignition should be reset.
And finally, the most severe type of breakdown is when the VAZ 2106 engine completely refuses to start. In general, many years of practice show that the engine may not start for many reasons. In order to know for sure that the distributor is faulty, you will need to remove it and install a new one.
Turn the ignition on and try to start the engine. If it works, then the problem area has been identified correctly. Often, with such a breakdown, installing a new distributor helps, but sometimes, you can resurrect the old one. This should be done by specialists, otherwise there will be no sense, but only wasted time.
Setting the angle of the closed state of the breaker contacts
The angle of the closed state of the breaker contacts (UZSK) is, in fact, the gap between the contacts of the breaker. Due to constant loads, it gets knocked down over time, which leads to disruption of the spark formation process. The UZSK adjustment algorithm is as follows:
After setting up the UZSK, the ignition timing is always off, so it should be set before assembling the distributor.
Video: setting the gap between the breaker contacts
What are the dangers of an incorrectly set OZ?
So, we have already found out that if the ignition of the fuel assembly in the form of a spark generated by the spark plug occurs earlier than usual, the expansion of the compressed mixture as a result of its combustion will begin to occur even before the piston has passed TDC, that is, at the stage of its ascent. This means that it will be more difficult for the piston to travel the rest of the way up before it begins to move downwards, during which the optimal release of energy from the exhaust gases occurs.
With late ignition, the amount of useful work performed by the piston also decreases, since part of the path it will travel by inertia, and part of the energy will be wasted and sent to the exhaust system, warming it up instead of increasing the efficiency of the power unit.
The consequences of an incorrectly set ignition can be very serious. If you allow the engine to operate for a long time at a late ignition, all the conditions for the optimal combustion process will be violated. In particular, at the moment at which the exhaust gas pressure peaks, the piston is already moving downwards, so the entire fuel assembly does not have time to burn, which leads to the deposition of unburned particles on the cylinder walls. Accumulating, such deposits can lead to coking of the engine, which can lead to its breakdown and the need for major repairs.
Adjusting the ignition timing
Ignition timing is the moment a spark occurs at the spark plug electrodes. It is determined by the angle of rotation of the crankshaft journal relative to the top dead center (TDC) of the piston. The ignition angle has a noticeable effect on engine performance. If its value is too high, ignition of the fuel in the combustion chamber will begin much earlier than the piston reaches TDC (pre-ignition), which can lead to detonation of the fuel-air mixture. If sparking is delayed, this will lead to a decrease in power, engine overheating and increased fuel consumption (delayed ignition).
The ignition timing on the VAZ 2106 is usually set using a car strobe light. If there is no such device, you can use a test lamp.
Setting the ignition timing using a strobe light
To adjust the ignition timing you will need:
The installation process itself is carried out in the following order:
Video: adjusting the ignition using a strobe light
Setting the ignition timing using a warning light
To adjust the ignition using a lamp you will need:
The work order is as follows:
Video: adjusting the ignition using a light bulb
Installing the ignition by ear
If the valve timing is set correctly, you can try to set the ignition by ear. This is done as follows.
If detonation lasts more than three seconds, ignition is early. In this case, the distributor body is rotated several degrees counterclockwise, and the verification procedure is repeated. If there is no detonation at all, the ignition is late, and the distributor body must be turned clockwise before repeating the test.
How to determine early or late ignition
When the OZ shifts in one direction or another, this causes a noticeable drop in engine power. But this phenomenon can also manifest itself with other symptoms:
- problems when trying to start the engine;
- a noticeable increase in fuel consumption;
- unstable work at XX;
- deterioration in dynamics when pressing the accelerator pedal;
- the occurrence of detonation processes;
- characteristic pops emitted into the exhaust system;
- engine overheating.
If you do not respond to these signs of unstable operation of the power unit, they can result in more serious problems. You need to be especially careful when persistent detonation occurs.
Let's look at specific signs of early ignition:
- increased engine detonation, threatening destruction of connecting rods and the occurrence of piston defects;
- loss of power, which is clearly noticeable at low speeds;
- the appearance of knocking in the engine;
- increase in fuel consumption.
Let's look at the symptoms of late ignition, which overlap:
- drop in power, especially at high speeds;
- problematic start of the power unit;
- motor overheating;
- decreased fuel efficiency.
As you can see, problems arise with any change in the ignition angle. And yet, many motorists take such a step at their own peril and risk. Some - by installing the ignition earlier, so as not to experience problems with starting. Others prefer late ignition, which improves the car's dynamics during acceleration. Both cases are undesirable because they negatively affect the engine.
It should be noted that the installation of LPG places increased demands on car owners in terms of optimizing the ignition angle. Currently, switching to compressed gas makes it possible to reduce fuel costs by almost half, but it must be taken into account that this fuel has a higher octane number compared to gasoline, and it is consumed somewhat faster than gasoline. All this leads to the fact that the combustion of the combustible mixture can occur during the exhaust stroke, exerting a strong thermal effect on the exhaust system. That is why owners of cars with gas equipment should monitor the functioning of the power unit much more often.
The symptoms of an incorrectly set ignition angle are also typical for diesel engines, but the reasons for this phenomenon are fundamentally different. The fact is that the method of igniting fuel in a diesel engine is different: here air is supplied directly to the combustion chamber, that is, there is no stage of preparing the fuel assembly. Diesel fuel is fed into the cylinder, where it spontaneously ignites when in contact with highly compressed air heated to a temperature sufficient to ignite the diesel fuel.
Adjusting the late/early ignition timing involves accurately setting the diesel fuel injection timing exactly at the moment the piston passes TDC, and the main element of the ignition system for diesel power units is the high-pressure fuel pump, which is responsible for optimal fuel injection.
Contactless ignition VAZ 2106
Some VAZ 2106 owners replace the contact ignition system with a contactless one. To do this, you have to replace almost all the elements of the system with new ones, but as a result, ignition is simpler and more reliable.
In a contactless ignition system there is no breaker, and its function is performed by a Hall sensor built into the distributor and an electronic switch. Due to the lack of contacts, nothing gets lost or burns here, and the resource of the sensor and switch is quite long. They can fail only due to power surges and mechanical damage. Apart from the absence of a breaker, a non-contact distributor is no different from a contact distributor. There is no gap setting on it, and setting the ignition timing is no different.
A contactless ignition kit will cost approximately 2,500 rubles. It includes:
All these parts can be purchased separately. In addition, new spark plugs (with a gap of 0.7–0.8 mm) will be required, although old ones can be adapted. Replacing all elements of the contact system will take no more than an hour. In this case, the main problem is finding a seat for the switch. The new coil and distributor are easily installed in place of the old ones.
Advantages of contactless systems
For an ignorant car enthusiast, the main argument in favor of BSZ is the fact that at the moment not a single manufacturer produces cars with a contact-cam spark generation system. Foreign brands abandoned it in the distant 80s of the last century, and in the Russian Federation mechanical ignition lasted until the 90s. The reasons for the refusal are quite clear:
- sparks constantly flashed across the contacts, causing them to burn and require frequent cleaning;
- the contact group wore out quite quickly, on average it was enough for 15-20 thousand kilometers, after which the element had to be replaced;
- the wear of the bearing on which the contacts were located made itself felt, which caused unstable operation of the power unit;
- the springs of the balance weights were stretched.
Non-contact ignition produces a powerful spark, which makes fuel burn better
All of the listed malfunctions appeared one by one, haunting the owner of the “classic” Zhiguli. Due to an imperfect design, the spark power of the spark plugs was constantly decreasing, engine performance was deteriorating, and fuel consumption was increasing. New BSZ systems are free of such disadvantages; they are characterized by durability and stable sparking. The spark power also increased, since the output pulse voltage increased from 16-18 kV to 24 kV, which contributes to better ignition of the fuel.
Note. At first, the weak point of domestic contactless systems was considered to be the switch, which quickly failed and could not be repaired. But later it was improved and the reliability of the BSZ increased.