How to remove the panel on Kalina? This question is asked by almost all car enthusiasts who have purchased a new or used AvtoVAZ car. Lada Kalina is an almost legendary car; there are a lot of jokes and stories about it. Of course, listening to all this is quite exciting, but when you yourself are faced with one of the comic problems, it’s no longer funny.
Kalina has many different flaws, and one of them is the dashboard. At the factory, its installation is carried out manually, which can later cause squeaks, unpleasant noise and other annoying sounds during a trip. They check exclusively the gaps, and rarely pay attention to the quality of the torpedo connection.
Because of this, many owners try to remove the panel themselves to eliminate the source of the noise. But this is not so easy to do either. Removing the instrument panel is carried out in several stages, and everything should be disconnected extremely carefully.
List of required materials and tools
The designers have developed a clear dismantling scheme; the instrument panel can be removed using a Phillips screwdriver. Tip type PH (standard), number “1” or “2”. Rod length 50-150 mm. There are no deep mounting units in the Kalina dashboard mounting scheme; all screws are located in the visible area.
It is not recommended to use a screwdriver to install the shield. The reason is that it is difficult to adjust the fastener pressure, and the panel may be damaged.
Additional materials and tools:
- lighting devices (flashlight, portable lamp), since the light in the cabin will not work;
- pliers or thin-nose pliers for replacing light bulbs;
- WD-40 or equivalent for “stuck” screws;
- a clean rag to clean the hidden elements of the shield from dust.
Before starting work, you need to warm up the interior to room temperature. This makes polymer components more ductile and reduces the risk of chips and cracks.
This is a minimum of accessories; the list can expand if you need to remove the entire front panel of the car. Most of the elements are fixed with latches. The glove box has a removable lid held in place by hinges and 4 latches. No tools are needed to dismantle it.
How to choose a new radiator
Before changing the heat exchanger, you need to select a new one. Particular attention should be paid to the material.
Based on this feature, radiators are divided into two types:
- Aluminum. Has lower thermal conductivity. If damaged, it cannot be soldered, but it costs much less. The vast majority of experts advise choosing this one.
- Copper. It is generally accepted that this heat exchanger is better. Its advantages are high thermal conductivity and maintainability. There is only one drawback - the price.
The heat capacity of the model does not play a decisive role; aluminum is more than enough to heat the interior. Maintainability, in modern times, is a dubious advantage; hardly anyone will solder. The quality of the radiators is approximately the same, so there is no point in overpaying for copper.
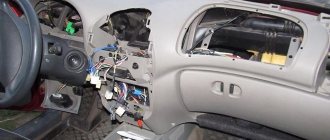
Removing the instrument panel on Lada Kalina 1
The first step is to disconnect the battery from the power supply system. Disconnect the negative terminal from the battery. If the temperature in the cabin is below +15°C, it needs to be warmed up to +20°C. The dashboard of Lada Kalina 1 is well illuminated by a flashlight, but additional light sources can be used.
The procedure for dismantling the shield:
- The steering column is installed in the lowest position.
- Removing the instrument cluster trim, unscrew the 2 screws at the top.
- Pull the cover towards you, overcoming the efforts of the two lower clamps.
- Use a Phillips screwdriver to unscrew the 2 screws located on the sides of the instrument panel.
- Move the top part of the shield towards you, tilting it.
- Disconnect the connector with wires by turning the lock.
- Remove the instrument cluster from the recesses into which the structure's shafts are inserted.
Tip: the screws can fall behind the panel while unscrewing. It is recommended to use a screwdriver with a magnetic tip.
After this, the Lada Kalina 1 dashboard is repaired or replaced. You can replace the light bulbs by turning the desired socket counterclockwise.
The lighting devices are assembled with a socket, the power of each is 1.2 W. EEC designation W1,2W.
Let's sum it up
In addition to the irresistible desire of LADA Kalina owners to defeat the “crickets” in the panel, there is another reason for removing the structure, this also applies to the removal of the torpedo. This is a noble goal of tuning, especially since now many people know how to disassemble the instrument panel.
The domestic manufacturer has deprived the LADA Kalina of a chic design and quality of panel material with a variety of lights and electronic gadgets. The diehard owners did not give up here either, and boldly installed fashionable instrument panels with a neon glow into the standard design, repainted individual components, installed lighting (including for the feet), and also performed a great variety of modern “tricks.” The main thing is to achieve a good fit of the parts and the panel will thank the owner with a soothing silence.
Installation of the dashboard Kalina 1
Installation is done in reverse order. For prevention, all surfaces are cleaned of dust and dirt, checked for defects and damage. The rag is dry; moisture may get on the surface of the electrical connector. Before installing a new instrument panel, check the correct location of the fastening units.
Installation steps:
- Install the plug connecting to the car's electrical network.
- Turn on the battery and check the operation of the dashboard.
- Disconnect the battery.
- Insert the lower rollers into the mounting recesses.
- Fix the shield, tighten 2 screws.
- Install the cover plate into the lower latches and screw in the mounting screws.
Several types of instrument panels have been developed for the Lada Kalina. They differ in appearance and functionality, but their installation diagram is the same.
When connecting the plug, you need to carefully move the latch to the “closed” position. This part is made of thin plastic and may break if pressed hard. First, insert the plug tightly, then turn the latch.
Stove radiator design
A car's heater consists of a housing with dampers and a metal radiator with pipes. Two types are installed: copper and aluminum. Each has its own advantages:
- Copper heaters have lower thermal conductivity, they heat up more slowly and also give off heat. Their reliability and maintainability are higher; the radiator can always be soldered.
- Aluminum is valued for its fast heating and good heat dissipation, low price and light weight. But if there is a leak, it is impossible to repair it.
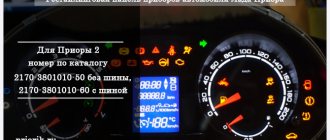
The procedure for removing the instrument panel on Lada Kalina 2
The dismantling steps for Lada Kalina 2 differ from the first model. The reason is that engineers increased the number of attachment points, which reduced the “rattling” effect after long-term use. Correct replacement of the dashboard is carried out in compliance with standard conditions: heated interior, lighting, disconnected battery.
How to remove the panel on Lada Kalina 2:
- Removing the protective plug located in the lower left part; it is secured with latches. In early models, it is necessary to unscrew the screws to completely remove the fuse box cover.
- Unscrew the 2 screws of the decorative trim and dismantle it.
- Remove 4 bolts on the dashboard (2 each on the bottom and side).
- Tilt the shield, disconnect the connector by turning the lock.
- Remove the panel.
To remove plastic parts, you can use a set of polymer pullers. It will also be needed to replace moldings, clips, and decorative overlays.
After dismantling, the on-board computer readings are reset to factory settings, with the exception of mileage. If the machine is used for personal purposes, you can reconfigure the system yourself. In company vehicles, it is recommended to record the data before starting work. They may be needed to check the condition of the machine.
Removing the center trim
Before you begin the repair procedure for the Kalina stove backlight, you need to stock up on everything you need. The list of required tools is modest: you will need Phillips and flathead screwdrivers, LEDs with resistors or assembled lamps. The algorithm for removing the center console itself is as follows:
- Turn off the radio. The device is removed completely after first disconnecting the wires going to it.
- Removing the plugs. The plugs located next to the alarm button are removed by pressing them from the inside through the space vacated by the tape recorder.
- Freeing the emergency lights from the wires. The plug is held in place by a latch on the button, but there is enough space here for comfortable manipulation.
- Unscrewing the bolts. Two screws for a Phillips screwdriver are hidden under the plugs; if you unscrew them, the console will only be held in place by the latches around the perimeter.
- Removing the heater adjustment levers. To remove them, you need to pull them towards you with a slight force. It was possible to remove them earlier, the main thing is not to forget (note that the speed controller does not need to be removed).
- Removing the center console. Starting from the bottom, you need to pull the console towards you, removing it from the metal clips. Try not to make too sudden or rough movements to avoid damaging the panel.
- Disconnecting the last wires. After removing the console, you have access to the wires leading to the speed controller, as well as the lighting bulbs. This is the last thing holding the plastic module.
In situations where it is difficult to remove the radio, a flat-head screwdriver will come in handy - you can use it to remove the plugs. Then standard actions are carried out according to the algorithm, only the wires from the radio are disconnected in the last step.
Correct installation of the Kalina 2 dashboard
Mount the instrument panel according to the standard scheme. First, clean the parts from dust and clogging. Check the integrity of the housing and replace the light bulbs if necessary. The temperature in the cabin should not fall below +15°C. In winter, it is recommended to carry out work in a heated garage or similar room.
Installation of the instrument panel:
- Connect the electrical connector and battery.
- Check the operation of the instrument module.
- Disconnect the battery.
- Screw the shield with 4 bolts.
- Install the decorative panel and secure it with 2 screws.
- Replace the protective plug or fuse box cover.
Diagnostics
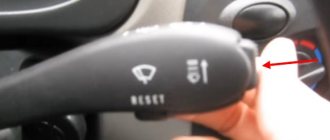
- Check the panel backlight brightness adjustment slider. It often happens that the brightness adjustment is at a minimum and the backlight is very dim or does not light at all;
- Check the panel hanger fuse. On Kalina, the fuses are located under the cover of the light switch block. In the block you need to check fuse F7, it is responsible for the panel illumination. The fuse location diagram is on the light switch block cover;
Dismantling the console containing the stove control unit
As you know, some trim levels of the Kalina-2 car do not have climate control. Here the driver can only control the operation of the stove. The stove control panel is held in place by 4 clips. In general, the mount used here is the same as in versions with climate control, but you won’t be able to remove the control unit panel unless you first remove the three control knobs.
Central console of Kalina-2, Standard equipment
Let's say we managed to dismantle the stove control unit panel. Then, all that remains is to remove the top flap, which is adjacent to the air ducts. This part itself needs to be pulled towards you from below, but first you need to unscrew two screws (they are circled in the figure). You won’t be able to simply grab and pull out the panel; you need to tighten the side clips with a screwdriver. In fact, the entire process is shown in the video we've posted below.
Any device of standard size 1 DIN can be installed in the compartment intended for the radio. You don't need to dismantle anything to do this. It is difficult to imagine a situation in which it is really necessary to remove the center console panels, if we consider the “Normal” or “Standard” equipment. However, you can use the information provided here. Remember that the owner performs all actions at his own peril and risk.
Possible faults
The following malfunctions are possible with the dashboard:
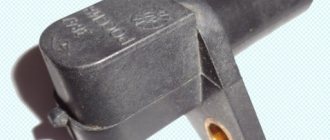
- Fuel level or temperature gauges do not work. The reason may be faulty sensors or damaged wiring.
- When the tank is full, the fuel level needle drops to the zero position.
- The arrow on the fuel level indicator moves abruptly and often drops to the zero position.
- The fuel reserve indicator does not go out.
- If any indicators on the device do not light up, the reason may be burnt out light bulbs, insufficient contact between the light bulb socket and the printed circuit board, oxidation of contacts, broken wires, or a malfunction of the indicator sensor.
- If the speedometer is not working, the reason may be in the flexible drive shaft of the device: the nuts are poorly tightened, a break, mechanical damage, etc. (video author - RasH19).