In order to do torpedo tuning with your own hands, you can think about the following directions:
- replacement of standard dials and hands;
surface flocking;
1200 rub. for the photo report
We pay for photo reports on car repairs. Earnings from 10,000 rubles/month.
Write:
Removing the dashboard of the VAZ 2107 injection model is quite simple. It is attached to only one bolt (located near the stove control knobs). For details of the procedure for removing the VAZ 21074 dashboard, see the video.
After the bolt securing the tidy has been unscrewed, you need to lightly pull it towards you and sequentially disconnect the plug, the speedometer sensor, reset the speed, and disconnect the air duct. In general, there is nothing complicated, the main thing is to remember where which plug was connected. If you need to repair the instrument panel, then proceed to further disassembly (as shown in the video), but if you need to replace the VAZ 2107 dashboard, then install a new panel and connect everything in the reverse order.
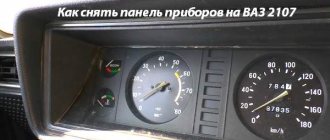
How to remove the dashboard on a VAZ 2107
You can hear a complaint from many car enthusiasts that the “native” design of the dashboard (or in common parlance, “torpedo”) on the VAZ 2107 is extremely laconic, stingy, even boring.
Others claim that yes, the pad is simple, but nothing distracts the driver. The instrument panel, or trim, is a broader concept, “all” the plastic that is located in the front part of the car’s interior. It is with the desire to change the appearance of the instrument panel with your own hands that professional tuning of not only the interior, but the entire car, often begins.
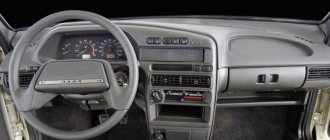
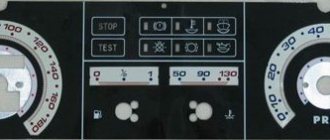
Let us remind you what the factory trim on the VAZ 2107 is:
And here’s how you can do the tuning yourself, change the instrument panel and embed a screen into the trim (not to mention the steering wheel):
But here is an almost professional tuning of the VAZ 2107 interior:
I can’t even believe that this tuning was done by hand!
To properly change the appearance of the front part of the cabin, change the instrument cluster, or install a new audio system, you often cannot do without removing the dashboard.
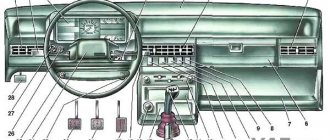
The torpedo consists of almost two dozen parts. Below is a schematic view of the torpedo.
In fact, it is very simple to remove and install the torpedo with your own hands. You will need a flat-head and Phillips-head screwdriver and a 10 mm open-end wrench.
Sequence of actions when removing a VAZ 2107 torpedo.
Attention! First, remove the negative terminal from the battery.
- Remove the negative terminal from the battery.
- Now you need to remove the shelf located in front of the passenger. To do this: unscrew the screws (2) on the right and one on the left;
- the last, fourth screw is fixed in the depth of the shelf, now it can be removed.
- using a flat-head screwdriver, pry up the additional central panel from either side, release the latches from the grooves, and pull it out along with the filling, then disconnect the connector going to the light switch:
- Using a flat-head screwdriver, carefully press out the switches, release them from the connectors and remove:
- first you need to separate the front and rear halves of the casing: unscrew the screws (4 pcs.), and one unpaired screw securing the lower half and separate it with both hands:
- Using the same screwdriver, we remove the tips of the heater levers and the deflectors through which air is supplied:
- after that, we “push” the meter into the dashboard, then unscrew the right screw of the shield and lift the shield on the right side. In the gap between it and the torpedo, unscrew the nut of the cable going to the speedometer, then lift the left edge of the shield and remove the economizer hose going to the fitting (on the VAZ 2107 on the left):
- Using small pliers, unscrew the nut securing the main cylinder of the corrector and also push it inside the panel:
Making your own beard
A beard is a complex structure; it is made of flat parts. To make them you need to make patterns; it is best to make them from cardboard. It is necessary to achieve high precision of the console parts; rigid cardboard is quite suitable for this. If you are not confident in your skills, first make a mock-up of the console from cardboard. This will allow you to make sure that the drawings are made correctly and to estimate how the new beard will fit into the installation site.
After making the pattern, mark the details of the beard and cut them out of plywood with a jigsaw. All parts are connected using glue and screws. The latter will allow you to fix the console elements until the glue sets. This is the most reliable and easiest way to connect beard parts.
Read, it may come in handy: Seats: repair and replacement of old chairs
After the beard frame is ready, it is covered with carbon fiber, leatherette or fabric. For their fastening, finishing materials, furniture stapler and glue.
After the glue has dried, all that remains is to install the new console in place of the standard one. Attach switches and devices and secure.
Important points
- Before removing wires and connectors, it is recommended to mark them to make reassembly easier. It is convenient to apply these marks with a black marker or felt-tip pen (because most of the connectors under the dashboard are white).
- You need to carefully remove the upper part of the steering column protective cover, as you can damage the rubber ring on the ignition switch (it gets caught on the edge of the cover and breaks easily).
- When removing the additional panel, do not tilt the screwdriver too much: the clamps that hold this panel are plastic and break very easily.
As can be seen from this article, removing the dashboard on a VAZ 2107 is a labor-intensive task, but it is doable. The main thing is to adhere to the instructions outlined above and not to use too much effort when removing: the panel material, despite its apparent strength, breaks quite easily.
Why do you need to remove a torpedo on a VAZ-2107
The need to dismantle and disassemble a torpedo is often faced by car enthusiasts who:
- intend to tune the dashboard, bring it in line with the latest fashion trends;
- carry out repairs of one of the devices that has failed;
- they are going to replace the speedometer cable, which has become unusable;
- restore the functionality of one or more indicators located on the panel.
During the tuning process, after dismantling the dashboard, you can install a new, more modern radio, additional heated glass and other high-tech devices, as well as reupholster the panel using some of the latest materials to improve its appearance.
If your main goal is repair, then simply replace the broken part and install the product in its place.
What can be placed on the center console
Tuning enthusiasts make their own beard to place on this panel:
- watch;
- multimedia devices (radio, radio, etc.);
- knobs for adjusting the level of illumination of the dashboard;
- switch block for fan, fog lights, external lighting;
- pocket for small items;
- USB sockets for charging gadgets
- part of a car's control devices.
Before taking measurements for the manufacture of the center console, it is necessary to remove decorative trims from the existing part and anything that will interfere with the installation of the new part. In order not to be mistaken with the dimensions, you must first make blanks from cardboard and try them on.
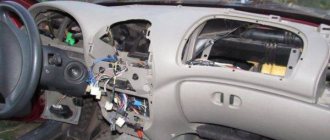
How to dismantle the instrument panel: step-by-step instructions
First of all, you need to open the hood of the car and remove the negative terminal from the battery in order to de-energize our dashboard. After this, the work is performed in the following sequence:
- unscrew the dashboard shelf and the glove compartment body using a special screwdriver;
- turn off the power to the light bulbs that illuminate the interior of the glove compartment in your car;
- We very carefully remove the additional dashboard along with the clock and other devices. To do this, you will need to pry the part with a screwdriver and pull it out of the special grooves;
- turn off the cigarette lighter and warning lamps by removing the corresponding wires located behind the additional panel;
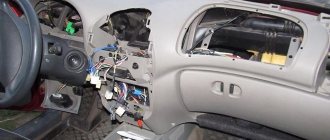
- we remove the switches located in the immediate vicinity of the gearbox lever and disconnect them from the on-board network;
- We unscrew the screws that you will immediately see under the switches and the bolts intended for fixing the main console of the torpedo. After this, you can freely remove it without fear of damaging the wires;
- remove the steering column cover;
- remove the heating system cover together with the air duct deflectors;
- dismantle the heater control unit;
- unscrew the last nuts holding the torpedo. For this purpose you need to use a key of 10.
Recommendations to avoid problems during the process of removing the torpedo
If you intend to remove the dashboard in a VAZ-2107 car for the first time, be sure to follow the following rules:
- When removing the upper part of the steering column protective cover, be careful not to damage the ignition switch O-ring. This part is made of rather flimsy rubber that cannot withstand strong mechanical stress;
- Mark all connectors, wires and switches that you remove to gain easy access to the dashboard. They will avoid confusion during the installation process;
- When removing the additional dashboard, do not try to use force, as there is a fairly high risk of breaking the plastic clips. Finding a replacement for them will not be so easy.
To remove the torpedo, it is better to use special tools, so we recommend preparing in advance a regular and medium-sized Phillips screwdriver, pliers and a set of open-end wrenches. This will help you remove all the necessary parts, as well as unscrew the nuts and bolts that hold the dashboard in place. In order not to make any mistakes during the work process, we suggest watching a video that describes in detail each stage of removing the torpedo.
Interior tuning
Replacing a VAZ 2101 torpedo with a VAZ 2105
Currently, the VAZ 2101 car is more than 30 years old.
This model was the first produced by the Volzhsky Automobile Plant, and at that time impressed many car enthusiasts with its ultra-modern design. And now 2101 remains a relevant model, which still travels along Russian roads. And numerous “clones” of 2101 (three rubles, fives, sixes and sevens) provide enormous opportunities for tuning. First of all, let's pay attention to the instrument panel 2101. To the modern eye, it is somewhat outdated and is only suitable for retro cars. However, if you replace it with a panel of younger car models, the 2101 will look quite modern. Now in stores you can find panels 2106, 2105, 2107, each of them has its own advantages and disadvantages.
Panel 2106 looks just as archaic and, moreover, does not have a particularly high-quality heating system. Its only advantage is the presence of a tachometer. But in panel 2105 there is no tachometer, but it has a modern heater that allows you to blow on the windshield and side windows. The shape of this panel is the most successful of all the others. The 2107 panel has the best heating system, as it has a central air duct. It also has a tachometer.
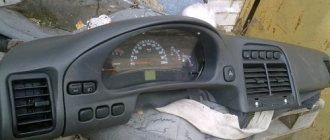
Removal and installation of VAZ 2107 dashboard
Instrument panel and its accessories:
1 — ashtray body; 2 — bracket for fastening the glove box lid lock; 3 - ashtray; 4 — glove box lid lock; 5 — decorative insert for the radio mounting panel; 6—radio receiver mounting panel; 7 — insert of the lower panel of the radio receiver mounting; 8 — facing of the radio receiver mounting panel; 9 — insert for the top panel of the radio receiver; 10 – plug for the windshield heating symbol display; 11 — instrument panel; 12 — loudspeaker trim; 13 — instrument panel; 14 — instrument panel insert; 15 — glove box body; 16 — glove box cover; 17 — hinge link of the glove box lid; 18 — instrument panel shelf
Unscrew the fastening screws and remove the steering shaft facing casing. Using a thin sharp tool, remove the side window heating nozzles from the instrument panel, the body ventilation nozzles and the plug 10 of the windshield heating symbol display from the instrument panel 11. Unscrew the screw (located under the plug) securing the instrument panel 11, remove the panel, disconnect the plugs and wires from the instruments. Remove the facings 12 from the left and right loudspeakers, overcoming the resistance of the two holders located along the upper edge of the facings. Remove four screws securing the speakers, remove them from the instrument panel and disconnect the wires. Remove shelf 18 and body 15 of the glove box by unscrewing the screws securing them. Unscrew the speedometer daily counter nut and remove the counter cable from the instrument panel. Remove the electric clock, cigarette lighter and rear window lighting and heating switches from panel 6 of the radio mounting. Disconnect the wires from them. After unscrewing the mounting screws, remove the radio and disconnect the wires. Pull out the lower insert 7 of the radio receiver mounting panel by the upper part. By squeezing the edges of the radio receiver mounting panel 6 on the left and right sides, release the hooks of the upper insert 9 and remove it from the panel. Remove decorative insert 5 of the radio mounting panel by pressing out the two hooks at the top of the insert from the inside. Unscrew the six screws of panel 6 securing the radio receiver (including two screws that simultaneously secure the instrument panel) and remove panel 6. Through the openings of the instrument panel 11 and the glove box, unscrew the four nuts of the upper fastening (they can be seen in the figure below) of the instrument panel, as well as two remaining bottom mounting screws, remove the panel and panel insert. Install and assemble the instrument panel in reverse order.
The most common reasons for dismantling
There are a lot of reasons for removing the tidy on a VAZ 2107, and some of them can be called banal, but nothing can be done. The most common reason when you need to remove the instrument panel is a burnt-out backlight bulb. Replacing light bulbs in the dashboard of a VAZ 2107 is carried out only when dismantling the device, and this procedure is simply impossible to perform otherwise.
The dashboard on the VAZ 2107 must also be removed for a number of the following reasons:
- Malfunction of pointer indicators.
- Failure of the instrument lighting, as well as lack of functionality of the arrow indicators.
- Replacing the device with a new one, for example, if a digital panel is installed instead of the factory instrument panel.
- Tuning or upgrading the device.
As practice shows, most often the need to dismantle the dashboard arises precisely because the backlight bulb burns out. If the device is dismantled for this reason, it is recommended to immediately replace conventional light bulbs with LED ones.
Required Tools
Before starting work, you will need to prepare the necessary tools so that you do not have to be distracted during the process. Despite the fact that the work of removing the device in question is quite labor-intensive, to implement it you will need a small set of tools, including:
- Phillips and slotted screwdriver.
- Electrical tape to indicate chips that are disconnected from the device.
- Work gloves for unscrewing the speedometer cable.
When all the tools are prepared, it remains to make sure that the parts and elements that are planned to be installed or replaced on the dismantled device are available. After this, we proceed to perform the main part of the work.
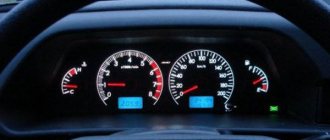
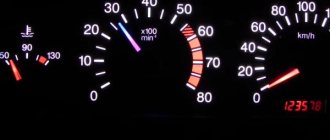
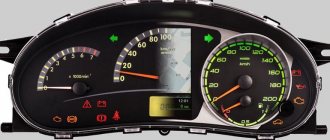
Emergency situations determined by the dashboard indicator
The VAZ 2107 instrument panel allows you to detect most malfunctions in vehicle systems without leaving the driver's seat.
- The low oil pressure light comes on. You should immediately turn off the engine, stop and check the oil level in the crankcase. If necessary, add oil and then start the engine. If the oil level is sufficient and the lamp is on, you cannot continue driving. The car needs to be towed to the repair site. Otherwise, the bearings (crankshaft bearings) will wear out or rotate and the engine will knock or jam, which will require expensive overhauls.
- The battery warning light comes on. In this situation, you can continue driving, but you should take into account that you won’t be able to travel far, especially at night, as the battery will quickly discharge. You need to start by checking the condition of the terminals. If they are oxidized, clean them. If the terminals are in order, it is necessary to check the functionality of the generator or voltage regulator relay (often the reason for the lack of charge lies precisely in the latter).
- If the brake fluid level warning light comes on, you should stop immediately. It is unacceptable to continue driving with faulty brakes. After stopping, it is necessary to add brake fluid and check the functionality of the brake system. If the brakes work, you can drive to the repair site yourself. Otherwise, you need to fix the breakdown on site or call a tow truck.
- If the coolant temperature gauge needle is in the red zone of the scale, you need to stop to let the engine cool down. When the temperature drops, you can check the condition of the pipes and the coolant level. If the level is normal, then you can try to go to a service station to find out the cause of the breakdown. Most often this is a malfunction of the thermostat or radiator fan. The VAZ 2107 panel is not equipped with an alarm or an additional lamp that lights up when the engine overheats. Therefore, inexperienced drivers often do not notice this problem, which can lead to antifreeze boiling away or even jamming the engine.
- If the fuel level needle is at zero or the yellow “reserve” light comes on, you need to refuel. The “reserve” range is about 50 km.
Also, the front panel of the VAZ 2107 has a tachometer, the readings of which should be paid attention to when driving. Driving at high speeds (over 5000 rpm) can lead to engine damage. If you keep the tachometer needle in the green zone of the scale, you can extend the service life and achieve minimal fuel consumption.