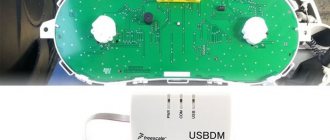
Since the USBDM programmer had already tested it at home (CAN recovery) and found out that it can also flash instrument clusters (gearboxes), I decided to flash it myself.
My gearbox costs 219240 and came with firmware 007 and did not display engine temperature readings. I decided to upgrade to version 009. But as always, the first thing is lumpy, an error popped up during the firmware and the result was a brick. Again, study the internet and figure out what’s wrong. I found my mistake, reflashed it with a new one - everything worked. But the mileage readings became “000” and the IMMO was lost. There were no problems with retraining the keys (IMMO), the Internet is full of information, and I’ve already done it myself. But it was not easy to restore the mileage; the car is under warranty and also needs mileage. MrRararai for help
, he helped restore my mileage, for which I thank him very much. Now I have firmware 012 on my gearbox.
Now I have also learned to change the mileage.
I surfed the Internet and this is what I found about instrument clusters:
how to view the CP firmware
- press the mileage switch button, then turn on the ignition without releasing the button (without starting the engine), the test will begin, press the button again - we see the software version (top line) and equipment (bottom line).
There are two firmware options:
1) with mileage and IMMO reset (it will be necessary to retrain the keys)
2) with preservation of mileage and IMMO.
— The gearbox seal is broken (warranty).
— When flashing the firmware, there must be a training key nearby, if something goes wrong and the IMMO is jammed, the car will not start, you need to train the keys (IMMO)
015
- on the old board, there is not a single temperature.
029 — 040
- updated board. there is no temperature.
All panels from the standard have a different display installed; to flash the firmware, you need to change it to a display from the standard. And add a bunch more elements. The old and new versions are different, each has its own improvements.
053, 060, 076, 087
- there is no temperature.
090, 091
– it is possible to connect an ambient temperature sensor (TOS), but there is no coolant temperature (TOZH)
092-095
– there is TOZ and TOS
053, 060, 076
– Old boards, to flash them you need to modify the board with a soldering iron or sew adapted 092 firmware
087-095
– New boards. Sewn without any modifications.
046
– has everything (same as 009 from Kalina)
009
– has everything (same as 046)
012
– everything is there, the latest version. It differs from 009 in the presence of a gear shift prompt.
Hardware PCs of configuration 40 (Lux) from configuration 20 (Normal) differ in the presence of an LED for indicating PPTF and the color of the glasses
— 219220(40)-007 and higher, there will be software: 009 or 012 — BC of the “Lux” configuration + engine temperature + removed the glitch with the outside air temperature + corrected the clock
On the 012 firmware of the gearbox and the firmware “i427ge05”, “i427GKA1” of the ECU, only on the luxury PC (219240), only on the manual (127 engine) - a hint about gear shifting appeared.
— 219020-060, 076 will be software: adapted 092, TOS and TOZH will be added
— 219020-087 and higher, there will be software: 092 or 046 (unlike 092, it will additionally show the engine operating time, fuel consumed and average speed. All parameters are resettable) or 009 from Kalina (in addition to 046, the squeak of the turn signals).
— 219040-032 and higher, there will be software: 046 — BC of the “Lux” configuration + engine temperature + removed the glitch with the outside air temperature + corrected the clock
On Grant, if you install the firmware from Kalina, the mileage may be reset or the IMMO may be lost (mostly), since the data is stored at different addresses.
Some data on firmware versions was taken from Goffka
FakeHeader
Comments 32
Kalina 2 after flashing from T007 to T012, the sounds of turn signals and emergency lights disappeared
There is a sound from the turn signals when the ignition is turned on...
I also had a gearbox from 007, now 012 - there is a sound from the turn signals.
there is no sound and the same thing while driving
So I did something wrong...
I have a grant from 2013. 1.6 98hp engine, automatic transmission, instrument panel 219020 - 076. Is it possible to install modified 092 firmware on it so that the technical specifications and TOC are displayed, will there be any problems with the automatic transmission indication.
Good day. Guys, tell me, the grant standard is 13 years old. Manual transmission. The firmware costs 219020_090. Which one can you upgrade to and how to have both the identity and technical specifications. If you can be more detailed because This is my first time encountering this, are there any nuances? I would be grateful! :)
You can flash it on software: 092
Instrument panel Lada Kalina, 11186 (2192380101020) can I install the automatic transmission standard on a grant?
No, from Kalina1 they do not fit to Kalina2/Granta
Hello, Granta automatic transmission 2013 firmware 009 but the coolant temperature does not show what can I reflash to?
009 firmware from Kalina, and it definitely has TOZH. May not show TOC if sensor is not installed.
Oh, I wrote 090 incorrectly, but if I set 009, it will show the automatic transmission switching? Can you tell me?
Nuances of multimedia firmware Grants (2190)
It is quite easy to carry out the firmware itself when installing the mms 2190 firmware. To do this, it will be necessary to use an SD card.
Let's concentrate! This card is subject to mandatory and preliminary formatting using the “FAT16” version.
Among the common flaws that occur after the dashboard firmware is installed, even if it is the latest version, is the Lada logo freezing on the display of the head unit.
This moment can be provoked by the following factors:
- failure to comply with required formatting principles;
- the presence of an outdated version of the SD card that differs from “SDHC”.
After successfully formatting the card and selecting software (for example, “New Menu V7.391 Nitro”), you will need to acquire the latest firmware and unpack the product onto a previously prepared SD media.
Regarding the “Firm Ware” folder, note: the files located in it will need to be redirected to the root directory of the card itself. Upon completion of the copying process, disconnect the flash card from the PC, not forgetting about the safe removal technique.
Instructions for flashing the dashboard firmware
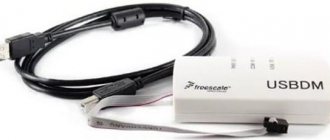
Required
: Usbdm OSBDM V4.95 programmer (available in the Aliexpress catalog).
Install the HCS12 Programmer software and USBDM driver X86 or X64. For Windows 8 or 8.1, driver authentication must be disabled before installing the software. After installing the software, connect the programmer to the PC (the COM and USB lamps should be on).
Connect to the device
:
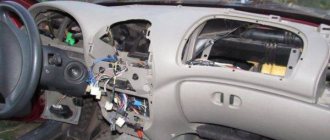
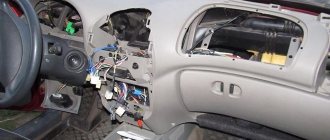
- remove the instrument panel and rear cover;
- power supply (9-14 V) on pins 19 and 21 (you can do it without power, to do this, move the jumper under the programmer cover to 3.3v);
- minus on pin 17;
- programmer cable (the PWR lamp will light up).
Launch the HCS12 Programmer software and make the settings:
- On the Interface click detect , USBDM-js16-001 . The bottom checkboxes must be activated;
- On the Target , click on the Load Hex Files and select the firmware (must be in the root of the disk), check the Auto Reload , select the HY-MC9S12HY64 , select Unsecure , select EraseSelective and check the Enable Sounds . (to reset the mileage and erase the immo, select EraseMass, but this is not recommended);
- On the Advanced , check the Enabled and check the field below (there should be a letter F at the end, if there is another letter, then change it to F).
When all the parameters are set, we start the process of flashing the instrument panel (on the Target , click Program Flash ). After 10 seconds, the update will be completed; when asked about connecting the next device, answer “No”. We check the version of the instrument panel again. All!
The process of flashing the instrument panel is also shown in the video:
Let us remind you that there are other improvements to the dashboard, for example, installing a PTF indication. In the comments, indicate successful options for firmware updates, we will supplement the table in the article!
How to set up "GPS" on the firmware version of the multimedia?
Carrying out this action will not take much effort. The procedure involves preliminary switching with the GPS module and consists of the following algorithm of actions:
- go to the corresponding “Tools” menu;
- activating the display keyboard;
- direct module switching;
- route instructions: “staticstoredll232usb.dll”;
- continuously pressing the “OK” key after the prompt regarding driver selection is displayed on the screen.
If the indicated steps are completed correctly, then we proceed to the manipulations of setting up the navigation software. In the program, we select the “COM 5” port and the corresponding speed – 4800 bps.
Upon completion of the entire list of manipulations, we observe the operation of the system. Please pay attention to the presence of the configured Navitel program.
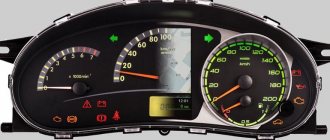
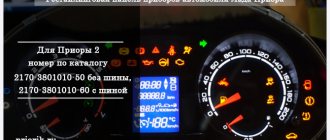
Instrument panel testing
You can find out the version of the instrument panel by self-testing, during which all instrument panel systems will be automatically tested, indicating its model and firmware version.
We test the instrument panel as follows:
1. With the ignition off, press the daily mileage reset button (small pin on the dashboard);
2. Turn on the ignition while holding the daily mileage reset button;
3. While the arrows are moving up and down, release the daily mileage reset button and briefly press it again.
How to read data:
1. The first line is the firmware version of the instrument panel.
2. The second line is the model of the instrument panel.
How to flash the tidy on Grant yourself
The steps look like this.
- Find a programmer and download a special application to your PC.
- Mount the utility on your computer and connect it to the car via the programmer.
- Install additional power wires according to the factory diagram.
- The system is activated and the firmware procedure begins.
- Next, you must strictly follow the manufacturer's instructions.
Firmware on Standard version
For a standard modification of a car, the utility version 2190-00-040 or 042 is used. From here you can safely flash versions up to 076. Also, in some modifications of a Norma-type car, you may also encounter an assembly like 219020.
Firmware for Norma configuration
The steps and tools here are similar to the Standard assembly. To understand which firmware version is in stock, you should enter the required combination on the machine specified by the manufacturer.
Re-flashing the panel Grants FL
Nothing changes when you try to upload a new program to the flap of the FL version. The actions are completely identical. The only difference is the version of the utility itself.
Brief specification of instrument panels used on Lada Granta and Kalina
| Instrument cluster item number | Software version | Sound accompaniment of direction indicators | Sound signal for turning on the hazard warning lights |
| 2190-3801010-00 | 28 and below | No | No |
| 2190-3801010-00 | 29 (serial) | No | Eat |
| 2190-3801010-20 | 90 and below | No | No |
| 2190-3801010-20 | 91 (serial) | No | Eat |
| 2190-3801010-40 | 39 and below | Eat | No |
| 2190-3801010-40 | 42 (serial) | Eat | Eat |
| 2192-3801010-20 | 06 and below | No | No |
| 2192-3801010-20 | 07 (serial) | Eat | Eat |
| 2192-3801010-40 | 06 and below | Eat | No |
| 2192-3801010-40 | 07 (serial) | Eat | Eat |
Instrument panel diagram Kalina 2
1,2 – blocks of the instrument panel wiring harness to the blocks of the front wiring harness; 3, 4 — blocks of the instrument panel wiring harness to the blocks of the rear wiring harness; 5 – lighting control module; 6 – ignition switch; 7 – on-board computer mode switch; 8 – windshield wiper switch; 9 – instrument cluster; 10 – light signaling switch; 11 – trunk lock drive switch; 12 – diagnostic block; 13 – block of the instrument panel wiring harness to the block of the wiring harness of the air supply box; 14 – rear window heating switch; 15 – alarm switch; 16 – brake signal switch; 17 – multimedia system; 19 – rotating device; 20 – driver airbag module; 21 – sound signal switch; 22 – mounting block: K1 – relay for the electric fan of the engine cooling system; K2 – door lock relay; K3 – additional starter relay; K4 – additional relay; K6 – windshield wiper relay; K7 – headlight high beam relay; K8 – sound signal relay; K9 – relay for low beam headlights; K10 – relay for turning on the heated rear window; K11 – main relay; K12 – fuel pump relay; 23 – electric power steering; 24 – cigarette lighter; 25 – lampshade lighting of the glove box; 26 – glove box lighting switch; 27 – block of the instrument panel wiring harness to the block of the ignition system wiring harness; 28 – engine control system controller; 29 – block of the instrument panel wiring harness to the block of the rear wiring harness 4; 30 – electronic accelerator pedal; 31 – additional resistor; 32 – heater electric motor; 33 – solar radiation sensor; 35 – relay (K13) of the electric fan of the engine cooling system 3; 36 – compressor relay (K16); 37 – relay (K14) for heating the windshield; 38 – relay (K15) for heating the windshield 2; 39 – headlight range control regulator; 40 – clutch pedal position signal switch; 41 – passenger airbag module; 42 – evaporator temperature sensor; 44 – windshield heating element; 46 – windshield heating switch; 47 – central unit of body electronics; 48 – micromotor reducer of the air flow distributor damper; 50 – controller of the automatic climate control system; 51 – micromotor gearbox for mixing air flows; 52 – micromotor gearbox for recirculation damper drive.