Firmware for the instrument cluster of Lada Granta and Kalina 2
Have you encountered a problem where the outside air temperature is not shown in the instrument panel? Even after installing the sensor, the values are not displayed on the screen. To correct this drawback, it is proposed to update the dashboard firmware of Lada Granta and Kalina 2 cars.
Let's find out first. what version of firmware is installed in the instrument panel. The first numbers (2190 or 2192) indicate the car model (Granta or Kalina 2). This is followed by the numbers 00, 20 or 40, which stand for “standard”, “norm” or “lux”, respectively.
Firmware versions of Lada Granta and Kalina 2 instrument panels
The table was compiled (is in the process of being adjusted) based on reviews from car enthusiasts (please add comments). There is no guarantee that all data is correct!
What is needed for firmware
Changing the display and working with a soldering iron
Changing the display and working with a soldering iron
053, 060, 076, 087
Work with a soldering iron or use modified firmware 2190-20_092_for_076
Suitable 092 and 009 or 012 from Kalina
Firmware 046 is suitable
Suitable firmware 009 or 012
Firmware 012 is suitable
Shows the transmission number
* — DTNV — outside air temperature sensor, DTOZH — coolant temperature sensor.
Download firmware (dumps of instrument panel firmware):
During the firmware process, the instrument cluster may fail; the author of the article does not bear responsibility. In addition, by disassembling the instrument panel you lose the warranty.
Comments
We disassemble part of the front panel of Kalina 2
We are disassembling part of the front panel of Kalina 2. I decided to disassemble the “beard” of the panel and read the instruments to find the cricket.
Instrument Cluster Grant Firmware
Instrument Cluster Grant Firmware.
Instrument Clusters Lada Granta Firmware
Instrument cluster Lada Granta Firmware.
I flashed the instrument panel from 076 to 092 firmware.
Flasher: https://vk.com/ruzaev73 8-937-874-20-67 VK group: https://vk.com/theladagranta Main channel: .
Instrument Cluster Kalina 2 Firmware
Instrument cluster Kalina 2 Firmware.
FIRMWARE OF INSTRUMENT PANEL LADA GRANT SPORT UNDER COOLANT TEMPERATURE
My detailed description of the firmware of the shield with sport grants. From version 042 to version 046. The goal is to display the identity. All.
Instrument Cluster Kalina 2 Firmware
Instrument cluster Kalina 2 Firmware.
Dashboard Kalina 2 Firmware
Instrument panels Kalina 2 Firmware.
branches: Moscow | St. Petersburg | Ekaterinburg | Nizhny Novgorod | Samara | Ufa | Chelyabinsk | Tyumen | Novosibirsk | Vladivostok | Khabarovsk
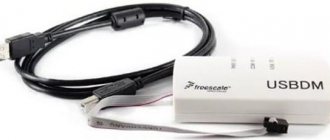
Since the USBDM programmer has already experienced ( CAN reconstruction ) and found out that they can still flash the instrument cluster (CP), he decided to flash it himself. My PDA is 219,240 and came with firmware 007 and did not display the temperature of the engine. I decided to upgrade to version 009. But as always, the first pancake is lumpy, with the firmware jumped out error and the result is a brick. Again, study the Internet and understand what is wrong. I found my mistake, I asked again for a new one, it all worked. But here the mileage readings became “000” and faded IMMO. With the re-training of keys (IMMO), problems did not arise, the Internet is full of information, and he himself has already done it. But to restore the mileage was not easy, the car is under warranty and the mileage is also needed. He turned to MrRararai
for help, he helped me to restore my run, for which I thank him very much. Now I have on firmware 012 firmware. Now I've learned to change the mileage also.
Instructions for flashing the dashboard firmware
Remove the instrument panel and rear cover. Usbdm OSBDM V4.95 programmer (when purchased, the kit includes a disk from which we install the HCS12 Programmer and USBDM driver software). For Windows 8 or 8.1, driver authentication must be disabled before installing the software. After installing the software, connect the programmer to the PC (the COM and USB lamps should be on).
Connect to the device:
- power supply (9-14 V) on pins 19 and 21 (you can do it without power, to do this, move the jumper under the programmer cover to 3.3v);
- minus on pin 17;
- programmer cable (the PWR lamp will light up).
Launch the HCS12 Programmer software and make the settings:
- On the Interface tab, click detect. USBDM-js16-001 will appear in the window. The bottom checkboxes must be activated;
- On the Target tab, click on the Load Hex Files button and select the firmware (must be in the root of the disk), check the box Auto Reload. select the HY-MC9S12HY64 chip. select Unsecure. select EraseSelective and check the box Enable Sounds. (to reset the mileage and erase the immo, select EraseMass, but this is not recommended);
- On the Advanced tab, check the Enabled checkbox and check the field below (there should be a letter F at the end, if there is another letter, then change it to F).
When all the parameters are set, we start the process of flashing the instrument panel (on the Target tab, click Program Flash). After 10 seconds, the update will be completed; when asked about connecting the next device, answer “No”. We check the version of the instrument panel again. All!
Let us remind you that there are other improvements to the dashboard, for example, installing a PTF indication. In the comments, indicate successful options for firmware updates, we will supplement the table in the article!
Have you encountered a problem where the outside air temperature is not shown in the instrument panel? Even after installing the sensor, the values are not displayed on the screen. To correct this drawback, it is proposed to update the dashboard firmware of Lada Granta and Kalina 2 cars.
First, we find out what version of the firmware is embedded in the instrument panel. The first numbers (2190 or 2192) indicate the car model (Granta or Kalina 2). This is followed by the numbers 00, 20 or 40, which stand for “standard”, “norm” or “lux”, respectively.
see also
Comments 182
Please tell me how to solve the problem? . The problem is that the warning lights (!), (ABS), (ESP) are constantly on, so these systems are not included in my configuration. Some people advise to reflash the device, others say that the problem can be solved in 5 minutes using a programmer. What needs to be done to keep the warning lights off?
And another question, in order for this dashboard to work correctly on Kalina Cross, do I need firmware 2192-50 1.2? The photo shows what it is like now. Now my low beam and high beam are not working at the same time, and the emergency lights are not working properly.
Is it the same with two screens? Why connect to the power supply when you can rearrange the jumpers, what is the difference?
I flashed grants for the tidy, everything works except for the backlight, that is, the screen lights up but where the arrows are there are no numbers, if you do a test of the tidy, everything lights up
Hello . Is it possible to flash a Priora 2 tidy with firmware 17 to 19?
Hello, I ordered USBDM v-4.95, but the Chinese sent USBDM-jb16-001, not USBDM-js16-001. Will it be possible to flash the KALINA 2 tidy and what needs to be done. THANK YOU.
I have USBDM-jb16-001. Still doesn't want to sew. It just doesn’t select the firmware, it gives an error
I was wrong, 076 without soldering, what version can I flash to?
I was wrong, 076 without soldering, what version can I flash to?
Guys, is 074 being sewn?
Thanks for the article and the used firmware! I edited the mileage, flashed the tidy from Granta Lux and put it in Kalina!
Please tell me how to solve the problem? I had a Grant standard 076 tidy, then a friend fitted me with a Datsun on-do Dream2 tidy. The price and white illumination of the scales captivated me. Shows TOZH, travel time, and everything else. The problem is that the warning lights (!), (ABS), (ESP) are constantly on, so these systems are not included in my configuration. I'm not good at electrics. Some advise reflashing the device, others say that the problem can be solved in 5 minutes using a programmer. What needs to be done to keep the warning lights off? I bought the programmer on Alika.
I don’t think it’s relevant anymore, but still. you need to reset the device. because this abs data is recorded when the device is connected to the car. I did that, everything is fine
Yes that's right. The problem has already been solved. Nevertheless thank you.
I don’t think it’s relevant anymore, but still. you need to reset the device. because this abs data is recorded when the device is connected to the car. I did that, everything is fine
can you tell me how to reset the device?
You need to do everything as written in the article above. Select EraseSelective and check the box. (if you want to reset the mileage and erase the immo, use EraseMass or erase all)
Firmware versions of Lada Granta and Kalina 2 instrument panels
The table was compiled (is in the process of being adjusted) based on reviews from car enthusiasts (please add comments). There is no guarantee that all data is correct!
| Equipment | Firmware version | DTNV* | DTOZH* | What is needed for firmware | Note |
| Granta Standard | 015 | No | No | Changing the display and working with a soldering iron | Old board |
| 029-040 | No | No | Changing the display and working with a soldering iron | Updated board | |
| Granta Norma |
* — DTNV — outside air temperature sensor, DTOZH — coolant temperature sensor.
Download firmware (dumps of instrument panel firmware, links available for site users):
- 2190-50 — To download files you need to log in to the site
- 2192-50 (software 1.9) - To download files you need to log in to the site
- 2190-00-029 — To download files you need to log in to the site
- 219020-060 — To download files you need to log in to the site
- 219020-076 — To download files you need to log in to the site
- 219020-087 — To download files you need to log in to the site
- 219020-090(AT) - To download files you need to log in to the site sent by ARS190475
- 219020-091 — To download files you need to log in to the site
- 219020-096 - To download files you need to log in to the site sent by ARS190475
- 219040-046 — To download files you need to log in to the site
- 219040-047 — To download files you need to log in to the site
- 2190-3801010-50 Software: 6.6 (KP with two displays) - To download files you need to log in to the site sent by ARS190475
- 2190-3801010-50 Software: 7.2 (KP with two displays) - To download files you need to log in to the site sent by ARS190475
- 219220-014 — To download files you need to log in to the site
- 219240-006 - To download files you need to log in to the site sent by ARS190475
- 219240-007 — To download files you need to log in to the site
- 219240-009 — To download files you need to log in to the site
- 219240-012 — To download files you need to log in to the site
- 219240-014 — To download files you need to log in to the site
- 219250-2.5 (KP with two displays) - To download files you need to log in to the site sent by ARS190475
- 219020-092_for_076 — To download files you need to log in to the site
- 219020-092 — To download files you need to log in to the site (author)
- 2190-3801010-50 Software: 7.1 - To download files you need to log in to the site
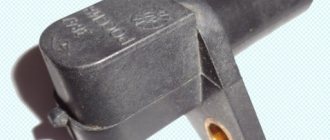
External temperature sensor on Kalina
This device is used, as a rule, to optimize the operation of climate control and, together with a temperature sensor in the cabin, help maintain an optimal microclimate inside the car, thanks to which the trip becomes comfortable.
The outside temperature sensor is located behind the bumper radiator grille, which will need to be removed if there is a need to replace the device.
You should not lose sight of the entire system in which the device operates - these signs may also indicate that the wiring connecting the detector to the computer is damaged, or the contacts have oxidized.
For what reason can the Kalina ambient temperature sensor break down?
Due to its rather open location, this device can be damaged by a variety of factors:
- mechanical reasons - a stone hitting the detector body can easily damage it;
- low ambient temperatures;
- the third reason, already mentioned above, can lead to the device breaking down - malfunctioning wiring or oxidation of contacts.
Replacing the sensor
- The process of installing a new device should begin with a complete blackout of the car (disconnecting the battery);
- after this, the radiator grille is removed (nothing complicated, just unscrew two bolts);
- the sensor is de-energized and disconnected from its socket;
- the serviceability of the device is checked and, if it breaks, a new one is installed in its place;
- the wires are connected, the grille is put in place, the battery is turned back on;
- All that remains is to start the engine and check the operation of the climate control.
A special device will help you verify the malfunction of this device - a multimeter in ohmmeter mode, which is used to diagnose thermistors.
On all modern LADA cars, depending on the configuration, an external air temperature sensor can be installed, which transmits readings to the instrument panel. If the instrument cluster shows incorrect outside temperature values, then this sensor may be faulty. Before replacing, check it with a multimeter.
Where is the air temperature sensor located:
- on Lada Granta/Kalina/Priora in the lower cross member of the body (photo);
- on Lada Vesta/XRAY in the lower left corner of the engine cooling radiator deflector (photo).
To remove it, in some cases it may be necessary to remove the front bumper and engine protection.
How to check the ambient temperature sensor? The easiest way is to replace the sensor with a known good one. If you have an ohmmeter, you can measure the resistance at its terminals and compare it with the data from the table:
| Temperature, about C | Resistance, Ohm |
| -40 | 100922,67±2,96 |
| -30 | 53046,93±2,49 |
| -20 | 29092,08±2,13 |
| -10 | 16567,33±1,68 |
| 9773,24±1,21 | |
| +10 | 5953,85±1,73 |
| +20 | 3737,33±2,11 |
| +30 | 2411,98±2,39 |
| +40 | 1594,92±2,65 |
On a Lada Vesta car, to check the sensor, it is proposed to assemble an electrical circuit:
Then apply voltage U=3.2 V ±1% to the sensor through a constant resistance R=4420 Ohm ±1%, which simulates the instrument cluster. Using the voltage Ux, determine the resistance of the sensor. Data to check in the table:
| Temperature, about C | Voltage Ux, V | Resistance, Ohm |
| ─ | 3,0657±0,0347 | 100 922,67±2983,4 |
| ─ | 2,7779±0,0360 | 29 092±620,62 |
| 2,2035±0,0310 | 9 773±118,4 | |
| +10 | 1,8366±0,0327 | 5 953±102,76 |
| +20 | 1,4661±0,0323 | 3 737±78,97 |
| +30 | 1,1297±0,0295 | 2 411±57,6 |
| +40 | 0,8485±0,0257 | 1 594±42,29 |
| +45 | 0,7307±0,0236 | 1 307±36,4 |
Manufacturer's recommendations: Check the sensor by immersing the sensor in a reservoir with silicone liquid at a certain temperature, after 3 minutes of exposure, measure the voltage Ux.
Note: In summer, in traffic jams, the readings of the outside air temperature may be too high, because... the sensor is not blown with air, and is heated by the hot asphalt and engine.
If the dashboard does not show the ambient temperature and the sensor is working properly, then there is a break in the wiring or poor contact.
Let us remind you that we previously looked at how to install an outdoor temperature sensor yourself.
Instructions for flashing the dashboard firmware
Required
: Usbdm OSBDM V4.95 programmer (available in the Aliexpress catalog).
Install the HCS12 Programmer software and USBDM driver X86 or X64. For Windows 8 or 8.1, driver authentication must be disabled before installing the software. After installing the software, connect the programmer to the PC (the COM and USB lamps should be on).
Connect to the device
:
- remove the instrument panel and rear cover;
- power supply (9-14 V) on pins 19 and 21 (you can do it without power, to do this, move the jumper under the programmer cover to 3.3v);
- minus on pin 17;
- programmer cable (the PWR lamp will light up).
Launch the HCS12 Programmer software and make the settings:
- On the Interface click detect , USBDM-js16-001 . The bottom checkboxes must be activated;
- On the Target , click on the Load Hex Files and select the firmware (must be in the root of the disk), check the Auto Reload , select the HY-MC9S12HY64 , select Unsecure , select EraseSelective and check the Enable Sounds . (to reset the mileage and erase the immo, select EraseMass, but this is not recommended);
- On the Advanced , check the Enabled and check the field below (there should be a letter F at the end, if there is another letter, then change it to F).
When all the parameters are set, we start the process of flashing the instrument panel (on the Target , click Program Flash ). After 10 seconds, the update will be completed; when asked about connecting the next device, answer “No”. We check the version of the instrument panel again. All!
The process of flashing the instrument panel is also shown in the video:
Let us remind you that there are other improvements to the dashboard, for example, installing a PTF indication. In the comments, indicate successful options for firmware updates, we will supplement the table in the article!
Since the USBDM programmer had already tested it at home (CAN recovery) and found out that it can also flash instrument clusters (gearboxes), I decided to flash it myself.
My gearbox costs 219240 and came with firmware 007 and did not display engine temperature readings. I decided to upgrade to version 009. But as always, the first thing is lumpy, an error popped up during the firmware and the result was a brick. Again, study the internet and figure out what’s wrong. I found my mistake, reflashed it with a new one - everything worked. But the mileage readings became “000” and the IMMO was lost. There were no problems with retraining the keys (IMMO), the Internet is full of information, and I’ve already done it myself. But it was not easy to restore the mileage; the car is under warranty and also needs mileage. MrRararai for help
, he helped restore my mileage, for which I thank him very much. Now I have firmware 012 on my gearbox.
Now I have also learned to change the mileage.
I surfed the Internet and this is what I found about instrument clusters:
how to view the CP firmware
- press the mileage switch button, then turn on the ignition without releasing the button (without starting the engine), the test will begin, press the button again - we see the software version (top line) and equipment (bottom line).
There are two firmware options:
1) with mileage and IMMO reset (it will be necessary to retrain the keys)
2) with preservation of mileage and IMMO.
— The gearbox seal is broken (warranty).
— When flashing the firmware, there must be a training key nearby, if something goes wrong and the IMMO is jammed, the car will not start, you need to train the keys (IMMO)
015
- on the old board, there is not a single temperature.
029 — 040
- updated board. there is no temperature.
All panels from the standard have a different display installed; to flash the firmware, you need to change it to a display from the standard. And add a bunch more elements. The old and new versions are different, each has its own improvements.
053, 060, 076, 087
- there is no temperature.
090, 091
– it is possible to connect an ambient temperature sensor (TOS), but there is no coolant temperature (TOZH)
092-095
– there is TOZ and TOS
053, 060, 076
– Old boards, to flash them you need to modify the board with a soldering iron or sew adapted 092 firmware
087-095
– New boards. Sewn without any modifications.
046
– has everything (same as 009 from Kalina)
009
– has everything (same as 046)
012
– everything is there, the latest version. It differs from 009 in the presence of a gear shift prompt.
Hardware PCs of configuration 40 (Lux) from configuration 20 (Normal) differ in the presence of an LED for indicating PPTF and the color of the glasses
— 219220(40)-007 and higher, there will be software: 009 or 012 — BC of the “Lux” configuration + engine temperature + removed the glitch with the outside air temperature + corrected the clock
Which sensor affects engine starting in winter?
Modern cars are stuffed with many sensors that are responsible for the operation of a particular device. But the presence or absence of electronic components should not affect engine starting. The car should start regardless of external conditions. Even if it’s frosty outside and the car has been standing in the cold all night, it should still start. Sensors are required to adapt to external factors. So, which sensor affects engine starting in winter? We will try to figure this out and try to find an answer to the question posed.
Sensors located in the motor
Modern engines have different technical equipment. There may be a lot of sensors, or there may be only a few. And if at least one of them is faulty, this will affect the start of the power unit.
Without going into details, we can say that absolutely everything affects engine starting. But if you start to look at it in detail, it becomes clear that the sensors were installed for a reason. They have their purpose and serve as a kind of indicator that signals that the machine is faulty. But not all sensors affect engine starting.
To understand the question of which sensor affects engine starting in winter, you need to understand what sensors are installed and what they are responsible for.
- Fuel quality sensor. Unfortunately, this device is not available on all machines. Usually they are installed only on American and German cars, which are not adapted for our fuel.
- Coolant temperature sensor. If this sensor is faulty, the engine simply will not start. And this is due to the fact that the engine is already hot, and fuel is not supplied in the required quantity.
- The idle air control sensor is an important device that measures the amount of fluid entering the engine. And if there is not enough of it, then the car simply stalls.
- DPDZ (Drossel damper position sensor) is an important indicator that controls not only the throttle body. He ensures that the supplied air is heated to the required level and enters the chamber already hot. If in summer the temperature outside is high and the car gets very hot, then in winter this is a whole problem. A faulty sensor will not allow you to start the engine.
- Mass air flow sensor. If this sensor fails, air will begin to flow into the motor in large flows. In principle, this will not greatly affect its operation, but the engine will begin to “choke”.
Additional sensors can also affect the car's starting. Experienced drivers, if they encounter such a problem, start checking with the battery and move on. But if during the inspection the problems were identified precisely in the heart of the car, then you should not immediately open the engine. Check each sensor individually, perhaps the reason lies precisely in them.
There are cases when sensor malfunctions begin due to contamination of the fuel system as a whole. The engine stops starting due to lack of fuel in the injection system. Those. the required amount of gasoline or diesel fuel does not get into the engine.
Low-quality fuel with a certain amount of water can freeze in the cold and ice will settle on the throttle position sensor. Bottom line, the car just won't start. It will be necessary to warm up the entire fuel system as a whole.
Which sensor affects engine starting in winter? Experts in this field give different answers and sometimes blame not the sensors, but other devices, for example, a generator or starter. But indicators can also cause a malfunction. In order not to be left without a car in the cold, it is better to check all the sensors in advance and eliminate all faults. And then your car will start in any weather.
Source
FakeHeader
Comments 32
Kalina 2 after flashing from T007 to T012, the sounds of turn signals and emergency lights disappeared
There is a sound from the turn signals when the ignition is turned on...
I also had a gearbox from 007, now 012 - there is a sound from the turn signals.
there is no sound and the same thing while driving
So I did something wrong...
I have a grant from 2013. 1.6 98hp engine, automatic transmission, instrument panel 219020 - 076. Is it possible to install modified 092 firmware on it so that the technical specifications and TOC are displayed, will there be any problems with the automatic transmission indication.
Good day. Guys, tell me, the grant standard is 13 years old. Manual transmission. The firmware costs 219020_090. Which one can you upgrade to and how to have both the identity and technical specifications. If you can be more detailed because This is my first time encountering this, are there any nuances? I would be grateful! :)
You can flash it on software: 092
Instrument panel Lada Kalina, 11186 (2192380101020) can I install the automatic transmission standard on a grant?
No, from Kalina1 they do not fit to Kalina2/Granta
Hello, Granta automatic transmission 2013 firmware 009 but the coolant temperature does not show what can I reflash to?
009 firmware from Kalina, and it definitely has TOZH. May not show TOC if sensor is not installed.
Oh, I wrote 090 incorrectly, but if I set 009, it will show the automatic transmission switching? Can you tell me?
But now doesn’t it show - D, R, etc. ?
On Granta they put 046, analogue 009
Good afternoon) Can you tidy me up? Kalina 2 does not show temperature.
Good afternoon. Tell me about the Grant standard with the new board, what extras. functions will need to be done, in addition to replacing the screen.
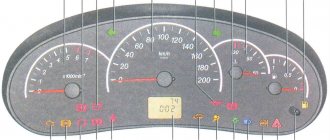
Every car has a dashboard where the main instruments of the vehicle are located. Thanks to the tidy, the driver knows at what speed he is traveling, what equipment is turned on and what is the condition of the main components of the car. In this material, we invite you to find out what the Lada Granta instrument panel is, what indicators are installed on it and what malfunctions you may encounter in its operation.
First, let's look at the description; the Lada Granta instrument cluster, the diagram of which is shown above, includes the following components:
- Tachometer, this sensor allows you to find out what the crankshaft rotation speed is at the moment.
- Indicator of malfunctions in the operation of the internal combustion engine control system.
- Left turn signal.
- Engine fluid pressure sensor. If it lights up after starting the engine, you need to check the oil level in the unit; if it is too low, there may be a leakage problem.
- Anti-lock braking system indicator.
- Light bulb of the standard anti-theft system - immobilizer. This unit is designed to block the engine from starting in the event of unauthorized entry into the car.
- The antifreeze overheating indicator in the cooling system appears if the engine temperature reaches 115 degrees.
- A light that turns on if the control unit has detected an emergency condition of the brake system. As a rule, its appearance is due to a lack of brake fluid in the reservoir.
- Right turn signal.
- Low battery indicator.
- Speedometer, the needle of which corresponds to the speed limit at which the car is moving. The speed sensor, which displays this information on a scale, is mounted on the gearbox housing.
- Indicator for turning on the exchange rate control system.
- Upshift prohibition lamp (as a rule, not used).
- This indicator appears when the high beams are activated.
- Symbol for turning on the rear fog lights.
- Lamp for low beam lighting.
- Front fog light activation indicator.
- A button designed to reset the daily mileage.
- LCD screen that displays data about the last trip, in particular, mileage. Depending on the vehicle configuration, the data displayed on the screen may differ. In general, the display can display time, mileage, outside air temperature, on-board computer options, fuel volume, as well as information in the form of hints regarding gear shifting.
- Indicator of unlocked doors in the car.
- Symbol of reserve fuel remaining in the tank.
- This indicator appears when the tire pressure is insufficient.
- Signal lamp for EUR operation. If it lights up when the engine is running, then most likely there are problems with the electric power steering system.
- This symbol illuminates when the seat belts are not fastened.
- Engine fault indicator, in most cases not used.
- Airbag status symbol. It always appears after turning on the ignition, since the system is in testing mode. If it continues to light after starting the power unit, this may indicate a problem with the system, so you need to contact service. If this indicator is on, then in the event of an accident the airbag either will not deploy, or it may deploy at the wrong moment while driving, which could be even worse (author - Lada Granta Fan channel).
If everything is clear with the description, then let’s move on to the malfunctions. Like any other electronic component, the Lada Granta instrument panel is also susceptible to various malfunctions.
CAUSES OF ENGINE OVERHEATING
Overheating can be caused by many reasons, all of them are related to a malfunction of the cooling system, or the quality of the coolant, as well as contamination of the cooling system jacket, which impairs the fluid throughput
It is important to use high-quality spare parts, otherwise the reasons below will happen suddenly. Let's consider each of the reasons
LOW COOLANT LEVEL
The most common problem is a lack of coolant in the system. Coolant, in the form of antifreeze or antifreeze, constantly circulates through the system, removing heat from heated engine parts. If the coolant level is insufficient, the heat will not be removed sufficiently, which means an increase in temperature will be inevitable.
If it is not possible to add coolant, then turn on the heater to reduce the likelihood of overheating. As a last resort, add regular or distilled water, after which the cooling system must be flushed and then filled with fresh antifreeze. At temperatures above 90 degrees, you should immediately stop the car, turn off the ignition, and allow the engine to cool.
ELECTRIC COOLING FAN FAILED
The electric fan forces cool air onto the radiator, which is especially necessary when driving at low speeds when there is insufficient air flow. The fan can be installed either in front or behind the radiator. If the temperature arrow starts to rise, stop the car and check the fan for serviceability. Reasons for fan failure:
- electric motor failed
- connector oxidized
- fan relay burnt out
- The internal combustion engine temperature sensor has failed.
To check the fan, remove the connectors from it and connect the wires directly to the battery, which will allow you to determine the cause of the failure.
THERMOSTAT FAULT
The thermostat is one of the main elements of the cooling system. The cooling system has two circuits: small and large. A small circuit means that fluid circulates only through the engine. In a large circuit, fluid circulates throughout the system. The thermostat helps you quickly reach and maintain operating temperature. Thanks to the sensitive element, which opens the valve at 90 degrees, the liquid enters a large circle, and vice versa. The thermostat is considered faulty in two cases:
- operating temperature of the coolant is not reached
- the power unit tends to overheat.
The thermostat can be located directly in the cylinder block, in a separate housing, or as one unit with a temperature sensor and pump.
BROKEN COOLING FAN BELT
On vehicles with a longitudinally mounted engine, the fan can be driven by a drive belt from the crankshaft pulley. In this case, the fan works forcibly. The service life of the drive belt is from 30 to 120 thousand km. Typically, several units are driven by one belt. When a belt breaks, the internal combustion engine immediately tends to overheat, especially when the speed decreases. If you have a domestic car with a belt-driven fan, it is recommended to install an additional electric fan to avoid unpleasant incidents.
DIRTY RADIATOR
Once every 80-100 thousand kilometers it is necessary to flush the radiator along with the entire cooling system. The radiator becomes clogged for the following reasons:
- untimely replacement of antifreeze
- use of low-quality liquid
- application in water system
- application of cooling system sealant.
To wash the radiator, you should use special compounds that are added to old antifreeze; the engine runs on this “mixture” for 10-15 minutes, after which you need to remove water from the system. It is advisable to remove the radiator and wash it with water under pressure, inside and out.
{Instructions} for updating composition software for devices with navigation
This annotation describes the process of updating software and hardware improvements to the composition of devices with navigation released between 2011 and 2012 (version with AMOLED screen). It is required to observe the order of execution of points of this annotation.
Attention. OJSC (form of organization of a public company; joint stock company)
AvtoVAZ does not bear any responsibility for cases of failure of the device composition during software updates and hardware modifications made according to the instructions given to us. Failure of the device composition will not be covered under warranty. For any questions please contact
Links for downloading software (that is, software - a set of programs for computers and computing devices)
:
Updating device composition software
1) Unpack the MOP_ 3 _ 9 .ZIP archive into any folder on your computer’s hard drive.
2) Copy the files iMX 233 TestApp.exe and ItelmaLauncher.exe from the folder given to us to the root of the flash drive;
3) Connect a flash drive using a standard mini-B/A adapter;
4) Turn on the ignition;
5) After downloading the software, the device composition will, after some time, launch the update program from the external flash drive indicating the current software version (that is, the software is a set of programs for computers and computing devices)
3. 9 . If a message about version incompatibility is displayed, this means that this composition of devices is the latest modification and the upcoming implementation of this annotation is not required.
6) Wait until the execution process is completed (about 2 minutes);
7) After finishing, the composition of devices will automatically reboot, at this moment you need to remove the flash drive, otherwise reprogramming will begin again;
8) Check in the menu (Menu->Additional information->Software versions (that is, software is a set of programs for computers and computing devices)
) that the device composition version is not displayed.
(The software version (that is, software - a set of programs for computers and computing devices)
3. 9 device compositions will be displayed correctly only after updating the software
(that is, software - a set of programs for computers and computing devices)
Dashboard).
Attention: software update (that is, software - a set of programs for computers and computing devices)
composition of devices must be done only by the method indicated above; updating via a file with the .bin extension is strictly not recommended.
Attention: the flash drive must be formatted under the FAT or FAT 32 file system.
Attention: this process must be done with caution, because if the power is lost, the ignition is turned off, or the flash drive is not removed in a timely manner, the programming process may be disrupted, in which case hardware will be required to restore the software.
Attention: if after flashing the device composition does not reboot, you need to briefly disconnect it from the on-board network (by disconnecting the battery or the corresponding fuse on the panel).
Note: After updating the device composition software, some of the data will not be displayed on the monitor because it requires an update to the Dashboard software.
Updating Dashboard Software
Attention: The update program works correctly only under Windows XP. It may be possible to use a virtual machine. Attention: this version of Dashboard is not designed for updating to the latest modifications of the device composition; updating will lead to the product not working. In this case, you will need to flash the Dashboard to a version that is compatible with this modification.
Attention: the Dashboard update should be created only after updating the device composition software. If the Dashboard update was made earlier than the device composition software, you must first roll back the Dashboard version to version 2. 18
1) Unpack the MOI_ 2 _ 25 .zip archive into the MOI_ 2 _ 25 folder in any hard drive space used for flashing the computer (laptop). In case of rolling back version to 2. 18 use MOI_ 2 _ 18 .zip archive.
2) Run the FirmwareUpdate.exe program from the MOI_ 2 _ 25 folder. In case of rolling back version to 2. 18 use folder MOI_ 2 _ 18 . (Fig. 1)
3) Enable the combination of devices in Recovery mode. For this:
- connect the mini-B cable to the laptop’s USB connector;
- Press and hold the “Menu/Cancel” button on the steering column joystick;
- turn on the ignition;
- after 2 seconds (when the Parking Brake indicator lights up), connect the mini-B cable to the USB connector of the device composition;
- after 3 seconds, release the “Menu/Cancel” key;
- The device composition will enter Recovery mode, the device composition screen will not turn on.
4) The device must be identified by the system as a USB HID compatible device. If you are using Windows 7, then the necessary drivers are located in the Drivers.zip archive, which you will need to unpack into the Drivers folder and specify the path to it when the system asks about installing the driver.
5) In the FirmwareUpdate program, press the “Start” button, the update process will begin (Fig. 2, 3)
6) Wait for the update process to complete (the message “Firmware downloaded successful” should appear)
7) Disconnect the USB cable, turn off the ignition and after 10 seconds turn it on again.
8) Check in the menu (Menu->Additional information->Software versions (that is, software is a set of programs for computers and computing devices)
) that the update was successful (Dashboard version must be 2.25, WinCE BSP version must be 3.3)
Note: Updating the Dashboard software is not critical to an unexpected loss of power or USB cable. In this case, the update process can be repeated again.
1) Unpack the archive Updater_Itelma_RU_ 5. 0 . 3. 547_2012. 02. 08 .rar to any folder on your computer's hard drive.
2) Copy the files CNT_Update.dat and CNT_Update.upd from the folder given to us to the root of a flash drive with a capacity of at least 2 GB;
3) Turn on the ignition, wait for the software to load.
4) Connect the flash drive to the device composition via a miniB/A adapter to the USB connector;
5) In the system options menu (Options->System->Software) select the item “Update software (that is, software - a set of programs for computers and computing devices)
navigation";
6) The device composition will search for available updates on the flash drive and offer, depending on the available updates, to perform:
– full update (with removal of old files);
– regular update (only modified files are updated).
If a regular update is not possible, only a full update will be offered.
If no update packages are found on the flash drive, the device composition will display the message “No updates found.”
7) After selecting the update type, the process of copying files will begin. In the case of a complete update, the process takes about 17 minutes.
8) After the update is completed, you can run a check of the integrity of the installed software (the “Check integrity” item in the Options->System->Software menu). Device Composition will display an error message if corrupted files are detected during the verification process. In this case, you need to repeat the software update function.
Hardware modification of device composition
Please note: hardware modification should be carried out only in this case if the composition of the devices shows a freeze in the form of “snow-white” or “dark” screens, which can only be corrected by disconnecting the battery.
1) It is necessary to extract the combination of devices in accordance with the vehicle maintenance instructions;
2) Remove the back cover of the device composition by unscrewing the 4 screws.
3) The two legs of the connector (pins 9 and 11), shown in the highlighted area, must be connected to each other with a jumper (item 1);
The temperature indicator in the instrument panel does not work
Using the example of a dial indicator for the temperature of the coolant (antifreeze, antifreeze) in the instrument panel of a VAZ 21093 car with a carburetor engine, we will find out why it does not work.
There are most often two options for a malfunction of the temperature indicator: either the indicator arrow is constantly at the beginning of the scale, or the arrow is constantly in its red zone. In addition, the indicator may give incorrect information about the actual coolant temperature.
Causes of the malfunction: “the coolant temperature gauge does not work”
The reasons for the failure of the temperature indicator on a VAZ 21093 car are:
— malfunction of the coolant temperature indicator sensor (it is installed in the engine block head and works in tandem with the indicator);
— malfunction of the electrical circuit of the pointer;
— malfunction of the temperature indicator itself.
How to determine the “culprit” of a temperature gauge malfunction
If the coolant temperature gauge needle is constantly at the beginning or end of the scale, and the car’s engine cooling system is functioning normally: the engine warms up as usual, the thermostat is completely hot, the heater “warms”, the coolant does not boil.
Checking the serviceability of the temperature indicator sensor
Turn on the ignition, remove the wire from the sensor and short it to ground (touch the engine or body); if the gauge needle rises from the beginning or end of the scale, the temperature sensor is faulty.
If the arrow does not deviate, the sensor is working, you need to check the pointer itself.
Checking the serviceability of the coolant temperature gauge
Remove the instrument panel. We disconnect the white block of the wiring harness from it. Turn on the ignition. We check the voltage supply to the positive terminal of the pointer (pin 12 of the block). We use a multimeter (tester) with voltmeter mode or a test lamp. If voltage is present, check the negative section of the circuit. This is pin 5 of the block (common minus). We connect the negative and positive terminals of the block with multimeter probes. The voltage must be at least 12 V. If everything is in order, check the “minus” from the sensor.
We attach the block to the instrument panel and, with the ignition on, connect its terminal 2 (negative from the sensor) to ground with a piece of wire. If the pointer arrow has deviated, the pointer is working and you will need to check the wire to the sensor for a break or short to ground. If the arrow does not deviate, the temperature gauge is faulty and must be replaced.
Checking the electrical circuit of the temperature indicator
According to the diagram, using a multimeter (tester) or a test lamp, we check the serviceability of individual sections of the electrical circuit.
Notes and additions
The coolant temperature dial indicator is installed in the instrument panel of the VAZ 21093 car. Its needle is connected to a rotating magnet, which changes its position depending on the strength of the magnetic field acting on it. The electrical circuit of the coolant temperature indicator includes a coolant temperature sensor installed in the engine block head. The sensor is the “mass” of the pointer. It contains a thermistor that changes the resistance of the circuit depending on the coolant temperature. The hotter the antifreeze or antifreeze, the lower the circuit resistance, the stronger the magnetic field affecting the sensor needle, the more it deviates.
Source
Diagnosis of errors
When you begin to notice something unusual in the behavior of your car, or there are obvious problems in its operation, then it certainly makes sense to have it diagnosed. Naturally, the OBD-II diagnostic connector will show errors most efficiently and accurately, however, not everyone has sockets to control this connector and has to use the standard one.
In order to enter self-diagnosis mode, you must:
- Turn off the ignition.
- Click on the daily vehicle mileage button.
- Then, continuing to hold it, turn the key in the lock.
- Thanks to this, all available indicators will light up, and the dial indicators will go into self-test mode and show data from zero to maximum.
- When this happens, use the button located on the steering column switch and use it to switch the data on the instrument panel.
- To read the fault codes, we need the last one - the third screen. Unambiguous error codes will be displayed there.
Displaying the error code on the third screen of the bookmaker. The photo shows error 4 (faulty coolant temperature sensor).
Error codes (decoding)
These are the most common error codes that can appear if there is a malfunction on the Lada Kalina.
| 053, 060, 076, 087 | No | No | Work with a soldering iron or use modified firmware 2190-20_092_for_076 | |
| 090, 091 | Yes | No | Suitable 092 and 009 or 012 from Kalina | |
| 092-095 | Yes | Yes | ||
| Granta Lux | 032, 038, 042 | Yes | No | Firmware 046 is suitable |
| 046 | Yes | Yes | Shows the transmission number | |
| 047 | Yes | Yes | ||
| Kalina Norma | 007 | Yes | No | Suitable firmware 009 or 012 |
| 014 | Yes | Yes | Added on/off gear shift sound | |
| Kalina Lux | 009 | Yes | Yes | Firmware 012 is suitable |
| 012 | Yes | Yes | Shows the transmission number | |
| 014 | Yes | Yes |
| Code | Decoding |
| 2 | Exceeding the voltage level in the vehicle's on-board network. |
| 3 | Malfunction of the gasoline level sensor in the fuel tank. Possible circuit break. |
| 4 | When this code appears, the car owner needs to pay attention to the operation of the antifreeze temperature sensor. There is also a possibility of a circuit break. |
| 5 | There is a problem with the outside temperature sensor. |
| 6 | The control unit has detected engine overheating. It is recommended to deal with this problem before further operation of the car. |
| 7 | Emergency lubricant pressure in the internal combustion engine is reported. |
| 8 | If you see this code on the dashboard, then you need to check the functionality of the brake system. The on-board computer recorded an error or breakdown in its operation. |
| 9 | The on-board computer reports that the battery charge is too low. It is recommended to perform a more thorough check of the battery. |
| E | An error has been reported in the data packet stored in the EEPROM. |
Itelma ECU 11186-1411020-22: stock firmware or chip tuning?
The dilemma regarding the need to flash a manufacturer-installed or a new ECU installed by the car owner depends on many factors. Among the main points is the “thoughtfulness” of the car at the time of overtaking or moving in a dense stream of cars.
It is worth noting the optimized dynamic firmware for Lada Granta 1.6L, 8V with an M74 controller and an established E2 toxicity standard. What does the practical implementation of such firmware provide?
As a result of the manipulations carried out and the return of the controller to its rightful place, fuel supply and ignition were significantly optimized. The firmware provides for changing the throttle settings.
Carrying out modern chip tuning on a domestic Lada Granta car provides the opportunity to physically disable the 2nd DC and the catalyst. As a result of such firmware, the dynamic characteristics of the car significantly increase while maintaining a moderate driving style.
The stock firmware of the Lada Granta ECU is designed for ordinary daily use of the car, while the manufacturer's firmware version is included in the warranty package. Unauthorized changes to the firmware version will void the manufacturer's warranty.
At the moment, the end user is provided with commercial firmware for M74 controllers, namely:
• AY_I484GG30 – Lada Granta 1.6l, 8V with pre-installed M74 controller 11186-1411020-22;
Recently I came across a new firmware (012) on the LKforum. I was wondering how it differs from 009, and whether they exist at all. Without thinking for a long time I decided to flash it, I noticed one Visual Change, Now the prompt shows next to the arrow the number of the gear you need to switch to
No other visual changes were noticed, the clock runs smoothly, most likely some bugs have been corrected in the firmware
Z.Y The prompt works on certain ECU firmwares, I have I427GKA1 In the BC menu there is a GSI with the reset button you can select the value “0” or “1” 0 — The prompt visually on the device shows what needs to be switched 1 — Turns on the sound alarm The prompt works on 2 — 2.5 thousand, the arrow is up, indicating that you need to switch to a higher gear, accordingly, the arrow is down, to a lower gear.