How to remove the dashboard of Lada Largus
Lada Largus.
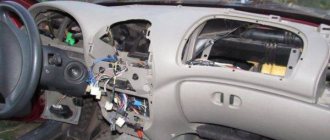
Removing the instrument panel We carry out work when dismantling the heater, radiator and heater fan, air conditioner evaporator or when replacing the wiring harness.
We show the operations on a car equipped with two airbags.
Disconnect the wire terminal from the negative terminal of the battery.
Remove the steering wheel (see “Removing the steering wheel”, p. 175).
We remove the steering column switches together with the connector (see “Removing the steering column switches and the switch connector with the spiral cable drum device,” p. 220).
We remove the instrument cluster (see “Removing the instrument cluster”, p. 229).
We disconnect the wire blocks from the ignition switch and the immobilizer coil (see “Replacing the immobilizer coil and the ignition switch contact group,” p. 206). We remove the floor tunnel lining (see “Removing the floor tunnel lining”, p. 255).
Location of the front passenger airbag wiring harness blocks in the vehicle interior.
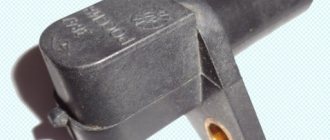
Using the Torx T-20 key, unscrew the two self-tapping screws securing the headlight beam direction regulator.
. and push the regulator inside the instrument panel.
Overcoming the resistance of the plastic latches, we wring out the upholstery
left front pillar.
. remove the lower clamps from the holes in the instrument panel and remove the upholstery of the left front pillar. Similarly, remove the upholstery of the right front pillar.
. Use a screwdriver to tighten the lock.
. and push the diagnostic connector out of the glove box socket.
We move the instrument panel away from the cross beam.
. and remove the instrument panel from the car interior.
Before installing the instrument panel, insert the diagnostic connector into the glove box socket.
We perform the remaining operations for installing the instrument panel in reverse order.
Instrument panel mounting points: A - outer side of the instrument panel; B - inner side of the instrument panel; 1 — lower side fastening; 2 - top mount; 3 - central fastening; 4 - lower mount
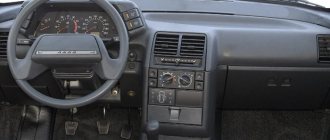
The interior design of the Lada Largus is similar to the interior of the Renault Logan. They have the same buttons and air ducts, similar to the dashboard. The central part is almost the same in the two cars.
Why is cladding needed?
One of the main purposes of Largus door trim is door sound insulation. It also improves the performance of the vehicle's acoustic system. If you cannot drive without music, and the speakers are installed specifically in the door, then the trim must be done.
To remove the upholstery in a Largus car, a simple set of tools is enough. It includes a flat-head screwdriver (spade puller), a T30 Torx bit and a T20 sprocket.
The reasons for dismantling and replacing the old casing in the Lada Largus Cross and other models:
- failure of the electric window;
- broken wiring;
- speaker malfunction;
- damage to rear and front door handles;
- the need to improve the quality of sound insulation.
Removal of old casing should be done carefully. For an experienced master, the procedure takes only 15 minutes.
Dashboard overlay for Lada Largus, Renault Logan, Sandero/Sandero Stepway, Duster reviews
For any online payment option from a private individual, a fiscal receipt will be sent to your email in electronic form in full compliance with the law on the use of cash register equipment 54-FZ, which does not give you any additional reason to worry about our store)
The following payment methods are available in our online store:
— FOR INDIVIDUALS, payment for orders is carried out in real time on the website of the ROBOKASSA payment system, 0% for transfers: plastic cards of any banks, credit cards, mobile payments (MTS / Beeline / Tele2), electronic money (Yandex.Money, WebMoney) and more (Samsung Pay, Viber) .
— FOR LEGAL ENTITIES (LLC and individual entrepreneur of the Russian Federation), through any bank on an issued invoice (non-cash payment) “without VAT” , by transferring funds to a current account.
Note ! After your first purchase, you can use the VS-AVTO BONUS PROGRAM to pay for your order.
Please note that delivery is at the customer's expense and is not included in the initial cost of the order.
The term for the formation and dispatch of an order is from 3 working days after receipt of payment to our accounts in accordance with the offer agreement and depends on a number of factors: movement of goods between warehouses, part painting, individual tailoring/execution.
After sending your order, you will be sent an email notification with the tracking number of the shipment, using which you can track the movement of the cargo on the carrier’s website.
An order for pick-up is made upon full prepayment of the order (after placing an order on the website, please wait for it to be confirmed by managers). The order is received at the pick-up point during business hours.
Basic functions of the device
On-board vehicles for the Lada Granta have high information memory and a small monitor, except for the “State” model, which only has a digital display. This makes it easier for people with poor eyesight and those who are unfamiliar with the nuances of engine operation to monitor all the processes that accompany its stable operation. BC will help the car owner by pointing out the following parameters:
- total travel time;
- detailed fuel consumption at different speeds;
- average speed indicators and excessive fuel consumption;
- remaining fuel in the gas tank;
- speed of start of movement;
- engine temperature;
- malfunctions of components and mechanisms;
- temperature inside and outside the car;
- on-board network voltage;
- crankshaft rotation speed (engine speed).
The on-board computer has a volatile memory and the ability to control the anti-theft system - the Lada Granta immobilizer. The on-board vehicle has a built-in supervisor, a fault indicator, and a “afterburner” function - the ability to reset the memory after starting the engine.
Some on-board drivers can additionally control lighting, stove operation, clock, calendar and alarm clock, and automatic window closers. You can plan your trip route based on the BC readings. It also allows you to use various navigation installation options and can warn you about low fuel levels or exceeding the permissible speed limit.
Most devices allow you to independently diagnose the operation of different car systems. The device can read ECU error codes without using any equipment. The explanation is presented in the accompanying documentation for each device. Such functionality will allow you not only to save on a trip to a specialized center, but also to identify problems, preventing serious malfunctions from occurring.
Removal and installation of the Lada Largus dashboard
Almost the same central car panel, round air ducts and buttons. The Largus instrument panel has only slightly changed, the buttons on the console in the center have been updated, and the insert is varnished. The scales themselves now have a silver edging.
Dashboard of Lada Largus No. 13 March. Instrument panel (instrument) of VAZ Lada Largus in Omsk. Add a note Share. A note about the ad. Save Cancel. 1 ₽ AutoDoc Review rating. Seller 7 years, 1 month on.
The Largus instrument panel itself, which can be ordered with delivery in Moscow and the region, is assembled, consists of a frame and a decorative car panel. Steel frame. It is to this that the system units and electrical wiring harnesses of the car equipment are attached, as well as all the steering elements. The frame itself is attached to the front shield, front pillars and the body base.
It is an integral element of the power structure of the car body. As for the instrument panel of the Lada Largus, the element is made of plastic, which is attached to the frame with screws.
The controls for the car as a whole and the climate system are attached to it. Remove the central trim 1, drawing of the instrument panel, overcoming the force of the clamps.
Disconnect the wiring harness connectors from the switches and remove the trim. Remove the plug from the center console of the instrument panel or the radio with CD player 2, disconnect the wiring harness connectors and the antenna from the radio receiver.
On-board computer functionality
On the right steering column switch of the Lada Largus there is a special button, through which the functions of the controller are controlled and its modes are switched.
The on-board computer is very convenient on the road, as it allows the driver to have up-to-date information about the main parameters of the trip.
Some of the information displayed on the device display includes the following:
- counter showing total mileage;
- mileage per trip;
- the value of the total fuel consumption, counted after the last reset of the counter;
- average flow level (also calculated after resetting the previous BC readings); the value begins to be calculated and displayed after the car has covered a distance of 400 m;
- range determined based on average fuel consumption readings; the value is also displayed on the display after 400 meters from the start of movement;
- average speed, which is determined by the device and is displayed on the screen after the fact that previously existing values have been reset to zero (the display is available after the car has covered a similar distance).
Note that the greater the distance the Lada Largus station wagon has “traveled” since the last reset of the values, the more accurate the readings regarding the power reserve, as well as the average fuel consumption and speed.
Dismantling procedure
Sometimes it is necessary to replace a part under the instrument panel or even completely replace the frame or decorative panel. It is important to know how to do this yourself, because there are different cases in life, and such knowledge can come in handy.
In order to remove the dashboard, you will need a special mounting plastic spatula or flat-head screwdriver. You will also need TORX T20 and T50 keys and a Phillips screwdriver.
Dismantled dashboard
The dismantling procedure itself consists of stages in a certain sequence:
- Initially, you need to disconnect the terminal from the “-” battery.
- Next, remove it from the bracket attached to the windshield.
- After this, the steering wheel is removed.
- The next step is to remove the steering column switches as an assembly with the contact ring of the driver's airbag.
- Next you need to remove the entire instrument cluster.
- Then the lining of the floor tunnel is removed.
- The lining of the two front pillars of the body is dismantled.
- After this, you should carefully pry up the edge of the central trim of the instrument panel and disconnect it from the panel itself. It is important to understand that, most likely, there will be resistance from the spring clamps and you should act extremely carefully so that, due to hard clamps and excessive force, you do not spoil the appearance of either the lining itself or the panel.
- The next step is to disconnect the wiring harness from the central locking switches, front door power windows, hazard lights, heated rear window, and also remove the central trim of the instrument panel.
- Next you need to remove the audio system head unit.
- After this, through the opened opening you need to remove the screw holding the decorative panel.
- By slightly pulling along the axis, you can remove the headlight range control knob.
- Then you need to unscrew the 2 screws securing the regulator to the panel and push the regulator itself inside the panel.
- Next, it is important to carefully pry and fold away the decorative plugs for the screws of the lower fastening of the instrument panel on the left and right.
- The next step is to unscrew the two screws securing the console to the bracket on the base of the body.
- Then you need to unscrew the lower screws of the side fastenings on the right and left.
- Then unscrew the two upper screws of the side fastenings on the left and right.
- Next, the steering wheel adjustment levers are removed.
- At the next stage, the front and right pistons securing the lower left panel of the panel are removed.
- After completing all the above steps, it will be possible to completely remove the instrument panel, while simultaneously removing the diagnostic connector from the glove box socket during the removal process.
After replacing the necessary parts, you should install the instrument panel in place, performing all the steps in reverse order.
The video shows how to replace light bulbs in the dashboard:
As can be seen from the description of dismantling, this action is not too complicated and is quite feasible for any car owner. So if you have to replace the panel yourself, it won’t be difficult to cope with.
The Lada Largus car is equipped with a prefabricated instrument panel, consisting of a decorative panel and a panel frame. The decorative panel is a molded plastic piece that is screwed to the frame. Attached to the decorative panel are control instruments, vehicle controls, heating (air conditioning) and ventilation systems, as well as linings that cover components located under the instrument panel or serve to install instruments and controls; air duct nozzles, glove box. The panel frame consists of steel reinforcement, to which steering elements, wiring harnesses and vehicle electrical system units are attached. The frame is attached to the A-pillars, the front panel, the base of the body and is part of its power structure. In this article we will talk about the procedure for removing the instrument panel from a Lada Largus car. Here are step-by-step photos and a description of them.
Repair
After a thorough diagnosis, as a result of which we can say with confidence what caused the malfunction, we can begin repairs. To do this, you can use the services of specialists from service stations or carry out the repairs yourself. This type of repair is not complicated and does not require special knowledge and skills. The set of tools is minimal (a set of heads and a pair of screwdrivers). In order to remove the Largus stove motor, the manufacturer recommends dismantling the entire tidy. But this takes a very long time and in some situations is almost impossible (for example, if a malfunction is discovered on the road). This repair can be done by unscrewing part of the panel and bending its edge. But this method is not suitable for all configurations. If the car has additional sound insulation installed, then dismantling with the dashboard bent will not be possible. In this case, we can give one recommendation: try to unscrew part of the panel and remove the fan, and if that doesn’t work, then dismantle the whole panel and only then proceed with replacement.
Method 1
- Remove the side trim (from the dash to the roof) on the passenger side.
- Unscrew the two screws securing the torpedo at the top and bottom (the top one is behind the side trim, and the bottom one is under the oval plug).
- Next, you need to unscrew the screws under the center console from below (to the right and left of the heater control unit).
- Remove the radio and disconnect it from the electrical wiring.
- Behind it there is another fastening screw.
- Then you need to unscrew the screw behind the oval plug at the bottom, on the driver's side.
- Next, you need to pull the torpedo towards you and either substitute something, or you will need an assistant who will hold it in this position.
- Then we put our hand behind the dashboard and feel for the fan cover.
- Disconnect the terminal and, pressing the latch, turn it 90⁰ and pull it towards you.
- Next, we diagnose the motor itself with the impeller and decide: either a complete replacement or repair will be required.
- Then we collect everything in reverse order. There is a small nuance: if there is a pin on the cover where the terminal connects to the motor, then you first need to put the terminal on the pin, and then connect the terminals.
Installing a cigarette lighter splitter on the Lada Largus
Special “doubles or tees” are sold for the car, allowing you to connect several electrical appliances. After disassembling the central tunnel, you need to connect the splitter directly to the network, observing the pinout. There are three wires connected to the cigarette lighter socket itself.
- The main plus. Guarantees heating of the coil itself. One end is connected to the battery, and power is supplied through a protective element rated at 15 amperes.
- The second plus. Designed to operate a backlight bulb. As a rule, it has a yellow, white or blue tint.
- Minus. The cord is black. It is a mass connected to the device, and the other end goes to the car body. All cables should be tightened with ties so that they do not dangle. A detailed video on how to remove the cigarette lighter of a Lada Largus car is posted at the end of the article.
Learn more about the contents of the available screens
The first screen contains information about the Logan firmware version.
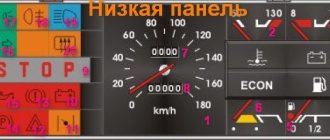
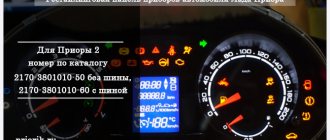
Indication on the Logan instrument panel
The second screen simultaneously displays all elements of the LCD display, and also shows the performance of each of them. If any malfunction occurs, the corresponding icon will not be displayed.
The third screen shows how much gasoline is in the tank, in liters. If only dashes are visible on it, it means that the car’s electrical wiring is faulty.
There is also one nuance here: this mode accurately shows the remaining amount of fuel only up to 50 liters; for larger values, the number 50 will still be displayed.
Manipulations to obtain information from BC Logan
The fourth screen is responsible for informing about the performance of sensors that regulate the coolant level and fuel level, and about instantaneous consumption (this function is only available if you have an on-board computer with firmware 6002). If there are no existing or stored faults, the display shows “- — — — -”. There are other designations:
- existing and stored faults of the sensor responsible for the coolant temperature appear on the display when the circuit is open in the form “- - -TO”, and in the event of a short circuit – “- - -TC”. These faults are not critical and can be ignored if the engine is sufficiently cooled;
- existing and recorded malfunctions of the sensor that determines the fuel level are presented on the screen in the form of “-JO- -” when the circuit is open, and “-JC- -” when there is a short circuit;
- existing and stored malfunctions of the information system regarding gasoline consumption in the absence of a signal notifying about instantaneous consumption are displayed on the display as “D- — — -”.
If there are several existing and stored faults, they are displayed in one line. To delete them from memory and leave the self-diagnosis mode, you should hold down the button located on the instrument panel for a few seconds.
If you have firmware 6002, a fifth screen is also available, showing fuel consumption when the engine is running in l/h. This mode allows you to find out the momentary consumption even when the car is standing still. If there is a fault such as “open circuit” or “short circuit”, “- — -” appears on the display.
How to remove the dashboard of Lada Largus
The Lada Largus uses a Renault instrument panel. It is quite informative and has a built-in on-board computer. You have to remove the instrument panel to replace it with another one, for modification, tuning or dismantling of subsequent interior elements.
You will need: remove the negative terminal from the battery, prepare a Torx T20 wrench, and a screwdriver.
- Remove the decorative trims (No. 1 and 4) by unlatching the clips. Remove the instrument cluster visor (No. 3) by unscrewing two screws (No. 2) and overcoming the force of the clamps;
- Remove the instrument panel by removing four screws (No. 1);
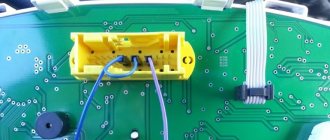
- Disconnect two connectors (No. 1) with wires from the dashboard.
We install the instrument panel in the reverse order. Video instruction:
Let us remind you that other instructions for repairs, modifications and operation of the Lada Largus can be found in the contents.
Cleaning process
Removing and cleaning the throttle valve on Renault Logan and other models where the K4M engine is installed, for example, Largus or Duster, is done at a service station. But you can do this yourself, since this operation does not require special knowledge or tools.
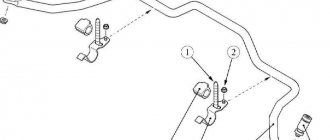
The reason that the speed of a cold engine fluctuates is the depressurization of the seal connecting the throttle and the intake manifold. To check this, you need to unscrew 4 bolts. Remove the throttle cable and connector from the idle air control, which will require a socket wrench. After this, the intake receiver is removed, for which you will need an E8 head; you can use a 6 head, which removes two bolts.
The crankcase ventilation pipe is disconnected from the idle air control valve. The receiver is pulled off the throttle towards the engine shield. The Renault Logan 1.6 16 valve throttle body is removed after unscrewing the two bolts that are located under it, which will require a 8mm socket.
On the removed assembly you can see the Renault throttle valve O-rings, made of special rubber. The small seal goes into the intake manifold, and the large one into the receiver. The floating idle speed is affected by a small o-ring that needs to be replaced. However, after removing the manifold, it is recommended to replace or additionally seal both Renault Logan throttle valve gaskets.
After removing the old seals, the throttle is treated with a washing liquid in the form of an aerosol or other available method. Then it is thoroughly wiped with a rag. Seats for rubber seals are thoroughly degreased.
There are several solutions for sealing the intake manifold and receiver. The ideal option is new original gaskets. But they are expensive, and in addition, the market always offers a huge number of fakes, which very quickly fail. A good solution is to leave the original seals, if they are intact, but wrap several layers of FUM tape under them. This will avoid unnecessary costs and ensure sealing of the throttle for a long time.
Before installing the throttle, all rubber seals are lubricated with silicone grease, and if this is not available, regular oil will do. Assembly is carried out in the reverse order, the throttle is carefully inserted into the intake manifold, and with greater force than it was removed from it, then the bolts are tightened. After this, the receiver, gas pedal cable and other previously removed components are installed in the reverse order.
Experience shows that cleaning the throttle assembly on your own is not difficult even for an inexperienced car enthusiast. To do this, you will need a set of socket wrenches and carburetor flushing fluid or other similar composition. It is imperative to pay attention that when reinstalling the seals, they must adhere to a degreased surface, otherwise they will quickly fail. Removing and installing the throttle assembly, which is located at the top of the engine, does not cause any difficulties.
Phased replacement of lighting fixtures
To ensure that replacing the light bulbs on the instrument panel of the Lada Kalina is done correctly, experts recommend doing it in the following sequence:
- After removing the dashboard dashboard, use a Phillips screwdriver to unscrew the two fasteners that secure the speedometer.
- Next, the contact block is disconnected from the panel; when disconnecting, you should take into account their color so that nothing is confused during assembly.
- After disconnecting the wiring, the tester is activated, with the help of which each light bulb is checked for functionality. If the device shows that the element has failed, it should be replaced by removing the base.
- It is most convenient to unscrew the base using ordinary pliers, turning the base counterclockwise with it.
- A new one of the same size is installed in place of a light bulb that has become unusable.
- All parts that were removed are installed in their original places in reverse order.
Next, all that remains is to check the result of the work performed by turning the ignition key. If the lights on the dashboard light up, it means the work was done correctly and the car owner, even without experience, can be proud of his success.
At this point, the process of replacing conventional lamps can be considered complete, and such an event will take no more than 2 hours, taking into account the preparatory process and the selection of the necessary tools. It’s hard to disagree that replacing light bulbs on the instrument panel is quite easy without the help of professionals, but if difficulties arise during the work, you can watch a training video on the Internet resource at any time.
Signs of a faulty Renault Logan heater motor
More often, the cause of a stove motor breakdown is wear and tear of parts over time, since rings, brushes and other moving parts will sooner or later fail. Less common are problems of an eclectic nature - oxidation of contacts or broken wires. Often the lubricant on the moving parts of the motor and fan simply runs out.
Signs that the Renault Logan heater fan is working in abnormal mode and the unit will soon fail can be determined by certain signs:
- the stove changes the sound during operation, the noise increases;
- the heat flow becomes uneven and weakens;
- The stove does not turn on the first time or takes a long time to gain momentum.
The stove whistles when operating
A whistle is heard from under the central panel and is a sign that the heater motor bearing has failed and if the motor is removed, you can see that the bearing has noticeable play on the shaft. Such a whistle indicates that the stove will soon break down and it is better to replace it. Sitting in the cabin becomes not very pleasant; the monotonous whistle is very tiring. If you simply lubricate the mechanism, this will not eliminate the problem for a while, but the whistling will inevitably resume.
SEE THE ROOT
It is easier to replace headlight bulbs on the right. The battery prevents access to the left headlight; it is often better to remove it. Especially if your hand is calloused and your fingers are not like a pianist’s. And yet, in most cases, it is possible to fasten the spring latch of the H4 lamp, although not the first time. Access to the turn signal is more or less acceptable.
To replace the fog lamps, you will have to lie on the ground and unscrew the corner screen fasteners under the bumper. The work is dirty and terribly unpleasant, especially in the slush. The question is, what prevented you from providing technological windows in the mudguards, as is done on many French cars?
Choosing an on-board computer for the Lada Granta
As an alternative to the weak standard BC, car enthusiasts install multifunctional on-board monitors that will show not only the engine temperature, but also many other parameters. Today, manufacturers can offer three main devices suitable for the VAZ 2190-91: “Multitronics”, “Orion”, “State”.
"Multitronics"
The device is a universal one, since the manufacturer does not produce them exclusively for Grants. Judging by the documentation and instructions included with the device, installation of Multitronics is quite possible on earlier VAZ cars: first-generation Kalina and Priora. Finding a place to install the device is the concern of the car owner.
"Orion"
The computer of this brand is also universal and is used not only for Grants. The installation site may have to be modified independently.
This company produces on-board computers exclusively for domestically produced cars. The devices are not created for universal use, but specifically for each car model.
"Stat" is based in Togliatti and tests all its developments on AvtoVAZ cars. Installed instead of a plug for additional buttons. This device is modest in size, but has additional useful functions:
- spark plug warm-up mode – relevant in winter;
- “Tropic” mode, which allows you to independently set the desired temperature for the engine cooling fan to operate;
- diagnostics of system errors.
The “State” X1 M is inexpensive, which makes it noticeably superior to its competitors. But if you need a full-fledged on-board computer with a display and an intuitive interface, you should take a closer look at universal devices.
Payment via webmoney
After selecting payment via WebMoney, the payment system will launch, where you need to select the payment method: bank card or WebMoney wallet.
If you already have a WebMoney wallet, then you need to log into it and make a payment.
If you do not have a WebMoney wallet and you want to pay in another way, you need to select any of the methods that WebMoney offers and make the payment
After specifying payment details and confirming payment, payment for the goods will occur.
Payment via PayPal
After selecting payment via PayPal, the PayPal payment system will launch, where you need to select the payment method: bank card or PayPal account.
If you already have a PayPal account, then you need to log into it and make a payment.
If you do not have a PayPal account and you want to pay using a bank card via PayPal, you need to click on the “Create an Account” button - shown with an arrow in the picture.
PayPal will then prompt you to select your country and provide your credit card information.
After specifying the information required to make the payment, you must click on the “Pay Now” button.
Payment via portmone
After selecting payment through Portmone, the payment system will launch, where you need to select the payment method: bank card or Portmone account.
The price in the Portmone payment system is converted into dollars at the exchange rate of the Central Bank of the country where you are located.
If you have a bank card in a currency other than the dollar, then the money will be debited from the card at the rate of the Central Bank of your country at the time of the purchase.
After specifying payment details and confirming payment, payment for the goods will occur.
ALONG THE MOTHER VOLGA
With these thoughts in mind, we drove out onto public roads. Yes, you don’t notice a lot when cutting circles around a high-speed oval. For example, how well do suspensions handle bumps of different sizes? The smoothness of the Largus is reminiscent of the related Logan and Sandero. Small road imperfections simply dissolve on the way from the wheels to the body, and large ones, which are scary to even look at, are conscientiously swallowed by the suspension, allowing you not to slow down. It’s comfortable, and the car responds adequately and quite promptly to the driver’s commands. If you expect the reactions of a sports car from a hard-working station wagon with a high center of gravity and energy-intensive suspension, stand in line for another car. Sensitive rolls and slight delays in steering movement are present, but in general the car behaves predictably, at least at the speeds allowed by our Road Rules.
Isn’t 105 “horses” enough for a car with a gross vehicle weight of under two tons? Those who expect acceleration, like during the take-off run of an airplane, go to the same line where lovers of refined handling stand: a budget car has never been endowed with excess power. I’ll tell the rest that with a half load (alas, it was not possible to fill all the seats), the efforts of the sixteen-valve engine are quite enough for dynamic overtaking. The elastic motor pulls out from any speed, and well-chosen gear ratios in the transmission also facilitate the intended maneuver. True, in order to spur the Largus, due to the closeness of the gear ratios in the box, you often have to jump down not one, but two steps at once. It’s unusual at first, but automaticity comes quickly. And along with it, the fuel gauge on the instrument panel quickly falls. Alas, short gears and mediocre aerodynamics do not contribute to a moderate appetite. With fairly economical driving on country roads, fuel consumption for different drivers ranged from 8.5 to 10 liters per 100 km.
“Largus” is the first car in which you don’t remember that it was made by AVTOVAZ. He is the first whose name is not ashamed to write in Latin. And for which I don’t mind paying my hard-earned money. However, most Russians look at it with distrust, because the most important question remains open - about reliability in operation. In recent years, many have been badly burned by buying models from the Volzhsky Automobile Plant, and, disappointed, went to competitors. Maybe Largus will be able to return them?
Mikhail RYABOV, presenter of the project “Cars on the BO platform”:
Where is this button
So, we present to your attention the most difficult to reach buttons in this car, some of which will be very difficult to find without instructions.
First of all, let's press the familiar horn button on the steering wheel. However, the machine is stubbornly silent, and in general, to be honest, nothing was pressed. There is no need to rush back to the dealer and scold him for the defective product that he, such a “scoundrel,” nevertheless slipped to us. The horn button is actually located on the steering column switch and, of course, this location is extremely inconvenient and unusual.
Let's go further, the button for heating the driver's seat turned out to be somewhere unknown, by the way, why it was there is also a mystery shrouded in darkness. And it is located next to the seat height adjustment lever between the chair and the door. Getting it will be problematic, especially in winter, if you are also wearing a jacket. Imagine the situation - winter, minus thirty outside, slippery road and speed around eighty. In such a situation, you can say goodbye to life, trying to find and press this ill-fated button by touch.
Largus was not offended by the presence of a power window on the front and rear doors. However, the window lift buttons were also not where we would like. Instead of installing them directly on the doors, the designers made a completely inexplicable layout. The front window lift control system is located on the front panel directly under the audio system and, while this is more or less convenient for the driver and front passenger, the rear passengers had a very hard time. For them, the window lift buttons were made between the front seats almost on the floor of the car.
Given the decent amount of space in the cabin, people sitting in the back seat will have to stretch hard for a breath of fresh air. It will also be difficult for the driver if he is alone in the car and needs to lower or raise the windows of the rear doors; not everyone will be able to twist his hand so skillfully and feel these same buttons. The rear window lock button is also not pleasing, since it was made directly under the handbrake lever and, if you suddenly reach for it, you can hit the lever, it’s good if your fingers remain intact.
The electric drive of side mirrors is an excellent and very useful thing, it is especially convenient to use it while driving, but not in the Lada Largus. The mirror adjustment button was also located under the handbrake lever and was extremely inconvenient to use.
To summarize, I would like to note that VAZ does not have as much experience in producing its own cars as its foreign competitors have. Initially, the Italian Fiat was copied, which in Russia was called Zhiguli, but now the French Renault has been used. So maybe we shouldn’t scold our people for what is not ours, and give the auto industry a chance to release something of its own?
LADA > Largus
Coolant temperature indicator
The device operates in combination with a coolant temperature sensor, which is installed in the cylindrical heads. When the temperature indicator shows a resistance of approximately 650-1340 ohms on the board, the arrow should be located at the initial marks of the scale.
If the resistance results on the dashboard have reached 76-88 OM, then the arrow should reach the section of the scale marked in red. The arrow reaches the end of the red scale when the sensor resistance is 41-51 ohms.
If the resistance data and the arrow level do not match, then the machine requires repair or replacement of parts.
Tired of orange
Tired of orange – Lada Largus Club
- New photos
- Lada Largus
- New entries
- Prices
- Club members
Accessories for Lada Largus at wholesale prices!
| Home → Operating my Largus → Tired of orange | Site search |
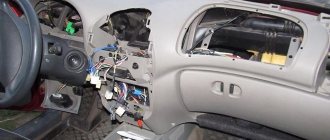
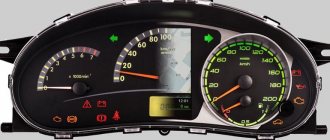
| Author: Kiryukha Published: 2391 days ago (October 29, 2013) Logbook: Operation of my Largus Category: Uncategorized Edited: 10 times - last December 21, 2014 Hello everybody! I decided to share my modification of Largus. The orange backlight on the instrument panel has always bothered me. I've read a lot of Logan forums, there are a lot of these topics there. After replacement, the instrument panel began to look like this.
The image has been reduced. Click to see original. 31000 and the first troubles → Create your own logbook, and you will be able to share with forum members your opinion about Largus, useful developments, installed additional information. equipment and tuning, trips and travel! To create a logbook, you must register on the site. Tags: changing the instrument panel backlight Popular in in-flight magazinesDRL Traveling on Largus Fuel consumption Armrest Mileage Discs Radio To1 First impressions Buying Largus Electrics Covers for Largus Bumper net Modifications HBO Speakers Rear view camera Wipers Interior lighting Brake light Tuning Tires and wheels Check valve Tuning lights Noise insulation Winter tires Rugs Largus DVR Rki-19 Winter operation Roof box PTF Tail lights Izhevsk Car audio Injectors Mudguards Washer reservoir Hood stops Low beam lamp Installing a cabin filter Parking sensors Thresholds Lada Largus LED Carpet covers Floating idle speed Trunk lighting Tinting Trunk shelf Trip to the sea Hood seal Accident Owner's review Fender liners Walkie Talkie Additional Socket Eyeglass case Replacement 5th gear The image has been reduced. Click to see original. |
Largus station wagon review
This car can easily adapt to any of your needs.
LADA Largus ideally combines comfort, practicality and high payload.
The car looks very friendly: faceted lines of body panels, decisive wheel arches, original taillights, and a signature radiator grille. Strong, well-built, confident Largus clearly states: “You can rely on me!”
LADA Largus has a dynamic body design, a modern interior and a surprisingly spacious interior.
Largus is the only car of its class that provides truly comfortable seating for seven adult passengers.
Thanks to folding seats, LADA Largus can be easily transformed to suit any needs - from a tourist trip to the transportation of large cargo.
LADA Largus is adapted to Russian operating conditions, and the proven design and technology ensure the high quality of the vehicle.
Some cars are designed for speed records. Others - to dazzle everyone with a bright design.
And Largus is created for real life. He will go where there is no way for a sports car. And they will look at him with love. Because it is the working car that is truly beautiful.
- Small overhangs and a ground clearance of 170 mm (145 mm with the maximum permitted load) - we have a car with excellent cross-country ability for its class.
- The high-torque motor confidently accelerates the Largus at full load.
- Interior transformation: from a 7-seater station wagon to a 2-seater truck.
- The third row of seats can be removed (without tools) and stored in the garage.
- The maximum load on the rails is 80 kg.
- Convenient hinged tailgates are fixed in several positions.
- The engine compartment is protected by a powerful mudguard made of 2 mm steel.
- 15-inch wheel rims.
LADA Largus is an amazingly roomy and very comfortable car.
The wide driver's seat is equipped with height adjustment and lumbar support. Truly comfortable seats have been created for passengers in the third row: men above average height feel free here. Each of the three rows of seats is equipped with air ducts to warm the feet of passengers.
The car's chassis is tuned for comfort: a long wheelbase ensures a smooth ride, and the energy-intensive suspension copes well with different types of surfaces. The front subframe provides confident stability and controllability at any speed.
LADA Largus is European-quality. All systems - from pedals to door handles - work with minimal effort. Thanks to the careful selection of materials, high acoustic comfort is ensured - even with high mileage, there are no squeaks in the cabin.
Despite its European pedigree, LADA Largus is a car for our roads.
A reliable long-travel suspension that easily “swallows” bumps and potholes, high ground clearance and good geometric cross-country ability – these are confident arguments against surprises on roads and directions!
- All external body panels of LADA Largus are made of double-sided galvanized steel.
- The B0 platform on which Largus is built has proven itself well all over the world.
- Largus is entirely manufactured using RENAULT-NISSAN Alliance technologies.
- The basic design, originally created for Eastern Europe, was adapted for Russia: the suspension and brakes were strengthened, the thickness of the anti-gravel and the area where it was applied to the bottom was increased, and chip protection linings appeared on the wheel arches.
- LADA Largus has original engine control calibrations, which make the car fully adapted to Russian gasoline.
- The terms of the LADA Largus warranty are 3 years or 100 thousand kilometers.