Almost every driver is familiar with the concept of “noise insulation”; every driver knows perfectly well what role this element of the car’s design plays. Noise insulation allows you to operate the car comfortably; sometimes you want to listen to your favorite music in the car, but annoying extraneous noises prevent you from doing this. It is known that tuning a car is not a cheap pleasure, and not every car enthusiast can afford it, so most car enthusiasts are looking for alternative ways to solve the problem of car sound insulation.
Comparison of foreign cars and Lada Priora
First you need to figure out why you need to install door seals. The sound insulation of any foreign car and the Lada Priora has a large number of differences. First of all, it is necessary to note the fact that a foreign-made car has a better designed shape and structure of the car and the seals are installed much better. It is the desire to get a car with good sound insulation that forces car owners to additionally install seals on the Priora.
There is another significant difference in the design of the doorways of the Lada Priora car compared to cars manufactured by foreign manufacturers. This difference is the doorway gap; on foreign cars it, as a rule, does not exceed 2 mm, but on the Lada Priora this gap is several times larger, which creates an additional noise effect. That is why it is worth considering installing additional door sealing material.
K-FLEX tube
This tube is intended for thermal insulation and can be purchased from departments specializing in air conditioning systems. Such a tube is attached with super glue, double-sided tape, or is already sold with a strip of contact glue. Before applying the tube to the surface of the body, it must be cleaned and degreased.
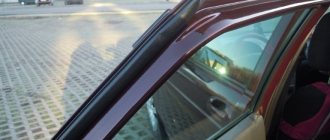
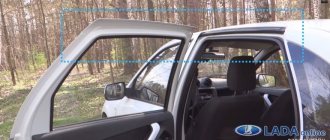
Glue the seal starting from the bottom corner of the windshield, along to the rear door. In addition, do not forget to glue the racks, reaching the door lock. At first, the doors will close quite tightly, but over time, the seal will become more pliable.
Doors Lada Priora
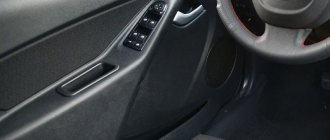
If we talk about Priora doors, it is worth noting that the doors have a rather problematic design. First of all, this relates directly to the door fastening itself, which becomes loose during operation, and an unpleasant sound appears when it is closed. To fix these problems, the Priora needs to remove the trim and double the clips installed on the door.
A common problem is an unpleasant sound when the door lock is activated. To eliminate it, you will need to put special rubber pads on the lock levers.
Suitable
So which ones to put? In no case should you buy the first copy you come across, since each car model is suitable for a certain sealing rubber. Let's summarize the reviews from Priora drivers:
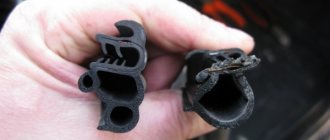
- Standard ones from VAZ-2110. They have hard rubber, so the door with such a seal closes tightly. Its U-shaped profile allows dirt to accumulate in it. Plugs on drainage holes make it difficult for moisture to drain away.
- Brands RKI-19 for VAZ-1117 (Kalina). Despite the assurances of the sellers, it is not suitable for installation on Priora. First, it is smaller in size, so it only covers part of the gap at the front of the door. Secondly, it is also made of fairly hard rubber.
- The best recommendations were received by foreign kits (K-FLEX and others) that have a tubular (or double-tubular), trapezoidal or Z-shaped profile. They are made of soft rubber, which ensures their tight fit to parts of the car.
What is noteworthy is that owners of Daewoo Nexia cars tune their car with seals from VAZ Priora.
Selecting a seal, correct fastening of the material
Having decided to install a certain sealing layer of material on the door of your car, in no case should you buy the first suitable material you come across, since only a certain additional door seal is suitable for each car.
Therefore, you need to familiarize yourself with all the information regarding the material used to seal car doors, and only then can you purchase components. For the Lada Kalina, material of the RKI-19 brand is suitable, but this sealing material is absolutely not suitable for installation on the Lada Priora. To install it on Priora you will need a little more material than RKI-19.
The right choice allows you to increase the life of the car and significantly reduce the level of noise entering the Priora’s interior. Installing additional seals on the doors allows you to carry out a kind of “sealing” of the car interior and protect the door locks and hinges from a variety of contaminants that can easily get through the door gap.
Reasons for replacement
Over several years of operation, the standard Priora door seals (as well as glass velvets) become unusable. Tears and cracks appear on them, parts of the door trim become wet. When driving at high speed, an air whistle and a draft appeared in the upper part of the windows. In this case, urgent replacement of rubber bands is required.
Often, Priora car owners install additional seals. This solution improves the noise and moisture insulation of the car interior.
Seal fastening methods and their alternatives
As practice shows, additional door seals can be easily replaced by a regular rubber tube. For installation you will need superglue or double-sided tape and a surface degreasing agent. First you need to cut the tube into several parts. After that, the first part is taken, degreased and fixed with superglue in the right place.
Next, the tube is glued on top, they begin fastening the tube from the side of the windshield, then pull it in the direction of the rear door. Installing an additional seal may make it more difficult to close and open, so additional door adjustments will be required.
Installation of the seal takes about two to three hours. Additional seals are an excellent solution for getting rid of noise and moisture in the Priora’s interior.
In some cases, a special sealant can be used as glue; it is better suited for installation than glue. With its help, you can not only securely attach the seal, but also protect the car from rust. The first changes in the interior are noticeable immediately after attaching the seal to the car. After installation, the cabin becomes quiet and warm, and street noise practically does not penetrate. In rainy weather, the seal prevents moisture from penetrating into the interior.
The second, more acceptable seal option for most car enthusiasts is the K-FLEX seal tube, which can be purchased at a technical service center. Its fastening is carried out by analogy with fastening a conventional rubber tube. After its installation, the doors will close tightly, but over time the tube will become more pliable, and the doors will close easily again, and the interior, thanks to the seal, will be warm, dry and quiet.
Installation
And now about what Lada Priora door seals are and their installation. Installation options can be very different:
- putting on the bottom of the door;
- installation with double-sided tape;
- gluing with sealant or glue.
Before gluing, the surfaces must be degreased. Usually the footage of the kit is enough to glue the door openings and the gaps between them and the wings.
As a conclusion, I would like to recommend washing the areas behind the rubber seals from dirt more often (and checking for rust). The lower parts require special attention.
https://www.youtube.com/watch?v=_GIX7vUHZZ4
Main functions of seals
The main functions of conventional sealing material are:
| № | Function |
| 1 | increasing the level of sound insulation |
| 2 | increasing the level of thermal insulation |
| 3 | increasing vehicle protection from moisture |
| 4 | Reducing the sound that occurs when closing doors |
Thanks to the installation of an additional seal, the operating comfort of the vehicle increases.
Suitable
So which ones to put? In no case should you buy the first copy you come across, since each car model is suitable for a certain sealing rubber. Let's summarize the reviews from Priora drivers:
- Standard ones from VAZ-2110. They have hard rubber, so the door with such a seal closes tightly. Its U-shaped profile allows dirt to accumulate in it. Plugs on drainage holes make it difficult for moisture to drain away.
- Brands RKI-19 for VAZ-1117 (Kalina). Despite the assurances of the sellers, it is not suitable for installation on Priora. First, it is smaller in size, so it only covers part of the gap at the front of the door. Secondly, it is also made of fairly hard rubber.
- The best recommendations were received by foreign kits (K-FLEX and others) that have a tubular (or double-tubular), trapezoidal or Z-shaped profile. They are made of soft rubber, which ensures their tight fit to parts of the car.
What is noteworthy is that owners of Daewoo Nexia cars tune their car with seals from VAZ Priora.
Removal
When you have purchased the required number of seals, you can begin to work.
Article on the topic: Do-it-yourself noise insulation of VAZ 2110 (Video)
The first step is to remove the old rubber elements, after which the installation of new parts begins.
Let's tell you more about the dismantling procedure.
- Remove the plastic trim panels installed on your vehicle's door sills. To do this you will need a thick screwdriver. Remove carefully, being careful not to damage the plastic caps. But it’s better to buy new ones in advance if you can’t carefully dismantle the threshold.
- Now remove the old pieces of rubber from the seats. Simply tear off the sections that are torn off by hand.
- Remaining rubber can be cleaned off with any available tool. Only be careful with sharp objects so as not to damage the metal and paint layer.
- Very small residues and traces of glue are removed using solvents. Make sure that the solvent you choose will not damage your paintwork.
- Go over the doorway with a vacuum cleaner, remove all dust and dirt. Take special care to clean the bottom part. If wet cleaning was used, wait until everything is thoroughly dry.
Upcoming work
Installation
This process cannot be called complicated. You are not required to have any special training or extensive experience. Although you should at least be able to handle glue.
Working with the back door
Each stage is performed consistently and carefully to achieve the desired result and create comfort inside the cabin.
- Even if you have already measured the required length of the seals for your doors, we advise you to do it again. Anything can happen.
- Cut the required length, plus leave a couple of centimeters of reserve. Although if we are talking about a ready-made set of rubber bands, you won’t have to cut or leave anything. Skip the first two points.
- Insert a tube made of silicone or polymer inside the sealing tape. They are sold everywhere, so there should be no problems finding them.
- The length of the tube must match the length of the rubber. This tube will serve to create the necessary elasticity and allow the elastic to press more tightly to the door. This way, ventilation gaps will not appear, and the cabin will become much quieter.
- A shaped side rubber seal is glued to the bottom.
- If the tape is solid, you can start putting it on from either side, as is more convenient for you.
- If it is a measuring rubber band, then start from a point between the door overhangs, or 30 centimeters from the bottom of the threshold. Moving up or down is a personal choice for each master. There is no difference here.
- Push the figured profile all the way down. To do this you will need a rubber or wooden hammer. He's a mallet.
- When the seal is installed around the entire perimeter, an extra piece will be revealed. Cut the tube straight and end-to-end, and make the elastic itself seem slightly deformed. It's like you tore it off by hand. This will avoid the unpleasant phenomenon of siphoning through the joint.
- Replace the pistons; if some were damaged during removal, replace them with new, intact ones.
- Replace the plastic cladding removed from the threshold.
- The second contour of the seal is glued along the edges carefully, but as tightly as possible, after which time is given for the glue to dry completely.
Article on the topic: Self-replacement of the crankshaft oil seal on a VAZ 2114
Almost immediately you will feel the difference between the old and new seal. This is a useful exercise that allows you to get rid of unpleasant sounds, knocking, whistling and cold air flowing directly onto your feet.
“Lada Priora” in a new role
COMPETITION in market conditions is a great thing! It seems that Russian automakers have finally begun to understand this. At least the “Lada Priora” station wagon, even with a purely “theoretical” acquaintance, clearly differs in a positive direction from similar models in a similar price segment. In the “Lux” package, for example, rain and light sensors are installed here. In cars of similar cost, you won’t even get such equipment as an option. Well, the VAZ station wagon is already equipped with climate control, ABS, electric windows and alloy wheels in the basic version.
Once inside the cabin, I almost reflexively noticed the quality of its build. After all, on the Priora sedan, which I had the opportunity to test two years ago, the glove box was difficult to close, the exterior mirrors vibrated, and the hatch for transporting long objects located in the back of the rear seat jammed.
And in general, everything there somehow creaked suspiciously and did not inspire any confidence. Therefore, with particular passion, I walked my hand over the dashboard and interior trim. But this time I didn’t find any outright hackwork: the gaps between the panels and interior parts became smoother and smaller, nothing in the cabin seemed to creak.. Well, you can get under way.
I have a presentiment of how knowledgeable people are trying to pull me back, to stop me: they say, tell me about the main thing - about practicality, the volume of the luggage compartment! After all, this is a station wagon! And you’re on your way right away...
We must, of course, pay attention to this. Although, unfortunately, there is nothing special to talk about practicality
The trunk volume of the station wagon is exactly the same as that of the predecessor “Lada-111” - 450 liters (if you load luggage up to the window line) and 777 liters (with the rear seats folded). The indicators are mediocre - in other compact class station wagons the cargo compartment capacity is close to, and in some cases exceeds, a thousand liters.
And what’s interesting is that the station wagon is 5.5 cm longer than the “eleventh”, why didn’t the trunk become larger? The fact is that the external dimensions have increased mainly due to the “plumper” bumpers - this has no effect on the internal space.
To be fair, it must be said that the luggage compartment here is well designed. To make loading easier, the edge of the fifth door was placed quite low, for which purpose a recess was specially made in the rear bumper. They provided a net in the trunk and several small metal loops for attaching things. Here the VAZ team also distinguished itself from its competitors.
Dismantling
After purchasing everything you need, you can first begin dismantling and then installing a new seal. The first stage is removing the plastic facing panel from the threshold. This is done using a regular flat-head screwdriver. Just try to do everything carefully, without damaging the plastic clips that secure the panel.
This is followed by the removal of old rubber bands. This is done by tearing it off, then removing the residue using available tools. If you need to remove the remaining glue or small debris, use a solvent (be careful that it does not dissolve the paintwork of the car).
Next, you need to clean the entire doorway from dust and various contaminants, paying special attention to the lower parts. You can do dry cleaning with a brush and vacuum cleaner. If you still need to wash it, let the surface dry thoroughly before installing the rubber bands.