When a car's sound system is fully installed, some of the equipment does not physically fit into the limited volume of the cabin. Fans of acoustic tuning find a way out of this situation by making special hanging frames for the dashboard and placing the equipment in the center armrest and on the trunk shelves. To beautifully cover the mounting shelves for acoustic equipment and protect the equipment from damage, a good solution would be to make decorative false panels for the trunk. The designs, dimensions, location, and decorative design of the false panels depend on the trunk of your car (sedan, hatchback, station wagon), the number and dimensions of the equipment. When making false panels on their own, tuning enthusiasts do not experience any great difficulties, but the aesthetic appeal of home-made structures rarely reaches a high level.
According to your wishes, the masters of the acoustic workshop of our car service will develop an original design of a false panel for the trunk of your car. When making the acoustic design, they will take into account the number of units and dimensions of the equipment, offer several options for decorative finishing, and fit the false panel into the interior of the cabin.
- Acura
- Alfa Romeo
- Audi
- Bentley
- BMW
- Cadillac
- Chevrolet
- Chrysler
- Citroen
- Daewoo
- DAF
- Datsun
- Dodge
- Fiat
- Ford
- Geely
- Great Wall
- Hino
- Honda
- Hummer
- Hyundai
- Infiniti
- ISUZU
- Porsche
- Renault
- Saab
- Scania
- SEAT
- Skoda
- Smart
- SsangYong
- Subaru
- Suzuki
- Toyota
- Volkswagen
- Volvo
- GAS
- ZIL
- KamAZ
- UAZ
Schedule: from 8:00 to 22:00
Raised floor in Kalina hatchback
The trunk floor was assembled from 8mm plywood. All elements are cut out with an electric jigsaw. Then we tighten the plywood with leatherette using a furniture stapler or glue. Installation of the raised floor is carried out using self-tapping screws.
As a result, we get a false floor of Kalina, which is able to fit a sufficient number of things, leaving the trunk completely free. The box itself is genderless.
A little later, this scheme was slightly modified, and the design was slightly redesigned. The corners abutting the back of the seats were made round, which made removing the shelf easier and faster. It also became possible to fold the parts of the shelf so that they do not interfere at all. The spare tire is under the raised floor, and in order to get it out you need to remove the shelves and pull out the “box”. The modification also affected the box, which was slightly reduced to make it easier to reach. By the way, leatherette was also replaced by a cheaper and more practical car carpet.
There is also a simpler version of Kalina’s raised floor, which required: 640x920mm plywood, 2 small boards and 6 screws. There are no compartments, as in previous versions, which allows you to place larger items.
To find things at night, it is recommended to make the trunk lighting independent.
“Cleanliness is the key to health, order comes first.” Let's give an example of putting things in order in the trunk by creating a raised floor in the trunk.
So, I’m posting a photo report of the step-by-step creation of a false floor in my car. Maybe it will be useful to someone.
So, let's throw everything out of the trunk. We immediately decided on the height, I needed it to fit the most necessary things and not to reduce the space in the trunk too much, since I don’t plan to remove the floor very often. I decided the height of the frame would be 11.5 cm. The top board is 84 cm, the bottom board is 78 cm, all the sides are 58 cm, with these dimensions the frame fits tightly into the trunk and does not move at all.
We cut out blanks from available material, mine is chipboard. It is better to cut with a jigsaw. Sand the ends and sides.
We mark and drill holes, assemble the frame. I used euroscrews because I like working with them. Who doesn’t want it, then use ordinary wood screws.
Next, we make partitions, here we immediately estimate roughly what will lie, for example, from a tool, unless, of course, you are a fan of everything lying in a common heap. I immediately decided what I would put in and what dimensions were needed for it.
Features of luggage racks
Cargo compartments for Lada Kalina vehicles have some special features. They must be taken into account by motorists who choose equipment for specific transportation conditions:
- Increasing cargo capacity due to the folded rear passenger seats of the Lada is much easier and faster than similar cars in this class.
- The luggage compartment lid rises 60 cm higher than on models in similar classes. This is quite convenient for frequent loading and unloading of Kalina.
- It is possible to install an additional non-standard roof box for transporting things. Kalina's load capacity increases by 40% if you use lightweight roof racks consisting only of crossbars and the main unit.
In addition to the advantages that the equipment has, there are also problems that are noted by owners of two- to three-year-old cars:
- At temperatures below 15 °C, frequent breakdowns of the shock absorber of the cargo compartment door are observed.
- Car enthusiasts note problems with the lock in the hatchback configuration in the second year of operation. The lock breaks, the cylinder falls out or the spring stretches, and in some cases the locking ring gets jammed. The lock has to be changed.
Initially, this AvtoVAZ line was planned as small family cars not intended for transporting goods. Hatchbacks have the smallest trunk; when transporting even small loads, you have to wisely use every centimeter of it, saving space. If you need a car specifically as a cargo carrier, we recommend choosing the station wagon option. Its cargo space is enough for family trips to the country, picnics and wholesale stores.
Soundproofing the trunk of Kalina
| Soundproofing the trunk brings a significant effect when it comes to a hatchback or station wagon body. Let's figure out how to make soundproofing of the trunk lid of Kalina with your own hands. |
Car soundproofing technology is the same for all brands and types of cars, however, specific cases have their own characteristics. In the case of the Lada Kalina, the whole process begins with removing the trunk trim and trunk door trim. Next, we clean the entire surface and degrease it with White Spirit. The first layer is vibrating material. Installation of noise insulation begins with vibration-isolating material (in this example, sheet vibration material Shumoff and STP are used). We cut sheets of a suitable size (the larger the pieces, the better), and heat their bitumen side with a technical hair dryer. We glue the material onto the cleaned metal of the body, and roll out the sheet with a hard (plastic/iron) roller. We glue the next sheet of vibration isolator with an overlap. We cover 60-100% of the surface, depending on the type of material. Sound insulation of trunk arches
Wheel arches should be given special attention, because all the noise from the wheels is transmitted through them. If you decide to partially soundproof Kalina, then the arches should be treated in any case
Second layer, sound insulation. It is customary to use accent material as either BiPlast (sound-absorbing material) or SPLEN (more heat-insulating material). All of them have a self-adhesive base, so installing the second layer will take significantly less time. There are no options here, we cover 100% of the surface. The only exceptions are technological openings, these include openings for interior ventilation.
Photo of Kalina's trunk after soundproofing:
Soundproofing the trunk lid of Kalina
Don’t forget about the fifth door, and here pay attention not only to the trunk lid itself, where we similarly cover it with vibration isolator and close the technological holes, but also to the upholstery of the trunk door. It needs to be weighted with pieces of vibration material, and then covered with Biplast or anti-creaking
Here it is worth paying attention to the entire lid, which will increase significantly after sticking the vibration material. By the way, we also glue all the plastic elements of the trunk (window pillar trims, podiums for speakers) with anti-creaking. Afterwards we carry out the assembly in the reverse order.
As a result, performing such sound insulation yourself will take you one working day. In this case, to completely cover the trunk of a Lada Kalina hatchback, it was required:
- 30 sheets M-4 (37*27cm)
- 3 sheets P-8 (75*56cm)
- 2 sheets P-4 (75*56cm)
The effect of sound insulation is significant, firstly, you can’t hear the exhaust, when before sound insulation, when you pressed the gas pedal with force, you could hear the sound of the nozzle on the pipe, but now you can’t hear it. Secondly, you can hardly hear how the rear suspension works on bumps. The sound from the suspension is dissipated, and the rear passengers are very happy. Remember that the best sound insulation is when a set of works has been carried out aimed not only at insulating from external noise (noise from wheels, wind, etc.), but also eliminating creaks and crickets inside the car.
Photo source:
Keywords:
Shelf Lada Kalina 1117 Station wagon (with sides) reviews
Average customer rating: (1) 1.00 out of 5 stars
Design change
I bought shelf 1117 of your production in Plamen, the design of which is slightly different from the one in the installation instructions on the website, the wooden fastening is displaced and it is not possible to screw it to the seat belt bracket, also the slot for the lighting lamp is 100 mm long, and the lamp lamp is 65 mm long mm, why such a huge slot. The seller has the same shelf hanging in his window from only 3 years ago and there is no defect there, the seller could not explain why they are different.
Please note that delivery is at the customer's expense and is not included in the initial cost of the order. Please wait until the company manager confirms your order to receive the total order amount. The period for generating and sending an order is 3-10 working days after receipt of payment in our accounts and depends on a number of factors:
— Orders that do not include a painting service , subject to product availability, are completed within 3-5 business days (estimated time frame). — Orders that include a painting service , subject to product availability, are completed within 7-12 business days (estimated time frame). — Individual orders are completed within 7-14 working days (approximate terms).
Pickup from pick-up points in Tolyatti
In order to place an order for the product you are interested in, select the delivery method “Pickup from the store”. Then fill in your contact information and wait for your order to be confirmed.
Delivery point address:
RF, Samara region, Tolyatti, GSK "Plamya", st. Officer 14
Pick-up point opening hours:
Mon-Fri 7:00 - 19:00, Moscow time
An order for pickup is made upon partial or full prepayment of the order. Receipt of a partially or fully paid order is made at the point of issue during business hours.
Delivery to regions by Russian Post
Delivery is carried out by Russian Post to the office indicated in the order (in accordance with your address and zip code), with 100% prepayment. The cost and approximate delivery time are calculated individually upon confirmation of the order. Typically, delivery costs range from 300 rubles for a small parcel to 2000 rubles for a bumper or sills; shipping to remote regions costs more. After sending your order, you will receive an email notification with the tracking number of the shipment, using which you can track the movement of the cargo on the Russian Post website.
Cash on delivery is not available due to the increasing number of returns. Hope for your understanding!
Parcels can be sent weighing up to 15 kg and with dimensions Width + Height + Depth - a total of no more than 3 meters .
Note! The shelf life of parcels at Russian Post offices has been reduced to 15 days! In this case, a repeated notification will not be sent to the address specified in the parcel.
Delivery to regions by Transport Companies (TC)
We send orders by transport company to more than 100 cities in Russia, we work with most Russian transport companies. Delivery to the departure terminal in Tolyatti is free of charge, the rest of the delivery cost is paid upon receipt at the TK terminal in your city. When processing an order, we can select the fastest and cheapest carrier in your region. After sending your order, you will be sent an email notification with the tracking number of the shipment, using which you can track the movement of the cargo on the Transport Company’s website.
The advantages of delivery using TC include the absence of restrictions on the volume and weight of goods.
Attention! Sending parts made of plastic, abs, fiberglass, etc. recommended by transport companies only in rigid packaging (crate)!
Attention: delivery times are determined by the transport company and are their area of responsibility. VS-AVTO cannot influence delivery times once the cargo has already been sent.
In connection with the amendments dated July 6, 2022 to Federal Law No. 374-FZ “On Combating Terrorism”, as well as the adoption of the anti-terrorism “Yarovaya package”, from July 20, 2022, in order to send cargo, the sender must provide information about himself, the recipient and payer. In particular, our clients require identification document details (Russian passport, driver’s license). Please understand that when placing an order, when choosing “delivery method: transport passport details”.
DIY raised floor in the trunk of a VAZ 2110
Until now, only a few automakers have managed to create a station wagon that doesn't scream about its gardening purpose. The five-door Mercedes-Benz CLS Shooting Brake is not just one of the most fashionable and sporty station wagons of our time, but a kind of aristocratic view of “car building” in general
In Russia, the sedan version of the CLS has traditionally been more popular, however, the stylish Shooting Brake has not been deprived of attention - the car is periodically seen on domestic roads
Are five-door CLSs chosen for their practicality and spaciousness? Of course not. For household needs, Mercedes-Benz offers an E-Class station wagon with a trunk volume of 2 cubic meters, and here the “shooting brake” with its flat roof and 590-1550 liters of useful volume has nothing special to answer. But what the more utilitarian “eshka” does not have is the spectacular trim of the luggage compartment, which, instead of the usual carpet, is offered as an option for the CLS Shooting Brake. The cargo floor here can be made of American cherry wood, which is trimmed with black stripes of dark stained oak. It really looks very elegant. Here is what the manufacturer himself writes about the wooden covering of the luggage compartment of the CLS Shooting Brake:
Extravagant, pleasing to the eye and incredibly pleasant to the touch, the optional designo wood boot floor in American cherry underlines the craftsman character of the interior. This masterpiece gives the luggage space the elegance of a luxury yacht deck, while also captivating with the capabilities of modern technology and the perfection of precision workmanship.
From a press release from Mercedes-Benz.
Wait, but this is just a trunk?! Perhaps in advertising photographs and in the imagination of Mercedes-Benz marketers, the cargo compartment is some kind of piece of art, but real people in real life transport all kinds of household luggage in it! From bags, suitcases and shopping bags, to boxes with car accessories, household utensils and everything that you usually don’t want to dirty the interior with. It’s clear that no one will stuff the trunk of a Mercedes-Benz CLS Shooting Brake under the roof with potatoes and stools from Ikea, but still. Over time, the “aristocratic” wooden finish runs the risk of becoming scuffed and scratched, so that after a couple of years the former luster may not remain.
So what costs should you be prepared for if one day a CLS owner wants to update the appearance of the luggage compartment? We addressed this question to the official Mercedes-Benz dealers in Moscow and were once again taken aback by the figures announced. It turned out that all these pretentious American cherry and stained oak, from which the fixed and folding sections of the bottom are made, cost as much as 397,545 rubles! The floor opening handle costs another 4,039 rubles (usually this is one of the most worn-out elements in trunks), and the installation of components will cost 2,750 rubles. Total - 404,334 rubles!
Replacement work
Yes, using the “wooden” trunk of the CLS Shooting Brake to its fullest is too expensive. You can’t help but wonder whether such luxury is actually needed in the “cargo” compartment, or whether a standard bottom with carpet trim will do (if replaced it will cost 8 times less). Don't take your friends and companions on an excursion to the trunk. Of course, expensive wooden trim can be protected with special accessories like protective trays and mats, but then a logical question arises - why order something that then has to be hidden? PS If you think that there is nothing so terribly expensive in your car, then you simply didn’t read our new research, stay tuned. We promise new tears every week.
VAZ 2110 First time in 9 years. History and tuning of the VAZ 2110 History Another front-wheel drive sedan...
Types of trunks for Priora You can no longer attach a design that was suitable for VAZ cars to a modern car...
One of the main problems of the Russian automobile industry is factory assembly. Designers produce a raw product that…
Repairing the glove compartment of a VAZ 2110 Many owners of VAZ 2110 cars have encountered the following problem - opening...
Lada 2110 Project “Regatta 412” › Logbook › Steering wheel braid from AliExpress Finally arrived...
Comparison of models
Everything is relative. So now let's draw some parallels. If we talk about new generation cars, then it should be said that the trunk volume of the Lada Kalina hatchback is not as large as car owners would like.
The station wagon is more spacious - here the manufacturers really did their best in terms of the capacity of the luggage compartment.
If we talk more specifically about the trunk volume of the Kalina hatchback, it is worth emphasizing that here the figure is 240 liters. But you need to understand that this parameter is calculated before the installation location of the shelf. If necessary, this element can be dismantled with your own hands.
Are you not happy with these numbers? In this case, you can simply fold down the rear seats in the Lada Kalina hatchback. Thanks to this, the volume of the luggage compartment will increase to 550 liters.
As a result, it is quite clear that a car owner who sets a goal of purchasing a car with a spacious trunk (from the Kalina line) should opt for the Kalina station wagon, because it is small in a hatchback. And if you plan to use a hatchback for frequent trips into nature or transport some things to your garden plot, then it’s better to forget about this option and take a station wagon.
It should also be noted that the trunk of the 2nd generation Kalina is larger than that of the 1st modification VAZ. With the seats folded down, it can accommodate about 670 liters of a wide variety of cargo.
Want to know more about the hatchback version? Because you can't decide between this option and the station wagon? We understand. And we will help with this.
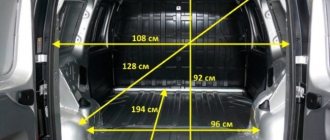
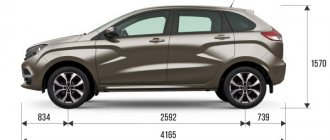
Imagine this situation. You are going to the dacha one fine fine day. Moreover, you have more than enough luggage. Will the hatchback be able to cope with the task? We take a tape measure in our hands and start taking measurements. As a result, we obtain the following indicators:
- the width of the rear door (the narrowest place between the rear arches) was about 9 cm;
- the height of the rear door reached 82 cm;
- the depth (from the edge of the luggage compartment to the seats of the folded rear seats) is fixed at 128 cm;
- The depth to the instrument panel was 220 cm.
So, we do simple calculations and make sure that the volume of the luggage compartment is about 1 m³, which, accordingly, equals 1000 liters. By the way, the book says that this figure is 550, but this only counts up to the height of the shelf, and we were going to load it up to the ceiling.
Information received. Draw your own conclusions, dear car owners.
Trunk floor for Toyota Corolla. With my own hands + assistant Kristina Neboga
And so I once bothered with the floor in the trunk. but I didn’t betray the special significance of such a useful thing as a normal floor... I left the good old Japanese)) and maybe not the Japanese plywood... in general, after a year of rapid use it sank... (((((so I thought about replacing it)))) ) and a complete replacement...
To perform this operation, the following were purchased: - 1 sheet of moisture-resistant plywood 10 mm thick (1.5 m by 1.5, and for convenient transportation, ask for it to be cut into 2 parts... - 1.5 x 1.0 m and 0.5 x 1, 5 perfectly fits into a 5-door hatchback from the 5th door!) - 1 sq. meter of sound insulation (what is it called, but very sticky... and false))) does not burn, does not absorb water - I checked it personally! for a night of tests! ) - 2 linear meter of carpet (size 2.00 x 1.40 - about 0.5 square meters left!) - PVA glue - White Spirit 1l. - Screws (about 50-60 pieces per head - of different lengths) - slats 40x20 mm (4 pieces, 1.5 linear meters long) - hinges for the lid
...From what else USED in work: 6-7 hours of free time! to do everything without stress! this comes with time to purchase materials!
- an electric jigsaw (a couple of different files) - a drill (with an attachment for a screwdriver and other attachments) - a Stanley screwdriver with a ratchet - different attachments (a cross, for a drill and for a jigsaw and drill) - cardboard about 1.2 m2. - film (for the pattern) - a couple of rags - sandpaper (medium, round off the edges) - a stapler (an irreplaceable thing!) - staples for the stapler (anywhere without them) - tape measure - electrical tape)))) (to determine the exact boundaries of the interior))) ) it’s difficult to describe... but still I used)))) green electrical tape) - Nokia N95 8 Gb phone (in order to take photos) - 3 bottles of 1.5 liter Pepsi max, cold... and ice))))) - second 2 hands))))
...and so let's begin))))) on paper I painted different things for myself... both the shelf and the lid and in general a dream and not a trunk))))) but in life I got a little carried away))))) I thought for a long time... it’s good to draw I can))))) but that was not the case...
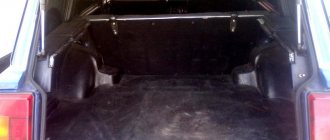
Empty trunk)))) well, almost empty... because... I replaced my spare tire from a 13 diameter to a 14 diameter... then the floor became a little bit higher... I had to raise the floor 5 cm higher than the previous level!
And so the measurements)))) you need to measure everything clearly so that there are no such crap as mine))))) although I seem to have measured it clearly too))))) in short, I’ll tell you everything was measured super, but I took a different path...
I cut a square to the size of the wheel, or rather covered it with a frame... 2 slats 68 cm long and 2 slats 75 cm long, and then from this frame I danced... inside I have corners))) from under the fastenings under the blinds... there were extra ones, so I used them! hard, comfortable)))) what else is needed))))) screwed them to each other through washers! It’s more practical this way (in the future they plan to cover them with carpet - it’s stupid to protect them on top!)
Next, the film was taken, placed in the trunk and the outline of the floor was outlined with a marker on top of the film! but here was the most interesting mess))))) I was going to raise the floor 5 cm up? and then I measured along the bottom... and it turned out that I missed a bit... on average, I need to add 1.5 - 2 cm on each side...
Next, thick cardboard was taken and curves were clearly measured on it at a level of 5 cm from the floor of the trunk! then we saw, we sawed again, we sawed, we adjusted, and so on and so forth...
We cover the square lid with carpet on top! from below with a slotted spoon... don’t forget to wipe the slotted spoon with white spirit where we glue it, and lightly coat the side where the carpet will be with PVA! ...literally a little bit! no need to pour a liter! Next, these edges were cut out))))) and covered using the same technology as the square)))))
After all this, it was decided to screw the edges to the square... which turned out accordingly))))) Then the hinges were screwed on... (they will have to be removed and painted later because there is temporarily no black paint...) and now the lid has learned to rise))))) a tape-loop made of carpet was temporarily stapled with a stapler for ease of opening... later there are plans to replace it with a more convenient handle... Well, after several manipulations with moving the rear seats... and searching for the correct position, it was installed on the car...
made! in 2 days))))) I indicated the approximate work time at the beginning of the post... I got a lot of pleasure from everything that was done))) although I was a little tired... but still happy with the work done))))) if you have any questions, ask... I will answer everyone ))))) without exception)))))
Options for modifying the luggage compartment of a car
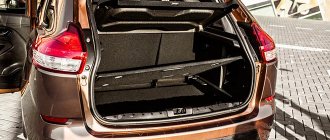
The trunk of the Lada X Rey, despite its impressive size, can be significantly improved by installing additional accessories, such as organizers, which can be purchased at spare parts stores. The most popular organizer for X Rey is the one that is installed under the trunk shelf. It serves to store things and prevent them from randomly rolling while the car is moving. The organizer itself does not take up space, allowing you to easily reach your packed items. It is easy to install and remove, as it has a simple plastic design.
You can make a convenient organizer with your own hands, installed under the raised floor. This accessory is made from a sheet of plywood; to improve its decorative qualities, the parts are covered with artificial leather or covered with other decorative materials. Drawings of parts for manufacturing the structure are shown in the figure.
Organizer parts, where “t” is the thickness of the plywood.
The cover is made of ABS plastic, which has high strength characteristics, is scratch-resistant, and looks beautiful. The protective element is easily attached to the lock eye and the trunk seal. It would be a good idea to purchase a rubber mat that will protect the carpeted surface of the luggage compartment from contamination.
To protect the interior from extraneous noise penetrating through the trunk and resulting from impacts from gravel, stones, water and air flow, it is advisable to soundproof the compartment. For this purpose, you should purchase special soundproofing kits; their parts are easily glued to the bottom of the trunk and are made according to special patterns. As a rule, this is a three-layer coating consisting of a vibration-proofing layer, a substrate and a sound insulator.
What is the trunk volume of a Kalina station wagon and hatchback?
The Kalina station wagon has a trunk volume that, without a doubt, matches its status. What does it mean? And the fact that this car belongs to the category of so-called state employees, that is, is affordable at its cost to the majority of residents of our country. Taking this into account, manufacturers largely calculated the dimensions of the trunk of the Kalina station wagon. That is, taking into account the fact that a good half of our compatriots will drive this car.
This, in turn, means that the dimensions of the luggage compartment must be quite impressive. Now we will find out if this is really so.
AND EVEN MORE TUNING FOR LADA X-RAY
For Lada X-Ray owners we have an excellent selection of various accessories and parts. For example, look at the most popular positions:
- Carpet covers - side and tunnel
- Hood gas struts
- Rails for X ray - available in different colors
- Central armrest made of hypoallergenic eco-leather
- Soft door armrests (front and rear)
- Front and rear bumper protection and sill protection made from Italian stainless steel
- Quick release tow bar (American square)
- Rear bumper trim (stainless steel)
- Stylish door trims
and more than 1000 more products for XRay in our store! If you need help choosing tuning, contact our operators!
Advantages of a raised floor:
- In the space under the floor you can place many communications. In our age, it is difficult to imagine an office building without kilometers of wires, let alone industrial buildings, data center premises, server rooms, etc.;
- Any finishing finish can be laid on the raised floor modules - carpet or vinyl tiles, laminate, etc. If necessary, slabs are supplied with a finished coating, which can be antistatic, conductive, high strength, etc.;
- The raised floor can be easily combined with ventilation, cooling, and heating systems;
- The installation of a floor on supports does not involve “wet” work with concrete, installation occurs relatively quickly;
- The adjustable height of the racks does not require a perfectly level base;
- The use of strong supports of varying heights of 15-200 cm makes it possible to construct reliable structures for premises arranged like an amphitheater: concert, cinema and conference halls, opera, classrooms;
- The raised floor can withstand enormous loads and significant weight of equipment;
- Premises for different purposes have different requirements for the characteristics of the floor covering, so the variety of materials for the manufacture of raised floors only contributes to its popularity.
Raised floor for the trunk of a VAZ 2105 VAZ 2107
Raised floor for the trunk of a VAZ 2105 - we will install it. First you need to completely empty the luggage compartment. Decide for yourself how much space you want to leave for the trunk. In our case, the height of the frame will be 11.5 cm. The top of the structure will be 84 cm, the bottom will be 78 cm, and the sides will be 58 cm. With this ratio, the device fits tightly into the luggage compartment and does not wobble.
We begin to make blanks from chipboard, it is recommended to use an electric jigsaw, and process the edges with sandpaper. We mark the places where holes will need to be made and drill them. When assembling, it is advisable to use Euroscrews, although ordinary self-tapping screws will work just fine. The next stage is making the partitions. At this stage, you should already have an idea of what exactly will be located in the raised floor niches. We make a cover from plywood, size - 91 by 69 cm, thickness 9 mm. But if you have to transport a heavy load, then the thickness should be even greater. The lid is attached to the entire structure using hinges. You can start installing the device, but it won’t look very nice, so we dismantle the entire structure and cover it with carpet. In the process of work, we will need a ruler, scissors and a large stapler. We make marks on the carpet, then start cutting. If you don’t have a stapler at hand, then take a hammer and nails. After completing the tightening procedure, we reassemble the false floor; we will not disassemble it anymore. Since we have a box for small items, when pulled out, they will not scatter throughout the compartment. It is recommended to organize a solid floor so that, if necessary, you can pull out the entire structure and do not bother with pulling out large and small objects from there. Next, we cover the cover with carpet and secure it to the base.
Now you can put a false floor in the trunk of a VAZ 2105. If you think that you will never take it out again and the structure will forever be in this place, then it is possible to attach it to the body. Superglue will do, it will make the device non-removable in a couple of minutes. So it’s up to you to decide whether such a modification should be made or not; it’s more convenient when it can be removed at any time. You can use the raised floor not for the purpose of folding small things, but for installing audio system elements there, for example, a subwoofer or subwoofer. The fact is that the subwoofer takes up a certain space and needs to be put somewhere. Hiding under the floor is ideal, plus it provides easy access and can be easily removed or reconfigured if necessary. In this case, the division does not occur into many branches, but into one large one. When installing speakers there, you need to make holes of the appropriate diameter. The wiring runs throughout the entire cabin. When it reaches the partition behind which the trunk is located, we will need an electric drill. With its help, a hole will be made through which the speaker wires will pass. All connections must be well insulated, because plywood is flammable and in the event of a short circuit the consequences can be disastrous.
Gearbox and rear axle of the classic VAZ 2107 2106 2101 2105
Do-it-yourself noise insulation of VAZ 2106, 2107, 2105.
Soundproofing VAZ 2107. Trunk
Lada Kalina Universal - Blueberry which is Kalina › Logbook › About the trunk
The Kalinovsky trunk is enough for me so far and it hasn’t disappointed me in 4 months; I compare it, of course, with my former VAZ 2111, which I owned for quite a long period of time and in which I very often transported things that, according to all the laws of physics, should not be was to get into this car. Yes, on the 2111 the trunk is larger and more spacious, with a volume of 430/775 liters, on the Kalina 350/650. Added:
it turns out AvtoVAZ indicates volumes in liters up to the shelves, if loaded to the ceiling, then in 2111 the maximum volume is 1215 liters.
and in viburnum it turns out 1 m³ 1000 l. Without folded backrests, the length is 2111 - 1015 mm on the viburnum 785 mm, the difference
22 cm. If the backrests are folded, then 2111 is 1605mm, and on the viburnum it is 1430mm. The difference is already smaller
17 cm. If you compare the width of the trunk where the arches are 2111
1007mm, on viburnum
950mm, due to the difference of 5 cm, you still can’t stuff an elephant into 2111. Maximum transverse size on viburnum
1500mm. The carrying capacity of the Kalina is 435 kg, the VAZ 2111 is 500 kg.
In general, what do I mean, it’s better not to stuff 1.5 tons into either 11 or Kalina, there are gazelles for that ;)) But if I carried 11 often different loads in everyday life, from dacha to dacha, from village to village, something for renovation, all sorts of furniture for the house, so I carry the same load with ease and on a viburnum, I didn’t notice any difference, I recently brought a bed with a mattress from Ikea...
Viburnum also has its advantages regarding the luggage compartment. I really like the trunk closing handle on the Kalina, there wasn’t one like that in the 2111, my hands got dirty, sometimes when you arrived laden. You take packages, bags, ask your wife to close the trunk, but there’s nothing to take hold of, she’ll get all her hands dirty, or break her nail, you’ll still be to blame later... And of course, the trunk lid rises noticeably higher on the Kalina. I’m not saying that I’m big, and I’m not saying that I’m small, but I constantly hit my head on the lid, but what can I say, my wife hit her head more than once even though she’s shorter than me, but here, of course, the gas stops failed in many ways, I changed them every winter, It was always enough for a year, like winter and frost, or it didn’t hold at all or gradually fell on the head. I don’t know yet how it will be in viburnum; there have been no frosts.
By the way, there is one unpleasant moment, maybe someone can tell me how to solve it... It has happened a couple of times already that the rod that opens the trunk from the lock button has come off, it came off exactly at the moment of pressing the lock, I’ll note it in the photo, I looked and didn’t understand, it’s a breakdown , something is missing, or this is a design miscalculation... You have to climb through the interior, remove the trim and open it. What if I’m loaded?
The speed of transformation of the trunk to its maximum size. On the 2111, I remember it was a bit of an ordeal to disassemble the interior, you can’t lift the seat, the ropes for lifting the seat constantly crawled under it for some reason, the release mechanism itself was constantly jammed on the backrests. It happened that it took about 10 minutes to disassemble the trunk. And it happened that I stupidly didn’t care about this assembly and disassembly and threw everything into the back and front seats. Viburnum has apparently already thought of all this and the disassembly and assembly process is much simpler and less time-consuming. Yesterday I was transporting a stand for flowers, assembled and disassembled everything with removing the passenger headrest, in about, well, a couple of minutes, and the stand itself is about 1.7m high and at the bottom, well, about a meter, probably exactly, it didn’t fit into a regular elevator, thank God it was a cargo elevator, but then the 16th floor... the stand went in like clockwork, probably two of these would have been removed!
Trunk overview, what is where and where
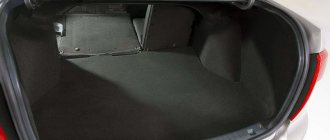
The basic configuration of the Lada Granta Liftback does not include a remote drive to unlock the doors. In Lux versions, a mechanical button is installed on the key. To unlock the fifth door, just press the button once. Next, lift the lid mechanically by hand. Note that it is not easy, one little finger will not be enough, make an effort. Even when folded, the trunk is spacious and impressive. The perimeter is lined with felt, fleecy material. It serves as both cladding and noise reduction.
Unfortunately, there is no rubber mat on the floor, only fleecy material. If necessary, the owner can independently purchase rubber coating. Lifting the false shelf, in the center we will see a recess for the spare wheel. Moreover, the standard radius of the disks is 14 inches, but you can fit all 16 inches. Convenient and practical, since there is free space. In addition to the full tire, there is a mechanical jack and a wheel wrench. If desired, you can fit a tow rope, which needs to be purchased separately; it is not supplied as standard.
Comparison of trunks of different car models
If we consider a new generation car, then the Lada Kalina hatchback is characterized by a small trunk volume. The VAZ station wagon is considered a more spacious car. The trunk of the 1st model has a volume of 240 liters. This parameter is calculated to the installation location of the shelf. If necessary, this element can be dismantled with your own hands. If you fold down the rear seats in the Lada Kalina hatchback, the trunk volume reaches 550 liters. For Granta, this parameter is 520 hp.
The trunk of the new Lada Kalina station wagon is considered more spacious. Its volume is 335 liters. The trunk of the 2nd generation Kalina is larger than that of the 1st modification VAZ. With the seats folded down, it holds about 670 liters of various cargo.
Cost of services
Making false panels for the trunk
Decorative panels negotiable False panel for amplifier day 1500–3000 rub. False trunk floor panel day RUB 1,500–4,500. False trunk panel (side, back) day 1500–3500 rub. False panel for a processor 1,500–3,000 rubles per day. False panel for a subwoofer 1,500–3,000 rubles per day. False panel of the wing per day 1500–3000 rub. False panel above the spare tire RUR 1,500–4,500 per day. False condenser panel 1–3 h negotiable
Our other services
Production of transition frames for GU (radio tape recorder) from 500 rubles. Production of podiums for acoustics from an hour from 1000 rubles. Manufacturing of spacer rings 1–4 hours from 400 rub. Manufacturing of subwoofer housing 1–7 days from RUB 3,000. Manufacturing of the rear shelf 1–7 days from 1000 rub. Selection of audio system components 5 min – 1 hour free Adjustment of acoustics (during installation) free Audio preparation from an hour from 1000 rubles. Installation (installation) of component acoustics 2–6 hours from RUB 3,500. Installation (installation) of subwoofers 1–4 hours from 500 rub. Organization of linear RCA outputs from an hour from 1000 rubles. Installation of a sound amplifier from an hour from 1000 rubles. Installation (installation) of a CD/DVD/MD changer 2 hours from 2500 rub. Installation (installation) of the processor with configuration 4–6 hours 1500–4000 rub. Reinforcement of the trunk opening (with aluminum) 1-2 days 4000–8000 rub. Enlightening (alteration) of the seat back is negotiable Manufacturing of the lifting frame 1–3 days 5,000–12,000 rub. Disassembly and assembly of interior elements from 30 minutes from 300 rubles. Installation of cooling fan negotiable Installation of condenser (storage) 1 hour 600–1500 rub.
Raised floor for a lady
At first I didn’t like the idea of making a false floor in the trunk of the Vesta, which is included in expensive trim levels. This is when I watched how people simply copied the factory design. Just think, there is a small space between the raised floor and the standard floor, in which you can’t really put anything. But the opportunity to organize a sleeping place by leveling the Vesta trunk floor to the level of the folded rear seats is already a worthwhile improvement. You can comfortably sleep in your car without a tent. And I decided to come up with a raised floor that is better and more useful than the standard one.
But I already bought a good rubber mat for the standard trunk floor of the Vesta... And then an idea arose - a mat! Ideally, the false floor in the trunk should be a mat - that is, flexible. Then you can make the most of the space underneath to store anything you need. But the practical implementation of a flexible and at the same time durable design is a technically very difficult task. Therefore, it was decided to come to a compromise and limit it to four sections. No sooner said than done. I ordered rectangular pieces of 15 mm plywood to size and cut out the required corners.
I really didn’t want to make a frame under the raised floor, as many people do. This is both a loss of space and a rigid division of the niche volume into sections. At the same time, you need to take into account that the spare tire that is currently lying around is a narrow stamped 15, and I plan to eventually cast it for 16 and wider. This means the height of the spare tire will increase and the frame should not rest against the spare tire. But it would be better without him at all. In the plastic of the trunk, on which the false floor rests, there are recesses that can be used under the frame (photo below). In short, it will be really needed - I’ll do it later.
The next thing I did was to study the space under the raised floor in the trunk of Vesta, in which I was going to store something I needed. The result did not cause delight. Bare primed metal, pitiful scraps of vibration and un-glued pieces of felt.
Definitely, sound insulation of the trunk is necessary. Moreover, I am removing the standard trunk floor lid, which was made with a claim for sound insulation. We need to compensate. An additional advantage will be the protective coating of the metal with a noise-insulating soft material, which will protect against scratches and prevent things from rattling.
Without fanaticism, I glued 3 sheets of 1.6 mm Comfort Mat G-Line vibration and carefully sealed the entire surface with 8 mm isolon. The result is a wonderful trunk niche.
Now you can return to making the raised floor. I was so distracted for a day of work, but I have to do it well, because it will turn out bad on its own. The final assembly of the raised floor panels was done outside the machine, since all dimensions had already been determined. First of all, I painted the plywood with a varnish similar to bitumen. I glued 4 mm isolon on the bottom for sound insulation. It adhered well to the varnished surface.
Next, I connected the sections of the raised floor with a synthetic belt, which goes to the handles for the bags. This is for reliability and the central belt creates handles for opening the raised floor.
In the final part, I connected the cut rubber mat and the raised floor sections with aluminum strips, using up all 100 pieces. self-tapping screws purchased for this purpose. I mentioned the mat at the beginning that I bought it for the trunk option without a false floor.
Now the sections have become movable due to rubber, while synthetic belts protect against rupture, especially in winter, when the elasticity of the rubber will be less. You can open one or two sections of the raised floor on each side to gain access to the contents of the trunk niche. This is much more convenient than completely unloading the trunk to open large sections. All the machine’s accessories can be easily accommodated inside - a jack, a pump, first aid kits, a fire extinguisher and many other things that you constantly carry with you.
I will also put a new mat on top, for the option with a raised floor, and enjoy the empty trunk. comments powered by HyperComments
Installing roof rails on Kalina station wagon
The supporting arches are mounted on top of the body quite simply, and one person can handle the task. There is no need to drill anything, since the manufacturer provides special technological holes. To install you will need:
- set of L-shaped hex keys;
- alcohol marker;
- double-sided tape for cars;
- insulating tape.
Railing installation diagram
After reading the accompanying instructions for the roof rails, you can begin installing them on the Kalina station wagon.
- Place the car on a level surface and clean the top of the body from dirt.
- We open all four doors to gain access to the rubber seals.
- To remove the rubber bands, you need to pull their rear edge towards the front door, and they can be easily removed.
- After removing the seals, access to the technological holes is opened, which are sealed with electrical tape, which should be peeled off.
- Now you need to try on the roof rails, marking the attachment points for the plastic fairings and brackets with an alcohol marker.
- The marked areas of the body must be wiped, degreased and treated with an adhesion-activating agent applied to a napkin. Unnecessary holes for installation should be sealed again with electrical tape.
- Remove the protective film from the double-sided tape and stick it on the fairing.
- You can attach the roof rails by tightening the screw fasteners gradually and not completely, thus avoiding distortions, after which we press the plastic fairings.
- We press the bolts all the way, first the front and then the rear. We press down the fairings again to fix them as securely as possible.
- All that remains is to mount the rubber seal, installing it in place, and inspect the results of the work.
It is now possible to attach transverse arches to the existing roof rails, which will serve as the basis for a box, basket, or special mounts for transporting certain large items (snowboards, skis with poles, bicycles, etc.).
In total, installing roof rails on the Kalina station wagon takes no more than half an hour. The result is a durable structure that can transport up to 50 kg of oversized cargo.
Kalina trunk design
The trunk of a car deserves special attention, especially when it is of impressive size. Tuning the trunk of Kalina, like any other car brand, consists of a set of modifications, we’ll talk about them
Where can we begin to improve the trunk of Kalina, of course with sound insulation. It is best to do it first, because disassembling an already decorated trunk for this is not entirely reasonable. Sound insulation will not only save you from squeaks (relevant for Kalina Hatchback and Station Wagon), but also from noise from the arches and exhaust system. The next stage of modifying the trunk is making a false floor. If we are talking about a trunk that should please the eye, then you cannot do without it. It will allow you to store all your things under the floor, while leaving the luggage compartment empty, and will also serve as equipment for further design of Kalina’s trunk.
Next, we are finalizing the side niches of the trunk. There are many options, from installing a simple mesh (attached with Velcro):
Before making full-fledged plywood compartments (assembly using corners and screws):
If you need to place a subwoofer in the trunk, then the side niches are perfect for this. The final stage of tuning the Kalina trunk is the organization of lighting. And here you can think not only in terms of lighting the luggage compartment, but also in terms of lighting the side compartments, as well as a subwoofer or amplifier.
How did you decorate Kalina’s trunk with your own hands?
Photo source:
Keywords:
Helpful information
Why do you need a false panel in the trunk, where to install it
Additional shelves in the trunk most often house external amplifiers, capacitors, and processors that do not fit inside the car. Many car enthusiasts do not want to clutter the space near the front passenger’s knees with hanging structures. There is enough space in the trunk of a car to freely place additional equipment, but it must be properly positioned and protected from damage when the compartment is loaded with luggage.
In the trunk of a sedan, from the locations of the mounting shelves and the false panels covering them, the side openings near the wheel arches and the recessed space under the rear window are convenient. Less commonly, a raised false floor is installed in the trunk, which can be considered a type of false panel. In the trunks of two-volume hatchbacks and station wagons that are not equipped with a partition between the passenger compartment and the luggage compartment, broadband woofers, additional midbass, and compact low-power active subwoofers can be placed on mounting shelves.
Do-it-yourself raised floor in the trunk of LADA cars
One of the popular modifications to the trunk is to install a second floor in it in the form of a low box (raised floor). This design will allow you to store things (tools, sound amplifier, etc.) that will not dangle or get in the way during use. Let's consider a classic version of this tuning of the trunk of modern Lada cars.
Let's look at a specific example of making a raised floor with your own hands for a Lada Granta liftback. For other Lada models, all actions are performed in the same way:
1. Cut pieces of plywood (5-6 mm) into pieces of the required sizes using a jigsaw or saw.
2. If desired, the plywood can be painted (in this example, white) or coated with drying oil to protect it from moisture.
3. The top cover is tightened with material (for example, carpet), using a furniture stapler or glue.
4. The box is assembled using corners and hinges. The top lid can be made double so that, if desired, only part of the hidden trunk can be opened.
5. We apply design solutions. For example, when placing amplifiers in such a trunk, it will be convenient to have a viewing window made from a piece of monolith. To install it, we cut out a 5 cm groove along the contour from the bottom of the lid. We place the glass in it and glue it, and secure it with metal slats for reliability. Holes for ventilation can be made in the sides of the resulting box.
As a result, all that remains is to install a false floor in the trunk of the Lada and fill it with the necessary contents. The side niches in the trunk are deeper, which allows you to place additional things in them. Such modification of the trunk will require at least three free evenings, but the result is worth it!
Lada XRAY already has a second floor from the factory. There is a separate article on this topic for the Largus trunk. We offer one more instruction that will improve the lighting in the trunk of Lada cars.
Rails and their functions
Rails are special slats located on the roof of the car. Their functions include giving the Lada an aesthetic and sporty appearance. If necessary, lighting equipment is mounted on the roof rails. Such modernization allows you to move comfortably in a vehicle at night. From a constructive point of view, the part is represented by the following elements:
The diameter of the main pipe ranges from 25-51 mm. It can have different lengths. Rails are made of chromed metal or steel. With the help of slats, the luggage compartment will open faster. To install them yourself, you will need to make a hole in the roof of the car. To connect the slats, threads or rivets are used.
First, the roof of a Lada Kalina station wagon or any other modification is cleaned of dust, grease and dirt. Then the front fairing of the unit is mounted. Installation of the railing ensures its reliable fixation. The rear fairing is mounted in the same way. Sealant is applied to the elements. It will protect the arch supports from moisture and debris. Before tuning, you will need to study the relevant instructions. If you have questions, it is recommended to seek help from specialists.
Using this technique, you can install roof rails on Kalina of any modification. This will not take too much time.
Features and disadvantages of the luggage compartment
- To fully fold the rear row of seats into a flat platform, you will need to remove the headrests. Otherwise, they will rest against the back of the front seats. The angle of the seat layout will not exceed 160 - 165°;
- To remotely unlock the rear door lock, you need to press the mechanical key fob button twice;
- Lifting the trunk lid requires a lot of effort; the door is moderately heavy;
- A solid rubber mat on a raised shelf is impractical, since with frequent use of a spare wheel or a mechanical jack, the sides touch the fleecy covering, wearing it out.