Print this article Font size 16
Over time, almost everywhere possible, backlash begins to appear on cars produced by AvtoVAZ. The gearbox is no exception. It is not surprising that replacing the rocker on a VAZ 2114 has become a routine procedure familiar to all owners of this model.
Set
Determining the malfunction is quite easy:
- Gear shifts with problems, indistinctly;
- The gearbox is loose.
If such a malfunction occurs, a complete replacement of the element may be required. Moreover, many are switching to a short-throw rocker, which gives the car a more sporty character. This technology was borrowed from motorsports. By the way, a simple adjustment can turn it into a short-stroke one.
Some masters argue that it is not always wise to completely change. It is more profitable from a financial point of view to purchase a repair kit. But in fact, such repairs do not give the desired result, and after a while the link will still have to be changed.
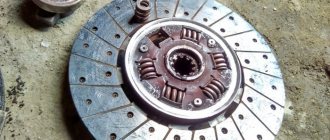
Replacing the gearbox seal of the gearbox rod on a VAZ 2108-2109
The gearbox is an auxiliary organ of the engine, without which the car also cannot go anywhere. Today we will talk about gearbox seals, or more precisely, the gearbox rod seal, which allows moving parts to operate without losing oil from the crankcase. So, how is the gearbox seal (gearbox rod) replaced using the example of a VAZ 2108-2109?
How to recognize a malfunction?
There are only two ways to diagnose a problem.
- The first is that an oil stain forms under the car after a long period of parking, which clearly indicates an oil leak from the gearbox. Unfortunately, many drivers blame this problem on poor tightening of the oil filter.
- The second method is a visual inspection of the checkpoint on an inspection pit or overpass. In the place where the oil seal is installed, you can see oil stains, which indicate that the oil seal needs to be replaced.
If you do not change this part in time, there is a possibility that the oil will completely come out of the gearbox, and then the entire mechanism will run dry. In this case, you will have to carry out a major overhaul of the gearbox or even replace it, which will cost much more. It is strongly recommended to immediately change the painful node after detecting a malfunction.
How to change the rod seal on VAZ cars
There are only two ways to change such an oil seal. The first necessarily involves the dismantling of the gearbox with further disassembly of the unit and replacement of the faulty part. And the second involves replacing the oil seal without removing the transmission. We will consider the second method, since it is less labor-intensive and takes less time.
Required tool:
- Wrenches for 10 and 13
- The most common awl
- Soda cap
- Bent slotted screwdriver. You can also use a crochet hook.
Be prepared to have to crawl under the car. It is best to use a viewing hole or overpass, but you can also raise the car using jacks. Don't forget to be safe!
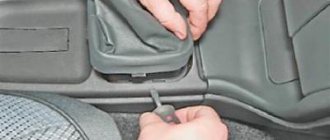
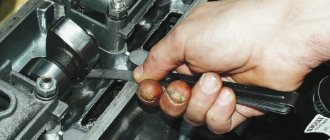
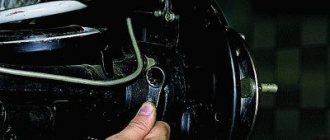
- Find the gearbox rod under the front of the car and bend its boot so that you can access its transition into the gearbox.
- Unscrew the cardan mounting bolt and remove it from the rod. Do not forget to disconnect the universal joint from the rod so that it does not interfere with the further replacement procedure. Now remove the boot completely. Immediately behind it you will see the same problematic gearbox rod seal.
- Now drain the oil from the gearbox, otherwise after removing the oil seal, it will simply pour out. The oil seal itself is not easy to pull out; here you will need a special tool in the form of an awl. Many car repairmen screw the screw into the oil seal and simply pull it towards themselves. This creates a corkscrew effect.
- Wipe the seat where the oil seal is inserted from dirt and transmission oil. It is best to use a completely old unnecessary rag or dry rags for these purposes.
After this, you can insert a new oil seal. Installation can be done in any available way. For example, you can use a regular plastic stopper for this. Cut out its center and press the oil seal into its seat using light pressure. However, no one forbids using another method; the most important thing is not to damage the new part, otherwise all the work will be done in vain.
Reassemble all components in reverse order and fill with transmission oil. After this, it is necessary to set up the correct engagement and shifting of gears, since the 13 bolt that holds the cardan on the rod has an adjustment purpose and its movement may make it impossible to engage first or reverse gear. Carry out adjustment work and tighten the bolt. There is no specific provision, because all drivers adjust the scenes “to suit themselves”.
To check the oil seal, start the engine and try to drive the car. If there are no leaks after this, then you did everything correctly.
As you have already noticed, it was not difficult at all. We hope that this article helped answer the question of how to change the gearbox rod seal.
Sports
We noted that for the VAZ 2114 you can install a sports short-throw rocker . Outwardly they are quite similar, but the difference in work is felt immediately. On a sports unit, gears shift faster and smoother. It's all about the design of the backstage itself. Unfortunately, it is precisely because of this that the process of independent replacement becomes almost impossible.
Sports model
If you decide to install a short-throw rocker on your VAZ 2114, contact trusted car services, or even better, a studio that specializes in tuning. Such events are classified as technical improvement, which is why no one understands this better than tuning specialists. Even official AvtoVAZ car services.
Procedure for replacing the rod seal
Replacing the camshaft oil seal on a VAZ 2109.
Replacing the rod is carried out in parallel with replacing the oil seal; all this can be done while simultaneously repairing the gear shift drives. During repairs, you will need a certain set of tools: an “11” wrench (necessarily a socket one), a metal rod with a diameter of 4 millimeters, and a mandrel for pressing.
During repairs, you should follow the following sequence:
- The car must be placed on a level surface.
- Place wheel chocks under the wheels, and the gearshift lever must be moved to the neutral position.
- Then the spring clamp is removed, and the axle is pulled out - thereby the forks of the mechanism are disconnected.
- Next, use a socket wrench to unscrew the mechanism cover bolts.
- After this, swinging the installed cover on the guides, remove it from the box. You need to know that if your car has air conditioning and power steering, this makes the task a little more difficult.
- The pin is knocked out using a metal rod. The rod itself is removed.
- Use a screwdriver to pry up the oil seal and remove it. Only after this is the new oil seal pressed in using a head of the appropriate diameter.
- After replacement, you need to find the cause of this breakdown.
- After the mechanism is assembled, it is placed carefully on the box.
Failure of the rod can be caused by cracks, small, almost imperceptible scratches or gouges on the rod. If this is the problem, then of course such a rod should not be installed with a new oil seal, otherwise the oil seal will quickly deteriorate and you will have to do it all over again. It is worth remembering that the developments on the axis are very noticeable. This has the effect of increasing the backlash in the drive mechanism responsible for shifting gears.
Remember that the lever of the mechanism must align with the grooves of the forks.
When installing the cover back, make sure that the gear shift knob is in the neutral position. And after installation, check the adjustment of the rocker. To do this, you need to remove the plastic plug on the gear selection mechanism and insert a 5 mm drill there. Then turn the fork so that it fits into the hole on the mechanism (you will feel how it sits deeper). After that, having removed the cover from the gearbox, you need to install a screwdriver in the control hole, fixing the gear selection lever in the desired position. You tighten the clamp on the slide and remove the screwdriver, put the casing back on, pull out the drill, and put the plug in place.
The procedure will probably cause you a lot of trouble and will take a lot of time, but the work done will definitely bring you pleasure!
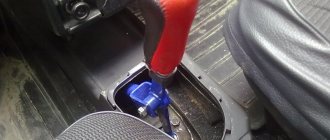
Backstage repair
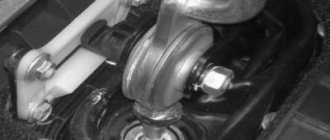
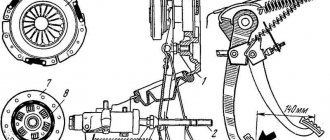
The gearbox linkage is an element of a multi-lever assembly, which is designed to connect the gearbox lever and the rod that fits the power unit. In Niva Chevrolet cars, the rocker is located under the bottom of the vehicle, next to the cardan. This component is susceptible to contamination and the formation of moisture on it, which over time can deteriorate the quality of lubrication of rubbing parts. As a result, parts begin to wear out, which can subsequently lead to various problems.
Chevrolet Niva car - 2013 model
As stated above, the rocker is an integral part of the transmission system in Niva Chevrolet cars. Compared to other components of the transmission system, the rocker, which is also commonly called the gearbox control rod, is a relatively simple mechanism in its structure. However, for correct operation, the condition of the scenes should also be given special attention.
A very simple way to replace the internal grenade seal
Lada 2110 Logbook 13 Replacing the drive oil seal and the input shaft oil seal. Changing engine oil
Grenade seals are divided into left and right, so when changing the seal, be sure to place the left seal on the left side, and the right seal on the right side. The left oil seal is brown (it is on the driver's side), the right oil seal is black (the passenger's side).
Photo. Internal grenade seals.
The first thing to do is to lift the front wheel on a jack; on the side on which you are going to change the oil seal, be sure to place a stump or bricks next to the jack for insurance. Remove the wheel and unscrew the hub from the ball.
Photo. The arrow shows which bolts need to be unscrewed to disconnect the hub from the ball, there are two of them with a wrench head, seventeen.
All that remains is to pull the grenade out of the box, here’s the most interesting thing, you can pull directly on the brake disc, trying to pull the grenade out of the box, if the grenade pops out well, or the drive may pop out from the internal or external grenade, then it’s an extra hassle to put the drive in place.
Photo. Removing the internal grenade using a pry bar and tube.
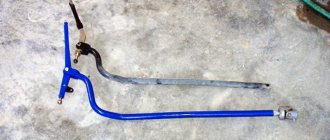
Do-it-yourself short-throw scaffold
A similar device can be installed on any VAZ car (both classic and front-wheel drive) with your own hands; below are examples of how this is implemented.
Short-stroke link for classics
For production in this case you will need:
- a piece of pipe with a diameter of fifteen millimeters;
- nut from a classic ball nut;
- RPP from 2108;
- backstage repair kit 2108 (axle and two bushings);
- cardan from the steering mechanism 2104, 2105 or 2107.
The work is performed as follows:
- The ball from the bottom is cut off from the RPP;
- The lower part is sawed off so that a pipe can be inserted into it and scalded;
- The nut is welded to the pipe from below;
- The ball is placed in a convenient place;
- The cardan is attached to the gearshift lever.
Replacing the rear oil seal on a VAZ 2109 gearbox
— Find the box rod under the rubber boot (if the seal is faulty, it can be easily detected by an oil stain).
— Bend down the wide part of the boot.
- Find the cord that is attached to the rod (located at the bottom).
— Disconnect this cord from the rod using a key at “13“, and then disconnect it from the gear shift lever.
— Unscrew the nut, while loosening the connection between the cardan and the lever.
— Remove the cordan from the lever (the first and third should turn on
broadcast).
— Using a size 10 wrench, disconnect it, while moving the lever to the side.
— Remove the rubber boot. The oil seal is located in the recess where the rod enters the gearbox.
- Take a self-tapping screw and an awl, and remove the necessary part. Before replacing the oil seal, first clean the seat and remove all accumulated dirt, sand and oil.
— Install a new gearbox rod seal.
— Secure the new oil seal in the seat.
— Carry out the assembly procedure in reverse order.
Attention!
When working with the cardan mount and the oil seal, the rocker may be displaced, which may result in difficulties with shifting gears. The reason may be an adjusting and fastening screw of size “13”, connecting the lever and the gear shift knob. Therefore, when installing a new oil seal, check the position of the lever and, if necessary, adjust it.
Price issue
If you decide to replace the rocker seal at the same time as installing the rocker itself, this can be considered absolutely the right thing to do. Additionally, replacing the driveshaft will not cost much, but the efficiency of such a comprehensive repair will be much higher.
Short walker
Actions on your own, you only have to purchase the necessary parts and ordinary consumables. If you contact a car service, the minimum cost of the service will be 800-1000 rubles. That is, the savings are obvious.
The curtain itself costs about 400 rubles. From here it becomes clear why we did not advise buying a repair kit, but rather completely replacing the part. There will be no savings as such, but the difference as a result of the repair will be significant.
Product delivery options
Note! Below are the shipping methods available specifically for this product. Payment options may vary depending on the shipping method. Detailed information can be found on the “Delivery and Payment” page.
Parcel by Russian Post
Available payment methods:
- Cash on delivery (payment upon receipt)
- Using cards Sberbank, VTB, Post Bank, Tinkoff
- Yandex money
- QIWI
- ROBOKASSA
Shipping throughout Russia. Delivery time is from 5 to 12 days.
Parcel by Russian Post 1st class
Available payment methods:
- Cash on delivery (payment upon receipt)
- Using cards Sberbank, VTB, Post Bank, Tinkoff
- Yandex money
- QIWI
- ROBOKASSA
Shipping throughout Russia. Delivery time is from 2 to 5 days. More expensive than regular delivery by Russian Post, approximately 50%. Parcel weight up to 2.5 kg
Express Parcel EMS
Available payment methods:
- Cash on delivery (payment upon receipt)
- Using cards Sberbank, VTB, Post Bank, Tinkoff
- Yandex money
- QIWI
- ROBOKASSA
Shipping throughout Russia. Delivery time is from 3 to 7 days. More expensive than regular delivery by Russian Post, approximately 100%.
Transport companies
Available payment methods:
- Using cards Sberbank, VTB, Post Bank, Tinkoff
- Yandex money
- QIWI
- ROBOKASSA
Delivery is possible to any locality where there is a representative office of the transport company. Delivery time is from 2 to 10 days. Sending large parcels is approximately 50% more profitable than by Russian Post.
Lada 2114 2007 - breakdown
Cars for sale
Lada 2114 Samara, 2006
Lada 2114 Samara, 2012
Lada 2114 Samara, 2005
Lada 2114 Samara, 2010
Comments 47
What is the cardan for? If it’s not a secret)
Backstage adjustment
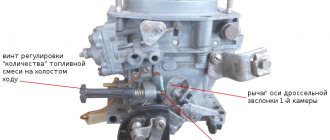
Step-by-step instructions on how to adjust the rocker on a VAZ 2114:
- Loosening the nut located on the clamp;
- Adjusting the position of the lever (at this stage you need to place it in the reverse position, and then tighten the nut on the clamp;
- Checking the gear engagement (here you need to carefully monitor the position - if the left side prevails when engaging reverse gear, then you need to smoothly move the cardan counterclockwise; if, on the contrary, the speed has “gone” to the right, then you need to turn it clockwise).
The correctness of the result of the adjustment process can be easily verified. To do this, you just need to install the lever in the middle. If everything was done correctly, the neutral gear will engage.
Advice! Watch the position of the lever itself. When installed correctly, the part will move freely. If it still interferes with the passenger or driver’s seat, then re-adjustment is required.
New or refurbished old?
If replacing the gearbox cannot be avoided, it is worth considering one very attractive option - installing a rebuilt gearbox. To do this, companies purchase old, damaged boxes, restore them to the highest possible quality and offer installation with a guarantee.
Disassembled gearbox
As practice shows, such gearboxes are approximately 30-70% cheaper than purchasing a new gearbox.
Diagnostics
What symptoms indicate that it is time to change the cuff or gearbox rod? Most often, oil stains and marks remaining on asphalt or other surfaces after the car has been stopped for a long time are the very signs. An experienced driver is obliged to notice them in time and draw the appropriate conclusions. But such spots do not always indicate a problem with the cuff of the drawstring. Often the reason for oil loss is, which needs to be checked to avoid errors. Often this same filter is poorly screwed in, resulting in leakage.
Note. Needless to say, noticing an oil leak from the gearbox in a timely manner is an opportunity to save an important vehicle mechanism. Otherwise, the danger associated with the complete loss of oil from the gearbox and the replacement of the gearbox, as a consequence, cannot be avoided.
Regular inspection will help avoid leakage problems. The gearbox oil level should be easily visible, and a faulty oil seal makes itself felt by a characteristic crunch that occurs when changing gears.