Modern life never tires of delighting us with various technical innovations. In the automotive industry, engineers are introducing modern technologies everywhere.
The domestic auto industry is no exception, which, although it lags behind leading manufacturers, is confidently reducing this distance. However, innovations are not always successful and reliable.
For example, in the modern version of the Lada Kalina, the electronics do not particularly simplify the driver’s life, but rather, on the contrary, create even more problems. The most common flaw among engineers is the failure of the rear gear of cars of this family.
This article will discuss why reverse gear does not engage on Kalina. Let's consider the main causes of this malfunction, as well as methods for eliminating it. But first, let's take a quick look at how reverse gear is engaged on this car.
The principle of operation of the reverse speed locking device on the Lada Kalina
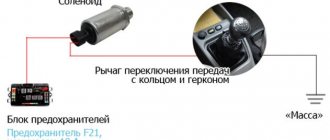
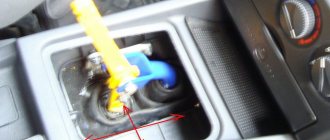
To be able to drive the car in the opposite direction, VAZ designers used a complex design when designing it. On Kalina, a solenoid was installed in the gearbox, thanks to which reverse is activated. To be on the safe side, the designers created a special algorithm for turning on reverse.
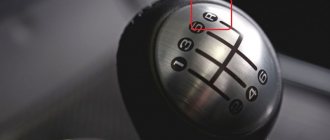
First, the driver grabs the plastic lever, lifts it and pulls the gearbox handle towards himself and forward. In the gearbox itself, the following happens:
- By moving the manual transmission lever and holding the plastic lever, you give a signal to activate the magnetic switch.
- After this, the solenoid is interfaced with the ground of the machine. This allows its auger to move in the opposite direction.
- As a result, it becomes possible to engage another gear - reverse gear.
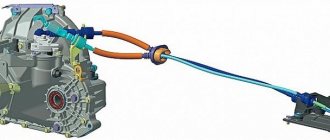
We study the design of the VAZ-2181 gearbox
The force from the handle is transmitted to two gear selector levers (see figure). But these levers cannot move in any way - their trajectory is limited by the slots in the “3” grid. The pin "2" can be moved inside the slots, and the upper right part of the grille is closed with a latch "4".
Gear selection mechanism of LADA cable box
To open the latch, the following condition must be met: the car should not move forward even at low speed. Let's look at how blocking actually works:
- A stop is made;
- A certain amount of time passes;
- The lock is deactivated.
In order for the reverse gear to become fully unlocked, you need to wait less than a second after stopping the car. But it’s unlikely that you’ll be able to start moving on a slope while engaging reverse. But if the slope of the surface is directed backwards, the gear engages immediately.
Why reverse gear does not engage on Kalina: causes and solutions
In total, 4 malfunctions can be identified related to the problem of engaging reverse gear on the Lada Kalina. Below we will describe each of them in detail. To identify some problems we will need a multimeter.
The locking mechanism fuse has blown
First of all, pay attention to the car’s electronic systems; you should carefully check them for functionality. If reverse gear on Kalina does not engage, the cause of the problem may be the fuse of the locking device.
The fuse itself, together with the relay, is located in the mounting block inside the car. Finding it is quite simple, it is standard for most passenger cars - it is located under the steering wheel or next to it. Regarding this VAZ car, the cover of the electrical system module is located directly under the handle for turning on the side lights.
After you open it, you can check the serviceability of the fuse, which supplies voltage to the electrical part of the reverse gear locking system in the gearbox. In the documents this element is designated as “F21”. The current strength of this component should be equal to 10 Amperes. You can see the location of this fuse in the picture below.
When checking the fuse, carefully remove it from its socket and carefully examine the condition of the jumpers. If the part breaks, you will immediately see it, the jumper will be damaged, just replace the fuse with another, serviceable version to solve this problem.
You need to understand that this part itself rarely burns out. If in the near future the reverse gear on Kalina stops engaging again, the fuse will burn out again, and the solenoid will still be the cause of the problem.
Damage to the wire coming from the solenoid to the gearbox lever
The most common cause of malfunction of the reverse gear mechanism on Kalina is the lack of voltage supply from the solenoid to the gear lever. This trouble, as a rule, arises due to the fact that the engineers responsible for the development of this car laid the power wire from the solenoid to the lever in a rather unfortunate place, namely under the bottom of the car.
Naturally, this wire experiences the harmful effects of various aggressive environments, temperature changes, and even mechanical stress. The situation is aggravated by the fact that the VAZ designers did not even bother to properly protect the wire from all these unfavorable conditions in which it is located. As a result of all the circumstances, this element quickly becomes unusable.
Most often, damage or breakage of the wiring occurs at the point of contact of the wire with the spar. Over time, sand and dirt inevitably accumulate there, which act as an abrasive, wearing it out. To restore the functionality of the reverse speed, the wire will have to be replaced or restored.
Failure of the magnetic switch
Such a breakdown is quite rare, since the magnet itself is very durable and boasts a long working life. However, as we all know, even the most reliable part can fail. Therefore, if the rear speed fails in Kalina, then it makes sense to check it too.
To check the switch you will need to do the following:
- Remove the housing from the gear lever.
- The next step is to search for the connector for connecting the lever and then disconnect it.
- Then it will be necessary to close the contacts using wire. These steps will allow you to check the serviceability of engaging reverse gear in manual mode.
- After this, try turning into reverse gear.
If, after performing all the above steps, the reverse gear begins to engage freely, then the problem is most likely in the magnetic switch. However, there is one more link that is worth checking to make sure that it is the magnet - this is the plastic ring.
To make sure that everything is in order with it, you need to carefully inspect the ring and check the work. Make sure there is no distortion during lifting and that it lifts until it clicks. If the lever is worn too much, it may simply not move the desired distance. As a result, reverse gear on Kalina will engage poorly, every other time, or not engage at all. In any case, you can solve this or that problem by installing a new magnet or replacing the ring.
Solenoid malfunction
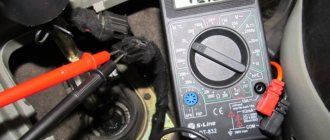
If reverse gear does not engage on Kalina, the reason may be in the solenoid itself. Its malfunction can be detected by measuring the voltages at its two contacts. To check, you need to disconnect the contacts and test them in order with a multimeter. The normal resistance value is 2.2 ohms.
If there is no voltage at all on one of the wires, the measuring device will display the value “0”, this means that the coil is not working, the winding has burned out. By the way, a winding break can also be determined if you switch the multimeter to the “ringing mode” and measure the voltage at the contacts again. If the device does not show anything, there is no signal, then you have found the source of the problem. Then replacing the solenoid should solve the problem of engaging reverse gear.
Possible problems
Sometimes it happens that the diagnostics described above were carried out, but the result did not change - the Lada Kalina does not engage reverse gear. Then there are the following possible explanations:
- The spring in the gearbox is damaged.
- The mounting screw has been cut off.
- There is a problem with the gear selection system locking mechanism.
The negative consequences in such situations are that eliminating them will require mandatory removal of the box. This type of debugging requires special knowledge and skills that are not always within the power of a car enthusiast.
What does a solenoid look like on a viburnum
Lada Kalina error codes
Replacing the thermostat Lada Kalina
For those with automatic
If your car has an automatic transmission. It will not hurt you to know the modes in which your machine can operate:
- P – For parking and starting the engine. Switching to this mode is possible only after the machine has completely stopped.
- R – To move backwards. Switching to this mode is also possible only after stopping the car and with the brake pedal pressed.
- N – Neutral. When the engine is completely disconnected from the gearbox.
- D – Moving forward without restrictions on gear shifting (the most commonly used operating mode of the automatic transmission).
- D3(S) – Low gears for climbing and braking engines on descents.
- D2 – Mode for difficult conditions (slippery or mountainous roads). Gears above second are not shifted, that is, only first and second gears are engaged.
- D1(L) - Movement occurs only in 1st gear, used off-road on mud, snow or ice, where you need to drive without changing the throttle, and also to overcome steep climbs.
A couple of practical tips
Let’s say that when you try to engage reverse gear, the handle does not move completely to the required position. Then under no circumstances should you release the clutch pedal. Perform the switch “through neutral” and save yourself from problems in the future.
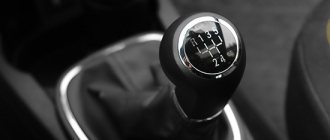
Manual transmission in Kalina-2
If, after switching on the gear, a crunching and grinding noise is heard, it means that the handle has not yet been brought to the required point. In this case, there is no need to be afraid that the gears will definitely break. Just follow the previous recommendation and switch again.
One or more gears may shift into gear with a crunch, not clearly, “every once in a while.” In this case, the source of the problem is a faulty clutch assembly. There is no need to delude yourself: if you do not repair or replace it, both the clutch and the gearbox will become unusable.
How to change oil
To do this you will need an inspection hole or overpass. Warm up the car before surgery. Transmission oil is very viscous, and at low temperatures it will not completely leave the walls of the box. Locate the drain plug on the transmission. Using a wrench, unscrew it and place a container to drain the waste liquid. Within 20 minutes, all the oil will pour out of the box. Next, tighten the plug with a wrench and find the filler cap. It's on the side.
Reading the instruction manual
The instructions included with Kalina-2 hatchbacks and station wagons say the following:
Before engaging reverse gear, you should depress the clutch and wait 3-5 seconds, and only then can you shift.
According to reviews, 3 seconds will be enough. By the way, the blocking stops working not after 3 seconds, but earlier. But if you switch immediately, there is a risk of breaking the gear teeth. All this, of course, is true only for the break-in period.
As the owners themselves say, reverse gear is engaged perfectly even on a car with “zero” mileage. But the driver is required to show dexterity: having squeezed the clutch to the maximum, the pedal is then moved back a little. The handle moves to the desired position and the pedal is fully released.
Clutch pedal response zones
You can also turn it on “through neutral”. This method is the most reliable. Release the pedal when the handle is in neutral and you are guaranteed to be able to shift into any gear. Actually, the method is suitable for any car and any manual transmission. But regarding AvtoVAZ products, the advice sounds like this: take a 3-second pause.
Removal and installation of gearbox Lada Kalina 1117 2004 - 2013
Tools:
- Open-end wrench 8 mm
- Open-end wrench 10 mm
- Open-end wrench 17 mm
- Open-end wrench 19 mm
- Straight box spanner 13 mm
- Straight box spanner 19 mm
- Driver for socket attachment
- Knob attachment 10 mm
- Knob attachment 13 mm
- Knob attachment 15 mm
- Knob attachment 17 mm
- Knob attachment 19 mm
- Knob attachment E-14
- Extension for socket bits
- Adjustable stops 2 pcs.
- Medium Phillips screwdriver
- Medium flat screwdriver
Parts and consumables:
- Wooden blocks 2 pcs.
- CV joint grease-4
- Studs M12x1.25 mm 2 pcs.
- Transmission oil
- Rags
- 3.5 liter capacity
- Funnel with hose attached
Note:
We carry out the work with an assistant on an inspection ditch or overpass.
1. Drain the oil from the gearbox as described here. Disconnect the wire terminal from the negative terminal of the battery. Remove the air filter as described here. Remove the starter as described here. We remove the clutch cable lead from the groove of the clutch release fork lever, following the instructions described here. Remove the left mudguard of the power unit, as described here. Disconnect the wire block from the reverse gear lock solenoid.
2. Disconnect the wiring block from the reverse light switch.
3. Disconnect the wire block from the speed sensor.
4. Using a 10mm wrench, unscrew the three bolts securing the lower clutch housing cover.
5. Remove the clutch housing cover.
6. Remove the right and left front wheel drives, as described here. Using a 13mm spanner, loosen the tightening of the nut of the coupling bolt of the clamp securing the control rod to the shank of the gear selector rod hinge. Then disconnect the transmission control rod.
7. Using a 19mm wrench, unscrew the nuts of the two bolts securing the clutch housing to the gearbox housing (which also secure the torque rod bracket), holding the bolts from turning with a head of the same size.
8. We remove the reaction rod with the bracket from the gearbox.
9. Disconnect the plastic throttle cable holder from the gearbox bracket.
10. Using a 13mm socket, unscrew the bolt securing the ignition coil bracket to the clutch housing.
11. Using a 19mm socket, unscrew the two upper bolts securing the gearbox to the cylinder block, which simultaneously secure the bracket with the holders of the throttle cable and wiring harness. The front bolt (in the direction of vehicle travel) is shorter than the rear bolt. We remove the bracket with the cable and wiring harness from the gearbox.
12. Remove the left front suspension brace as described here. We install adjustable stops through wooden blocks under the engine oil pan and gearbox housing.
13. Using a 19mm spanner, unscrew the nut of the lower rear mounting of the gearbox to the cylinder block.
14. Using a 19mm socket, unscrew the bolt of the lower front fastening of the gearbox to the cylinder block.
15. Using the “E-14” head, unscrew the two screws securing the front left support bracket of the power unit to the support.
16. Using a 15mm socket, unscrew the three nuts securing the bracket for the front left support of the power unit to the gearbox.
17. Remove the bracket.
18. Using a 19mm socket, unscrew the two outer bolts 1 securing the rear support bracket of the power unit to the gearbox, and using a 17mm socket, unscrew the middle bolt 2.
19. We move the gearbox away from the engine, removing the input shaft from the hub of the driven clutch disc.
20. When removing and installing the gearbox, do not rest the gearbox input shaft on the clutch diaphragm spring petals so as not to damage them. Before installing the gearbox, apply a thin layer of CV joint-4 lubricant to the splined end of the input shaft. To facilitate the operation of installing the gearbox, we screw two guide pins M12x1.25 mm (with sawn slots for a screwdriver) into the front lower threaded hole of the cylinder block and into the rear upper hole.
21. We insert the input shaft of the gearbox into the splines of the driven clutch disk and, orienting the gearbox so that the two guide pins fit into the corresponding holes in the clutch housing, and the standard pin of the clutch housing into the hole in the cylinder block, push the gearbox all the way into the engine cylinder block . Use a screwdriver to unscrew the guide pins from the holes in the cylinder block. We carry out further assembly operations in reverse order.
22. Fill the gearbox with oil as described here.
The article is missing:
- Photo of the instrument
- Photos of parts and consumables
- High-quality photos of repairs
3 Repairing the solenoid - all operations for independent work
We have already told you how to replace the wires leading to the solenoid. Now let's look at the rules for repairing the Kalina locking mechanism. Its malfunction makes it impossible to turn on the rear. To perform this type of repair, you need to look at the solenoid control circuit. It is given below.
Failure of the mechanism in most cases is caused by the failure of fuse F21 (it is rated at 10 A). Through it, as can be seen in the diagram, 12 V is supplied to L1 (solenoid). Then S1 (switch) closes the circuit to ground. As a result of this, the solenoid coil is activated. If the fuse is blown or the switch is faulty, reverse gear will be locked. Let's solve this problem. We take out the fuse (if you look at the left, it will be the eighth one), and check it with a multimeter. Instead of the faulty element, we install a new one (of strictly the same rating - 10 A). When F21 starts working, we work on the switch (see the first section of the article).
If replacing the switch and fuse does not produce results, remove the connector from the solenoid. We put regular pins in it (two pieces). We measure the voltage with a multimeter. With a normally operating mechanism, it is equal to 12 V. If the readings are different, we have a break in the electrical harness on the pallet - at the place where the clamp is mounted. We pull out the entire harness, expose the wires, and eliminate the break. We solder the twisting area and treat it with heat shrink for greater reliability.
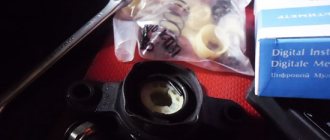
In very rare cases, the solenoid itself breaks down. You can check if it is faulty with a multimeter. We connect the device to the solenoid and measure the resistance. If we see a value other than 2.2 Ohm, we will have to change the element. The work is not difficult, but quite dirty. You will need to drain the oil from the gearbox, then remove the old solenoid and install a new one. Before installing a working element, be sure to treat the threads with sealant. It is important. Without this procedure, oil will soon begin to seep through the threads.
The main causes of manual transmission malfunctions
In good condition, a car with a manual transmission accelerates quickly and without jerking. It is worth highlighting the symptoms that a malfunction of the gearbox on the car has occurred:
- one or more gears do not engage;
- changing speeds is difficult;
- “knocks out” the transmission, extraneous noise is heard;
- the appearance of oil smudges under vehicles.
The range of occurrence of these manifestations is quite wide, ranging from gear wear to the use of low-quality gear oil. As a rule, a problem with shaft bearings occurs if vehicles have been in operation for a long time. If they are worn out, noise may occur at idle.
The clutch includes a disc and a basket. Malfunctions of the basket may be associated with wear of the “petals”, as a result of which it will overheat, which will affect the efficiency of changing speeds. Gears often fail to shift because the friction linings of the disc have become deformed. Against this background, a drop in power indicators may be observed.
In case of any manifestations, you cannot do without diagnosing the car transmission. This procedure should be entrusted to car service specialists. In some cases, repair work may involve replacing the transmission fluid. Adding new fuel to the existing old one is allowed, but you should use fuel of the same brand that was previously added. Otherwise, mixing liquids of different brands will negatively affect the functioning of the vehicle.
Wear of the rocker bushing
This malfunction may be indicated by some looseness of the lever. However, if the wear proceeded evenly - it ran its course - you could get used to the free movements of the scenes and not notice the impending troubles. The problem is solved by replacing the bushing - remove the lever cover, then remove the rocker itself, replace the plastic bushing with a new one and put everything in place. The procedure is carried out in the car interior.
Transmission
This is the very first reason. The failure of reverse gear to engage is often caused by wear and tear on the components - the gear will not engage at all or is knocked out while driving. The first thing you should pay attention to is the oil. With the loss of physical and chemical properties, its viscosity changes significantly. This may cause the gears to jam. The box mechanism will work, but certain difficulties may arise when turning on certain speeds.
- Reverse gear.
- Release bearing.
- Power plug.
The box is opened, troubleshooting is carried out, and the worn part is replaced. After this, the gearbox mechanism should work properly.