As a rule, repair and maintenance of the “tag” can be done with your own hands. Many car owners do this. Sometimes a VAZ 2115 has a problem with the engine idling. And then questions arise: where is the idle speed sensor on the VAZ 2115 and how to check its serviceability? Is it necessary to replace the part?
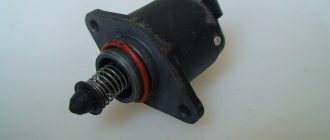
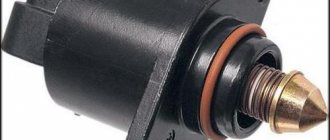
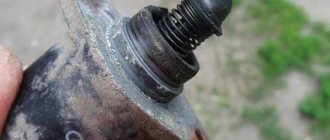
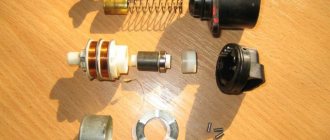
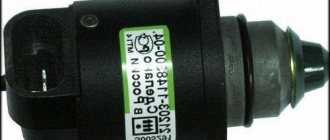
The idle speed control (or, as it is more commonly called, the idle speed sensor) is located in a mounting hole on the throttle body. The part is a cylinder with two small ears for fastening and a cone-shaped needle at the end.
The function of the idle speed sensor (this applies not only to the VAZ 2115, but to any car) is to regulate engine speed in neutral gear or when switching from one gear to another. The valve located outside the housing regulates the air supply to the combustion chambers. Its task is to open the throttle valve slightly if it is necessary to lean the fuel mixture (add a little air to the fuel). Proper operation of the element contributes to an increase in idle speed.
Important addition: IAC is installed only in VAZ 2115 models equipped with a mechanical throttle unit. In cars from 2010 to 2013, where the gas pedal is electronic, the sensor’s operation is handled by electronics.
Sensor location and design
The idle air control is located in the mounting hole on the throttle body. It is a small cylinder that has two small ears, with the help of which the sensor is directly attached with a cone-shaped needle at the end.
Due to the fact that the sensor is small in size and has a very simplified design, the likelihood of various malfunctions and problems appearing is quite high, and therefore it is important to pay attention to the appearance of the first signs of a malfunction. If problems are observed, it is not recommended to use the vehicle, as the performance of internal structures will deteriorate.
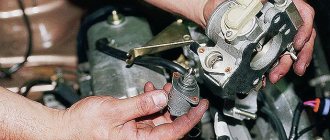
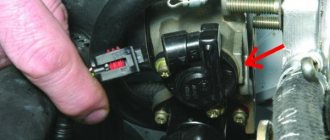
Location of IAC VAZ 2115
Replacement
Replacing the idle air control sensor on a VAZ 2115 is a fairly simple task that does not require much experience in car repairs. To replace, you only need a Phillips screwdriver and nothing else.
Let's start replacing the sensor:
- Remove the connector from the regulator;
- Unscrew the two screws securing the sensor to the remote control housing;
- Using a rotating motion, remove the IAC;
We install the new IAC in reverse order without damaging the O-ring.
Principle of operation
Turning on the ignition, the on-board computer begins to test the system. You can hear the fuel pump starting and all the lights on the instrument panel light up. At the same time, the idle air control completely blocks the air flow, and the control unit calculates the required number of steps and removes the needle, slightly opening the channel to the desired position.
The distance to the air flow can be different and depends on the parameter: hot or cold motor. For example, for warming up a rich mixture is required, which means the needle is extended as much as possible, but for operation on a hot engine the mixture is lean, that is, the regulator removes the lead screw, increasing the air supply.
For reference! The number of steps of the idle speed sensor on the VAZ 2115 depends on the type of software (firmware). For example, on a hot engine with a “January 5.1” controller the usual distance is 110 shg, and on a Bosch it’s 50 shg. (The maximum stroke reaches 250 shg.).
Fault marker and cause
Many car owners will say that it is very difficult to calculate the failure of the IAC on a VAZ 2115, since signs of a malfunction do not always indicate problems with the regulator. Moreover, the control unit is often treacherously silent and does not signal the owner with the Check Engine icon. It’s just that the ECU is quite primitive and cannot always determine where exactly the failure occurred. Because of this, drivers are guilty of bad fuel, a clogged filter, low-quality spark plugs, etc. But thanks to the inquisitive owners of the “tags”, the main signs of an IAC malfunction have become known:
- painful starting of the internal combustion engine, especially in winter;
- floating speed when hot, in the range of 850–1100;
- the engine freezes if you switch to neutral and release the gas;
- The firmware reduces the speed to 800–900 on a cold internal combustion engine (less than 40 °C), without waiting for it to fully warm up.
The listed symptoms most likely indicate problems with ICC. There is constant movement inside the sensor, causing natural wear and tear. Often in the lead screw and rotor. Even a small amount of play does not allow the ECU to set the steps correctly, so the fuel mixture is incorrect, causing the engine to operate incorrectly. Sometimes the air valve simply becomes clogged, which also negatively affects the operation of the fuel system.
Air flow meter (MAF)
One of the most expensive scanners, its breakdown is extremely unpleasant. It is installed in the air chamber immediately behind the filter and estimates the amount of air entering the collector. Based on his evidence, the ECU doses the fuel; at idle it flows about 9 liters per hour, at 3 thousand turns - about 30 liters per hour.
Malfunctions and symptoms
This is one of the few sensors that cannot suddenly cause obvious signs of malfunction, but over time one can note an increase in fuel consumption, a drop in traction at the bottom, failures at high turns, and problems with cold starts may arise. The CE lamp may come on.
How to check
If you have any suspicions about the correct operation of the mass flow sensor, you should remove the terminal connector and start the engine. If the unmarried speed increases above 1300 rpm, it is possible that the sensor requires replacement. This method is not precise, so it is better to use a multimeter and draw simple measurements. The device is set to a measurement threshold of 2 V, the positive probe is connected to the far right wire (most of all yellow), the negative probe is connected to the green wire, one contact from the positive one. The ignition is turned on, the engine is not started. The multimeter will show a minimum of 0.9 V, a maximum of 1.04 V. The final value is already critical and if the measurements show a higher voltage, the sensor is changed. An external inspection will also be healthy: if there is an oil deposit on the surface, the sensor is cleaned and the test is repeated.
Symptoms of a problem
If one of the following symptoms appears while using the car, this indicates a malfunction that will need to be eliminated:
- Some vibration of the engine appears during idling, that is, the vehicle shakes and rattles, and makes strange sounds.
- The machine stops functioning when switching to XX. Switching off can occur at the moment when the gears are changed or when driving in neutral gear.
- When starting the engine in a cold state, there is no increase in speed. If the part is working normally, there is a constant increase in indicators, otherwise they remain in one place, that is, at a fairly low level in comparison.
- There is a sharp increase or decrease in engine speed when idling, which can cause an emergency situation on the road. It is quite easy to notice such changes - sharp fluctuations of the instrument needle occur during movement.
In some cases, such symptoms indicate the presence of other problems, but it is worth noting that in any case it is necessary to check the idle speed sensor, just for your own safety.
Purpose
The idle speed sensor assumes the performance of a rather important function, which is to constantly regulate engine speed while driving in neutral gear, as a result of which you will not have to worry about the normal and uniform movement of the vehicle. This device also controls the speed during the process of switching from one speed to another, which is also quite important, since in the absence of such control, switching may occur unevenly, as a result of which the car will simply stall, which is unacceptable while driving, especially at high speed.
The valve, which is located on the outer part of the housing, is responsible for regulating the air supply to the combustion chambers, as a result of which the throttle valve opens slightly if it is necessary to connect the fuel mixture and air. Only proper operation of the sensor guarantees the ability to increase idle speed.
Examination
To carry out an independent test, you will need a multimeter, which will need to be used in two stages: checking the state of the power circuit and checking the sensor itself.
Checking the power circuit condition:
The sequence of actions during verification is quite simple and understandable:
- The multimeter is turned on and the measurement is configured with a limit of 20 Volts
- Remove the corresponding connector from the sensor and turn on the ignition
- The probes of the device are connected to the connector, and a direction of at least 5 Volts must be shown - then everything is normal
Checking the functionality of the sensor:
In order to check the condition of the sensor, you will need to:
- Switch the multimeter to the device voltage measuring state
- Connect it to the terminals on the idle speed sensor
- Rotate the central part of the sensor, while constantly monitoring the state of the indicators - they should change smoothly
If all conditions are met, then the sensor is operational.
Description of RZH
Now we suggest that you familiarize yourself with the basic information regarding the reverse control. Where is it located, how to check the device and replace it? Read on.
Location and purpose
The main purpose of the RZH is to activate the white lights in the rear headlights, which indicate that the vehicle is starting to reverse. Thanks to this, other drivers know that the car will make a maneuver. Correct operation of the RZH allows you to prevent a possible collision on the road. As for the location, the device itself is installed on the gearbox; looking at the box, you can see two speed controllers and a speed controller.
Principle of operation
The main component of any RZH is the limit switch. When the driver engages reverse, this switch is activated and powered by the battery. The device closes the electrical circuit, resulting in voltage being supplied to the lighting sources located in the rear lights. If the driver disengages the reverse gear, the limit switch is pressed out, as a result, voltage is no longer supplied to the light bulb and it goes out.
Possible problems and methods for eliminating them
A breakdown of the RZH can be recognized by the absence of light from the lamps when reverse gear is activated. Before checking the sensor itself, you need to make sure that the lamps installed in the headlights are working properly.
There may be several reasons for problems:
- The contacts on the rear headlights have oxidized. If such a problem occurs, it is necessary to clean them, which will most likely help solve the problem. If the contacts are severely damaged, they will have to be replaced.
- Over time, when operating under vibration conditions, the regulator may become loose. If the device is working, then simply screw it on and check that it is securely installed.
- There is no contact with the electrical circuit in the box itself. It is necessary to restore the contact of the device and check the wiring.
- In some cases, the reason lies in the lack of contact between the connector, as well as the mounting block with fuses. In this case, you need to check all contacts for signs of burning or damage. If burning occurs, then you should find out the reason why power surges occur in the on-board network.
- In "Fours" it often happens that the safety device in the block burns out (we are talking about any fuses), and this contributes to disruption of the contact circuit. It is necessary to check all safety devices and replace the failed element (author of the video channel In Sandro's garage).
How to check IAC (idle air control)?
If your car has an unstable idle: 1) the speed drops and then increases, 2) the engine stalls while driving after resetting the gear, then the idle speed sensor is most likely dead. To do this, we need to check the sensor for functionality.
Checking pxx
To check the Idle Air Controller we need a tester.
- We find the Regulator and remove the wire block from it (If you have a 1.6-liter engine, then first unscrew the two fastenings of the throttle assembly to the receiver and move the throttle assembly from the end of the receiver by 1 cm)
- First, let's check the Regulator circuit to see if the voltage is suitable for it. We take a voltmeter and connect the negative block to ground (to the engine), plus connect it to the block of wires at terminal A and terminal D (the terminals are marked on the block). Turn on the ignition and look at the tester readings: the voltage should be at least 12 volts. If it is less, the battery is probably low. If there is no power, then the power circuit or the ECU is faulty. Turn off the ignition.
- Having checked the sensor circuit, we begin to check the Regulator itself: We connect the tester terminals to terminals A and B, then C and D - the resistance should be around 53 Ohms. Next, we measure the resistance in the following pairs: A and C, B and D. The resistance in these pairs should be infinitely large. If the readings of your Regulator are different, it is recommended to replace it. Before replacing the Regulator, try cleaning (How to clean the IAC?) and repairing (How to repair the IAC?) it. Perhaps you will save extra money.
There is another way to check: to do this, completely remove the Regulator by unscrewing two screws. Having pulled it out, connect the block to it and place your finger on the tip of the Regulator needle without making any effort. Theoretically, a working Regulator, at the moment the ignition is turned off, fully extends its needle. Therefore, when you turn on the ignition, you should feel a slight push on your finger. If this does not happen, then the Regulator is not working.
Cleaning DXX
You cannot ignore such a basic procedure as cleaning - this can give results, since sometimes parts of the product, contacts, become coked, covered with dirt and oil.
What you need for cleaning:
- cleaner (lubricant) WD-40 or similar cleaning products for equipment;
- cotton wool, clean rags, tampons.
Cleaning:
- The sensor is completely dismantled, with the block disconnected.
- The swab is moistened with the cleaning mixture. You can also spray the product with an aerosol.
- Carefully wipe the contacts, needle, and installation sites, especially if oil is found there.
Before installation, the regulator is dried, the protrusion of the needle from the body is measured (the norm is 23 mm).
If the sensor has a malfunction of the electrical part - the winding, the electric motor - then repair is impractical or impossible. They buy a new product, especially since it is not too expensive (on average 500–700 rubles, but can be found for 250–300 rubles).
If the problem is in the block with wires (you can buy a new one), loose contacts or contamination, then repair is advisable. Repair also makes sense if there are serviceable parts of an identical product - you can disassemble it and try to replace these parts. But we must take into account that usually such a repaired device breaks down more often and the inconvenience caused by this will be very unpleasant, so it is usually more profitable to immediately buy a new product.
How to clean the idle air control (IAC)?
If the Regulator does not work, then you can try to wash and clean the Regulator before spending money on a new IAC. Cleaning the rcx is an easy and quick process. To do this we will need carburetor cleaner or wd-40. On a VAZ 2114 with a 1.6 liter engine, you first need to unscrew the 2 nuts securing the throttle assembly to the receiver.
Then you need to move the throttle assembly away from the end of the receiver without removing it (by 1 cm).
- First, disconnect the wire block from the Regulator.
- Apply cleaner to a cotton swab and clean the contacts.
- Take a small Phillips screwdriver and unscrew the 2 Regulator fasteners. (If there are no fasteners, then the sensor is seated on the varnish, in which case you need to remove the entire throttle assembly)
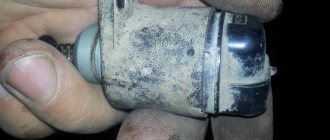
- We take out the Regulator and look at its condition: If the Regulator is covered in oil and black dirt, then the conclusion follows that in addition to cleaning it, you need to clean the throttle valve (This is the kind of fuel we have).
- Take WD-40 or carburetor cleaner and generously spray it on the conical needle with a spring, thereby cleaning it from dirt. Then we dry the Regulator and install it back. Before installation, check the distance from the sensor body to the needle (23mm).
If no changes are observed in the operation of the engine and the Regulator at idle, it means that the cone needle guides are worn out (replace with a new Regulator) or the wire inside the Regulator is broken.
At the time of purchase of the Idle Air Controller for a VAZ, the distance from the rod head to the flange should be no more than 23mm. Carefully measure the length of the protruding head.
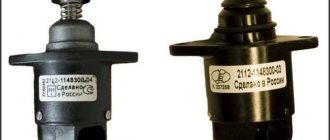
It is recommended to install the Idle Air Controller from the Omega group with the number 2112-114830. Also quite good RXX 2112-1148300-04 “KZTA”. It is worth noting that when purchasing, you need to pay attention to the end mark 04. Regulators are produced with mark 01 02 03 04, so look at the mark of the old Regulator and purchase the same one. If you put, for example, a Regulator labeled 04 instead of 01, the Regulator will not work. The following replacement is allowed: 01 to 03, 02 to 04 and vice versa.
You might be interested in reading:
- IAC VAZ 2114: idle speed sensor, checking and replacing the idle speed controller In the VAZ 2114 device, the IAC (idle speed regulator) is a mechanism that allows you to automatically stabilize and regulate the idle speed of the vehicle’s internal combustion engine. Sensor…
- How to check the idle speed sensor: IAC VAZ 2110 The idle speed sensor 2110 VAZ (abbreviated IAC 2110) is a part of the intake system of a car’s injection engine. The specified sensor is responsible for automatic…
- Crankshaft sensor on a VAZ 2115 - where it is located, diagnostics Purpose of the dpkv The crankshaft sensor on a VAZ 2115 belongs to the engine electrical control system. Based on the controller readings, the ECU sets the ignition and...
- Oxygen sensor VAZ 2115 - where it is located, replacement Purpose of the oxygen sensor on the VAZ 2115 This sensor estimates the percentage of oxygen in the exhaust gas mixture. The lambda probe helps to identify how...
- Oil pressure sensor VAZ 2115 - replacement and repair Types of oil pressure sensors It is believed that in order to be able to correctly replace any part on a car you need to know its principle...
Differences between an original item and a counterfeit one:
· The fake body is 1 mm shorter;
· The color of the spring is also different. The original one is black and has a rarer winding;
· The original packaging contains all the necessary marks indicating the quality of the product, as well as the manufacturer.
· Counterfeit IAC differs in the color of the tip; it is much darker
It is important to buy only the original element, exactly the same as originally installed from the factory. Only in this case will the vehicle operate normally. When using counterfeit products, damage to other working elements associated with the IAC may occur. The throttle assembly suffers first, and then the carburetor. Replacing them will cost significantly more.