The VAZ 2107 is far from a perfect car; it cannot boast of the reliability of its systems. Including brake mechanisms, on which the safety of driving depends. Sometimes situations arise when the system does not work efficiently or there is a brake fluid leak - in such cases, immediate repairs are required. You can do the work yourself, for which you will need to prepare the necessary tools and read the instructions.
- Soft brake pedal
- Stiff pedal
- One wheel does not brake
- Liquid is leaving the reservoir
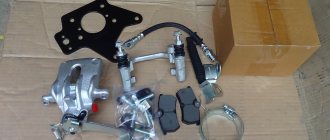
- Repair of master and working brake cylinders
Video: GTZ repair on a VAZ 2107
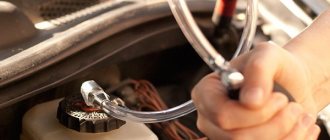
- What kind of brake fluid should I fill in the VAZ 2107 and how much?
- Procedure for bleeding the brakes
Video: pumping brakes on a VAZ
Approximate sequence of steps for pumping brakes on a VAZ-2112
The car itself is placed on an overpass or in a pit. Pumping is carried out “diagonally”, starting from the rear wheels. Example: first the rear right cylinder, then the front left one, etc.
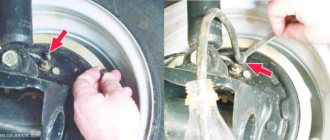
Rear and front brake cylinder
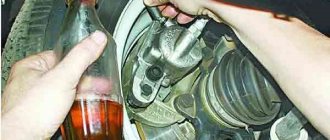
There is a fitting on each brake cylinder. We clean it, then remove the plug-cap. This will allow you to put the tube on top (see photo).
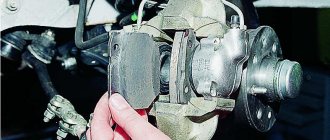
Photo 1 shows the rear brake cylinder, photo 2 shows the disc brake cylinder.
Procedure:
- On any car, including the VAZ-2112, you can bleed the brakes only with the tank cap closed. We find the expansion tank and tighten the cap tighter.
DOT fluid tank
- In step 1, if necessary, top up to the MAX mark. DOT-4 fluid is suitable
- We put a hose on the fitting. Place the second end of the hose in a container.
- The assistant presses the pedal 4-5 times at intervals of a second. The pedal remains pressed.
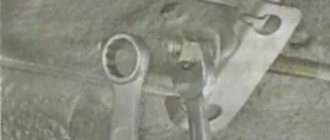
- Using an 8 key, unscrew the fitting half a turn. The DOT fluid comes out along with the air, the pedal sinks to the floor.
- The fitting is tightened and the pedal is released. If the fluid level is now below the MIN mark, add it to the MAX mark.
- Steps 4-6 are carried out until bubbles can be seen in the drained liquid.
- Move on to the next cylinder.
At the final step, all four plugs must be returned to their place.
Tricks and subtleties
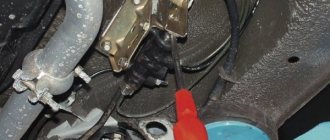
Perhaps we don’t have an overpass, but only a lift. This means that the rear wheels will be hanging out. And then you need to do the following: before pumping, install a slot between the bracket and the pressure regulator.
Brake pressure regulator
After bleeding the rear cylinder, the screwdriver or slot is removed.
It is advisable to use a spanner “8” key, not a flat one. The tube is then put on the fitting following the key. The material of the tube, that is, the hose, must be transparent. This also applies to the drainage container.
Common mistake
Let's assume that two cylinders were pumped, and when the second was pumped, there were no more bubbles. Then the third cylinder is pumped, and the job is considered done. This is where the mistake lies: all four cylinders need to be pumped. On another it is impossible!
We recommend: How to determine what kind of oil is poured into an automatic transmission - sequence of actions
How to properly level up if there are no helpers?
In theory, you can bleed the brakes on a VAZ-2112 alone. There is no ABS system here, but with it everything would be simpler - there is an electric pump. And instead of a pump we will use special equipment.
Brake bleeding device
Here you need an aerator or just a lid with a nipple. You can buy it or make it yourself - a classic tank cap and a nipple for a tubeless tire are suitable.
Procedure:
- The aerator cap is screwed onto the neck.
- One of the wheels is hung up and the structure is assembled, as in the photo.
Air from the tire enters the tank
- Carry out steps 5-6 (see above), pumping one cylinder after another.
In theory, everything looks simple. But in practice, you need to monitor whether the fluid has gone below the MIN mark. To top up, do this:
- Unscrew the coupling from the wheel nipple;
- Carefully unscrew the lid, fill the tank, and so on.
The air pressure entering the tank should not exceed two atmospheres. That's why we connected the hose to the tire and not to the pump. It is important!
There are other methods that allow you to bleed the brakes without an assistant. For example, a gas stop is installed between the pedal and the seat, or the liquid is drawn out with a syringe by opening the lid on the tank.
We work independently
It is possible to carry out all the steps to rid the VAZ-2110 brake system of air yourself. This fairly simple method also allows you to complete all the assigned tasks alone:
- the brake fluid reservoir cap is replaced with an old clutch reservoir cap with a hole pre-drilled in it into which a car nipple is inserted;
- the compressor sets the pressure to 1.5-2 atmospheres and supplies it to the installed nipple on the tank lid;
- the second hose is put on the fitting through which the brakes are pumped, and its other end is lowered into a container (for example, a bottle);
- When air stops coming out of the hose, the fitting can be closed.
This operation is repeated on all wheels of the car. It is worth noting that in camping conditions the compressor can be replaced even with a regular bicycle pump, which will be somewhat more difficult than working with a compressor, but with due diligence it is also effective.
Why and when is pumping required?
As we have already said, bleeding is a mandatory event after carrying out any work related to making changes to the brake system of the car.
Process diagram
We recommend that you watch the video about bleeding the brakes on a VAZ 2110 to clearly see the whole process from start to finish. The need for this kind of procedure is due to the fact that the system becomes airy; excess air does not allow the brakes to respond to the pedal being pressed at the right time. When driving at high speed, seconds matter, so the brakes must work one hundred percent.
Plus, there are a number of other reasons for which pumping is required:
- When pressed, the brake pedal of the VAZ 2110 sinks, it becomes like cotton wool;
- You have made adjustments to the braking system;
- A brake fluid leak was discovered and cracks formed in the supply hose;
- Old brake fluid is of poor quality and therefore needs to be replaced;
- The brake discs were replaced;
- The water level in the brake fluid has increased due to the hygroscopicity of the composition.
What brake fluid should you use on your car?
Cars of the VAZ 2107 family are required to be fueled with DOT-4 class diesel fuel based on synthetic and semi-synthetic bases. Mineral is excluded from use.
Until 1995, DOT-3 was filled into the VAZ brake circuit. Due to low technical characteristics and non-compliance with modern requirements and standards, the third class was excluded.
AvtoVAZ engineers recommend updating the TZ every 45,000 km or three years from the date of refueling, whichever comes first.
The 4th – 6th generation bunkers have one drawback – active absorption of moisture and condensate. This is explained by the peculiarities of the hygroscopic structure at the molecular level. The more water absorbed, the fewer nutrients inside, the weaker the structure.
The “boiling point” of DOT-4 is 250°, after the vehicle has run 60 thousand km. 130°. A low “boiling” threshold is one of the factors creating an emergency situation on the roads, jamming of calipers and working cylinders.
Note to the driver!!! Do not mix synthetic, semi-synthetic and mineral based fuels with each other. As a result of a chemical reaction, the liquid coagulates, forming a thick, homogeneous mass that will clog the circuit lines.
Tools
But it is important to know how to properly bleed the brakes on VAZs of different models and what is required for this. The operation itself is not complicated, so you can do it yourself. But it’s better to do this with an assistant - it will be both faster and easier.
We recommend: Replacing the clutch cable of Lada 2109i (VAZ 2109i)
Not many tools are required:
- Key for 8 (10);
- Silicone transparent tube according to the diameter of the fitting;
- Capacity;
- Brake fluid;
As for the wrench, you should use the cap type. There are also special keys on the market for unscrewing fittings, clamping. The fact is that the fittings often stick to the thread and are very difficult to unscrew. Using a regular open-end tool, you can easily “lick” the edges and then it will be completely impossible to unscrew the fitting.
The essence of pumping work is almost the same for all cars - VAZ-2101, VAZ-21099, and VAZ-2121 Niva. But the sequence of operations is affected only by the design features of the models.
What can't you do?
As a rule, during any brake repair work it is necessary to add fuel fluid. Remember: you can only add “original” fluid - the exact brand that is already filled into your VAZ 2110.
Brake fluids from different manufacturers
You should never mix different brands under any circumstances, as the result is unpredictable! If there is no such thing, then the only way out is to completely replace the fuel fluid in the system.
Approximate sequence of steps for pumping brakes on a VAZ-2112
The car itself is placed on an overpass or in a pit. Pumping is carried out “diagonally”, starting from the rear wheels. Example: first the rear right cylinder, then the front left one, etc.
Rear and front brake cylinder
There is a fitting on each brake cylinder. We clean it, then remove the plug-cap. This will allow you to put the tube on top (see photo).
Photo 1 shows the rear brake cylinder, photo 2 shows the disc brake cylinder.
Procedure:
- On any car, including the VAZ-2112, you can bleed the brakes only with the tank cap closed. We find the expansion tank and tighten the cap tighter.
DOT fluid tank
- In step 1, if necessary, top up to the MAX mark. DOT-4 fluid is suitable.
- We put a hose on the fitting. Place the second end of the hose in a container.
- The assistant presses the pedal 4-5 times at intervals of a second. The pedal remains pressed.
- Using an 8 key, unscrew the fitting half a turn. The DOT fluid comes out along with the air, the pedal sinks to the floor.
- The fitting is tightened and the pedal is released. If the fluid level is now below the MIN mark, add it to the MAX mark.
- Steps 4-6 are carried out until bubbles can be seen in the drained liquid.
- Move on to the next cylinder.
At the final step, all four plugs must be returned to their place.
Tricks and subtleties
Perhaps we don’t have an overpass, but only a lift. This means that the rear wheels will be hanging out. And then you need to do the following: before pumping, install a slot between the bracket and the pressure regulator.
Brake pressure regulator
After bleeding the rear cylinder, the screwdriver or slot is removed.
It is advisable to use a spanner “8” key, not a flat one. The tube is then put on the fitting following the key. The material of the tube, that is, the hose, must be transparent. This also applies to the drainage container.
We recommend: How to change the oil filter without changing the oil?
Common mistake
Let's assume that two cylinders were pumped, and when the second was pumped, there were no more bubbles. Then the third cylinder is pumped, and the job is considered done. This is where the mistake lies: all four cylinders need to be pumped. On another it is impossible!
How to properly level up if there are no helpers?
In theory, you can bleed the brakes on a VAZ-2112 alone. There is no ABS system here, but with it everything would be simpler - there is an electric pump. And instead of a pump we will use special equipment.
Brake bleeding device
Here you need an aerator or just a lid with a nipple. You can buy it or make it yourself - a classic tank cap and a nipple for a tubeless tire are suitable.
Procedure:
- The aerator cap is screwed onto the neck.
- One of the wheels is hung up and the structure is assembled, as in the photo.
Air from the tire enters the tank
- Carry out steps 5-6 (see above), pumping one cylinder after another.
In theory, everything looks simple. But in practice, you need to monitor whether the fluid has gone below the MIN mark. To top up, do this:
- Unscrew the coupling from the wheel nipple;
- Carefully unscrew the lid, fill the tank, and so on.
The air pressure entering the tank should not exceed two atmospheres. That's why we connected the hose to the tire and not to the pump. It is important!
There are other methods that allow you to bleed the brakes without an assistant. For example, a gas stop is installed between the pedal and the seat, or the liquid is drawn out with a syringe by opening the lid on the tank.
Articles
- 2101-1602591 – drain fitting (rear cylinder);
- 2101-1602591-01 – the same (front cylinder);
- 2101-1602592 – fitting cap.
Useful tips
There is another method of bleeding the brake system without an assistant, which will require a block or other support. Add brake fluid to the reservoir until it is full, then pump the brake pedal several times and hold it depressed. Next, follow the standard procedure: open the fitting and wait until the fluid flow becomes uniformly weak. Tighten the bleeder fitting. Next, release the brake pedal and repeat the procedure. After bleeding, add brake fluid.
Parking system
Although it engages the mechanism of the rear axle wheels, it is in no way connected with the working mechanism. It uses a cable as a drive connected to the handbrake located inside the car.
Under the car, this cable is divided into two parts, going into the rear axle mechanisms. Inside, the ends of the cable are connected to the drive lever, which in turn is connected to a spacer bar. The drive lever is connected to one of the pads.
When the handbrake is engaged, the cable pulls the lever, and since it rests against the bar, the pads are released. The toothed sector of the handbrake fixes the position of the lever when the pads are spread apart.
Diagnostics of the pressure regulator
How to check if the VAZ brake pressure regulator is working? This procedure is quite simple:
Place the car above the inspection hole (lift it on a special lift).
Thoroughly clean the regulator body and protective cover, as well as the junction of the torsion arm and the piston, from dirt and old grease.
After pressing the brake pedal, the movement of the piston (with simultaneous tightening of the torsion lever) of a working regulator should be 0.5-0.9 millimeters.
Repeat the described procedure several times. This will allow you to verify the stable functioning of the pressure regulator.
The immobility of the piston after pressing the brake pedal suggests the presence of corrosion processes in the area of contact between the housing and the piston, which indicates the need to replace the regulator with a new one. Upon completion of the performance check, a layer of lubricant (“DT-1”) is applied to the working elements of the regulator and a protective cover is installed.
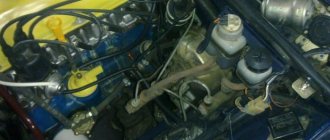
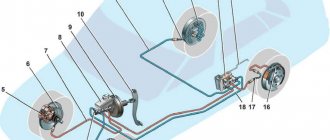
VAZ 2107 brake system diagram
Classic VAZ models 2101-2107 use a dual-circuit brake system. The first circuit is responsible for braking the front wheels, the second - for the rear. They are not related to each other. This is necessary to ensure traffic safety. If the first circuit fails, the second circuit will help you stop, or vice versa.
Design and main components of the system
- Master brake cylinder
- Brake fluid reservoir
- Vacuum brake booster
- Hoses and tubes
- Front brakes: caliper, cylinders, pads, disc
- Rear mechanism: slave cylinder, drum, pads
- Hand (parking) brake: lever in the cabin, cables, shoe drive lever in the rear drums
Let's look at each element in detail.
"CHEVROLE-NIVA"
By the way, before testing tires on cars without ABS, each time we slightly adjust the regulator taking into account the road condition (snow, ice, asphalt), ensuring that the rear wheels lock a little later than the front ones. Let's not break tradition. Our Shniva found the gap between the cheeks of the regulator to be 16 mm, which was adjusted using a stop screw.
Several brakings, and the braking distance from 80 km/h for a car with a partial load is determined: 34.4 m. With a full load... 33.6! Almost a meter shorter! At the same time, the driver noted a heavier pedal and rapid heating of the brakes, which required cooling before each measurement. Let’s remember these parameters and make adjustments to the “sorcerer” adjustment. First, let's reduce the gap to 8 mm. Now the regulator significantly limits the pressure in the rear brakes, transferring almost all the hard work to the front ones.