Welcome! Bleeding the brakes is the most important part after replacing any unit in the brake system, or even after replacing the brake fluid itself with a new one. This procedure must be carried out in the cases described above, that is, after replacing something in the brake system itself, if you neglect this procedure, then you will have air in the brake system due to which you will not be able to simply brake , and in the literal sense of the word, your brakes will not work, but the pedal will simply move when you press it and when you release it and that’s it, so it’s necessary to pump the brakes.
But not in all cases, your brakes will not work at all; generally, this only happens after replacing the brake fluid with a new one, that is, if you only replace any brake caliper (for example, the right one), then after all this you will not have Only the right brakes on the front wheel of the car will work, and all the others, including the rear ones, will work!
Note! To bleed the brake system, you will need to stock up on: Firstly, an ordinary small about one liter bottle, which must be transparent, as well as a small hose which will be inserted into this bottle with one end and the other will be put on the fitting for bleeding, so choose the thickness of the hose strictly along the neck of the bottle and at this very fitting (What kind of fitting we are talking about, you will find out in more detail in this article but a little lower), and you will also need to stock up on new brake fluid, preferably of the same brand, if you are not going to change it, as well as a wrench or a spanner, and an inspection hole or a lift!
When should you bleed your brakes? They must be pumped in all cases, as mentioned earlier, after replacing any part or the fluid itself in the brake system, because when replacing, air enters the system and the car will not brake after that.
But air can also get in for other reasons, for example, when the brake system depressurizes, which can happen when any brake hose bursts, as well as when the master or working brake cylinder is deformed, due to which air enters the system and will not allow you to stop the car normally.
Replacement
To replace the TJ yourself, you will need a certain set of tools and materials. This set includes:
- Brake fluid - 500 millimeters;
- A set of keys;
- Screwdriver Set;
- Transparent flexible hose;
- Container for draining old fluid;
- Dry rags for cleaning surfaces.
To work, you will definitely need the help of one more person, so when pumping, one should be inside the car, and the other outside.
Let's start the procedure.
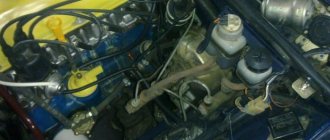
- Unscrew the cap on the master cylinder reservoir and place it on a prepared surface. The cover is combined with the float of the fuel oil level sensor, so be careful, because a toxic and dangerous substance will remain on it.
- Unlock the rear brakes using a screwdriver. It is simply inserted between the plate and the piston. Ready.
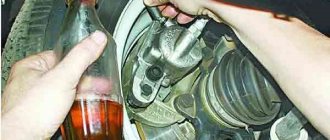
- Clean the right rear brake release valve of any accumulated dirt and dust, then remove the rubber cap that covers the valve.
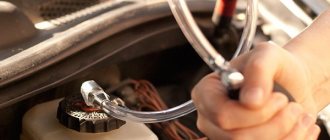
- Place a flexible transparent hose onto the valve fitting and place its other end in a container to drain the liquid.
- Approximately once every two seconds, press the gas pedal all the way four times in succession. When you press the fifth time, lock the pedal in the clamped position.
- Unscrew the valve at least half a turn. As the brake fluid drains, the pedal will gradually begin to sink.
- As soon as the fluid flow stops, close the valve.
- Simultaneously with the procedure, do not forget to monitor the level of fuel fluid in the tank.
- As you pump out the old substance, add a little new one. This will avoid the formation of air locks inside the system.
- Add fresh fuel fluid into the tank until all the old fluid comes out and new clean substance begins to flow through the hose into the container.
- Having completed the work on the rear right wheel, go to the front left and perform a similar procedure. Due to this movement pattern, you will be able to completely get rid of the old fuel oil in one circuit.
- By analogy, remove the fuel fluid from the second circuit in the same sequence. Having completed draining, close the valves with caps and add new fuel fluid to the required level.
After completing the replacement procedure, be sure to bleed the brakes. It is strictly not recommended to go out on the road without it, since the brakes may simply not work.
Why bleed the brakes?
Bleeding a vehicle is a preventive measure aimed at ensuring stable operation of the brakes. The point is to remove foreign liquid and excess air.
Air and excess liquid can appear in the system for various reasons. Namely:
- The hoses are damaged and their integrity is compromised;
- Low-quality brake substance is used;
- System elements were replaced or brake fluid was updated;
- The seal of the vehicle is broken.
Any braking system, due to its design, can spontaneously accumulate moisture inside itself. Therefore, pumping cannot be ignored under any circumstances.
Preparation for work
First of all, disconnect the sensor connector and secure this connector next to the tank. Then open the lid and add liquid to the MAX mark. This requires DOT-4 fluid.
Level sensor connector
On any car, including the VAZ-2114, the brakes are pumped with the lid closed. This means we tighten the lid harder, and then roll the car onto an overpass or pit.
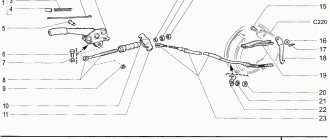
If a lift is used, it means that when bleeding the rear cylinders, a spline is placed in the regulator (sorcerer).
Pressure regulator (sorcerer)
The screwdriver here is between the bracket and the rod. When bleeding the front brakes, remove the screwdriver.
Safety precautions: the handbrake must be engaged and the ignition key must be removed.
Preparation for work
First of all, disconnect the sensor connector and secure this connector next to the tank. Then open the lid and add liquid to the MAX mark. This requires DOT-4 fluid.
Level sensor connector
On any car, including the VAZ-2114, the brakes are pumped with the lid closed. This means we tighten the lid harder, and then roll the car onto an overpass or pit.
If a lift is used, it means that when bleeding the rear cylinders, a spline is placed in the regulator (sorcerer).
Pressure regulator (sorcerer)
The screwdriver here is between the bracket and the rod. When bleeding the front brakes, remove the screwdriver.
How to bleed the brakes in a VAZ-2114: instructions
In fact, it is quite possible to bleed the brakes yourself, especially when there is no other option. First, we recommend watching the video, which will make it easier for the car owner to learn all the intricacies of the process.
Important! Do not add fluid to the system when the composition does not match the old contents. In addition, you need to make sure that everything is in order with the tightness of the brake system, then the work will not be done in vain
In addition, you need to make sure that everything is in order with the tightness of the brake system, then the work will not be done in vain.
The brakes are bled in the correct sequence:
- rear right;
- front left;
- rear left;
- front right.
So, let's start actually pumping the VAZ-2114.
It is necessary to check the fluid level ("brake fluid") in the reservoir. On the eve of pumping, it should be filled as much as possible. Clean the exhaust valve from any contaminants and foreign particles. Remove the dust cap from the valve. First you need to fill the glass container with the working mixture. Take a rubber tube and put it on the valve. Place the opposite end in a container with a “brake seal”. Such a homemade pumping device is not inferior in productivity to professional equipment at service stations. Press the brake to the floor approximately five times (break - 2 seconds). Having made the last press, you need to lock the pedal in the pressed position. Unscrew the valve approximately 75%, from where the fluid with bubbles will gradually flow out. Once the leak stops, the valve can be closed. After tightening the valve, the pedal should be released. It is possible that more pumping periods will be required. The goal is to achieve complete disappearance of bubbles in the brake fluid. Observing the leakage of fuel fluid, it is necessary to add liquid to the tank
It is important to maintain it at its maximum level. After you have managed to bleed the brakes, you should remove the hose, removing traces of the brake fluid from the fitting and tightening the cap.
Don’t be intimidated by the number of points, because in practice this event does not take much time. When you replace and bleed the brakes yourself on the 2114 model, you will be able to save a lot and gain invaluable experience.
Preparatory stage
If you decide to bleed the brakes yourself, it is important to know that when bleeding you must use the same brake fluid as the one in the system. No other liquid can be used. You must first check the tightness of the system. To level up you need one more person. You will also need a hose of a suitable diameter for the bleeder fitting, a glass or plastic container (transparent), a wrench and a rag for cleaning the caps.
It is very important to know in what order to remove air from the brake system. This procedure must be carried out diagonally, alternating the rear and front brakes:
- rear right;
- front left;
- rear left;
- front right.
Self-bleeding brakes
Some motorists who do not have the opportunity to invite an assistant are interested in how to properly bleed the brakes on a VAZ 2114 on their own? The answer to this question is quite simple - with the help of tires. It is with their help that you can create increased pressure inside the tank, which will replace pressing the pedal.
All this is done as follows:
- a wheel is hung up, which is a “donor” of pressure;
- using a hose, the threaded neck of the tank and the chamber nipple are connected (such an adapter hose should be made in advance);
- pumping operations are carried out (they are done in exactly the same way as with an assistant - the fitting is turned, the liquid is drained, and so on). The only difference in this case is that you don’t need to press the pedal.
If, during pumping, the fluid level drops below the minimum mark, it will need to be added by first disconnecting the adapter hose from the neck of the expansion tank and then installing it in place.
When bleeding the brakes using this method, you should remember that the pressure in the donor tire should not exceed 2 atmospheres.
By putting into practice the simple methods described above, you will not only be able to quickly and effectively pump the brakes, but will also make traveling in your car much safer for both yourself and others.
VAZ 2115 Bleeding the brake system
After each brake repair, during which the system was opened, air may appear in the pipelines. In this case, the system should be bled. There is air in the system if the pressure fluctuates when you press the brake pedal. In this case, the leak must be repaired and the brake system must be bled.
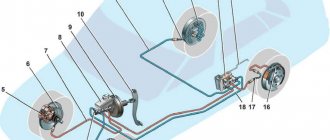
Air is removed from the brake system by pumping the brake pedal; this requires the help of an assistant. If you need to bleed the entire system, you should bleed each cylinder separately. This is the case when air has entered each cylinder. Bleeding sequence: 1 - rear right wheel cylinder, 2 - rear left wheel cylinder, 3 - front right brake caliper, 4 - front left brake caliper.
If only one caliper has been replaced or repaired, it is usually sufficient to bleed only that caliper.
Before bleeding, unscrew the cap of the compensation tank and fill it with brake fluid to the maximum mark.
While pumping, monitor the fluid level in the tank. The fluid level should not drop too low, otherwise air will enter through the reservoir. Always top up with fresh brake fluid. Brake system with ABS only: Turn on the ignition and depress the brake pedal 4 - 5 times. Then, if necessary, add brake fluid to the reservoir to the maximum level. When bleeding the rear brakes, leave the ignition on during the entire bleeding. When the bleeder valve opens, the ABS hydraulic pump will turn on and create pressure.
Remove the boot-1st wheel cylinder bleeder bolt. Clean the bolt, put on a clean hose, lower the other end of the hose into a bottle half filled with brake fluid
When is pumping required and how to prepare for it
Bleeding the brakes is not always necessary - if the brake system is functioning properly, then bleeding is not necessary.
It is required only in the following three situations:
- When the pedal begins to “fail” (as was mentioned at the very beginning of the article).
- After replacing any component of the brake system.
- After replacing the fluid.
All these situations are caused by one single reason - air entering the system. So, if the pedal began to “fall” by itself, then, most likely, the brake tract was depressurized in some area, and air leaked inside.
When replacing parts, air also enters the brake system in large quantities and remains inside, causing its failure (the same applies to a complete replacement of the brake fluid).
It is important to note that it is highly advisable (or, more correctly, mandatory) to do bleeding immediately after repairing the brakes or replacing the fluid, without driving a “not pumped” car - after all, this can pose a more than real threat to life.
A mandatory condition that should always be observed is the order of bleeding the brakes of the VAZ 2114. So, the left rear wheel is pumped first, followed by the right front, then the right rear and then the front left.
In preparation for bleeding the brakes, you need to perform the following preparatory work:
- install the car on the handbrake;
- disconnect the liquid level sensor connector from the tank and secure it;
- open the tank lid;
- add brake fluid to the maximum level (MAX mark);
- insert a slotted screwdriver into the rear adjuster between the rod and the bracket (this should only be done when bleeding the rear brakes; when starting to bleed the front brakes, it should be removed).
Signs to watch out for
In what cases should this operation be performed? The main reason that leads to pumping is air accumulated in the system. It can get inside for various reasons. As a rule, this is a malfunction of the brake cylinders or leaking hoses. Very rarely, air gets in due to a weak connection of the fittings, but this possibility should not be ruled out.
How to determine that air has formed in the system? The driver will notice changes in the behavior of the car. So, when you press the pedal, the car will not reduce speed as effectively. And the pedal itself will be more sluggish and have an increased stroke. The situation is critical when it completely falls into the floor, and the car barely slows down. In this case, it is urgent to bleed the front and rear brakes of the VAZ-2115.
This operation is also required when replacing brake fluid. If it has not been updated for more than three years or has become black, it definitely needs to be replaced. In addition, some fluids are changed when buying a car on the secondary market, when there is no confidence in the reliability of the system. Bleeding may also be required when doing any work on the brake system. This may include replacing the reservoir, working or master cylinder, hoses and other elements. It is not pumped only when replacing the pads, since the working cylinders are only recessed here (both in the case of front disc mechanisms and rear drum mechanisms).
On the subject: What to do to prevent arm muscles from hurting
Where did the air come from?
Air in the brake system may appear for the following reasons:
- Got in while changing brake fluid (How to change brake fluid?).
- Got it when replacing any brake elements, for example when replacing a brake cylinder (How to replace a rear brake cylinder?).
- Air may also appear due to a leak in the brake system, for example, cracked brake fluid pipes that need to be replaced immediately.
- The rear brake cylinder is leaking.
- The front brake cylinder is leaking.
- A leaky GTZ (brake master cylinder) can also be a problem.
Important: Over time, water gets into the brake fluid, as evidenced by its darkening. In this case, you need to replace the brake fluid. And in general, it is recommended every three years or 45 thousand km. mileage, change the brake fluid, because One way or another, condensation accumulates in it.
Also, prevent brake fluid from getting on the car body, otherwise it will easily wash away the paint to bare metal.
Bleeding brakes on a VAZ 2110
The brake system is a very important component of any car, regardless of its brand and other characteristics. Malfunctions of the brake system are one of the common troubles that arise every now and then during the operation of a car. However, in most cases they can be avoided if preventive measures are taken in time.
Why do you need to bleed the brakes?
Thus, one of the most common measures to prevent and ensure the stability of the brake system is bleeding the brakes. The essence of this event is to remove “excess” air and foreign liquids from the system. There may be several prerequisites for the appearance of “foreign” substances in the brake system:
- spare parts were replaced in the unit,
- violation of the integrity of the hoses,
- use of low-quality brake fluid, etc.
In addition, it should be understood that brake fluid has the property of being hygroscopic, that is, it has the ability to accumulate water. For this reason, sooner or later the liquid must be drained and the system, accordingly, must be pumped. Replacing brake discs with your own hands, by the way, also entails the need for bleeding, just like any other intervention in the brake system.
Instructions for the last chapter in one video
Yes, as on most cars, bleeding is done crosswise, but I would advise changing the old brake hoses, pads and brake fluid for a brake system that does not fail. It’s better to spend money once and forget about the brakes than to constantly crawl under the car.
Pumping is not difficult, call an assistant and pump them according to the instructions in the manual. Just keep an eye on the brake fluid level when bleeding. After bleeding, drive off with caution. Until the pedal becomes hard and the pads are in place.
Preparation
The first sign that there is air in the system is when the pedal that activates the brake becomes depressed. Moreover, if you press and release it several times, it falls into place. Of course, with such unstable operation of one of the most important elements of a car in terms of safety, it is dangerous to go outside. Therefore, we recommend starting pumping immediately.
Please note that the described symptom may also indicate other breakdowns. This is about:
- an excessively large gap formed between the piston of the main cylinder and the bolt that regulates the operation of the vacuum booster;
- liquid leakage due to depressurization of communications;
- damage to the rear cylinder thrust ring (it usually fails).
Each of these problems needs to be addressed as a priority. Only after this does it make sense to start pumping.
There is one more important circumstance. Be sure to only use the brand of brake fluid that is already in the system.
You will also need:
- a transparent jar or plastic bottle with a capacity of 1.5 liters;
- flexible tube (rubber, silicone, etc.);
- a set of keys;
- clean rags.
It should also be understood that air is removed from the VAZ-2115 system in a certain order. First, the procedure is performed for the rear wheel (for example, the right one), and then the front one (respectively, the left one). That is, you need to act diagonally.
Self-leveling
It is not always possible to attract an assistant to work. Here the question arises: how to bleed the brakes yourself, and, in general, is this realistic in the case of the 2115 VAZ model? The answer will be yes. To perform the operation discussed in this article, you must use a compressor. A device is required that can maintain the pressure in the system at least 2 atmospheres. The pedal is not activated in this situation.
The work is done like this:
- select a cap suitable for replacing the one that is screwed onto the fuel tank of your VAZ-2115 (suitable for canisters in which motor oil is sold);
- drill a hole with a diameter of 14 mm in it;
- insert the fitting from the tubeless wheel into the hole;
- the joints must be treated with sealant;
- fill the tank with liquid to the maximum mark;
- Unscrew the cap from the brake cylinder fitting;
- put on the tube and place the other end in the bottle;
- Connect the compressor to the tank and activate.
When the air stops coming out, tighten the fitting and move to the other wheel.
At the last stage of the procedure, it is necessary to add brake fluid to the reservoir intended for it to the maximum and screw the cap tightly.
Next, all that remains is to check how the system works after removing the air.
Pumping - important nuances
In a situation where repair work was carried out on only one cylinder, then bleeding is done only on it - there is no need to touch the other wheels.
If your 2115 has ABS, there are a few things to keep in mind. Before bleeding, you should turn on the ignition, and only after that press the brake pedal at least 4 times. Then fill the tank with TJ to the maximum and then proceed as described above.
When work is done on the rear wheels, the ignition is not turned off. This allows you to use the ABS system pump - it will create the necessary pressure.
Bleeding the brakes alone. The simplest, most effective and fastest way
Bleeding the brakes begins with the wheel furthest from the master cylinder.
Brake bleeding sequence.
For ease of bleeding, if there is no inspection hole, it is better to remove the wheel, but you don’t have to remove it if the vehicle’s ground clearance allows you to get to the bleeding fitting.
To clean the brake caliper from dirt and dust, buy a large syringe, about 250-300 ml. set of windshield washer tubes from VAZ.
Connect the tube with a syringe and pump out all the brake fluid from the barrel.
The washer tube fits perfectly onto the syringe.
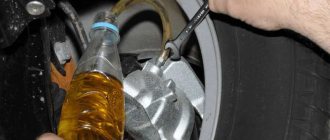
Next, take a jar with the purchased brake fluid and, after unscrewing the lid, do not tear off the soldered protective foil, but pierce two holes in it with a screwdriver opposite each other, this will allow you to fill the brake fluid without spilling.
Punch two holes opposite each other.
Fill the reservoir up to the very edge with brake fluid. We loosen the fitting on the first caliper to be pumped, it may not be possible to loosen it with a regular wrench, it is for this purpose that it is better to remove the wheel in advance, since it can be torn off with a regular head and it will be more convenient to crawl up with the wheel removed.
And here we again need our syringe with a tube, put the tube on the fitting
We loosen the bleeder fitting and try to draw out the brake fluid with a syringe, while in the syringe you will see bubbles that supposedly come out of the brake system, but this is not air from the system - it is air that is drawn in through the thread of the fitting; this air can also get into the system itself, but the syringe contains little brake fluid, but a lot of air, this method is very labor-intensive and not very effective, but there is an excellent way out.
Fuel check valve VAZ.
Instead of a syringe, you can insert a fuel check valve from front-wheel drive cars of the VAZ family.
The valve can be found under article number 2105-1164060
The valve is placed on the bleeder fitting in such a way that it releases brake fluid, but does not allow air in, and we move into the cabin to bleed the brakes using the brake pedal.
Place the valve in the jar
The brake pedal must be pressed slowly and released just as slowly; brake fluid will begin to flow out of the valve, but air will not get back in. In this case, you need to monitor the level of brake fluid in the barrel and do not forget to top it up on time. To bleed one wheel you need about 10 presses on the brake pedal. If there is old fluid in the can, it is not clear whether the new one has reached it. To do this, you need to drain the old fluid from the can and loosen the fitting again, make a couple of presses on the brake pedal, you can tell by the color of the liquid make sure that the new fluid still reaches the caliper.
We do the same with the rest of the calipers according to the diagram.
Sources
- zen.yandex.ru/media/mex8219/prokachka-tormozov-v-odinochku-samyi-prostoi-effektivnyi-i-bystryi-sposob-5dc68334b18b3938187fb5e4
- ladaprofi.ru/vaz-2115/poryadok-prokachki-tormozov-na-vaz-2115-s-opisaniem.html
- drive2.ru/l/519039033494471482/
- vaz-russia.com/remont-vaz-2113/prokachka-tormozov-na-vaz-2113-vaz-2114-vaz-2115.html
Required tools and materials
To get to the fittings in the absence of an inspection hole, we need to unscrew the wheels. Therefore, you need a jack, stops and a wheel wrench. If there is a hole or overpass, the wheels do not need to be unscrewed. You will also need new brake fluid. On vehicles of the Samara-2 family, RosDot of the fourth class is used. In addition, we need a plastic bottle and a hose that will be put on the fitting (so that the liquid does not splash in different directions, but goes out into a certain container). To unscrew the fitting, you need a regular 8mm wrench.
How to bleed the brake system on a VAZ 2113-VAZ 2115?
Note! Bleeding the brakes is carried out on a car with an assistant, although it is possible without one, but it will be more difficult, and the article itself is written on bleeding the system only with an assistant!
On cars of the Samara 2 family, the bleeding system must be replaced in sequence, namely first the rear right wheel, then the front left, then the rear left and only after that the front right, generally diagonally starting from the rear wheel first!
1) At the very beginning of the operation, open the hood of the car and then unscrew the cap of the reservoir containing the brake fluid by hand. (The location of this cover is indicated by an arrow in the photo below, but only it is turned out)
2) Then, if possible, take brake fluid of the same brand, and add it to the MAX mark in the same tank, and if you bought new fluid and decided to replace it, then for more detailed information on replacing brake fluid, see article: “Replacing brake fluid on a VAZ”
(By the way, in this article to which the link is given, at the very bottom there will be a section “Important!”, be sure to read it, a lot of interesting things are said there). 3) Next on the rear right wheel, find a small cap that covers the bleeder fitting, and after you find this cap, remove it and clean it of dirt
3) Next on the rear right wheel, find a small cap that covers the bleeder fitting, and after you find this cap, remove it and clean it of dirt.
4) After this cap is removed from the fitting, take the pre-prepared hose in your hands and put one end of it on the fitting, and lower the other end into a transparent plastic bottle, preferably. (If you don’t understand about the hose and the bottle, then for an example with a hose and this very bottle, see the photo below in paragraph “6”)
Note! The bottle into which you will lower the hose must be filled with brake fluid and the tip of the hose must be in this very fluid!
5) Then, when everything is done, tell your assistant to get behind the wheel of your car and then let him smoothly press the brake pedal 7-8 times and at the very end, that is, when he presses the last eighth time, let him press this pedal will remain pressed all the way.
6) And at this time, start using a wrench to carefully unscrew the bleeder fitting, but in no case do you need to unscrew it completely, you just need to loosen it a little by 2-3 turns and after which you should see how the brake fluid goes into the bottle liquid.
Note! Wait and watch carefully how the brake fluid drains, by the way, you will see in it those same air bubbles that should not be present in the system under any circumstances, so continue to drain the fluid from the system until the release of bubbles into the bottles stops, and when the release of bubbles will stop, then screw the fitting all the way and only after that let your assistant take his foot off the pedal!
Be sure to keep an eye on the level in the tank while the fluid is draining; under no circumstances allow this level to drop to zero, otherwise air will get into the system and you will have to start pumping the brakes all over again, so always keep an eye on the fluid and top it up if possible !
7) After your rear right wheel has been bled, do exactly the same operation with the left front one, the same fitting on the front wheels is located slightly differently, see the photo below for more details:
Note! When this circuit is pumped, proceed to bleeding the next circuit, that is, the rear left wheel and then the front right!
Additional video clip: To make it more clear to you about how to bleed the brakes, we have prepared a video clip for you just below, it contains a bunch of excellent tips that will be useful to you in life, but this video, as you have already seen from the title, is aimed only at cars of the ninth family, but it also applies to cars of the Samara 2 family since the braking system of these two cars is almost identical!
Hello Vlad! In principle, it is possible, but not necessary, since on cars of the Samara 2 family the braking system is diagonal, this is necessary so that the car does not skid when braking and if one of the sides fails, the car brakes more smoothly, unlike, for example, the classics, where The braking system is horizontal, that is, the rear left wheel and the rear right, therefore, when braking sharply on such a system, the car pulls to the side, and besides all this, if one of the sides fails, for example, the front two wheels, then the car will only brake with the two rear wheels which is very dangerous at high speed!
Sequencing
First you need to open the hood of the car and open the cap of the brake fluid reservoir. Make sure it is filled to the maximum. If not, add to about. After this, follow the steps in the following sequence:
- On the rear right wheel, find the cap that covers the fitting. Remove the cap and clean it of dirt.
- Fill a clear glass or plastic container with brake fluid.
- Place one end of the hose onto the fitting and place the other end into a glass or transparent plastic bottle. The hose must be lowered into the liquid.
- Ask your partner to sit behind the wheel and gently press the brake pedal 7 times with breaks of 2 seconds. After this, he must press the pedal again and leave it in this position (pressed all the way).
- While an assistant holds the pedal, use a wrench to unscrew the fitting 2-3 turns.
After all these steps, you will see that brake fluid will flow into a transparent container through the hose. Watch how it drains.
There will be visible air bubbles in it that need to be removed. Drain the liquid until the bubbles disappear. Then screw the fitting back on. Only after this can your assistant release the pedal. When the liquid flows into the container, monitor its level in the tank. If necessary, add brake fluid. If during pumping it completely leaks out, you will have to start the whole procedure from the beginning.
Repeat similar steps for each wheel in the above sequence. This mechanism of action is suitable not only for the VAZ-2114, but also for models 2113, 2115.
Many car owners are wondering: is it possible to carry out pumping alone? Yes it is possible. Only in this case, the pressure should be produced not by pressing the pedal, but by using a powerful compressor for these purposes. It should create a pressure of 2 atmospheres.
Car owners have to carry out pumping in different situations. Air can enter when replacing copper pipes at the rear or other components of the brake system, when hoses are damaged, when replacing brake fluid, or if the seal in the unit is broken. Regardless of the reason, after air enters the GTZ (brake master cylinder), bleeding must be carried out. Otherwise, the brake simply will not work.
Sequence and correct procedure for pumping brakes on a VAZ-2114
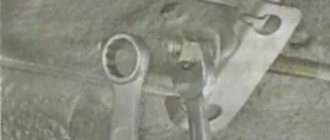
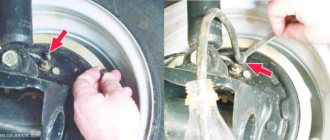
- We find a fitting on the rear wheel drum (photo 1). It is usually closed with a cap that is removed. Place a hose on the fitting.
Rear brake cylinders
Ask an assistant to press and release the brake pedal several times. Now the pedal remains pressed. Using the “8” key, turn the fitting half a turn to the left. The liquid is drained into an empty container (photo 2), the pedal “falls”. As soon as the liquid stops draining, tighten the fitting. The pedal is released. If there were bubbles in the drained liquid, repeat steps 2-4. In this case, you must ensure that the tank is filled at least to the MIN mark. If necessary, top up. Move to the front brake mechanism (photo 3), perform steps 2-5.
Bleeding the front cylinders
Screw on the protective caps.
Possible sequence for pumping brakes for a VAZ-2114: rear right wheel, front left, rear left, etc. Each circuit is pumped starting from the rear wheel.
- 2101-1602591 – rear cylinder fitting;
- 2101-1602591-01 – disc brake fitting;
- 2101-1602592 – fitting cap.
How to bleed the brakes alone?
It seems that one person can bleed the brakes. But then you need to increase the pressure in the tank. The source of air will be the tires. By the way, the limiting value should be considered 2 atmospheres.
Cover from VAZ-2106 and nipple for tubeless
The cap is placed on the brake reservoir
The cap with the nipple is screwed onto the neck of the tank. Next, the “extension cord” is assembled. The donor wheel is hung out when bleeding the brakes.
Bleeding device
But you can also use a camera
Or a compressor. Do not apply strong pressure; the hose may burst. In this case, you will stain the entire engine compartment.
You can open the fittings one by one and drain the liquid. But you also need to monitor the fluid level in the tank.
Topping up is done as follows: disconnect the “extension cord” from the tire, unscrew the cap, etc.
Features of work on models starting from VAZ-2108
Now let’s look at the specifics of the operation on other cars of the VAZ family. Starting with model 2108, the circuit diagram has changed, and therefore the sequence is somewhat different. And you need to know it before bleeding the brakes on the VAZ-2108, 2109, 21099.
These cars already use a diagonal arrangement of contours. That is, one of them combines the rear left and front right wheels, and the second - the other two.
Bleeding begins, as usual, from the farthest wheel, that is, from the rear right one. An operation to remove air from its brake mechanism is carried out according to the described sequence.
But there is one caveat. The design includes a pressure regulator for the rear wheel drive mechanisms. If the rear of the car is hung out before bleeding, this regulator must be unlocked. To do this, just install a screwdriver between the regulator rod and the thrust plate.
After all work it should be removed.
Then it is pumped to the second rear wheel, and the front left one, since it is the one that is combined with the circuit with the already pumped rear mechanism.
After pumping each mechanism, it is necessary to check the level in the tank. If you omit this point, then during operation the liquid will go into the system and air will enter it again.