Sometimes a car enthusiast may notice that wet spots of fuel appear near the gas tank flap, and they can occur both when the tank is full and when the level of fuel in it is low. In the vast majority of cases, the VAZ 2114 separator, which has failed, is to blame for this. Today we will talk about what it is, where it is installed and how to replace it with a new one.
Separator VAZ 2114
How to remove and install the separator on a VAZ 2114, 2113, 2115: 1 comment
Thanks to such a detailed description, you can easily save on car service. Tomorrow I will definitely try to change it myself.
Sometimes a car enthusiast may notice that wet spots of fuel appear near the gas tank flap, and they can occur both when the tank is full and when the level of fuel in it is low. In the vast majority of cases, the VAZ 2114 separator, which has failed, is to blame for this. Today we will talk about what it is, where it is installed and how to replace it with a new one.
No. 17. Simplification of the tank ventilation system - logbook Lada 2115 2005 on DRIVE2
Good day to all. Ever since I replaced the tank, one of the reasons for which was a cracked fuel gas separator, I have had a bad ventilation system using a fuel filter from a classic. That is, the ventilation pipe went to the filter left under the bumper and that was all. Recently, the problem of a small spill of gasoline on the bumper when fully refueling began to plague me, and, as it turned out, gasoline was flowing out of this pipe. I then decided to study the tank ventilation schemes according to the new and old (without adsorber) scheme, since the always dirty bumper from gasoline was very annoying for me, and I don’t like refueling 10 liters at a time, it’s better to have a full tank at a time. In addition, a long time ago comrade Maniak665 suggested completely removing the adsorber from the system. After searching the Internet, I found the following two diagrams.
New scheme with adsorber
Old scheme without adsorber
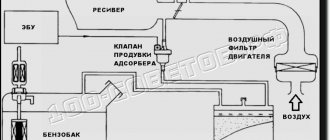
According to the new scheme, the pipe (13) from the gas tank goes to the separator (12), from the separator it goes to the tee, and then along one path it goes to the check valve (11), and along the other to the gravity valve (10), a two-way valve ( 9) and only then to the adsorber (6). According to the old one, after the separator (10), the pipe simply goes to the check valve (4) and that’s it. Decide to see how I did it. As a result, it became clear that even without taking into account that over the 12 years of the car’s life the adsorber had not worked for a long time, a year ago I had already disconnected it from the entire system. This means that it remains to solve the problem of gasoline pouring out of the pipe. At first I wanted to do it according to the old scheme, replacing the separator with a new one, but it turned out to be problematic to find it in my city, and besides, many on the forums wrote that it would not last long. I was thinking about buying an iron separator, but finding one turned out to be even more problematic. Then I decided to do without it (especially since I didn’t want to disassemble half the back of the car to change it). Maniak665 suggested plugging the separator pipe and installing a tank cap with a valve, but again he couldn’t find it in the city (what a city, you can’t find anything xD), then he decided to do it using the same fuel filter from the classics and a check valve. The scheme is as follows.
Full size
Check valve
Full size
Check valve
Full size
fuel filter from the classics, located below
During the period of using this scheme, there are no problems with gasoline odors, there are no overflows when filling a full tank (the check valve is at the level of the separator), no water gets into the tank, as I had with a cracked separator. Thank you for your attention.
Price: 150 ₽ Mileage: 203010 km
Gas tank vapor recovery system
In almost every modern car, the gas tank has a built-in ventilation system (otherwise called a vapor recovery system).
It includes elements such as:
- separator;
- connecting tubes;
- two way valve.
The fuel vapor recovery system operates as follows:
- when heated or vibrating, gasoline vapors are formed in the tank;
- due to their volatility, they rise up and fall inside two drainage tubes running from the tank to the separator;
- getting inside the separator, they condense, turning into drops of liquid, and flow back into the gas tank;
- excess vapors that do not have time to condense (for example, in very hot weather) enter the two-way valve from the separator and are discharged into the atmosphere.
In cars with an injector, the tank ventilation system works on a similar principle with the only difference that instead of a two-way valve, it has an adsorber (absorber) of vapors installed, which accumulates them and, at the command of the ECU, releases them into the engine for afterburning. This avoids intentional leakage of fuel into the environment.
Why do experienced drivers immediately remove adsorbers after purchasing a car?
Many modern cars have a so-called adsorber, which traps gasoline vapors, preventing engine breakdowns and improving the environmental performance of the car.
Many modern cars are equipped with adsorber devices that increase the environmental friendliness of the car by absorbing toxic gasoline vapors formed in the gas tank. However, many car owners cut out and remove such devices immediately after purchase, which can save them from the need to carry out expensive repairs in the future. Let's talk in more detail about what design the adsorber has, what it is intended for and why car owners cut them out immediately after purchasing a car.
Adsorber
Separator design
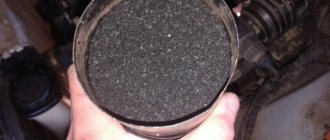
The VAZ 2114 gasoline vapor separator is a small, completely sealed tank made of metal or impact-resistant plastic. It is installed in the right rear part of the car on a special bracket. Using a hose system, it is connected to the gas tank (from where vapors flow through drain pipes) and to a two-way valve. The total volume of this device is 7 liters.
Despite the obvious simplicity of the fuel ventilation system and the minimum of parts located in it, it still breaks down, leading to rather unpleasant consequences.
So, signs of a vapor separator failure may include:
- smell of fuel inside the cabin;
- the smell of fuel near the car (and a lot of time has passed since refueling);
- gasoline stains near the neck of the tank;
- drops of fuel on the ground after a long stay.
Having noticed these signs, we can conclude that the VAZ 2114 gas tank separator is cracked or leaky and is no longer doing its job.
Ventilation system for the fuel tank (gasoline tank) of VAZ 2108, 2109, 21099 cars and their modifications
VAZ 2108, 2109, 21099 cars with a carburetor engine are equipped with a fuel tank ventilation system.
It is part of the power supply system. The ventilation system of the gas tank is necessary to prevent the occurrence of excess pressure in it, which is created by the fuel vapors generated here (especially at high temperatures in the summer or when the car is strongly rocked while driving).
Operating principle of the gas tank ventilation system
Through two drainage tubes located in the fuel tank, fuel vapors, which create excess pressure in the tank, enter the separator through a hose. They condense in it, and the resulting gasoline flows back into the fuel tank. Fuel vapor is removed through a two-way valve connected by a hose to the separator.
Installation of the fuel tank ventilation system for VAZ 2108, 2109, 21099
Elements of the fuel tank ventilation system for VAZ 2108, 2109, 21099 cars
— Drainage tubes inside the tank
Two drain tubes are inserted into one another, their ends are located at the edges of the fuel tank to prevent fuel from leaking out when the car turns. They have a common outlet to the drain hose to the separator.
— Gasoline vapor separator
A sealed plastic tank installed in the rear right side of the car on a bracket. Connected by hoses to the fuel tank and a two-way check valve. Serves to condense fuel vapors entering it from the tank. Capacity 7 liters. The gasoline condensate from the separator is drained back into the fuel tank, and the vapors are released into the atmosphere through a two-way valve.
— Two-way check valve
Located near the fuel tank filler neck. Connected by a hose to the separator. Double-acting check valve: it introduces atmospheric air into the gas tank and, when the pressure of fuel vapors in it increases, releases them into the atmosphere.
Malfunctions of the gas tank ventilation system
— Breakdown of the two-way check valve
The result of a valve failure or clogged hoses will be that the pressure in the tank exceeds the norm, which can lead to its deformation, damage to the hoses and separator. As a result, a fuel leak may occur and a persistent smell of gasoline may appear both in and around the car.
Notes and additions
— On the injection engine 2111 of VAZ 21083, 21093, 21099 cars, instead of a fuel tank ventilation system, there is a fuel vapor recovery system. It is similar to the ventilation system, but in addition it has an adsorber with a valve that absorbs fuel vapors and, at the command of the control unit (purge of the adsorber), sends them back to the engine for afterburning. This allows you not to release toxic fumes into the atmosphere and comply with certain toxicity standards.
Separator replacement
To replace this device you will need the following set of tools:
- Phillips screwdriver;
- key to 8;
- key to 10;
- ratchet;
- head at 13.
The separator replacement itself is performed in the following order:
- Place the machine on a pit or overpass.
- Apply the handbrake.
- Remove the rear bumper trim.
- Fold back the right side of the upholstery inside the trunk.
- Using a 10mm wrench, unscrew the separator shield fixing nut.
- Remove the fuel tank cap.
- Using a screwdriver, loosen the clamp where the inlet hose connects to the pipe at the bottom of the car.
- Remove the hose from the filler tube.
- Using a 13mm socket, unscrew the nut securing the clamp that presses the filler tube to the body.
- Using the same head, unscrew the fasteners of the filler pipe bracket.
- Loosen the clamp holding the gas tank ventilation hose to the filler tube fitting.
- Remove the ventilation system hose from the fitting.
- Remove the filling tube from the separator.
- Remove the O-ring from the junction of the separator shield and the tube.
- Unscrew the bolt securing the separator shield to the car body (you will need a size 8 wrench).
- Move the separator shield and separator to the side.
- Loosen the clamp securing the separator hose.
- Remove the separator hose from the fitting.
- Remove the old separator.
The new gas tank vapor separator should be installed in exactly the same order, but in reverse order.
A whole complex of devices combined into one fuel system is responsible for supplying fuel to the VAZ 2114 engine. This article is dedicated to it, by studying which you will learn what the power supply system of the VAZ 2114 injector consists of, what is the principle of its operation, and what preventive measures must be taken in order for the system to work out its resource to the fullest.
Spare parts catalog VAZ-2114
- Body Body 60 Body
- Body panels 21
- Body panels 20
- Body panels 19
- Body floor 14
- Windows 10
- Front frame 4
- Side and rear frame 4
- Trunk lid 18
- Front doors 15
- Rear doors 9
- Tailgate 28
- Front seats 14
- Ventilation and heating system 23
- Interior accessories 14
- Hood 28
- Engine 536 Engine 1
- Fuel tank 41
- Silencers 30
- Radiator 30
- Electronic blocks 19
- Clutch 29 Clutch 10
- Gearbox 27
- Front wheel drive 42
- Differential 24
- Frame, bumpers and engine mudguards 76 Front bumper 14
- Front axle Steering knuckles and hubs 24
- Steering control 100 Steering column 19
- Electrical equipment 1869 Generator (11, 13, 15) 15
- Instruments and lighting 110
- Tools and accessories 5 Driver's tools 5
- Standard parts 288 Studs, bolts, screws 104
- Oil seals 30
- Rolling bearings layout 72
- Plug installation diagram 5
0087dd90a0d18a2b6460e21fe2b13d98
PRINCIPLE OF OPERATION OF THE SYSTEM
The fuel system of the VAZ 2114, in comparison with foreign cars, is made quite simply, thanks to which a high level of its reliability and endurance has been achieved. The 2114 has an injector for injecting gasoline into the combustion chambers. The presence of an injector provides for a complex fuel dosing system, for which the ECU controller (electronic control unit) is responsible.
The VAZ 2114 fuel pump is driven electronically. The injection moment itself is calculated thanks to sensors that determine the location of the car’s crankshaft. When the fuel pump is turned on, the fuel is supplied through the transport system to the filters, where it is cleaned of impurities, and after the filters - to the fuel rail.
The fuel rail is the part of the intake manifold in which gasoline and gas are mixed in a ratio of 1 to 15 (an increase or decrease in the amount of gas can be adjusted manually, but the optimal gasoline consumption is observed precisely at the above ratio). Next, the mixture is supplied to the injectors, after which it enters the combustion chambers.
How to identify a problem at work?
The most common symptoms of malfunction include:
1) Sometimes the engine starts to run unstable at idle speed;
2) If clogged, you may feel a slight increase in fuel consumption;
3) The car engine does not start the first time when hot;
4) A noticeable loss of traction at low speeds. At higher speeds, the loss of torque is less sensitive.
Another common malfunction is the appearance of cracks in rubber plugs. Through these cracks (holes), additional air is sucked in, and as a result, leads to problems with the engine.
WHAT GASOLINE TO POUR IN THE VAZ-2114?
This topic has become overgrown with various conjectures and speculations, but we will try to put everything in its place.
The technical data sheet of the fourteenth indicates that the car engine requires AI-95 gasoline, and there is no reason not to trust the manufacturer’s recommendations.
Another thing is that many car owners, over their long driving experience, have accumulated rational doubts about the existence of any serious differences between 95 and 92 gasoline. Adding fuel to the fire was the recent statement by the chief engineer of the Moscow oil refinery, A. A. Abrosimov, that we do not make 95-grade gasoline in our country, and everything that is sold under its guise is either 92-grade or unknown fuel brought from somewhere.
As evidenced by reviews from VAZ 2114 owners who use exclusively 92-octane gasoline, there were no problems with the car during its service life due to fuel, and they see no point in using a more expensive analogue. However, the final decision about what to pour into the fourteenth is yours.
inspection of the separator and replacement of check valves - logbook Lada 2114 gReyMouse 2005 on DRIVE2
It’s already warmer outside and due to the above-zero temperatures, the old problem has returned, namely the smell of gasoline and the constantly wet separator.
but in order to ensure its integrity and carry out a visual inspection, you need to remove the bumper.
Let's start removing the bumper
unscrew these bolts to pull off the bumper on clips along with the stiffener, I didn’t have clips)))) PS forgot to take a photo, two more bolts are located at the bottom of the bumper almost in the middle
unscrew the protection approximately to the middle of the wing so that there is more opportunity to bend it
Now let's move on to the side mounts
for convenience it is better to jack it up
and here is the mount itself, unscrew it on both sides and the bumper is removed! You can’t do without WD-40, but it didn’t help in this case either, the bolts broke (((
such perfect cleanliness awaits you under the gas tank flap))))) The culprits who caused it all to start are marked in red. the separator turned out to be intact...
this is basically the end result, I changed some presses, valves that were clogged, changed them to regular ones
On the left is my valve, only there is something metallic rattling inside, and on the right what should it be)))))
I bought new mounts for the bumper, 2a check valves and a clamp
Result of the work: after two days of driving, everything is dry near the neck! Thanks to everyone who finished reading, I hope this post is useful to someone! Good luck to everyone and avoid any breakdowns!
never remove the bumper like this)))))
Issue price: 250 ₽
COMPONENTS OF THE FUEL SYSTEM
The VAZ 2114 fuel system consists of the following main elements:
- Gas tank;
- Fuel pump;
- Gasoline filtration devices;
- Pipeline system;
- Fuel rail;
- Injectors;
- Waste disposal unit.
Let's analyze each component separately.
GAS TANK
The VAZ 2114 gas tank is a container made of two equal metal parts. A neck is removed from the tank into which gasoline is poured. The neck is connected to the tank via a rubber pipe and clamps.
FUEL PUMP
The fuel pump is located directly in the tank. It has a fuel level sensor, which transmits information about the current amount of gasoline to the ECU. The gasoline pump is connected to a line through which gasoline is transported to the fuel rail. The fuel pump itself consists of several parts - coarse filters, wiring and an electric motor, which pumps fuel. As evidenced by reviews from owners of fourteenth cars, fuel pumps from the German company BOSCH have proven themselves to be the best.
FILTRATION DEVICE
The VAZ 2114 fuel injection system very much depends on the quality of the filter devices used. A bad filter will significantly reduce both the efficiency and the longevity of the entire system.
On the fourteenth, non-separable filters with a working element made of paper are installed. Such filters clog quite quickly, and they need to be changed at least once every 10-15 thousand kilometers.
FUEL RAIL
The fuel rail is located on the intake manifold housing. Its design consists of two parts, separated by a spring-loaded diaphragm. The first is the fuel one, in which the required level of gasoline pressure is set, the second is the air one, air is pumped into it, due to which the diaphragm compresses the fuel chamber and changes the pressure level in it.
Ramp
PIPING AND HOSES SYSTEM
To circulate gasoline from the gas tank to the injectors, the fourteenth uses steel fuel lines located on the bottom of the car. The VAZ 2114 fuel supply system also provides for a return pipeline through which excess gasoline from the injectors is returned back to the gas tank.
VAZ 2114 owners are advised to carefully monitor the condition of the fuel line in order to avoid gasoline leaks. Pipes should be checked regularly for deformation and corrosion.
INJECTORS
Injectors are valves actuated by electromagnetic control. They have a sprayer, with the help of which fuel under pressure is supplied directly to the combustion chambers.
Injectors are one of the most problematic parts of the fuel supply system of the fourteenth (as well as VAZ 2115 and VAZ 2113), the service life of which directly depends on the quality of the gasoline used. If the fine filter does not fully perform its functions, the injectors will become clogged, and from time to time you will need to clean them at a service station (doing this at home is very problematic).
A critical failure of the injectors is a short circuit or break in the winding, after which it is necessary to replace the failed part.
WASTE DISPOSAL UNIT
The EURO-3 environmental safety standard, to which the VAZ 2114 complies, provides for the presence of a gasoline vapor recovery chamber, for which the fourteenth uses an adsorber with activated carbon. The adsorber is connected to a throttle assembly, from which all resulting vapors are sucked out.
Adsorber
Features of the 2111 (1.5i) engine power system
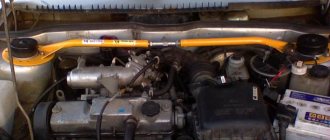
Location of elements of the 2111 (1.5i) engine power supply system in the engine compartment:
1 – receiver; 2 – vacuum supply hose to the fuel pressure regulator; 3 – throttle unit; 4 – fuel rail; 5 – fuel pressure regulator; 6 – air supply hose to the throttle valve; 7 – adsorber; 8 – air filter; 9, 10 and 11 – hoses of the crankcase ventilation system; 12 – throttle valve drive cable; 13 – diagnostic fitting
Fuel pump
combined with the fuel level indicator sensor into a single unit -
a fuel module
(often called an electric fuel pump). The pressure pump delivers fuel from the tank through the fuel filter to the fuel rail.
Engine Fuel Module 2111 (1.5i):
1 – fuel level indicator sensor; 2 – connecting block; 3 – inlet pipe; 4 – outlet (discharge) pipe; 5 – module cover; 6 – module cover guide; 7 – electric fuel pump in a plastic casing; 8 – intake chamber
Fuel rail for engine 2111 (1.5i) complete with injectors:
1 – diagnostic fitting; 2 – fuel rail; 3 – fuel supply pipe to the fuel rail; 4 – fuel pressure regulator; 5 – tube for draining (draining) fuel into the tank; 6, 7, 8 and 9 – nozzles
Fuel pressure control
installed on the fuel rail. Excess fuel is returned to the tank through the fuel return line.
Engine power supply system diagram 2111 (1.5i):
1 – nozzle; 2 – fuel rail; 3 – diagnostic fitting; 4 – adsorber; 5 – check valve; 6 – throttle unit; 7 – gravity valve; 8 – safety (two-way) valve; 9 – separator; 10 – filler pipe; 11 – fuel filter; 12 – fuel drain line; 13 – fuel line hose connecting the outlet pipe of the fuel module to the fuel filter; 14 – fuel module; 15 – fuel tank; 16 – fuel line connecting the fuel filter to the fuel rail; 17 – fuel pressure regulator
PREVENTION OF THE FUEL SYSTEM VAZ-2114
Prevention, as a rule, comes down to regular cleaning and, if necessary, replacing the fuel pump filter and the main fuel system filter.
Also once every 25-30 thousand km. It is necessary to clean the injectors, which is performed exclusively at a service station. There are two methods for cleaning injectors, neither of which require removing them:
- Ultrasonic cleaning;
- Cleaning with a special washing liquid.
The most effective and expensive is ultrasonic cleaning, which makes it possible to bring back to life even heavily worn nozzles.
A whole complex of devices combined into one fuel system is responsible for supplying fuel to the VAZ 2114 engine. This article is dedicated to it, by studying which you will learn what the power supply system of the VAZ 2114 injector consists of, what is the principle of its operation, and what preventive measures must be taken in order for the system to work out its resource to the fullest.
PRINCIPLE OF OPERATION OF THE SYSTEM
The fuel system of the VAZ 2114, in comparison with foreign cars, is made quite simply, thanks to which a high level of its reliability and endurance has been achieved. The 2114 has an injector for injecting gasoline into the combustion chambers. The presence of an injector provides for a complex fuel dosing system, for which the ECU controller (electronic control unit) is responsible.
The VAZ 2114 fuel pump is driven electronically. The injection moment itself is calculated thanks to sensors that determine the location of the car’s crankshaft. When the fuel pump is turned on, the fuel is supplied through the transport system to the filters, where it is cleaned of impurities, and after the filters - to the fuel rail.
The fuel rail is the part of the intake manifold in which gasoline and gas are mixed in a ratio of 1 to 15 (an increase or decrease in the amount of gas can be adjusted manually, but the optimal gasoline consumption is observed precisely at the above ratio). Next, the mixture is supplied to the injectors, after which it enters the combustion chambers.
Features of the engine power system 11183 (1.6i)
Receiver
engine 11183 (1.6i) is made of plastic.
Engine Intake Module 11183 (1.6i):
1 – flange with an o-ring for fastening the throttle pipe; 2 – receiver with o-rings for connection to the inlet pipeline
Engine Fuel Module 11183 (1.6i):
1 – inlet pipe (for supplying fuel to the pressure regulator); 2 – outlet (discharge) pipe; 3 – module cover; 4 – fuel level indicator sensor; 5 – intake chamber; 6 – module cover guide
Fuel pump
combined with a fuel level indicator sensor and a fuel pressure regulator into a single unit -
a fuel module
(often called an electric fuel pump). Fuel from the pump (through the outlet pipe of the fuel module) enters the fuel filter. Purified gasoline is again supplied through the fuel line and through a tee to the inlet pipe of the fuel module, and then supplied to the fuel rail.
Engine fuel pressure regulator 11183 (1.6i):
1 – hole for dumping excess fuel; 2, 4 – sealing rings; 3 – holes for supplying fuel to the regulator; 5 – body; 6 – terminal for connecting the regulator to ground
Fuel rail for engine 11183 (1.6i) complete with injectors:
1 – diagnostic fitting; 2 – fuel rail; 3 – fitting for connecting to the fuel line; 4, 5, 6 and 7 – nozzles
WHAT GASOLINE TO POUR IN THE VAZ-2114?
This topic has become overgrown with various conjectures and speculations, but we will try to put everything in its place.
The technical data sheet of the fourteenth indicates that the car engine requires AI-95 gasoline, and there is no reason not to trust the manufacturer’s recommendations.
Another thing is that many car owners, over their long driving experience, have accumulated rational doubts about the existence of any serious differences between 95 and 92 gasoline. Adding fuel to the fire was the recent statement by the chief engineer of the Moscow oil refinery, A. A. Abrosimov, that we do not make 95-grade gasoline in our country, and everything that is sold under its guise is either 92-grade or unknown fuel brought from somewhere.
As evidenced by reviews from VAZ 2114 owners who use exclusively 92-octane gasoline, there were no problems with the car during its service life due to fuel, and they see no point in using a more expensive analogue. However, the final decision about what to pour into the fourteenth is yours.
Common FLS malfunctions
Often, the driver can observe the following situation: while driving on a flat road, the instrument panel displays information about a full tank, and after driving off-road, about an empty one. The readings jump, which is clear evidence of a malfunction of the VAZ-2114 FLS. This disease often manifests itself due to wear on the contact tracks.
In some cases, the situation can be corrected quite easily - bend the slider so that it is located above the worn-out place in the diagram. But such a solution to the problem is not always appropriate. Sometimes you have to replace the entire regulator.
Other malfunctions of the mechanism include:
- The pointer is at zero - most likely the problem is related to the limited travel of the float.
- The low fuel light does not light up - there may be a problem with the potentiometer.
- When starting the engine, the indicator does not light up - there is a problem with the electronics.
- Incorrectness of the data displayed on the instrument panel - you should check the tightness of the float.
If such symptoms of a device malfunction appear, experts also recommend checking all the wires securing the nut sensor. The fastening elements clamp the mass, so if they are not tightened well, the contact will appear and disappear. If the sensor does not show the fuel level of the VAZ-2114, then the contacts need to be cleaned, and if this cannot be done, then they can be completely replaced.
COMPONENTS OF THE FUEL SYSTEM
The VAZ 2114 fuel system consists of the following main elements:
- Gas tank;
- Fuel pump;
- Gasoline filtration devices;
- Pipeline system;
- Fuel rail;
- Injectors;
- Waste disposal unit.
Let's analyze each component separately.
GAS TANK
The VAZ 2114 gas tank is a container made of two equal metal parts. A neck is removed from the tank into which gasoline is poured. The neck is connected to the tank via a rubber pipe and clamps.
FUEL PUMP
The fuel pump is located directly in the tank. It has a fuel level sensor, which transmits information about the current amount of gasoline to the ECU. The gasoline pump is connected to a line through which gasoline is transported to the fuel rail. The fuel pump itself consists of several parts - coarse filters, wiring and an electric motor, which pumps fuel. As evidenced by reviews from owners of fourteenth cars, fuel pumps from the German company BOSCH have proven themselves to be the best.
FILTRATION DEVICE
The VAZ 2114 fuel injection system very much depends on the quality of the filter devices used. A bad filter will significantly reduce both the efficiency and the longevity of the entire system.
On the fourteenth, non-separable filters with a working element made of paper are installed. Such filters clog quite quickly, and they need to be changed at least once every 10-15 thousand kilometers.
FUEL RAIL
The fuel rail is located on the intake manifold housing. Its design consists of two parts, separated by a spring-loaded diaphragm. The first is the fuel one, in which the required level of gasoline pressure is set, the second is the air one, air is pumped into it, due to which the diaphragm compresses the fuel chamber and changes the pressure level in it.
Ramp
PIPING AND HOSES SYSTEM
To circulate gasoline from the gas tank to the injectors, the fourteenth uses steel fuel lines located on the bottom of the car. The VAZ 2114 fuel supply system also provides for a return pipeline through which excess gasoline from the injectors is returned back to the gas tank.
VAZ 2114 owners are advised to carefully monitor the condition of the fuel line in order to avoid gasoline leaks. Pipes should be checked regularly for deformation and corrosion.
INJECTORS
Injectors are valves actuated by electromagnetic control. They have a sprayer, with the help of which fuel under pressure is supplied directly to the combustion chambers.
Injectors are one of the most problematic parts of the fuel supply system of the fourteenth (as well as VAZ 2115 and VAZ 2113), the service life of which directly depends on the quality of the gasoline used. If the fine filter does not fully perform its functions, the injectors will become clogged, and from time to time you will need to clean them at a service station (doing this at home is very problematic).
A critical failure of the injectors is a short circuit or break in the winding, after which it is necessary to replace the failed part.
WASTE DISPOSAL UNIT
The EURO-3 environmental safety standard, to which the VAZ 2114 complies, provides for the presence of a gasoline vapor recovery chamber, for which the fourteenth uses an adsorber with activated carbon. The adsorber is connected to a throttle assembly, from which all resulting vapors are sucked out.
Adsorber
How to check the adsorber valve removed from the car
You need to take a medical syringe of suitable volume, simply pull out the piston 2-3 cm and connect it to the outlet fitting. If you press on the piston, it will move with difficulty, which indicates that there is pressure in the valve. Now connect the battery to the electrical part of the control unit and press the piston again: the resistance should disappear. If this does not happen, you will have to buy a new valve.
It seemed like such an inconspicuous element, which at first glance is not important for the car, but without which it cannot work properly. Dips appear, the engine “troubles” and the gas tank may even collapse! And all this is due to a faulty adsorber valve
Many people don’t know what it is, how it works and MOST IMPORTANTLY what it affects. Today I will try to put everything into simple terms, and also describe the main symptoms of a malfunction
It will definitely be useful, so read and watch...
First, let's start with a definition.
An adsorber (from Latin sorbeo - absorb) is a car system that serves to capture gasoline vapors that come out of the tank. When the engine is running, they are sent to the fuel injection system, namely to the intake manifold. When the engine is turned off, some of the vapors are captured by the separator (it directs them back to the tank), and the remaining vapors enter the adsorber, where they are neutralized.
PREVENTION OF THE FUEL SYSTEM VAZ-2114
Prevention, as a rule, comes down to regular cleaning and, if necessary, replacing the fuel pump filter and the main fuel system filter.
Also once every 25-30 thousand km. It is necessary to clean the injectors, which is performed exclusively at a service station. There are two methods for cleaning injectors, neither of which require removing them:
- Ultrasonic cleaning;
- Cleaning with a special washing liquid.
The most effective and expensive is ultrasonic cleaning, which makes it possible to bring back to life even heavily worn nozzles.
Before turning off the adsorber in a car, it is important to understand how much this will affect the performance of the vehicle, including environmental ones, as well as driving safety.
In the article we will analyze the purpose and operating principle of the adsorber, where it is established, when it needs to be changed and whether it is possible to turn it off and drive without the device, how to properly remove it on a VAZ 2110, 2112, 2114, Lada Priora, Grant, Largus, Gazelle and whether it is necessary to flash the ECU after shutdown devices.
Do-it-yourself absorber valve replacement
If signs of malfunction are detected, the valve will need to be repaired or replaced. The adsorber valve is inexpensive and easy to replace. To dismantle you need to have a pair of Phillips screwdrivers and know where the canister purge valve is located. Operating procedure:
The markings on the old and new valves must match.
- Open the hood and find a cylindrical device - an adsorber.
- Remove the negative terminal from the battery.
- Disconnect the wire block by pressing the latch and pulling it towards you.
- Loosen the valve.
- Remove the fittings under the latch and disconnect the hoses.
- Remove the valve together with the bracket from the adsorber.
- The new valve is installed in the reverse order.
Thus, even such a small element as the adsorber valve performs important functions and its malfunction can seriously disrupt the operation of the entire engine. Therefore, it is important to monitor the condition of your car and carry out diagnostics on time.
What is the correct name for an adsorber or absorber?
- In our case, we are talking specifically about an adsorber, since this is a device that, with its solid surface, absorbs gaseous or soluble substances without undergoing chemical reactions. There are periodic and continuous devices.
- And an absorber is a device that completely absorbs gases (vapors) inside, followed by a chemical reaction, as a result of which one of the substances is completely absorbed by a special liquid (absorber).
Therefore, for our situation, the first option will be correct.
see also
- Selecting a fan for ventilation
- Breezer supply ventilation
- Kitchen with ventilation box in the corner design
- Ventilation and heating center
- Ventilation blows in the opposite direction
- Design of a ventilation system for an apartment in an apartment building
- Electric motor for ventilation
- Ventilation without heat loss
- Dimmer for ventilation
- Safety goggles with indirect ventilation
- An anemometer is a device for measuring ventilation performance
Purpose and principle of operation
Adsorber - is a container filled with activated carbon, which acts as a filter element. This element is the main part of EVAP - Evaporative Emission Control (gasoline vapor recovery system).
The system has been integrated into the fuel system of cars with Euro-2 standards and higher. Those. you won’t see an adsorber on a VAZ classic or even a 2108 model, not to mention Moskvich, Volga 3110, etc.
The goal is to reduce harmful emissions into the atmosphere and eliminate gasoline odors in the car interior.
But despite the simplicity of the design, in addition to the housing and the filter element, the adsorber consists of:
- Branch pipes: air supply, vacuum, gasoline vapor removal.
- Separator - here the vapors are condensed and drained back into the tank.
- Gravity (emergency) valve – blocks the overflow of fuel when the machine overturns.
- The solenoid valve (or vacuum valve - for example, found on some Nissan models) is one of the important elements (details below).
- Other additional devices (depending on the car model).
Fuel vapors accumulating in the gas tank must go somewhere. In old cars they escaped into the atmosphere through a special tube. In modern vehicles, fuel tanks are isolated from the external environment.
Gasoline vapor, through a separate outlet pipe, enters the adsorber and condenses there in the form of fuel, which is returned back to the tank or to the intake manifold. In the first case, the process occurs with the engine turned off, in the second - with the engine running.
As soon as the car starts, the ECU sends a signal to the solenoid valve. The latter opens and the activated carbon (sorbent) is purged. Fuel vapors are “extracted” from the sorbent and immediately enter a special receiver and then into the combustion chamber.
To find out more about what an adsorber is, follow the link.
Device
Engines with distributed fuel injection first appeared on front-wheel drive Ladas, starting with the 2111 model. They differ greatly from their carburetor predecessors in a more complex power system design. It consists of 2 subsystems: fuel supply to the fuel rail and gasoline vapor recovery. One of the components of the latter is the adsorber in the VAZ-2114.
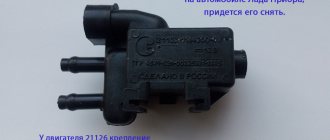
A solenoid valve is placed on top of the plastic cylinder and is controlled by the engine control unit. This part is removable and secured with plastic latches. The valve body is rectangular, and there are 2 fittings (inlet and outlet) and a connector for connecting the ECU.
The hoses are secured to the fittings using clamps. The incoming one is connected to the gravity valve and then to the separator and the gasoline tank. The outlet is connected to the throttle valve assembly.
Where is it installed?
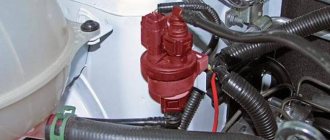
As a rule, the adsorber is installed under the hood on the right in the direction of travel of the car, for example, in the VAZ 2110 it is in the form of a barrel.
In other cars, it can be square and installed to the left of the engine (in the direction of travel), under the air duct (Lada Granta), the vacuum brake booster (some Nissan models) or in the radiator area. For VAZ 2114 it is located near the battery and air filter.
On the Volkswagen Passat B3, the adsorber is located under the air filter on the right side in the direction of travel.
What does the fuel level sensor consist of and how does it work?
The fuel level sensor can work properly for a long time. The mechanism itself is not one of the most painful areas of the VAZ-2114, but, like all other devices, sooner or later it fails. Its breakdown is most often due to the fact that the FLS is in unfavorable conditions.
The device body is quite fragile, which often leads to the sensor breaking due to mechanical damage. Among other things, constant temperature changes significantly reduce its service life. The fuel sensor of the VAZ-2114 is especially painful during the frosty season.
In a VAZ-2114 car you can most often find a sensor of the BM-150 type. Regardless of the design feature, the operation of each fuel controller is based on a measuring float made of lightweight material. The operating principle of the device is as follows: a unique signal corresponds to a certain amount of gasoline in the tank. The design also includes a lever and a resistor element.
Why do they refuse the adsorber?
Despite the advantages of this design solution, and these are: fuel economy, absence of odor in the cabin, reduction of harmful emissions into the atmosphere (although many do not care about this), the adsorber has a number of significant drawbacks, due to which many seek to disable it or completely remove it.
Disadvantages, they are also signs of malfunction:
Therefore, when a product fails, many people turn it off and remove it, or take a more complicated path - they open the case and replace the old activated carbon with a new one.
Features of adsorber removal
If you decide to completely remove the adsorber, you will need:
- replace the gas tank cap with a leaky one;
- replace the firmware of the electrical control unit;
- plug the outlet and supply pipes.
As mentioned earlier, before removing the adsorber, you should think about the advisability of such an action, since there are no unnecessary parts in the car. But even if you decide to delete it, this process should be taken seriously. First of all, you need to take care of the ventilation of the gas tank, which is simply necessary in the absence of an adsorber. Those car owners who convert a carburetor engine to an injection engine have an undeniable advantage. If they do not touch the tank pipes, then they will not be able to disrupt the carburetor ventilation system. In this situation, there is no need for an adsorber in such cars.
In the case of the VAZ-2114 car, which has an injection engine, everything is much more complicated. However, there is no need to remove the adsorber either. It should be noted that the only positive aspect of having an adsorber is the reduction in the amount of harmful emissions into the atmosphere of our planet. The undeniable “disadvantages” of this part include the rather high cost, as well as too much space occupied by the adsorber under the hood. It is the last two facts that, as a rule, become the reason for making a decision to remove it.
But most often, car enthusiasts remove the adsorber after it has failed. Its cost is so high that car owners come to the conclusion that they are not really concerned about the state of the Earth's atmosphere. Moreover, removing this part is quite simple. To do this, you need to put a fine filter on the separator hose. Now all gasoline vapors will go directly into the atmosphere. In this case, there is no need to close the hose from the valve. But if the Check Engine bothers you, then you should adjust the ECU control program so that this light stops glowing on the dashboard.
At the same time, we should not forget that in the Russian Federation there are certain standards regarding the amount of harmful emissions into the atmosphere that a car produces. Therefore, when undergoing a technical inspection of a car, a vehicle without an adsorber may not be allowed to drive in the country.
How to disable or remove the adsorber on a car and do you need to reflash the ECU?
You need to understand that when the adsorber is removed, the solenoid valve is turned off, which is directly connected to the controller and controlled by the latter.
This will lead to error p0443, which we already mentioned above. The tubes are also silenced, in particular the one that goes to the intake manifold.
What is the disadvantage of such a shutdown?
In the ECU firmware, constant air leaks and the flow of fuel vapor are taken into account when forming the air-fuel mixture, despite the fact that all this goes past the mass air flow sensor, the causes of the malfunction of which can be found out by clicking on the link.
If you plug the pipe, which many people do, a certain amount of air will not flow into the intake manifold bypassing the ECU, but the latter still takes them into account.
That is, the controller takes into account one volume of air, but another (smaller) one actually enters. As a result, the amount of fuel is generated by the ECU based on more air than is supplied. This leads to an over-enrichment of the air-fuel mixture.
As a result, the engine does not work correctly, because the mixture is constantly over-enriched where it is and is not needed, and fuel consumption increases.
It is also worth talking about the transient mode of operation of the engine, which can manifest itself when approaching an intersection, a traffic light, lying to a policeman, at the moment when the gas is released.
Therefore, it would be correct to disable the adsorber in the following ways:
- After removing the device, install a nozzle with a diameter of 1 mm into the tube that goes directly past the mass air flow sensor. This will, at least partially, solve the problem, since only air without gasoline vapors will be supplied in doses.
- The ECU is being reflashed (difficult). If it is impossible to remove the Check error, you may need engine chip tuning, which is expensive.
- Dismantling the entire system except the solenoid valve, which operates idle.
- By installing a resistor (valve emulation) in the electrical circuit at 200 - 250 Ohms and 2 watts. To do this, bend the legs of the resistor and insert them into the valve chip. We secure everything with electrical tape. But this doesn't always help.
How to disable the adsorber on a VAZ 2110, 2112, 2114
Taking into account the recommendations above, we do the following:
- Disconnect the power connector from the valve.
- Disconnect all pipes from the adsorber and remove the latter along with the mount.
- We fix the valve in a place where the plug with wires and pipes will reach.
- Connect a hose with a fuel filter to the lower fitting (see photo below).
- To the upper end fitting we connect the pipe going to the intake manifold.
- We put another filter on the pipe going into the tank, similar to the first one.
With this scheme, when the valve opens, clean air enters the system, albeit without gasoline vapors.
We exclude the valve
This method is even simpler. We dismantle everything, including the valve. We put a fuel filter on the pipe coming from the gas tank, and we plug the pipe going to the intake manifold with a bolt and clamp.
The consequences of this method are described above, but this method also has the right to life.
As for Priora, Granta, Lada Largus, Gazelle and other cars, the absorber is turned off in similar ways as described above.
Toyota Chaser
It is worth considering one of the foreign cars, for example, the Toyota Chaser.
The shutdown principle is similar to the previous ones:
- Locate the canister valve. It is located near the mass air flow sensor on the air filter housing.
- Disconnect the chip with wires and all pipes from it (Check may light up on the instrument panel).
- Find the adsorber, disconnect the pipes from it and plug it.
- Disconnect the pipe going to the valve from the throttle assembly and plug it with a bolt and clamp.
- Place a fuel filter from a carburetor VAZ on the pipe going to the tank.
Possible damage to the adsorber
The adsorber, like any other device operating on a car, may at some point become faulty. And in the case of an adsorber, this is not surprising at all, since it is susceptible to clogging.
Determining that the adsorber has failed is quite difficult. This can be done only based on secondary symptoms, for example, increased pressure in the gas tank. If the adsorber is clogged, gasoline vapor remains locked in the tank space, and therefore the pressure on its walls increases significantly. But it is possible to detect the fact that the pressure in the tank has increased too much only mechanically. To do this, open the tank lid and, in case of increased pressure, hear a characteristic hissing sound.
However, it also happens that the pressure in the tank increases so much that the cap can no longer stay in place, as a result of which it simply shoots off. This indicates that the pressure in the tank has reached its critical point as a result of a malfunction of the adsorber, which, in turn, requires urgent replacement.
By the way, many car enthusiasts firmly believe in the fact that by removing the adsorber on a VAZ-2114, nothing bad will happen. But in reality this is far from the case. Moreover, we should not forget that car manufacturers never equip cars with unnecessary parts. It's simply not profitable for them.
Therefore, simply removing the adsorber will not be enough. It needs to be repaired. The most problematic area of this unit is the purge valve, which, by the way, can be repaired by yourself. The only tool required for this action is a flathead screwdriver. But you should be extremely careful when removing it. The fact is that the mount for this valve is made of plastic, which means it breaks easily.
In order to determine whether the valve is faulty, it must be purged. If at this moment no air comes out of it, the valve is broken. If the problem is really in the valve, then the car may experience some problems when starting a hot engine. Among other things, gasoline consumption can be significantly increased.
If this problem is not corrected, the Check Engine light on the vehicle's dashboard will constantly glow, and normal driving dynamics will be lost. Moreover, malfunctions in the adsorber or valve may cause unstable engine operation at idle.
There are only two reasons for a clogged adsorber valve:
- Low quality gasoline.
- Canister filler particles clogged the valve.
By the way, there is another option for diagnosing an adsorber malfunction. If it is significantly clogged, but the gas tank cap is still in place, then from time to time you can hear a persistent smell of gasoline in the cabin, which appears and disappears on its own.