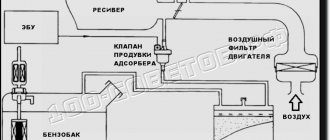
The gas tank of any car always contains vapors formed due to a decrease in atmospheric pressure or heating of the fuel. In order to prevent the leakage of fuel vapors into the vehicle, a special gasoline vapor recovery system (VPSU) is installed. Thanks to it, the vapors retained by the adsorber (essentially activated carbon) enter the intake manifold and burn in the engine cylinders. To regulate the amount of gasoline vapor coming from the adsorber to the manifold, a special solenoid valve is used.
Principle of operation
The adsorber itself allows fuel vapors to accumulate in a special place - the separator. As a result, gasoline turns into condensate and goes back to the tank. Vapors that have not undergone treatment go through double valves of the system, one of which prevents fuel from spilling out during an emergency (for example, a coup), and the second “is engaged” in regulating the pressure in the tank. The adsorber purge valve is located under the hood, and the adsorber itself is located on the tank. The control unit ensures the normal operation of the entire system: it ventilates and removes condensation.
Changing the device yourself
To change the adsorber, it is enough to perform a number of simple manipulations. In this case, there are two solutions - do the work yourself or go to a service station and entrust the problem to specialists.
The advantages of the first option are cost savings and high speed of work. The sequence of actions is as follows:
- Dismantle the old part, freeing it from the fixing elements and discarding the tube through which fuel vapors enter the throttle.
- Discard the block and wires.
- Connect the fuel outlet pipe from the separator and the purge valve.
- Remove the bracket by unscrewing the three bolts.
The work time is 15-20 minutes.
As soon as the faulty unit is dismantled, proceed with the installation of a new device.
Here the sequence is as follows:
- Connect a long piece of rubber tube to the hose through which fuel vapors flow into the purge channel.
- Connect the short part of the tube to the intake tube from the separator.
- Put the adsorber in place.
- Connect the vapor supply pipe to the purge channel, which is installed on the motor cover.
- Connect the block with wires.
- Install a tube between the purge channel and the adsorber. Make sure that the material from which the pipe is made is resistant to oil and gasoline.
Design and operation of the adsorber purge valve
The KPA is an electromagnetic locking device that operates from the vehicle’s on-board network. The valve consists of:
- plastic case;
- valve with spring;
- windings;
- metal core;
- connector
When the vehicle's engine is turned off, no voltage is supplied to the valve and it remains in the closed position. That is, on the motor side, the system that captures vapors is blocked. At the same time, the adsorber begins to “collect” vapors. When the power unit starts, voltage is applied to the valve, causing it to open and fuel vapors to enter the intake manifold. As soon as the ignition is turned off, the control unit is de-energized and the pipeline is closed: no vapors enter the receiver.
Cars of a high price category have a more complex evaporation system. Such machines have special sensors that can “calculate” the amount of air and vapor as a percentage. This allows you to more accurately control the supply of gasoline to the injector.
Is it possible to remove
Some motorists neglect environmental standards and remove the adsorber valve. The words are basically like this: “why do I need it, the car has become slower, the consumption has become higher, I’ll throw it away altogether.” But realistically, is it possible to do this? Will this make the car worse?
It is worth understanding that a working system does not affect the operation of the engine at all, and even saves a little fuel, because the vapors that remain in the main body are then burned out in the engine. Of course, you should not expect that the savings will be huge, but you get a few kilometers of mileage.
Signs of a malfunction of the control unit
First, start the engine: at idle or in cold weather, you will hear a characteristic, barely audible chirping sound. It indicates that the valve is working properly. In order not to confuse this sound with the noise from a working timing belt, sharply press the gas. The character of the chatter should not change. The following signs indicate a malfunction of the control unit:
- lighting of the CHECK signal on the instrument panel;
- determination of error PO441 during testing;
- increased gasoline consumption;
- unstable operation of the power unit when driving;
- unstable idle;
- increase in CO2 content;
- a hissing sound when unscrewing the tank lid (a vacuum has appeared);
- the appearance of a fuel smell in the cabin.
Complete removal of the adsorber from the power system
Some VAZ 2114 owners decide to completely remove this part from their car for reasons of savings and to prevent future malfunctions. There are two ways to do this.
Method 1. After completely removing the adsorber from the VAZ-2114, the hose leading to the throttle valve assembly is closed using a plug. A fuel filter from any VAZ carburetor engine is inserted into the hose running from the gas tank to the adsorber.
Method 2. The adsorber is removed along with the support. The hoses previously connected to it are closed using plugs. A small hole (1-2 mm) is drilled in the standard gas tank plug to connect the cavity to the atmosphere. You can also use the cap from a carburetor “eight” or “nine” to depressurize the fuel tank.
After upgrading the power system, it may be necessary to update the firmware of the engine control unit, since it will perceive the absence of an adsorber as a malfunction in the engine and switch to emergency operation. This threatens to significantly reduce the traction qualities of the car.
The adsorber in the VAZ-2114 is an important element in the engine power system, which allows you to slightly reduce fuel consumption and eliminate the smell of gasoline in the cabin.
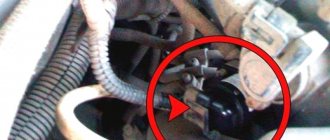
Valve check on site
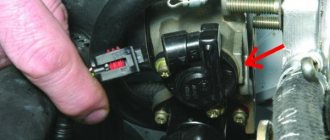
You will need a tester (voltmeter, multimeter) and a screwdriver. The KPA itself is installed on the radiator frame. The device can be recognized by seeing two tubes approaching it, through which the evaporation moves. Further:
- disconnect the electrical connector from the control unit by releasing the block lock;
- using a multimeter, check for the presence of voltage by touching the negative (black) probe of the device to ground, and the red probe to “A” (the letter on the block connector);
- turn on the ignition: the multimeter should show the vehicle's on-board voltage. If not, check the wiring.
Why do some motorists remove it?
Many car enthusiasts decide to remove a functional adsorber, considering it an unnecessary element in the car. At the same time, not all motorists can justify their actions.
Some drivers are sure that the presence of an adsorber leads to a decrease in the dynamics of the car, others - to an increase in the “gluttony” of the vehicle, and to others such a device seems completely unnecessary.
There is also a category of car enthusiasts who remove the device if it breaks and do not return the new element to its place. The reason is the high cost of the adsorber, which was mentioned above.
The work of discarding the adsorber (if you know some aspects) takes no more than 5 minutes. All that is required is to put a fine filter on the separator tube.
In this case, fuel vapors are directed into the atmosphere. In this case, the tube from the valve is closed, and the ECU program is adjusted. If you do not perform the last action, an error appears.
How to check the adsorber valve removed from the car
You need to take a medical syringe of suitable volume, simply pull out the piston 2-3 cm and connect it to the outlet fitting. If you press on the piston, it will move with difficulty, which indicates that there is pressure in the valve. Now connect the battery to the electrical part of the control unit and press the piston again: the resistance should disappear. If this does not happen, you will have to buy a new valve.
What is an adsorber, what task does it perform, what problems can arise, we’ll talk about this and much more in today’s article.
Many car owners have no idea, let alone the structure of the system, and sometimes even its existence. Therefore, the goal of this article is to “put everything into perspective,” including finding out how the device works, as well as where it is located.
Why do you need an adsorber?
It was originally created as a tribute to environmental standards, more precisely under EURO2. By and large, the motor can be configured so that it can do without it. But, taking into account modern standards, vapor leaks are unacceptable. Plus, the adsorber does not allow fuel vapors to enter the cabin, which, as you understand, is also unpleasant. If on old cars, still of the carburetor type, such a system did not exist, in principle, on all modern injectors, it is mandatory.
What is the adsorber and where is it located?
The adsorber is structurally a cylinder, a hollow one, inside of which there is a so-called filter component. The adsorber also consists of a number of additional modules, for example:
• The first is the container in which the filter is placed.
• The filter element is often simple granular activated carbon.
• Separator, a device that receives and sends retained fuel vapors back to the tank.
• Magnetic valve responsible for changing operating modes.
• The gravity valve prevents fuel overflow if the vehicle rolls over.
• Various connecting hoses and tubes.
Perhaps one of the main elements of the entire adsorbing system is the magnetic valve. The mode of operation and the change of modes depend on it. That is, it is responsible for the timely switching of the accumulation mode, when vapors accumulate in the tank, to the mode of transferring vapors back to the tank.
Components
In fact, this is a large plastic jar with activated carbon inside, because it is this composition that perfectly fights gasoline vapors. The main parts can be described as follows:
- Separator + gravity valve
- Pressure meter
- Filter part (usually carbon)
- Connecting tubes
- Solenoid valve
As you can see, there is absolutely nothing complicated. Separator - serves to catch part of the gasoline, then sends it back to the tank. Gravity valve - almost never used, but it is needed in emergency situations, for example during accidents, it prevents fuel from overflowing from the tank (for example, when a car overturns).
The pressure sensor is a very necessary thing - it monitors the pressure of gasoline vapors inside the tank, if necessary, it opens and resets it, preventing the structure from being damaged.
The filter part is, as I wrote above, a large jar into which coal powder is poured, in fairly large granules. This is done so that vapors can pass and condense freely.
Removal and inspection
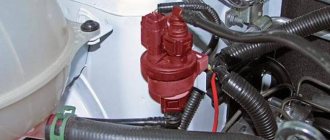
2. Having released the latch, disconnect the wiring harness block from the canister purge valve.
3. Connect the negative voltage probe (to the car body).
4. Turning on the ignition, use a voltmeter to measure the supply voltage at terminal A of the wiring harness block (the pins are marked on the block).
Comment. The voltage at the terminal must be at least 12 V. If the voltage does not flow to the block or it is less than 12 V, it means that the battery is discharged, the power circuit is faulty, or the ECU is faulty.
5. Use a Phillips screwdriver to loosen the clamp securing the hose to the canister purge valve.
6. Remove the hose from the valve nozzle.
Advice. If the hose on the nozzle is seated tightly and cannot be disconnected, then you can remove the valve from the adsorber and, by rotating the valve, remove the hose from it.
7. Using a screwdriver, remove the valve from the adsorber.
8. We apply 12 V voltage from the battery to the valve terminals (“+” to terminal A, “-” to terminal B).
Comment. When voltage is applied to the terminals, the valve should open with a characteristic click. The faulty valve must be replaced.
Separator replacement
Due to the fact that the separator is an ordinary tank (most often plastic), it is hardly worth trying to repair it with improvised means - due to the high fluidity of gasoline, the problem may remain, and time for repairs will be wasted. That is why the best option in this situation is replacement (especially since a new vapor separator is very inexpensive).
To replace this device you will need the following set of tools:
- Phillips screwdriver;
- key to 8;
- key to 10;
- ratchet;
- head at 13.
Replacing the separator
The replacement of the separator itself is carried out in the following order:
- Place the machine on a pit or overpass.
- Apply the handbrake.
- Remove the rear bumper trim.
- Fold back the right side of the upholstery inside the trunk.
- Using a 10mm wrench, unscrew the separator shield fixing nut.
- Remove the fuel tank cap.
- Using a screwdriver, loosen the clamp where the inlet hose connects to the pipe at the bottom of the car.
- Remove the hose from the filler tube.
- Using a 13mm socket, unscrew the nut securing the clamp that presses the filler tube to the body.
- Using the same head, unscrew the fasteners of the filler pipe bracket.
- Loosen the clamp holding the gas tank ventilation hose to the filler tube fitting.
- Remove the ventilation system hose from the fitting.
- Remove the filling tube from the separator.
- Remove the O-ring from the junction of the separator shield and the tube.
- Unscrew the bolt securing the separator shield to the car body (you will need a size 8 wrench).
- Move the separator shield and separator to the side.
- Loosen the clamp securing the separator hose.
- Remove the separator hose from the fitting.
- Remove the old separator.
The new gas tank vapor separator should be installed in exactly the same order, but in reverse order.