If when you press the brake pedal it fails, and after several presses everything returns to normal, it means there is air in the system . He needs to be kicked out, that is, pumped up. On the VAZ-2114 hatchback, you need to pump the brakes “diagonally”: start from the rear left wheel, move to the front right, etc. Also, if the rear axle is suspended, then install a screwdriver between the pressure regulator and the bracket.
We study the design of the brake system - watch the video.
Preparatory stage
If you decide to bleed the brakes yourself, it is important to know that when bleeding you must use the same brake fluid as the one in the system. No other liquid can be used. You must first check the tightness of the system. To level up you need one more person. You will also need a hose of a suitable diameter for the bleeder fitting, a glass or plastic container (transparent), a wrench and a rag for cleaning the caps.
It is very important to know in what order to remove air from the brake system. This procedure must be carried out diagonally, alternating the rear and front brakes:
- rear right;
- front left;
- rear left;
- front right.
Necessary tool
The pumping process should be carried out with a partner, because... It will be difficult to do the work yourself. To get results when working independently, you will need the following tools:
- A hose suitable for the fitting on the wheels of the car;
- Set of keys and sockets;
- Brake fluid;
- A rag for cleaning dirt from the caps;
- Container for liquid accumulation;
- Spare fittings in case the old ones break off.
It is also worth knowing the procedure for bleeding the brakes on a VAZ 2114, because... When performing the procedure, you should start with the rear wheels.
Sequence and correct procedure for pumping brakes on a VAZ-2114
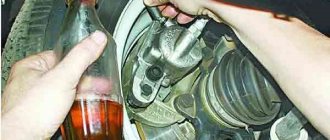
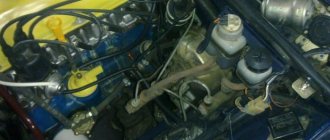
- We find a fitting on the rear wheel drum (photo 1). It is usually closed with a cap that is removed. Place a hose on the fitting.
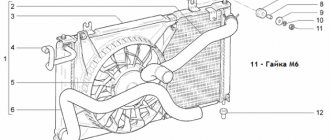
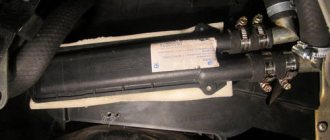
Rear brake cylinders
- Ask an assistant to press and release the brake pedal several times.
- Now the pedal remains pressed. Using the “8” key, turn the fitting half a turn to the left. The liquid is drained into an empty container (photo 2), the pedal “falls”.
- As soon as the liquid stops draining, tighten the fitting. The pedal is released.
- If there were bubbles in the drained liquid, repeat steps 2-4. In this case, you must ensure that the tank is filled at least to the MIN mark. If necessary, top up.
- Move to the front brake mechanism (photo 3), perform steps 2-5.
Bleeding the front cylinders
- Screw on the protective caps.
Possible sequence for pumping brakes for a VAZ-2114: rear right wheel, front left, rear left, etc. Each circuit is pumped starting from the rear wheel.
Articles
- 2101-1602591 – rear cylinder fitting;
- 2101-1602591-01 – disc brake fitting;
- 2101-1602592 – fitting cap.
How to bleed the brakes alone?
It seems that one person can bleed the brakes. But then you need to increase the pressure in the tank. The source of air will be the tires. By the way, the limiting value should be considered 2 atmospheres.
Cover from VAZ-2106 and nipple for tubeless
The cap is placed on the brake reservoir
The cap with the nipple is screwed onto the neck of the tank. Next, the “extension cord” is assembled. The donor wheel is hung out when bleeding the brakes.
Bleeding device
But you can also use a camera
Or a compressor. Do not apply strong pressure; the hose may burst. In this case, you will stain the entire engine compartment.
You can open the fittings one by one and drain the liquid. But you also need to monitor the fluid level in the tank.
Topping up is done as follows: disconnect the “extension cord” from the tire, unscrew the cap, etc.
Preparation for work
First of all, disconnect the sensor connector and secure this connector next to the tank. Then open the lid and add liquid to the MAX mark. This requires DOT-4 fluid .
Level sensor connector
On any car, including the VAZ-2114, the brakes are pumped with the lid closed. This means we tighten the lid harder, and then roll the car onto an overpass or pit.
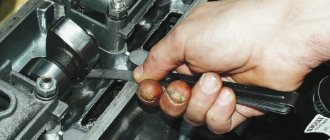
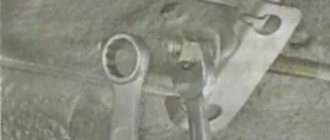
If a lift is used, it means that when bleeding the rear cylinders, a spline is placed in the regulator (sorcerer).
Pressure regulator (sorcerer)
The screwdriver here is between the bracket and the rod. When bleeding the front brakes, remove the screwdriver.
Safety precautions: the handbrake must be engaged and the ignition key must be removed.
We pump the brakes on a VAZ 2115. We do it ourselves, quickly and without problems
Many drivers sooner or later encounter such a problem when they need to bleed the brakes on a VAZ 2115. Essentially, this process removes air from the braking system in any car. It would seem that nothing bad will happen if air does get into the brake system of the car, but in practice such careless attitude towards the car very often leads to serious damage. If you think that you don’t yet need to bleed the brakes on your VAZ 2115, then take a look Pay attention to how the car is moving and how gently you press the brake pedal.
We recommend: Why don't the gears shift when the engine is running?
It is because of air getting inside the mechanism that such problems can arise. Before bleeding the brakes on a VAZ 2115, you should make sure that the brake system does not contain air and is completely sealed. Carefully check the integrity of all its components, and only then start working. By the way, do not forget that you need to fill the brake system with the same brand of oil that was previously filled.
You should not experiment when you decide to bleed the brakes on a VAZ 2115, since this will not lead to anything good. You can easily ruin everything and then you will have to change the entire brake system. And one more piece of advice, when you want to bleed the brakes on a VAZ 2115, take an assistant with you, because this procedure is quite difficult to cope with alone. Preparation for work Bleeding the brakes on a VAZ 2115 is not as easy as it seems, so let’s move on directly to the process of bleeding the braking system. Everything needs to be done one by one, namely:
- Rear right;
- Front left;
- Rear left;
- Front right.
This is described in more detail in the article “Sequence of bleeding the brakes”. It is very important to do everything in exactly this order if you decide to bleed the brakes on the VAZ 2115 yourself, otherwise nothing will come of it. First of all, check the brake fluid level. The most important thing is that at the first stage of pumping it reaches the maximum amount.
If necessary, add more, but the mark should reach “MAX”. When you understand that the oil level is normal, you can start working. Sometimes the rear wheels of a car may be hanging out. To get rid of this problem, you need to unlock the pressure regulator and insert a screwdriver between the piston and the plate. In fact, everything is done easier in a specialized service station, but this guide is intended for drivers who decide to bleed the brakes themselves.
By the way, do not forget to remove the screwdriver from the brake system after you have fixed the problem. Bleeding the brakes If you have done all of the above, then it is time to move on to the main work. By adding oil and dealing with the rear brake problem, you have only prepared your VAZ 2115 for bleeding. After this, the entire brake system must be thoroughly cleaned. The most important thing is that the air release valve is in perfect condition, otherwise it will not be possible to bleed the brake system.
We recommend: How to check the oil pressure in the engine and what it should be?
In any case, it can be replaced, but it will take a lot of time. If everything is in order with the car, then feel free to remove the protective cap from the valve. Now you need to insert one end of the hose into the valve, and place the other in a container with brake fluid. The most important thing is that the end of the hose is accurately immersed in the brake fluid, and not just hanging on it. After this, you just need an assistant.
His task will be to press the brake pedal. You need to do this about five times, and then hold the pedal down constantly. Completing the work In general, the procedure for releasing air must be carried out several times until there is no air left in the valve. At this moment, monitor the amount of oil in the tank, since its level should not be below about.
Bleeding the brakes on a VAZ 2115 is not that difficult if you work in pairs, so be sure to call someone for help. When the brakes are bled, check how they work on the other wheels and, if necessary, carry out exactly the same operation with them.
How to bleed the brakes alone?
I decided not to spend money on this procedure and stir up something like that so as not to return to this issue. And so, in order...
We take the plug of the expansion tank of the brake system, drill a 16 mm hole, this is exactly the inner diameter of the upper skirt where the fuel fluid level sensor was located, while it (the plug) retains the greatest strength. It looks something like this:
Next, we find a fitting of a suitable diameter (let me remind you, it is 16 mm) and try to push it in. It should fit very tightly and have an outlet of such a diameter that you can put a hose on it with the diameter of a regular pump (or compressor). I found this one in the garage:
I sharpened it in the place intended for turning with a key, to the recommended 16 mm. It turned out like this:
Then he inserted it into the intended place in the traffic jam, it stood very tightly, which is what was required to be achieved.
Because tight fixation is not enough, I decided to pour epoxy glue inside the cork, which was done. The glue was poured into the place indicated between the two red circles in the figure below:
There are grooves in the plug to prevent vacuum and excess pressure in the expansion tank, so they also need to be carefully filled with epoxy glue, an ordinary toothpick will help with this, and of course glue.
The rubber seal, which is normally placed in the plug, must be left, carefully cutting off the “skirt” to prevent the passage of air during pumping. To be honest, I missed this, so I used regular foam, which I wrapped around the neck of the expansion tank. In principle, the nano-cork is ready.
Next, everything is even simpler, we take a hose for the pump 1.5-2 m long (as convenient for you) and a tip, which we usually put on the nipple when inflating the wheel. I recommend taking the one that is at 90 degrees, because... a straight line will allow air to pass through when the hose is bent. We secure everything with clamps and the device is ready. We also need a thin hose to put it on the bleeder fitting, a transparent bottle, and a 10 or 8 wrench.
The whole thing looks like this:
To replace the fuel tank and flush the brake system, I needed 1.5 liters. DOT4 brakes and 15 minutes of time. The result is obvious, in the can of brake fluid that was there, and in the bottle that is now (drained at the time of pumping the last circuit).
I hope this idea will be useful and useful to someone...
I would be grateful for comments on improving this device.
Where did the air come from?
Air in the brake system may appear for the following reasons:
- Got in while changing brake fluid (How to change brake fluid?).
- Got it when replacing any brake elements, for example when replacing a brake cylinder (How to replace a rear brake cylinder?).
- Air may also appear due to a leak in the brake system, for example, cracked brake fluid pipes that need to be replaced immediately.
- The rear brake cylinder is leaking.
- The front brake cylinder is leaking.
- A leaky GTZ (brake master cylinder) can also be a problem.
Important: Over time, water gets into the brake fluid, as evidenced by its darkening. In this case, you need to replace the brake fluid. And in general, it is recommended every three years or 45 thousand km. mileage, change the brake fluid, because One way or another, condensation accumulates in it.
Also, prevent brake fluid from getting on the car body, otherwise it will easily wash away the paint to bare metal.
Replacing the TJ: reasons
If characteristic malfunctions occur, the brake fluid must be replaced. Let us describe the main points entailing the replacement of the TJ in the VAZ-2114:
- Leaks from brake cylinders leading to loss of fluid.
- The occurrence of air pockets in the pipeline and hoses. They appear due to broken tightness in the system.
- Deformation/scuffs of hoses removed from tires. The hoses also need to be replaced.
- Damage to the integrity of the sealing rings in the gas turbine engine, which leads to leakage of the fuel fluid.
- Leakage of working substance through the sealing ring of the pusher in the rear tires.
- Depressurization of the system circuit, which can be felt by a failed pedal.
- Mechanical failure of any part of the brake system. In addition to dismantling or installing new spare parts, you will need to replace the TJ.
Sequencing
First you need to open the hood of the car and open the cap of the brake fluid reservoir. Make sure it is filled to the maximum. If not, add to about. After this, follow the steps in the following sequence:
- On the rear right wheel, find the cap that covers the fitting. Remove the cap and clean it of dirt.
- Fill a clear glass or plastic container with brake fluid.
- Place one end of the hose onto the fitting and place the other end into a glass or transparent plastic bottle. The hose must be lowered into the liquid.
- Ask your partner to sit behind the wheel and gently press the brake pedal 7 times with breaks of 2 seconds. After this, he must press the pedal again and leave it in this position (pressed all the way).
- While an assistant holds the pedal, use a wrench to unscrew the fitting 2-3 turns.
After all these steps, you will see that brake fluid will flow into a transparent container through the hose. Watch how it drains.
There will be visible air bubbles in it that need to be removed. Drain the liquid until the bubbles disappear. Then screw the fitting back on. Only after this can your assistant release the pedal. When the liquid flows into the container, monitor its level in the tank. If necessary, add brake fluid. If during pumping it completely leaks out, you will have to start the whole procedure from the beginning.
Repeat similar steps for each wheel in the above sequence. This mechanism of action is suitable not only for the VAZ-2114, but also for models 2113, 2115.
We recommend: How often should you change the air filter in your car?
Many car owners are wondering: is it possible to carry out pumping alone? Yes it is possible. Only in this case, the pressure should be produced not by pressing the pedal, but by using a powerful compressor for these purposes. It should create a pressure of 2 atmospheres.
Car owners have to carry out pumping in different situations. Air can enter when replacing copper pipes at the rear or other components of the brake system, when hoses are damaged, when replacing brake fluid, or if the seal in the unit is broken. Regardless of the reason, after air enters the GTZ (brake master cylinder), bleeding must be carried out. Otherwise, the brake simply will not work.
The failure of the brake pedal in VAZ cars can be overcome by carrying out the process of bleeding the system.
Before you start bleeding the brake system, you need to study the car's instructions, which contain a clear bleeding scheme. If there is no such scheme, then the wheels are pumped from right to left (rear right and left, then the front ones in the same way).
You also need to prepare the following necessary elements: a hose and any plastic or glass container.
The work progresses like this:
- Brake fluid is poured into the master cylinder;
- The brake pipe fittings are cleaned;
- Brake fluid is added to the container, into which one end of the hose is inserted. The other end is inserted into the fitting;
- An assistant is brought in to press the brake pedal several times and hold it down. At this time, you need to unscrew the fitting and check the liquid that leaks out. When the system is aired, air bubbles may be noticeable;
- Next, the fitting is tightened and bleeding continues with three wheels, which should be pumped according to this scheme.
If bleeding the wheels yourself is not successful, then you need to contact a service station, where highly qualified specialists will inspect and bleed the car’s brake system.
Reasons for replacement
There are several characteristic malfunctions that must necessarily entail the replacement of the TJ.
- The presence of leaks from the brake cylinders, which lead to the loss of a large amount of fluid.
- The appearance of air pockets in the pipeline and hose system. They arise due to a leak in the brake system elements.
- Scuffs or deformation of flexible hoses installed on wheels. They also require replacement of the hoses themselves.
- Violation of the integrity of the sealing rings in the main brake cylinder, which leads to leakage of the working substance.
- Fluid leaking through the sealing ring of the pusher on the rear wheels.
- Violation of the tightness of the system circuit. This can be felt by a partially collapsed brake pedal.
- Mechanical failure of one of the elements of the braking system. In addition to repairing or replacing them, you will definitely have to change the TZ.
Choice of TZ
IMPORTANT! To ensure normal functionality of the braking system, the brake fluid must be selected correctly. Modern compositions such as "Rosa" consist of 93-98 percent polyglycols. The remaining percentages are additives that help combat oxidation and corrosion on the metal components of the vehicle.
To choose the best option for a brake substance, you should take into account the main parameters of its selection so that it meets the requirements of the VAZ 2114 model. After all, this is the car we are talking about.
| Index | Requirement |
| Boiling point | It must be high so that steam bubbles do not form inside the system and block the flow of liquid |
| Viscosity | Good viscosity ensures efficient pumping of fluid through the system |
| Hygroscopicity | This criterion is responsible for the ability of a substance to absorb water |
| Lubrication | The thermal fluid should not only promote braking, but also prevent overheating of the internal surfaces due to the lubricating effect |
| Neutral to rubber | The composition should not have a destructive effect on the rubber elements used in the system |
| Corrosion resistance | The liquid should protect metal elements from corrosion and rust. |
| TZh class | You should choose the DOT 3 marking |
Having chosen the vehicle that is suitable for your car, you should replace it. It’s entirely possible to do the work yourself, but you should first read the instruction manual, consult with specialists, or watch visual video lessons.
Why do you need a brake force regulator?
The function of the regulator is to temporarily reduce the braking force during heavy braking. The fact is that force evenly distributed on the rear and front axles can lead to a skid of the car. If the rear brakes start working a little later and weaker than the front ones, this does not happen.
Based on the above, we can conclude that the sorcerer is an element of the car’s safety system, partly preserving its stability on the road when the brake pedal is pressed in an emergency. On modern models, this function is performed by ABS. That is why there is no need today to use a technically outdated device in production.
Examination
The operation of the VAZ-2109, 2110 and other AvtoVAZ models is checked on the move, in closed areas. To do this, accelerate the car to a speed of 40 km/h and sharply press the brake. The rear wheels should lock 1/2 second later than the front wheels.
The wheels are monitored by an assistant located outside the car. If wheel locking occurs noticeably later or does not occur at all, and also if the rear axle is locked simultaneously with the front, the sorcerer adjustment procedure is repeated.
To increase the response time of the rear brakes, the gap between the adjuster and the bracket is increased; to shorten it, it is reduced accordingly.
Source
Setting the brake force regulator
Adjustment of the sorcerer should be done on an overpass or inspection hole. At the same time, the car is unloaded and driven to the work site. To perform the manipulation you will need:
- Socket wrench 13 or corresponding socket;
- Drill diameter 2 mm.
To adjust the sorcerer, use a wrench to loosen the bolt securing it to the lever bracket. Next, use a screwdriver to move the bracket until the resulting gap allows you to insert a prepared two-millimeter drill into it. After this, the bolt is tightened.
Note: the brake pressure regulator of the VAZ-2110 and previous VAZ models turns sour during operation so that it is not possible to move its bracket. In such a situation, you should pour WD-40 liquid over the rusted area, wait 15-30 minutes, and then use a hammer to move the part to the side using a soft drift.
Possible malfunctions of the regulator
In general, there are few malfunctions that can occur in the sorcerer. These include:
- Valve jamming;
- Misalignment of position;
- Brake fluid leaks.
A deregulated sorcerer can be adjusted. You can determine the need for adjustment by the behavior of the car when you press the brake. If the regulator is set incorrectly, the car starts to toss to the side.
If the valve jams or fluid leaks, the mechanism must be replaced. Theoretically, it can be repaired. However, the process of such repairs is complex and expensive, which makes it unprofitable.