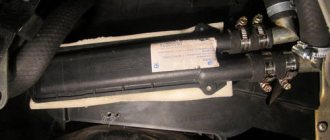
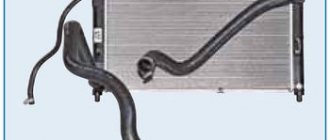
Let's say a car owner, for some reason, decides that the engine radiator needs to be replaced. Usually, this happens after unsuccessful flushing of the cooling system, after an accident, and so on. In Kalina-2, you can replace the radiator without even disassembling the unit called the “bumper”.
That is, the protective mesh (grid) will remain in place. Next we look at what exactly needs to be dismantled before removing the radiator. Note that this unit itself is attached to the body with two M6 nuts. Confirmation is in the standard drawings.
Diagrams of the radiator assembly and its fasteners
When to change the radiator
Regardless of location, design and intended purpose, radiators should be replaced when a leak is detected. Some types of coolers can be repaired. At the same time, specialists plug the damaged areas, which makes it possible to continue to operate the device. The disadvantage of the restoration procedure is a noticeable decrease in the efficiency of the part. The machine overheats faster and does not maintain operating temperature well.
Cases of decreased trafficability of highways are considered separately. When using low-quality antifreeze, sediment and scale may form. When sludge completely clogs the tubes, the part must be decarbonized or replaced.
Basic radiator malfunctions
Malfunctions of this Kalina unit do not occur so often and are the result of wear and tear due to natural causes of the car owner’s negligence. There are two most common types of problems:
- coolant leak;
- coking of cavities inside the radiator.
Leaks are dangerous because a decrease in coolant level leads to an increase in engine temperature. This leads to overheating and jamming of the motor. A leak of hot antifreeze can be dangerous. The fluid in the system is under pressure, a leak can form a fountain, and contact of hot antifreeze on exposed skin will cause burns.
Coking disrupts the antifreeze circulation process. As a result, the lower part of the radiator begins to cool, and then the entire heat exchanger. The liquid will not cool, causing the engine to overheat. In most cases, the cause of coking is ordinary scale. This happens when tap water is poured into the SOD. Less commonly, blockages occur due to mixing oil and antifreeze. In this case, the reason is the loss of tightness of the cylinder head gasket.
At an early stage, coking is difficult to detect. In advanced cases, mixing oil and antifreeze forms a consistency similar to jelly, which makes the heat exchanger tubes difficult to pass or completely impassable.
Replacing the radiator Lada Kalina 1st generation
The repair procedure is as follows.
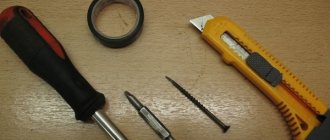
- Prepare the required materials: a Phillips screwdriver, 10-mm sockets and open-end wrenches, a container for draining the waste,
- The car is thoroughly washed and left in the inspection pit to cool the power plant. When performing repairs, care must be taken - even small debris should not enter the cooling system.
- After the car has cooled, drain the waste into a previously prepared canister. Initially, the cover of the radiator and radiator opens, then the drain opens and the liquid flows on its own to where it is directed.
- Loosen the clamp securing the upper pipe and remove it. The lower hose is unscrewed in the same way.
- Next, you will need to release the seal of the expansion tank and radiator. Using pliers, loosen the plastic clamp and pull the thin hose off the tube flange.
- The next step is to remove the radiator itself. Using wrench No. 10, unscrew the two screws securing the part to the car body.
- Tilt the radiator approximately 10-15 cm towards the engine and pull it up. After this, the part should easily separate from the machine.
- If plastic fasteners are stuck at the bottom of the device, they need to be removed and moved to the body brackets.
When installing it back, there is no need to replace the lower cross member of the Lada Kalina radiator frame - the part is put back in place in the reverse order. But for convenience, the operation can be performed.
Fundamentally, replacing the radiator of a 2nd generation Lada Kalina is practically no different from the procedure performed on a car of the first modification. The main difference is only the need to first remove the plastic engine cover.
How to remove a radiator (step by step instructions)
Let's assume the following requirements are met:
- The negative terminal is disconnected;
- There is no antifreeze in the cooling system;
- The 16-valve engine trim was removed.
Then, you can begin to dismantle the fan cooling the radiator. It may be necessary to remove the air filter module, which prevents free access to the engine compartment. The module is not completely dismantled, but simply taken to the side. Then you can remove the fan:
- Disconnect the fan power connector;
- Unscrew two metric 10 located on top of the casing;
- The same bolt is located below. It needs to be unscrewed with a spanner;
- The fan casing must be carefully guided upward (along the guide on the radiator), then disengaging the plastic tab.
An illustration for each action is given below.
Disabling the connector Unscrew two screws at the top of the casing Unscrew another screw from the bottom Pull the casing vertically upward
If the fan has been completely removed, the only thing left to do is disconnect the hoses from the radiator. This will be easy to do.
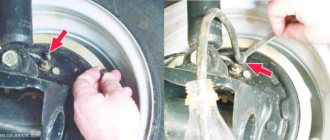
Using pliers we squeeze the two antennae of the clamp
Squeezing the antennae of the mounting clamp, the part is moved away from the radiator. Then, each hose can be disconnected.
It is important to know that there is always antifreeze in the cooling system, albeit in small quantities. To carry out these actions, wear protective gloves. It is recommended to disconnect the outlet hose (bottom) first, placing a free container under its pipe.
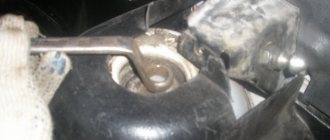
The radiator itself is secured with two nuts located above the top edge. Unscrew each nut using a 10mm wrench:
Both fastening nuts must be completely unscrewed
After completing this action, you need to remove two washers. Then, the radiator block is removed, tilting it towards the engine:
The radiator block is removed in one movement
There will be two rubber “feet” left at the bottom. Don't lose them! These details will be used later.
If it is necessary to replace the radiator of the Kalina-2 cooling system, perform all the indicated actions. Then, a new unit is installed. In this case, the entire sequence will be the reverse of what was discussed above.
Don't forget to fill in antifreeze before starting the engine. When the engine has run for 2-3 minutes, add coolant. How to get rid of air in the CO of Kalina-2 is described below. Happy replacement!
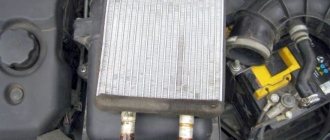
Replacing a heating system radiator
The planned replacement of the stove radiator on the Lada Kalina is carried out as follows.
- Allow the car to cool and drain the antifreeze from the cooling system. To do this, unscrew the plugs of the head radiator and expansion tank. Next, remove the drain plug and allow the liquid to drain into a pre-positioned container.
- Disconnect the transmission rods from the module itself.
- Having moved into the car interior, it is recommended to remove the front seats - this is not necessary, but will increase the ease of repair.
- Next, remove the gearshift lever along with the panel and drive. Also remove the fasteners.
- The next step is to remove the center console trim using a Phillips screwdriver.
- Next comes the removal of the gear lever housing.
- Remove the opened radiator from the pipes and fasteners and remove it from the car.
- Reassembling the unit is performed in reverse order.
ODS device of Lada Kalina
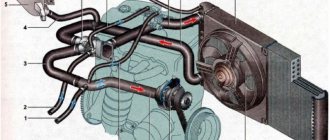
Kalina 1 and Kalina 2 cars use a liquid cooling system. It consists of an engine jacket, radiator, electric fan, pump (water pump), expansion tank, thermostat and connecting hoses. The coolant moves through two circulation circuits. In a small circle, antifreeze circulates only through the engine jacket, while in a large circle, the liquid passes through the radiator.
Expansion tank
Used to pour liquid into the system. It is made of heat-resistant plastic of a translucent color to allow you to control the level of antifreeze. There is a special pipe on the top through which the tank is connected to the radiator steam outlet.
The tightness of the entire system is ensured by the valve cover, which has inlet and outlet valves. The latter is designed to maintain pressure in the SOD above atmospheric pressure. Due to this, losses in the form of steam are reduced, and the boiling point of the working fluid increases. The exhaust valve of the cover opens when the pressure rises to 1.1 bar, and the inlet valve opens when the pressure drops to 0.13 bar and the engine cools down.
water pump
This is a centrifugal pump with blades. It is belt driven from a crankshaft pulley and is included in the gas distribution system. The pump is made of aluminum. This unit cannot be repaired; if it fails, it can only be replaced. Rotation occurs due to a double-row non-separable bearing; its high-temperature lubricant is designed for the entire service life. There is a toothed pulley at the front and an impeller at the rear.
Thermostat
Designed to redistribute coolant flows, it contains a temperature-sensitive element and two valves. When the engine cools down, one of the thermostat valves is in the closed position, and fluid circulates through the motor jacket - only a small circuit is used. As the temperature reaches 85 degrees, the second valve begins to open slightly, allowing antifreeze into the radiator and closing the bypass channel. Full opening occurs at a temperature of 100 degrees. In this case, all the liquid begins to pass through the cooler.
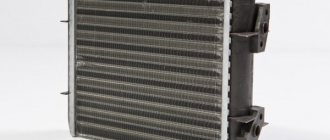
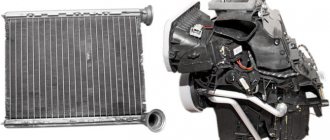
Engine radiator
The heat exchanger can be monolithic aluminum, tubular, or plate type. Its device uses two plastic tanks that are connected by tubes. The upper one is inlet, and the lower one is outlet, through which the cooled liquid is sent back to the engine. Near the first there is a steam outlet connected to the expansion tank. The radiator on Kalina is complemented by an electric fan. There is a drain plug at the bottom of the outlet tank.
An electric fan cools the liquid forcibly. It is turned on via a relay after a command from the ECU when the temperature reaches critical levels.
Radiator design
The cooling system is complemented by a heater radiator, which is integrated into the ODS and is used to heat the air in the cabin, since hot antifreeze also passes through it. The controller monitors the coolant temperature using a sensor that is installed in the cylinder head and transmits readings to the instrument panel. To transmit a signal to the controller, a sensor installed on the exhaust pipe, near the thermostat, is used.
Differences between modifications with air conditioning
Some configurations of the Lada Kalina are complemented by air conditioning, which is part of the climate control system and is used to cool the air in the cabin. The device cannot operate if the outside temperature is below 5 degrees, the engine is not running, or the heater fan is on. The air conditioning compressor is driven by the engine, and this is the main disadvantage of the installation.
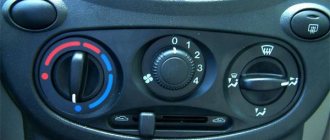
The use of a cooler increases fuel consumption and negatively affects dynamic performance. The temperature is adjusted using the knob on the climate control unit in the cabin. In a car with air conditioning, the air flows first to the evaporator and then to the heater core.
Replacing the radiator insert on models with air conditioning
Replacing the air conditioner radiator on Lada Kalina
The sequence of actions is as follows
- Remove the car bumper.
- Pour the antifreeze into a container prepared in advance.
- Disconnect the radiator fan terminals.
- Remove the pressure pipes and plug them to prevent dirt from entering.
- Press out the plastic fasteners of the cooling system and remove the air conditioner radiator from the car.
Installation of a new element is carried out in the reverse order.
If it is necessary to install a new element, the plastic line plugs are removed only immediately before installing it on the machine.
Cooling system upgrade
The main disadvantage of the Lada Kalina SOD is the appearance of air locks, which can cause overheating and failure of the power plant. In order to avoid such situations, car owners upgrade the cooling system themselves. Several methods are used for improvement:
- installing a 6-hole thermostat;
- adding a coolant filter;
- installation of a shut-off valve for the antifreeze inlet pipe on the heater.
The system can also be supplemented with a button for turning on forced engine cooling with a fan, and tubes for steam removal can be added.
To prevent air locks, some car enthusiasts recommend removing the valve from the valve cover. But this can lead to overheating and jamming of the motor. The problem can be solved by making changes to the software, reducing the boiling point to 98 degrees.
The most effective way to modernize the SOD is considered to be modification of the steam outlet. A plug is installed in the branch pipe of the expansion tank connecting it to the large circuit. The fitting is released and connected to the lower hose of the stove through a tee. The thin hose from the throttle valve is plugged. The fitting is connected to the expansion tank, into the upper part of which an additional nipple is cut. You can use a tee instead. As a result, the steam removal is transferred to the small circle.
Installing a 6-hole thermostat allows you to maintain a stable temperature in the system and improve the performance of the interior heater. To prevent blockages, the SOD is equipped with a coolant filter. In the summer, installing an additional stove faucet will help. Some car enthusiasts install another pump. As a result, the fluid circulates faster, the engine warms up in a shorter period of time, and the risk of overheating of the power unit is reduced.
Radiator dismantling in Kalina
To remove the designated assembly and related components, you will need to use the following tools:
- wrench "10" (socket type);
- pliers with thinned grips;
- Phillips screwdriver;
- If the Lada Kalina is equipped with an air conditioning system, then we additionally stock up on a set of Torx (star profile).
- Disconnect the power connector from the system fan.
- Let's dismantle this unit. It is held on the radiator with 4 bolts. To unscrew them, you will need to use a “10” key. Extraction is carried out in the upward direction.
- Next, we move on to removing the pipes from the radiator fittings. We loosen the clamps using pliers or a screwdriver. We use the same wrench to unscrew the two nuts that hold the radiator assembly in the seat.
- Now we tilt the product slightly towards the engine and lift it up.
When dismantling the unit on a Lada Kalina equipped with air conditioning, you will need to resort to removing additional components that are directly attached to the radiator. To carry out this activity, you should stock up on a key with an asterisk profile.
You need to unscrew 4 screws. During dismantling, look towards the lower radiator cushions. They can either be removed along with the product or left in the landing niches. Experts recommend removing these support elements to assess their condition. It would also be useful to remove the rubber-metal bushings present on the body of the LADA Kalina radiator unit. It is better to replace them with new analogues.
Installation of speakers in the front doors of Lada Granta
Lada Granta on credit
Lada Granta overall dimensions
After dismantling, the radiator is checked. For this purpose, plugs are used that are installed in the bends. Then air is pumped into the unit placed in water (through a small fitting) with a pressure of approximately 1 bar. If there are a lot of fistulas, then the unit must be unconditionally replaced. When the leaks are insignificant, you should try to negotiate with the technicians to repair the unit in the station conditions. The new product is installed in the reverse order. Particular attention should be paid to rubber pipes and clamps. If the condition of these components is in doubt, then it is better to replace them with new analogues.
When all the elements of the system are assembled, we begin to fill the refrigerant. We perform this action until liquid begins to leak from the throttle heating unit pipe.
Design of heating radiators from LUZAR
LUZAR heating radiators are available in three types:
- Tubular-plate, prefabricated, aluminum. It consists of aluminum plates through which aluminum tubes pass, inside which coolant runs. The tanks on such radiators are made of plastic. Heater radiators of this type are used for heating small-sized salons due to limited heat transfer; have the best rigidity and light weight, as well as the lowest price.
- Tubular-tape, non-assembled (brazed), aluminum. The corrugated aluminum tape in such a radiator is located between aluminum flat-oval tubes. Radiator tanks of this type can be made of either plastic or metal. The design of non-assembled (brazed) aluminum devices is the most universal, allowing the creation of heat exchangers with any specified characteristics. Aluminum stove radiators are light in weight and relatively high rigidity, as well as at optimal prices.
- Tubular-tape, non-assembled (soldered), copper-brass. The design is very close to type 2 - between the copper flat-oval tubes there are copper strips folded in the form of an “accordion”. At the same time, the tanks on such heating radiators are made of brass - in order to increase the overall rigidity of the structure. Copper heating radiators - due to the high specific heat capacity of copper - have excellent heat transfer rates. However, due to the high softness of copper, heating radiators made of this metal are forced to have a narrow tube and a large interval (step) between the tubes, which imposes serious limitations on maximum efficiency. Also, copper heater radiators have the highest cost and the lowest rigidity to torsion, fracture and internal pressure. In this regard, copper heater radiators are “outdated” and are gradually falling out of use.
LADA Kalina engine cooling system diagram
Cooling system : 1 — coolant drain hose from the heater radiator; 2 — hose for supplying coolant to the heater radiator; 3 — coolant pump supply pipe hose; 4 — expansion tank hose; 5 - expansion tank; 6 — steam exhaust hose of the engine radiator; 7 — thermostat; 8 — hose for supplying fluid to the throttle assembly; 9 — hose for supplying fluid to the engine radiator; 10 hose for draining fluid from the engine radiator; 11 — engine radiator; 12 radiator drain plug; 13 electric radiator fan; 14 coolant pump; 15 supply pipe of the coolant pump; 16 coolant drain hose from the throttle body
Sequence of actions when replacing the Lada Granta heater radiator
Note to the driver!
There are two ways to dismantle the heater radiator on a Lada Grant: according to the instruction manual and the “folk method”. Let's look at each with a specific example.
- We place the car within the perimeter of the repair area, turn off the engine, and open the hood. We provide priority safety measures.
- After the engine has cooled down, we proceed to dismantling the heating system on the Lada Grant without a condenser.
Brand name – LRh – Luzar Radiator heater
Heating radiators (also known as heater radiators, also known as heater radiators) are heat exchangers that use the heat generated by the engine to heat the vehicle interior. They allow you to maintain a comfortable temperature and prevent the car windows from fogging up.
For reference: different names of this node have equal rights of use. For example, “heating radiator” and “stove” come from the function of this heat exchanger, “heater radiator” and “stove radiator” - from the installation . . more details