How to make spacer rings for speakers
You will need : plywood, drill, jigsaw, sealant, varnish.
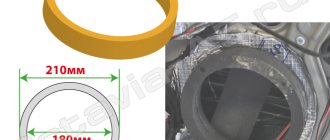
The thickness, width and other dimensions of spacers for columns are calculated individually in each case, so there are no universal sizes of spacers. The diagrams presented above can act as a template, which will be modified locally.
The total thickness of the spacer is determined individually. Approximately, for a speaker mounting depth of 52 cm, spacer rings 16 mm thick should be suitable.
Procedure:
- Determine the outer and inner diameter of the rings (using a sample or speaker).
- Cut out the spacer slides with a jigsaw, having previously drilled holes for installing the jigsaw blade.
- Fasten all parts of the spacer (if they are composite) using glue or self-tapping screws.
- Try on the door spacers and modify them if necessary. Make sure that the spacers fit tightly to the surface, nothing interferes with the correct positioning of the speaker, and the door trim is installed without problems (modify locally).
- Coat the rings with several layers of varnish.
When installing spacers, make sure that it and the speaker are secured as tightly as possible (stick vibration isolator strips under the ring), this will eliminate the occurrence of vibrations and rattling. Seal all cracks using caulk. It is recommended to combine the installation of spacers with sound insulation of doors.
Installing speakers in Granta rear doors
The procedure for working with the rear doors is identical to the front ones. Important difference : homemade spacers are not required here. The plant produces a set of special mounts for installing 13 cm speakers in the rear doors.
Articles for ordering online:
| Speaker Mount - Rear Left | 21907901033 |
| Speaker Mount - Rear Right | 21907901032 |
| Rear left column trim | 21906202095 |
| Rear right column trim | 21906202094 |
| Trim for front left door | 21906102097 |
| Trim for front right door | 21906102096 |
Installation sequence:
- Disassemble the door;
- Cut a hole in the door card for the lining;
- Install the speaker mount on the door;
- Replace the standard audio terminals with normal ones;
- Connect the wires to the column, secure it;
- Install the trim and assemble the door.
You can replace the fastening with improvised materials, but factory production takes into account all bends.
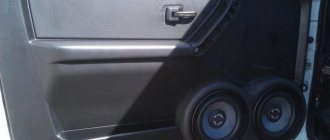
Installation of 16 cm speakers using spacers
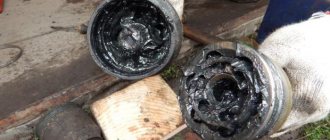
A spacer is, in this case, a wooden product that follows the shape of the column. It is made in the form of a ring; the material used is usually fiberboard, MDF board or plywood. But even in this case, you may need to cut the metal of the door, which in my opinion is a little blasphemous in relation to the car.
Spacer made of two rings, MDF material
- The inner diameter of the ring is measured so that the speaker is freely attached to it, and for the best sound, they try to ensure that the speaker fits as tightly as possible to the ring.
- The outer diameter should be such that the column is attached tightly to the ring, and, if possible, fits behind the upholstery so that the metal of the door does not have to be cut.
The video below shows the installation of a 16 cm speaker system in the front doors of a Lada Priora. The principle is the same.
Video
General information about music in Grant
In this section, we will consider general non-professional points about music in the Lada Granta.
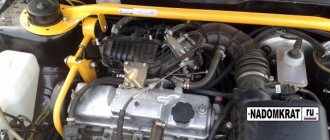
Installing music
If you have a VAZ 2190 in the basic configuration (or Norma) with audio preparation, then installing music will entail the following steps:
- Removing the radio cover - on the back side there are ISO connectors for power and speaker wires. You will have to run the wires to the rear speakers yourself if you plan to install an acoustic shelf, since from the factory the wires are routed only to the doors;
- Installation of a 1- DIN radio (for 2-DIN you will have to farm, cutting out a jumper in the panel and looking for a suitable frame);
- Finding and connecting the plug of the pre-installed antenna - often the antenna wire on the roof is lost under the ceiling trim and it turns out to be easier to install the antenna separately than to find the factory cable;
- Pulling wires into the trunk to connect an amplifier, subwoofer and speakers installed in an acoustic shelf.
- To install the amplifier, you will also need a separate power cable from the engine compartment directly from the battery terminal through a fuse.
Algorithm of actions
- First you need to remove the door trim (details in this article).
- We take measurements and estimate certain dimensions. The most convenient way is to pre-make a layout from cardboard.
- Based on the layout, we figure it out on the spot and see if the column fits into the door niche. We are trying to understand whether the glove compartment can open with this column, since the column may interfere with it.
- We cut out spacers, if necessary; below we will consider options for columns for which it is not necessary to make spacers.
- We cut out a decorative plug for the column on the door trim.
Preparatory work before installing speakers in the front doors Grants
Before the installation of 16 speakers in Grantu begins, it is worth noting the need to enhance the wave dispersion effect. Thus, it is necessary to glue an additional layer of Bitoplast 10 on top of Vizomat MP-2. This kind of action is not mandatory, but will reduce the reflection of sound directly from the door itself.
It is also worth noting the use of Bitoplast 10, and not foam rubber. The fundamental difference between these materials is the different degrees of water absorption. Foam rubber absorbs water like a sponge, resulting in corrosion inside the door.
As for the additional materials that were mentioned at the very beginning, it is at this stage that it is necessary to install the spacer on the door. You can buy it at any car audio store. As for the possibility of making spacers (rings) yourself?
What are podiums
The acoustic podium is the base for the speaker, thanks to which it is fixed in the desired position. The podium serves as a speaker mount, for example, in a car door or pillar.
Those speakers that are built into the podiums give a completely different sound: richer and deeper, with clearly distinguishable high and low frequencies.
What are speaker shelves used for?
We can say that the podium performs several functions in the car interior:
- the variety of appearance of the podiums helps to hide an unattractive sound system or emphasize the strengths of the interior design;
- expands the acoustic capabilities of the speakers in the cabin;
- podiums can be made from various materials and decorated with leather, wood, velor and other types of finishing fabrics to create a unique interior;
- in complex-shaped podiums it is easy to place non-standard and large-sized speakers, for example, a horn.
What types of podiums are there?
Podiums are divided into only two types: external and internal.
External ones can be considered podiums that are mounted directly in the car interior - for example, on the rear parcel shelf. However, most often, car enthusiasts use internal podiums in car doors to better fix the speaker and improve the character of the sound.
Traditionally, most cars already have standard speakers or holes for them. Usually their sizes depend on the make of the car. Domestic cars typically have speakers with a diameter of 130 mm. Foreign cars can have built-in podiums of larger sizes - 160, 200 and even 250 mm.
Car door speakers are usually round or oval in shape. Depending on the car model, podiums must take this feature into account. In general, the shape of the podium can be absolutely any, since the main purpose of this element is to securely fix the speaker in order to give volume and clarity to the sound.
Round speakers of different sizes can be installed in the doors of any car
Installation and fastening of the podium in the car
The traditional method to securely secure a homemade podium is to screw it with self-tapping screws from the inside of the casing. This, on the one hand, will ensure the quality of fastening, and on the other hand, will not spoil the appearance of the entire structure.
To carry out this procedure, you will need only two tools: a screwdriver and soundproofing materials.
Main stages of the procedure
The process of installing and fixing any podium in any part of the car is as follows:
- Take a ready-made podium with a speaker built into it.
- The podium is screwed on the inside of the casing with self-tapping screws.
- However, to achieve truly clear sound, you will need to experiment with the installation - some screws will be tightened all the way, and some will not. That is, you need to give the podium such a position so that the speaker can reveal its sound to the maximum.
- It is recommended to soundproof the doors and ceiling (in this case you can achieve even clearer sound).
- After completing all the work, reassemble the ceiling, racks or doors (depending on where exactly the podium was mounted).
Cost of services for manufacturing & installation of rings
Making simple rings 1 hour 600–1600 rub. Production of complex rings 2-3 hours 1600–2600 rub. Making rings for tweeters 1 hour 800–1200 rub. Manufacturing of supporting elements for midrange and tweeter speakers 2–4 h 1000–1500 rub. Making rings for a subwoofer (wood) 1 hour 400–800 rub. Making rings for a subwoofer (metal) 1 hour 800–1200 rub.
Installation of rings on self-tapping screws / bolts 0 / 50–100 rub.
Installation of rings on speakers is free if you order installation of acoustics from us.
Manufacturing of other elements
Standard speakers - article number and price
At the front of the Priora (sedan, hatchback, station wagon), speakers with a diameter of 13 cm (5.25 inches) were installed, forming a bipolar coaxial speaker system. Maximum power – 80 watts, resistance – 4 Ohms, sensitivity – 4 dB. The AvtoVAZ spare parts catalog provides for audio speakers the designation 2170-791020.
The Lada Priora sedan was also equipped with radio speakers 2170-7901030 with a diameter of 16.5 cm (6.5 inches), mounted on the trunk shelf. Components 1117-1901030 were installed in the rear pillar of the Priora station wagon. Hatchbacks in the “Norma” configuration were produced with the same audio components located on the support of the trunk shelf.
The acoustics of the standard Lada Priora speakers satisfy only unassuming car owners. Fans of high-quality car audio assemble and upgrade the car's acoustic system.
Tightness is the key to high-quality sound
In order to achieve the maximum effect from the installation, almost every stage of the installation of 16-centimeter speakers requires additional sealing. After the installation of the ring is completed, and the use of plastic spacers has led to the formation of gaps between the door and the ring, it is necessary to glue the ring with Visomat 10 on the outside.
The outer side no longer has holes and cracks, and a void has formed between the ring and the door, which can be filled with polyurethane foam. Without waiting for the foam to dry completely, we remove its protrusions, which will certainly interfere with the installation of the column itself.