Have you started to notice a strange knocking noise coming from the engine compartment? When driving on an uneven road with potholes and bumps, the sound appears, but when accelerating or on a flat road it disappears?
Most likely, the engine fasteners are broken, which means it’s time to look under the hood. And if the knocking is accompanied by strong vibration of the body, there is a problem with the engine mounts. What are they and what are they for?
The VAZ 2114 car is equipped with three rubber cushions, two of which support the gearbox, and one serves as a support for the engine.
The direct purpose of rubber supports is to reduce vibrations. When the car moves, strong vibrations occur, transmitted from the engine to the body. To make the ride as comfortable as possible, and the driver not to be distracted by extraneous noise and jolts, airbags are installed.
Without rubber softeners, driving a car would be like riding a cart, just as noisy and shaking.
Features of the procedure for replacing motor mounts
It is necessary to ensure easy access to the cushions, so in addition to wrenches, you will also need a good jack. Let's look at the list of measures to replace a defective cushion using the example of a rubber-metal product:
- Loosen the nut securing the airbag to the body.
- Jack up the engine and remove the bolt.
- Unscrew and remove the faulty support.
- We install a new one and tighten it.
- Jack up the engine and insert the mounting bolt.
- Tighten the bolt and lower the motor.
Self-replacement
If a visual inspection reveals problems in the pillow, it should be replaced as quickly as possible. Start by purchasing a new part. It should be noted that it is better not to buy this spare part for disassembly, even if it is in good condition. In this case, saving money may cause more harm than good. Ideally, it would be to buy an original part.
- Remove the terminals from the battery. Raise the car to a height that will allow access to the engine from below. In this case, you can use a jack and wooden blocks as support.
- Raise the engine with a jack to release the load on the required part.
- Remove the bolts that secure the cushion to the engine and body.
- Place the new part in place, guiding it properly into place. Tighten the mounting bolts well. It's best to tighten them while the engine is running to avoid excessive vibration in the future.
- Once you have finished installing the cushion, put all the dismantled parts back in place.
In each individual case, it may be that there is no convenient access to replace the part. In this case, try to remove those components that prevent you from making a replacement.
Sometimes this operation may require another person to help guide the motor while you push the part into place. If we are talking about the top cushion, then, as a rule, it will not be difficult to inspect it and, if necessary, replace it. It will be possible to do without a hole.
Periodically check the condition of the engine mounts on your car. As you can see, this is not at all difficult, but it can help avoid many problems in the future and provide you with a comfortable ride in any conditions. Remember that a car feels when it is being looked at and then thanks its owner for a long and good service.
Auto repair school – DIY car repair
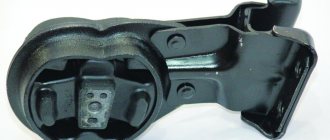
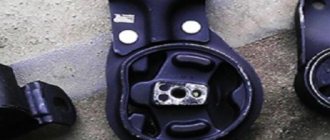
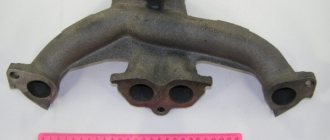
This article will describe the process of replacing the rear engine mount on a VAZ-2109 car . On VAZ 2108, 2109, 2109 and VAZ 2113-2115 cars, replacing the rear airbag is similar. But first, I will list the reasons why you should think about replacing the pillows or engine mount. Wear, breakage and destruction of the rubber or metal component of any engine mount leads to vibration and itching while driving, and shocks when starting and stopping the car. Therefore, if the above symptoms appear in your car, then pay attention to the condition of the airbags or, as they are also called, engine mounts. If large cracks, breaks or peelings of the rubber part of the cushion are detected (photo 1), replace the part. If the metal part of the pillow bursts or breaks, replace the part as soon as possible. I think there will be problems in this part. But questions regarding work related to replacement may arise! Right? Therefore, we continue to read further and at the end of this material the answers to the questions will be found)))
Spare parts . The rear engine mount for VAZ 2108, 2109, 2109 and VAZ 2113-2115 cars can be found on the Internet and purchased using the catalog number - 2108-1001033-10. According to the manufacturer, everything is simple - we buy a pillow from BRT or SEVI. Other options are not options...
Tools required for replacing the rear engine mount : a 17 socket wrench, a pair of 19 socket wrenches, a trapezoidal jack for fixing the engine. We carry out the replacement work in an inspection pit.
The procedure for replacing the rear engine mount (support) on a VAZ-2109 car:
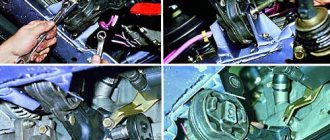
We drive the car into the inspection hole. Remove the engine protection, if any.
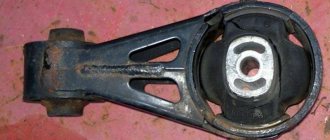
Place a jack under the gearbox and slightly lift the gearbox up (photo 2)
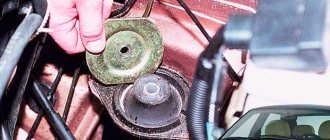
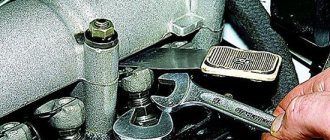
Unscrew the nuts securing the mounting bolts to the gearbox (photo 3)
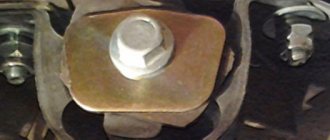
Using a 17 mm socket wrench, unscrew the nuts of the body studs (photo 4)
We take out the bolts and remove the pillow. And we put a new one in its place (photo 5)
Tighten all the nuts and remove the jack. All! Replacement of the rear engine mount on the VAZ-2109 is complete! Thank you all for your attention;)
When using an article or photographs, an active direct hyperlink to the website www.avtorem.info is required!
Did you like the article? Share it on your page!
Replacement
We have already noted that there are a total of three supports on the VAZ 2114. But it’s not uncommon for car owners to decide to install a fourth—an additional airbag. It serves to connect the crankcase and transverse the front suspension. This reduces wear and vibration and increases the level of comfort. But keep in mind that with such a modification you will have to look for a new place for the ignition module.
Now let's talk in more detail about the three standard pillows. Replacement of each of them is carried out in a certain sequence and according to the appropriate algorithm.
Front
To change the front engine mount, follow the instructions.
- Drive the car into a pit with a flat surface. Stop the wheels, turn on the handbrake, and put the transmission in first gear. This is a guarantee that the car will not roll away unexpectedly for you.
- Remove the crankcase protection and give yourself access to the front airbag.
- If the car has been in service for more than a year, and you haven’t touched the supports for a long time, then be sure to treat all fasteners with WD40 or another effective “fighter” against rust.
- Using a jack, you need to slightly raise the power unit. In this case, be sure to use a wooden beam as a spacer so as not to damage the motor. Keep an eye on the radiator and fan while lifting the engine. They should not break, otherwise you will not avoid serious expenses.
- There is a rather long bolt on the body cross member. It secures the support and bracket. It needs to be unscrewed.
- Now the bolts that connect the motor block and the pillow are unscrewed.
- All that remains is to remove the damaged element and replace it with a new one.
- Assembly is performed strictly in reverse order.
Engine pad
Left
Here, in addition to the standard set of tools, you will also need a cable.
- Using a cable, pick up the gearbox and place a jack under it.
- If your car has a large stator (an old-style device), you cannot do without dismantling it.
- Now we remove the bolt that connects the bracket and the support.
- Remove the worn out cushion.
- Place the new element in place and reassemble.
- Before firmly tightening all the fasteners, make sure that everything is exactly in place.
Path to the left pillow
Rear
A cable will also come in handy here. How exactly to perform the replacement? Simple enough.
- By analogy with the left support, pick up the gearbox and place your jack under it.
- Loosen the fasteners that secure the gearbox and rear support slightly.
- Loosen your grip on the two nuts on the body that hold the rubber mount in place.
- Raise the gearbox slightly with a jack and unscrew both nuts.
- The bolts that hold the pillow are unscrewed from the box itself.
- Remove the damaged element, install a new support and reassemble in the reverse order.
- If there is rust on the fasteners, we recommend cleaning it or replacing the bolts with similar new ones.
Changing these elements is not difficult, but we still recommend that you first consult with specialists and watch training video instructions. This will allow you to take on the work with your own hands more confidently and save an impressive amount of money on car service services.
To ensure that new engine and gearbox components serve for a long time and reliably, we recommend that you do not skimp on their purchase. Buy high-quality products right away that will last you many years.
How to replace a VAZ 2114 engine mount will be discussed in our article. The power unit of any vehicle begins to vibrate strongly from the moment it is started, and if its vibrations (which increase with power gain) are not suppressed, one can expect dire consequences for the car frame.
Despite the fact that on older models of the domestic automobile industry, special cushions made of dense and durable rubber acted as dampers for engine vibrations, but the engine still continues to lie on the frame.
The designers have significantly modernized the engine compartment of the latest generation front-wheel drive models (for example, on the VAZ-2114), adding specially designed cushions, which are now also supports for the power unit.
However, under our operating conditions for automotive vehicles, these elements are subject to high loads and wear out faster. In this publication, we will discuss in what cases it is necessary to replace the engine mounts of a VAZ-2114, and how to carry it out yourself.
Self-replacement
Before replacing the pillows, it is necessary to diagnose their condition. The condition of any silent blocks is checked with a mount: with its help you need to influence the support, simulating the movements of the engine during operation. If:
- rubber ruptures are visible,
- the bushing of the silent block touches the joints,
- the motor moves easily when pressed and hits the protection,
- the support bracket is broken,
the part needs to be replaced. Even if the signs of wear are not so noticeable (for example, the rubber is cracked but not torn), it is better to replace them as a set. Silent blocks lose their elasticity over time and begin to perform their functions poorly.
There are regular and reinforced supports for the VAZ 2114 on sale. The second type uses a harder rubber compound, but they are more durable only in quiet driving mode. Fans of sharp starts and braking will have to change any of them every 15-20 thousand; for other drivers they can last 50 thousand kilometers. This is the answer to the question of how long the supports last.
Front engine support VAZ 2114
On a VAZ 2114, the supports can be replaced independently, without contacting a car service center. It is more convenient to use a pit or overpass, but you can do without them. To do this, the car is jacked up and placed on supports (bricks or tree stumps). If crankcase protection is installed, it must be removed.
Replacing the front support. You need to jack up the oil pan. First, use a 17mm head to unscrew the 4 bolts securing the bracket to the crankcase, then the silent block bolt. To remove the bolt, you need to use a jack to get it into a position where the engine will not put all its weight on it. When installing a spare part, it is important to lubricate the silent block bolt well: not only the threaded part, but also the body. It is in contact with the metal sleeve, so it can stick.
This is interesting: Adjusting the carburetor of an Alpha moped
Side engine support VAZ 2114
Replacing the right support is similar, with the difference that it is better to jack the gearbox housing rather than the engine. Another option is to install a jack in the area of the oil filter housing. It is attached to the crankcase with three bolts. Another trick is that the right pillow needs to be changed by two people. Without a side stop, the motor moves up, not down. The jack will not help here, so an assistant must press on it so that the silent block bolt can be secured.
Replacement of the rear support is the most difficult task if done without a pit or lift, requiring some skill in performing auto mechanic work and perseverance. It is located at the connection between the engine and gearbox, so you will have to work in a confined space. In addition, when unscrewing the bolts from the body, the key may rest against the gearbox housing.
Checking and replacing the engine mount
Timely replacement of the VAZ 2114 engine mount is of great practical importance. This is one of the most important components of a car engine suspension.
After all, it is with the help of these elements that reliable fastening of the engine to a non-rigid body and its depreciation are achieved. Such a replacement of the VAZ 2114 engine mount must be carried out on time, preventing the appearance of disturbing noises and knocks when crossing uneven road surfaces. Otherwise, the following malfunctions may occur:
1. The power plant, due to faulty supports, acquires excessive mobility. This may lead to deformation of the air purification filter housing upon contact with the hood. 2. A cooling system fan with faulty supports can touch the radiator grille, and, as a result, the blades become deformed and the fasteners become loose.
Car enthusiasts often ask the question, how much does a VAZ 2114 engine mount cost? This product is in the price range from 1500 to 1800 rubles.
What is required to replace the engine mount:
- new support;
- 2 jacks;
- car repair stands;
- locksmith kit;
- polyethylene bags;
- colored marker;
- adhesive composition for threaded connections;
- scrap.
Pillows always require close attention from the car enthusiast, since if they are defective or aging, they require replacement, otherwise the increased vibration impact can lead to vehicle breakdown, resulting in failure of the vehicle's transmission system
In this case, it is important to remove the weight load from the VAZ 2114 engine mounts by lifting the car. To do this you need:. To do this you need:
To do this you need:
In this case, it is important to remove the weight load from the VAZ 2114 engine mounts by lifting the car. To do this you need:
- Raise the vehicle on a jack and place it on supports, then place a lifting device under the bottom of the engine crankcase.
- Install a wooden beam between the pallet and the vehicle lifting device to evenly redistribute the load force. Carefully lift the engine a little to remove the weight load from the power plant mountings. It is forbidden to work on a car that is hung on jacks!
- Visually check the engine mountings for various defects (cracks, delamination or hardening). There are cases when the rubber coating has a defect in the central part of the support.
- Determine the wear of the pillow plates at the point of contact with the chassis (frame) using a “mounter” or a large-size screwdriver. If there is play, remove the engine from the jack and tighten the engine mounts, followed by assembly.
- To prevent early obsolescence of rubber products of engine mounts, it is necessary to apply a protective component to their surface.
To replace the VAZ 2114 engine mount, the following measures must be taken:
1. Remove the negative cable from the battery terminal. 2. Raise it on a jack and place it on supports. 3. Raise the power unit on a lifting device, being careful not to touch the radiator or fan guard. 4. Loosen the bolt and remove the mounting of the cushion to the chassis. 5. Remove the through-type fasteners and the cushion.
Installation of a new VAZ 2114 engine mount is carried out in the reverse order; in this case, it is necessary to apply adhesive sealant to the threaded segment and tighten the fasteners tightly.
Purpose of VAZ 2114 engine mounts and requirements for them
This applies to both the design features of the support and the materials used in its manufacture. Additionally, product manufacturers apply special marks to them as confirmation of the brand and quality of the product to protect against counterfeiting. Such unit supports are constantly under the influence of various forces, even when the vehicle is not in use. When a vehicle starts moving in forward gears, a certain moment of force is used, and when moving at reverse speed, the opposite is applied.
Rubber engine mounts of the VAZ 2114 act as a damper. They compensate for the loads from one-time rapid acceleration or the action of brakes in extreme situations, driving on uneven road surfaces and in other cases when forces of different signs and values act when driving and parking.
Therefore, the purchase of a set of supports made of rubber products must be carried out only of the factory type, using proven technology and with the appropriate certificate. Such VAZ 2114 engine mounts are capable of operating in a temperature range from -45 to 70 degrees Celsius.
When replacement is necessary
Since the pillow has rubber inserts, it loses its elasticity over time. This becomes noticeable even in the cabin, as an unpleasant vibration appears. The replacement period for a part varies, depending on weather conditions and sudden temperature changes. It is these factors that affect the structure of rubber: it becomes harder.
If you do not replace the cushion at this stage, then in the future the part will begin to deteriorate, which can lead to more serious damage to the engine mount. If while driving you hear a knocking noise under the hood and notice increased vibration, you should conduct a visual inspection and, if defects are found, begin preparing for repairs.
Tip: We recommend buying only high-quality pillows from the manufacturer with a guarantee, since a bad part will not properly dampen vibration and will begin to quickly deteriorate.
Replacement result
After assembling all the parts, you should check whether the replacement was carried out correctly. To do this, you need to start the car and drive the car on a rough road.
If no more knocks bother you, and the car doesn’t shake like a tractor, then the job was done correctly. Otherwise, you should check whether you have placed the pillows evenly.
In order to extend the service life of the engine mounts, you should check that the bolts are well tightened and periodically remove dirt from them. Only regular monitoring will help delay the occurrence of engine mount malfunctions.
Engine mount malfunctions
The main damage to a pillow is loss of elasticity. The support is made of rubber, which loses its properties with prolonged use.
This is due to constant loads accompanied by changing weather conditions (cold, heat). In the future, the pillow will begin to deteriorate: it will crack and delaminate.
To prevent destruction of the rubber support, it is necessary to inspect it regularly. If damage is detected, the part should be replaced, otherwise strong vibration and extraneous knocking will be felt in the cabin, which will soon affect the operation of the engine.
It is better to replace the airbags in a timely manner than to later spend money on expensive repairs or purchasing a new engine.
The cost of engine mounts depends on the manufacturer, the minimum price for the front support is from 600 rubles, the rear and left ones are 500 rubles each. Average prices start at 1,200 rubles for the front, and 900 rubles for the rear and left.
It is possible to buy a set of three pillows from 3,500 rubles.
To replace engine mounts at a car service center, you will be asked for 1,500 rubles, but you can replace them yourself.
As already mentioned, there are three rubber supports on the “fourteenth”:
Front cushion
- It is necessary to drive the car onto the overpass and make sure that it does not move. To do this, put the handbrake on and engage first gear.
- We remove the crankcase and engine protection, freeing access to the support.
- If the car is not new, to make work easier, all fasteners should be treated with anti-rust solution, and before assembly, all bolts should be cleaned with the same solution.
- Raise the engine slightly using a jack. It is recommended to place a wooden beam or board between them to prevent damage to the part. We carry out the lifting very carefully, avoiding damage to the fan housing and radiator.
- On the body cross member we find a long bolt connecting the bracket to the support and unscrew it.
- We unscrew the mounting bolts connecting the support to the engine block.
- We remove the damaged pillow.
- We install a new one and assemble everything in reverse order.
Left pillow
To replace the left airbag, you need to equip yourself with a cable.
- Using a cable, we hook up the gearbox and place a jack under it.
- If the starter is an old type (large size), remove it.
- Find the bolt that holds the support to the bracket and unscrew it.
- We remove the pillow.
- Install the new pillow by performing the steps in reverse order. Before firmly tightening the bolts, check that everything is in place.
Back cushion
To replace the right airbag you will also need a cable.
- Similar to replacing the left airbag, you need to hook up the gearbox with a cable and place a jack under it for safety.
- We loosen the bolts connecting the gearbox and the cushion.
- We also loosen the 2 nuts on the body that hold the cushion.
- Raise the gearbox with a jack and unscrew these 2 nuts.
- We unscrew the bolts from the box that secure the mountings of the pillow.
- Remove the rubber support.
- We install a new pillow, to do this we do what is written above in reverse order. Don't forget to clean off any rust before screwing in the bolts.
Step-by-step instructions for replacing VAZ 2114 engine mounts/mounts.
Preparatory stage of work.
Having determined by knocking from the engine compartment, vibrations in the body or visual inspection the need to replace the engine, do not delay this procedure, otherwise you may end up with a much more expensive repair than simply replacing the supports. Moreover, even a beginner who has never encountered this type of work before can carry it out. You just need to prepare a certain set of tools, spare parts and simply follow the instructions given below.
This set consists of:
- jack;
- new engine mounts;
- spanners;
- ratchet;
- small board;
- set of socket heads and wrenches.
Depending on the condition of the car and its components, you may also need a rust remover.
When everything you need is at hand, you can begin the replacement process itself.
Replacing the front airbag.
- We drive the car onto an overpass or “pit”, in general, we do everything to make it convenient to work under it.
- We protect ourselves with stops.
- For our safety, we remove the terminals from the battery.
- Using a wooden plank, carefully (so as not to touch the radiator and fan) jack up the engine in the place where the support will be replaced.
- We loosen the protection fasteners, remove the old support and install a new one in its place. All threaded connections are pre-lubricated with sealant.
- If necessary, repeat all the above steps with another (other, photo below) pillows.
- We install the dismantled parts in the reverse order described above.
Replacing the rear cushion.
Replacing the left/side airbag.
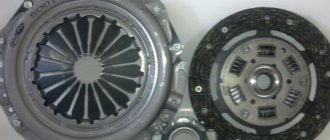
How to replace the flywheel of a VAZ 2114
To prevent a short circuit, before starting work you need to remove the negative terminal from the battery. The VAZ 2114 flywheel is dismantled in the following sequence:
- install the machine on a viewing hole or lift;
- open the hood;
- unscrew the bolts securing the crankcase protection and remove it;
- Unscrew the bolt securing the ground to the crankcase and disconnect the wire;
- loosen the clutch cable tension nuts;
- remove the clutch cable from the lever;
- disconnect the wire terminal of the starter traction relay;
- unscrew the nut securing the starter power wire;
- remove the starter power wire;
- unscrew the three nuts holding the starter and remove it from the car;
- loosen the clamp securing the gear shift joint;
- remove the gear shift rod from the tip;
- disconnect the wires from the speed sensor (located in the upper part of the gearbox);
- remove the reverse switch wire terminal from the sensor located on the gearbox;
- Unscrew the bolt of the lower right mounting of the gearbox to the body;
- Unscrew the bolts and remove the clutch housing cover;
- unscrew the lower left gearbox mount;
- hang or support the engine so that it does not fall over;
- unscrew the nuts holding the engine mounts;
- remove the supports;
- remove the gearbox from the bushings using a powerful screwdriver;
- move the gearbox back so that the input shaft disengages;
- lower the front end of the gearbox and remove it from the car;
- unscrew the 6 bolts securing the clutch basket to the flywheel;
- remove the basket, holding the driven disk;
- unscrew the flywheel mounting bolts and remove them together with the locking plate;
- remove the VAZ 2114 flywheel from the crankshaft flange.
After dismantling the flywheel, you should inspect its condition and make sure there are no burrs or deformations. Minor risks and scuffs can be eliminated by grinding the surface of the flywheel on a machine. The layer of removed metal should not exceed 1 millimeter. If deep scoring or deformation is detected, the flywheel should be replaced with a new one. The flywheel runout should be no more than 0.1 millimeters. The flywheel ring teeth cannot be restored. If they have severe wear or are missing at least one tooth, the flywheel must also be replaced.
How to replace engine mounts on a VAZ 2110-VAZ 2112?
Note! In this article we will talk exclusively about 8-valve cars, if you are looking for information about 16-valve engines, then go to another article called: “Replacing the pillows on the engine of a Lada Priora car,” in fact, the pillows in these two engines are not particularly different , it’s just that in 16-valve cars, additional cushions were added and one rear engine cushion was removed, despite this, the left and right engine cushions are present in both 16-valve cars and 8-valve cars, but information on replacing these two cushions is only posted in this article, so if you start with them, then do not follow the links, but simply continue reading this article on replacement!
Replacing the left engine mount:
First, crawl under the car and place a support under the gearbox itself that will rest on the jack (This board can be and in no case do not lift the box with a jack alone, it may be damaged or if your jack has a flat surface and you are sure that it will not damage the gearbox body, you can try to lift the gearbox without any support), then lift the jack a little at a time (it’s best to use a hydraulic one, it’s unlikely to fall off, but you just need to secure it well) and behind the gearbox, a little the engine itself will rise, when this is done, unscrew the nut securing the engine to the cushion (Indicated by the red arrow) and carefully lower the jack so that the rod comes out of the cushion, as soon as the operation is completed, unscrew the two bolts that secure the cushion (Indicated by blue arrows) and completely remove it from the car, install a new and metal support on it, which you also removed from the old cushion, then lift the engine again by the box and tighten the nut that secures the engine rod to the cushion, but only before that, be sure to tighten the bolts securing the cushion to the body.
Replacing the right engine mount:
The replacement is carried out as with the left cushion, namely, a jack is placed (Indicated by a red arrow), but not under the gearbox, but under the engine crankcase (Indicated by a blue arrow) and after which it lifts the engine and the nut that secures the power unit to the cushion is unscrewed (see small photo, it just shows unscrewing this nut), then the two bolts securing the airbag itself are unscrewed (indicated by green arrows) and it can already be removed from the car.
How to remove a generator on a VAZ 2114 and 2115 Available methods
- The terminal is removed from the battery; this should be done for all work on the car’s electronic systems;
- The car is jacked up, the right wheel is removed;
- The mudguard is unscrewed;
- Remove connector block D from the generator;
- After that, using a 10mm wrench, unscrew the wire from terminal B++. The wires are removed;
- The generator adjusting screw is loosened. The belt is removed. The screw should be completely unscrewed. Remove the tension bar;
- Using a 17 socket, unscrew the 3 screws securing the generator bracket to the cylinder block;
- The generator is removed;
- Remove the bracket, to do this the nut is unscrewed, this is done with a 13 key. The screw is removed.
- Unlock the cover fastening latches and remove it;
- Use a Phillips screwdriver to unscrew the 2 screws securing the voltage regulator;
- The block of wires from the regulator is disconnected, and it is finally removed from the generator;
- Using a 10mm wrench, tighten the nut securing the capacitor wire. Next, unscrew the screw securing the capacitor itself;
- We remove the diode bridge. To do this, unscrew the screw securing the block with a Phillips screwdriver. Next, unscrew several screws securing the winding terminals. There are insulating washers on the screws;
- We remove the winding leads and remove the diode block;
- While holding the head from turning with a gas wrench, use a hexagon to unscrew the pulley;
- Using a Phillips screwdriver, unscrew the 4 screws holding the covers together;
- We mark the position of the covers relative to each other. Separate both halves;
- We remove the stator;
- We clamp the cover with the rotor in a vice. We knock it out with a punch;
- All that remains is to remove the bearing using a puller.
AutoFlit.ru
replacing the box cushion of a VAZ 2115.
| Replacing the rear mount of the engine box on a VAZ 2115/Strong vibration in the body |
| Click to view | Hello everyone, and in this video we will get rid of unnecessary sound and vibration of the interior body due to faulty... |
| Tags: |
| replacing the box cushion on a VAZ 2115 part 3 |
| Click to view | The pillow was replaced and a video was made that might be useful to someone. |
| Tags: |
| REPLACING THE PILLOW OF THE BOX OF A VAZ 2115 PART 2 |
| Click to view | I wanted to show you the replacement of the VAZ 2115 box cushion. |
| Tags: |
| REPLACING ENGINE MOUNTS VAZ 2108, 2109, 21099, 2113, 2114, 2115 |
Click to view | How to change the side engine mount (box mount) on a VAZ 2108 2109 21099 car - so that... |
| Tags: |
| Replacement of engine side mount 2108 2109 21099 2115 |
| Social networks Video on how to change your... |
| Tags: |
| REPLACEMENT OF ENGINE MOUNTS VAZ 2113 / VAZ 2114 / VAZ 2115 / DIY / REPAIR OF ENGINE MOUNTINGS |
| Click to view | Continue eliminating vibration. Watch previous videos. |
| Tags: |
| Vibration VAZ 2114 |
| Click to view | Replacing engine mounts for VAZ 2108, 2109, 21099, 2113, 2114, 2115. |
| Tags: |
| Replacing engine mounts for VAZ 2108, 2109, 21099, 2113, 2114, 2115 |
| The video shows the process of replacing the front engine mount on a VAZ 2109 car. Applied... |
| Tags: |
| Replacing the front engine mount of a VAZ 2109 |
| UNPACKING FROM UNCLE LENYA HANDBRAKE REPAIR... |
| Tags: |
| how to change engine mounts on a VAZ 2109 |
Click to view | Replacement of the rear support (mount) of the 8-valve VAZ-2110-11 engine LetyShops... |
| Tags: |
| Replacing the rear engine mount of a VAZ-2111 |
| Vibration? That way! |
| Tags: |
| Checking engine mounts |
| Contacts for communication. Emel VK Wallets if you want... |
| Tags: |
| A method for replacing silent blocks at home on a VAZ 2109 |
| Inexpensive treatment for one of the causes of gearshift lever play in front-wheel drive VAZs with traction drive - if it bursts... |
| Tags: |
| The gearshift lever is loose. How to quickly repair? |
| A method for eliminating the looseness of the gear lever on the side of a VAZ. |
| Tags: |
| How to eliminate the looseness of the gear lever on the side of a VAZ. Do it yourself. |
| Website of the service station “Kovsh”: By lifting parts of the engine, gearbox, we determine the cause of vibration in the cabin... |
| Tags: |
| How to determine the cause of body vibration? |
| Dead engine mounts are the first cause of body vibration. Over time, old engine mounts deteriorate... |
| Tags: |
| BODY VIBRATION – dead engine mount. Do-it-yourself tuning of a VAZ engine mount |
| Click to view | Rear engine mount VAZ 2108-21099, 2113-2115. The design of the vibration isolator has been improved, the lower one has been modified... |
| Tags: |
| Engine mount VAZ 2108-09 rear, “bracket”, SEVI EXPERT |
| Correct installation of the rear support on sixteen-valve Prior and tenth family engines is very... |
| Tags: |
| CORRECT installation of the REAR MOUNT of the VAZ (LADA) 16v engine |
| Click to view | Replacing the front airbag Here, follow all the same conditions that were relevant for the previous ones... |
| Tags: |
| How to replace the front engine mount of a VAZ 2115,2114,2113,2199,2109,2108 |
| Click to view | Hooray. I solved the problem with jerking when starting off. |
| Tags: |
| Hooray. I solved the problem with jerking when starting off. |
| A short video about replacing a motor mount in the Samara family, the video consists of 3 parts, which included… |
| Tags: |
| Replacing the MOTOR cushion on a VAZ 2115 part 1 |
| Click to view | Front engine support VAZ 2108-21099, 2113-2115. Redesigned vibration isolator design. Tides in... |
| Tags: |
| VAZ 2108-09 front engine mount, “bulda”, SEVI EXPERT |
| Don't waste time turning the bushing. Resharpen it and take it apart again. This is what you need! Before you run... |
| Tags: |
| How to fix the rattling of the VAZ 2114″ rel=”spf-prefetch |
Purpose of engine mounts
The main purpose of engine mounts is to reduce vibrations, since without their participation all the vibrations that occur during engine operation are simply transmitted to the body, and this is very uncomfortable. And at the moment when these rubber softeners (dampers) wear out, the car ride is like a cart with a motor, intense, but very shaking.
Types of airbag malfunctions on the VAZ-2114
One of the most common types of engine mount failure is loss of elasticity.
Since this element is made of rubber, it loses its properties over time and is no longer able to fully perform its functions. This is due to the constant loads that fall on these elements along with the constant change in weather from hot to cold. From such conditions, cracks first form on the surface of the “cushion”, and then it simply begins to delaminate.
In order to prevent the destruction of rubber in time, it is necessary to inspect it in time and, if damage is detected, replace it.
So, as soon as timely dismantling and repair will allow you to avoid unpleasant problems in the future.
How to check engine mounts on a VAZ 2115: diagnosing faults at home
The condition of the engine mounts determines how long the engine will run, as well as the rate of body wear.
If the pillow is torn or worn out in places, it should be replaced without wasting time. But how can you find out what condition it is in? Of course, you can go to a car service center, where they will inspect your car and tell you what condition the airbags are in and whether they need to be changed. But keep in mind that often car service workers exaggerate the scale of the problem, or even invent it themselves for the sole purpose of making more profit.
Even if in the end they tell you that you don’t need to change a single engine mount, the check is also not free. That is why it is better for you to figure out how to check the engine mounts yourself without extra costs.
By the way, if you experience increased vibration when you start/stop the engine, then this may indicate that the cushions are worn out. If you ignore this symptom, it can develop into a bigger problem, for example, lead to deformation of the body and suspension.
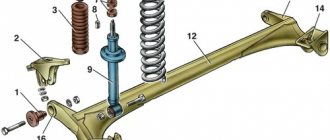
Assembly of the unit
After purchasing all the new components, you only have to do a few simple steps:
- Compress the spring using a puller. It must be installed in such a way as to engage at least three turns.
- Install rubber pads on the spring; they can be secured with tape or tape.
- Place the bump stop on the rod and the boot on top.
- Install the rod into the hole in the body and tighten the nut.
- Secure the lower part of the shock absorber to the rear beam by aligning the holes and inserting the bolt. Tighten the nut.
Check the tightness of all threaded connections. After a run of 50-100 km, it is recommended to re-tighten all the nuts. When replacing the rear struts of a VAZ-2115, use nuts with plastic bushings - they are much more reliable.
Checking engine mounts without removing them from the car
Timely prevention is the key to long vehicle service and safety during its operation. For this reason, it is advisable for every driver to monitor his car independently. For the comprehensive implementation of scheduled operations, knowing how to check the serviceability of engine mounts will not be superfluous.
Types and types of engine mounts
Before checking anything, it is also necessary to understand the purpose of the part, what malfunctions of the element may occur, as well as what signs of failure. As you know, the engine weighs quite a lot and vibrates during operation. This means that if the internal combustion engine is rigidly attached to the car body, then all vibrations will be transmitted to the latter.
When driving over uneven surfaces, the mounting points of the power unit experience significant loads. A rigid attachment to the body will mean that the fasteners and their installation location will quickly begin to break. To ensure that the overall design is reliable and comfort is maintained, special supports are used to mount the internal combustion engine.
A cushion (engine support) is a part that serves to fix the power unit, prevents it from moving and dampens vibrations during operation. In essence, this is a real gasket, only quite large. It is placed between the engine and the car body, that is, it is attached both to the power unit and to the body itself. The number of pillows depends on the make and model of the car; there are from three to five.
If you open the hood, you can immediately see the top (right support). The rest are located on the underside of the motor. Again, placement points depend on the car model, engine and gearbox type. In most cases, engine mounts consist of a rubber housing and metal fasteners.
Sometimes polyurethane is used instead of rubber, which is more wear-resistant. In expensive cars, more complex and modern options are installed - hydraulic ones. The vibration damping efficiency is naturally much higher.
Such supports consist of two chambers, between which a membrane is located. Either propylene glycol or a special liquid (gel) is used as a filler in the chambers. During operation, depending on road conditions (for example, on uneven surfaces), it flows from one chamber to another through special channels, and the overall rigidity of the cushion dynamically changes thanks to this design.
There are different types of hydraulic supports:
Of course, high-tech devices are installed on very expensive cars. On budget options, and even more so on old Soviet models, simple rubber-metal supports are installed.
In case of breakdown or wear (usually they last about 100,000 km), they are simply replaced. And the hydraulics can be repaired. And even on your own.
However, before removing the mounts, you need to know how to check the engine gel mount, rubber mount, etc.
Signs and causes of engine mounting problems
The main symptoms of faulty engine mountings are as follows:
When these signs appear, it is worth diagnosing the pillows. You can do this yourself.
Checking engine mounts yourself
Making such a diagnosis is not at all difficult. Even if the car is equipped with hydraulic cushions. The main thing is to know how to check the right engine mount correctly, and also diagnose the others. This can be done in several ways, which are best used in conjunction with each other to make a more accurate diagnosis.
If the mountings are faulty, the engine will move from its place. In this case, characteristic sounds will be clearly audible. A similar check can be done with the engine not running, if you insert a pry bar or stick between the engine and the car body and try to shake the power unit from side to side.
In order for the supports to last as long as possible, you need to monitor your driving style. The principle “higher speed - fewer holes” must be thrown out of your head forever. In addition, engine mounts are more likely to fail if you move off frequently and abruptly. In a word, the fewer sharp fluctuations in the internal combustion engine, the less often you will have to check the serviceability of the engine mounts.
Source
Signs of wear
Since the function of the engine mount is to dampen vibrations, if they are noticeable even at idle, this indicates a problem. Among other signs of wear on the airbags on the VAZ 2114:
- Vibration of the gearshift lever. This indicates that all motor vibrations are transmitted to the box.
- If you open the hood, strong vibrations of the engine are visible.
- Uneven car operation. The fact is that when the silent blocks are heavily worn, the crankcase begins to move slightly relative to the clutch. Because of this, the crankshaft position sensor (CPS) constantly produces different signals. The ECU is forced to mistakenly “catch” the revolutions to eliminate the imbalance.
When the car drives, serious vibrations occur, which are transmitted to the body from the power unit. To ensure the necessary level of comfort while driving and not to be distracted by extraneous noise or shaking, special supports are mounted on the car. If you remove them, driving a VAZ 2114 can be compared to riding an old wooden cart.
Causes of malfunctions
The most important problem that pillows face is the loss of elasticity of the material. This is due to the fact that the supports are made of rubber. Over time and with use, these elements lose their original characteristics. Various factors accelerate the wear process of bearings:
- Regular exercise;
- Long service life;
- Cold;
- Heat;
- Temperature changes, etc.
If elasticity decreases, this entails the formation of cracks and delamination of the material.
Replacement is purely a matter of time. But the procedure for changing the front and all other pillows should be carried out on time. If you drive for a long time with worn out bearings, this will result in a negative impact on engine performance. Then the repair will cost much more than the cost of new supports.
The main advice is to periodically check the condition of the supports for wear. If you detect a fault in a timely manner, you can replace it yourself and significantly save on car repairs.
Price issue
If you do everything correctly and in a timely manner, then your costs will be insignificant. You will have to purchase new supports and contact a car service. Of course, it is quite possible to do it on your own. This is a matter of desire and availability of appropriate skills.
How much will it cost to replace engine mounts? We suggest that you familiarize yourself with the current prices for the VAZ 2114.
| Detail | Minimum cost | average price |
| Front airbag | 600 rubles | 1200 rubles |
| Rear cushion | 500 rubles | 900 rubles |
| Left pillow | 500 rubles | 900 rubles |
| Set of three supports | 3500 rubles | 5000 rubles |
| Car service | 1500 rubles | 2500-3000 rubles |
There is no need to pay someone, since the replacement can be done by yourself.
Choosing a support
The cost of supports starts from 500 rubles per piece. It all depends on the manufacturer, manufacturing method and materials used.
The front airbag is the most expensive of the three.
As a rule, prices for the front “cushion” are slightly higher than for the left and rear ones, since this is due to the much greater load-bearing capacity of the part and the use of the largest amount of materials.
The average cost for high-quality supports is about 1,000 rubles per piece, and a complete set can be purchased for just over 3,000 rubles.
All supports are in one place, ready for replacement.
In order to replace the supports, it is not necessary to contact a service center, because such work can be easily done with your own hands.
Torn engine mount: signs
Like any other part, the power plant support also has a limited service life and eventually fails. On average, airbags on modern cars are designed to last at least 100-120 thousand km, although in practice these elements may need to be replaced both earlier and much later than this period.
Usually the cause of problems is the rubber insert, which simply cracks and breaks under load. Less often, cracks appear in the metal part of the support, the installation sites of fasteners are broken, etc.
One way or another, the following symptoms usually indicate a malfunction of the engine mounts:
- The engine itself runs smoothly, but the driver feels a clear increase in vibrations in the body, on the steering wheel, on the gearshift knob, etc.;
- When you start moving from a standstill, as well as during braking, you can hear clicking or muffled knocking in the engine compartment;
- When driving on an uneven road, impacts are heard from the front of the car; in many cases such impacts are felt on the gearshift lever; shifting gears with a manual transmission at this moment can be difficult;
To check the engine mounts, it is not necessary to immediately go to a service station and drive the car to a stand. Usually, a fault can be identified and localized on your own, even if you do not have much experience in car repair and maintenance.
The simplest method of initial diagnosis is to rock the engine with your hands in the engine compartment, after which you can localize a torn or cracked support by knocking.
Another technique for diagnosing engine mounts is when the hood is first opened and fixed, then the car is started and jerked forward in first gear. The car moves backwards in the same way. At this time, an assistant outside monitors the vibrations of the internal combustion engine.
To carry out a more detailed check, you first need to find out in advance where exactly the supports are located on a particular model. Then the elements available for review will need to be pre-inspected. Cracks, breaks and other damage are usually visible and easily visible.
For a full visual assessment of the lower airbags, you need to be prepared for the fact that the car will need to be parked in a garage with an inspection hole, driven onto an overpass, or using a lift.
how to replace engine mount
. From this article you will learn how to replace an engine mount, as well as what subtleties and nuances should be taken into account as part of this procedure.
If a superficial diagnosis shows nothing, then the assistant should be used again. One person uses a pry bar to move the support, while the other watches for tears in the rubber insert at the very moment the support moves. It happens that some cracks are not immediately visible without rocking.
After detecting a torn engine mount, the damaged element should be replaced. It is not recommended to try to press the rubber insert out of the cylinder in order to save on spare parts, since such makeshift repairs often do not bring the desired results.
As for the replacement itself, replacing the top cushion is quite simple. The car needs to be jacked up, the old cushion removed and a new one installed.
If you have to change the lower supports, it is also important to consider that the engine goes down after removing this cushion. This means that an additional support will be required that supports the internal combustion engine, allowing you to direct the pillow and correctly secure this element
When do you need to change engine airbags?
The main reason for replacing engine mounts is the natural wear and tear of the rubber part. This process is irreversible and any rubber product is susceptible to it. However, there are a number of cases when replacing a support may be necessary ahead of schedule - this is an accident or any other accidental damage.
Symptoms of faulty supports include the following:
- Various knocks that appear when you suddenly start moving or braking. Sometimes it can occur when changing gears.
- Vibrations that are transmitted from the engine to the body. If the level of vibrations in the cabin has increased, then it’s time to assess the condition of the supports.
- It may happen that when replacing the timing belt, the mechanism cover will not be so easy to remove due to the fact that the engine tilts towards the mudguard. This phenomenon is associated with subsidence of the rubber part of the support.
- Due to a sagging engine, the geometry of the CV joints is disrupted. Therefore, if you notice too rapid wear of the grenades, you need to carefully check the engine mounts.
- Shifting the gearbox may be accompanied by a certain metal grinding noise. This suggests that due to the sagging engine, the wings have dropped lower. Accordingly, when switching, they touch other parts of the car.
- There are cracks and other defects on the rubber parts of the support.
If you delay replacement until a later date, the engine may collapse and then repairs will become much more expensive. That is why, try to change the supports immediately after detecting malfunctions.
Replacing engine mounts for VAZ Lada 2115 in auto repair shops in Moscow
18 car repair companies
- TTS Motors
- Pyatnitskoe highway, 2
- +7 (495) 24… show all
- Lexus on the market
Skladochnaya street, building 1, building 9 +7 (495) 24... show all
- Garimotors
st. Lyublinskaya, building 1, building 1A +7 (495) 76... show all
- Motorway
Ostapovsky proezd street, building 17, building 4 +7 (495) 98... show all
- Lorant
Kolskaya street, building 14, building 5 +7 (495) 76... show all
- Auto-rad
st. Novokhokhlovskaya 11 building 2 +7 (495) 25... show all
- Nivus
st. Avtozavodskaya 16, building 2, building 16 +7 (495) 62... show all
- Auto complex
Biryusinka street, 1/18, building 4 +7 (968) 51... show all
- Ddcar
st. Vavilova, 13a +7 (495) 12… show all
- Technical center gm east
Green Avenue, building 3A, building 1 +7 (499) 39... show all
- LR-west
Ryabinovaya street, building 28A, building 2 +7 (495) 21... show all
- Tolex tuning Lexus on Taganka
street 2nd Mashinostroeniya street, building 27, building 2 +7 (495) 24... show all
Popular companies
How to change supports
To replace, you will need to purchase front, left and rear airbags. Experts advise replacing the entire set during repairs, since after replacing one part, another one may break after a while. The average cost of parts is 2000 rubles. If you have the necessary tools, you can do the repair yourself and save on car service.
List of tools
To replace the pillows we will need:
- 2 good jacks;
- metalworking tools;
- scrap;
- steel rope;
- glue.
Tip: At some stages you will need to lift a lot of weight, so it would be a good idea to invite a neighbor or a fellow car enthusiast here.
Replacing the front airbag
The repair of each support has its own characteristics. Replacing the front airbag is carried out as follows:
- Put the car in 1st gear or the handbrake so that it does not move.
- To gain access to the support, remove the upper engine protection.
- Raise the engine with a jack. To avoid damaging its lower part or other elements, place a wooden board underneath.
- When we have freed the support from the load, we can unscrew the bolt that connects it to the bracket.
- We unscrew the bolts connecting the pillow to the motor. Removing the bolt that secures the cushion to the engine
- We remove the old part and install the new one.
Replacing the rear cushion
Here we will need a steel cable to make it more convenient to work with fasteners.
- We hook up the gearbox with a cable and install a jack under it.
- Slightly press out the bolt connecting the gearbox to the support.
- Unscrew the nuts securing the support to the body. Loosening the nuts that connect the cushion to the body
- Raise the gearbox and unscrew the nuts and bolts.
Unscrew the bolt and nuts - We replace and reassemble in reverse order.
When replacing the side airbag, you will need to perform the same steps. If you have a large starter installed, it will need to be removed to get to the bolt. It is better to coat rubber products with a special protective substance - this will ensure a long service life of the parts. After completing the repair, do not forget to test the car. If during movement the knocking stops and the vibration becomes almost unnoticeable, then everything was done correctly.
avtoexperts.ru
The car engine is quite heavy and subject to vibration, so it must be secured against any displacement during operation. If the fastening points are rigidly connected to the body elements, they will fail very quickly, since when driving over uneven road surfaces, the fastening points will absorb significant alternating loads.
Plus, the entire body will constantly vibrate, which, in addition to discomfort for those inside the car, will also negatively affect the durability of all elements of the car.
VAZ engine cushion (support)
Purpose
Special supports, or cushions as they are also called, are used to dampen vibrations during engine operation and to securely fix it.
The name of the support as a pillow is not accidental, as it fully corresponds to its purpose. So, in Ozhegov’s explanatory dictionary, one of the meanings of the word “pillow” is something that supports something, takes on the pressure of a mechanism.
The main task of installing supports is to securely fasten and minimize sideways movement during operation.
In addition, thanks to the pillows, the power unit is isolated from all body parts, which makes the car comfortable to drive.
Depending on the car model, the engine can have from 3 to 5 airbags.
So the front and rear airbags monitor vibration at idle and when the engine reaches maximum load.
Design
The simplest support is a rubber-metal element, where a layer of rubber is placed between two steel plates. The plates have a threaded part in the form of a pin at the ends for connection with body parts. Such products can be made either integral or collapsible.
Some supports, for example, the classic VAZ 2101-07 models, also had a spring and a rubber bumper inside the cushion, which increased rigidity and softened strong impacts.
Recently, increasingly, instead of rubber, manufacturers have begun to use polyurethane, as the most wear-resistant, and metal in most cases has given way to aluminum.
On more expensive car models, more modern designs, such as hydraulic supports, are used for greater driving comfort. They consist of two chambers and a membrane between them; the chambers are filled with liquid, which, when loaded, can move from one container to another.
Electric hydraulic engine mount
Such supports can be adjusted to the operation of the power unit in any mode of operation and are capable of maximally damping any vibrations that occur, significantly increasing the degree of comfort when operating the car.
The greatest loads on the engine mountings occur when starting the engine, starting and stopping the vehicle. A faulty mount increases the stress on the engine and transmission, making them more likely to fail.
Malfunctions:
• Cracks, breaks in the filler body or steel plates;
• Deformation of the pillow;
• Peeling of rubber from metal;
New and old pillow
Signs of malfunction:
• Engine vibration;
• The motor “bounces” when starting and braking the car;
• Vibration radiating to the steering wheel, gear knob and the entire body;
• Shocks when changing gears;
• Knocks out the speed;
• Impact when planing at reverse speed;
• When driving on an uneven road, knocking noises are heard, similar to a malfunction of the chassis.
Causes of malfunction
There can be several reasons for premature pillow failure. For example, when tuning a car, shock absorbers with a stiffer characteristic and low-profile tires are installed to improve handling and change the appearance of the car. However, in this situation, the shock absorbers in the pits do not completely dampen body vibrations, which have a negative effect on all suspension elements, including the engine mounts.
Driving style. These are sudden starts and braking that provoke huge loads on the engine mounts due to a rapid shift in the center of gravity. This also includes driving over bumps on the road without slowing down.
Natural wear and tear. These are mechanical loads, temperature changes, aging of the rubber filler, which loses its elasticity.
Tired pillow
Replacement timing
On average, the power plant supports are capable of operating for about 100 thousand kilometers or more (up to 200 thousand) with moderate driving and proper monitoring of their condition.
If any signs of malfunction of the engine and gearbox mounts are detected, it is recommended to replace them without delay. At the same time, you should not purchase products from an unknown manufacturer, giving preference to the original.
Finally. Serviceable supports mean comfort and safety of movement, as well as extending the life of your power unit.
How to check engine mounts: what indicates wear and condition assessment
If the engine is rigidly attached to the body, vibration will cause great discomfort in driving the vehicle.
To avoid this, the engine is attached to the body using specially designed cushions that are designed to support the weight of the power unit and absorb vibrations.
This also helps protect the engine from harsh vibrations that occur when driving over rough terrain. But without knowing how to check engine mounts, it is difficult to ensure their timely replacement.
What indicates wear on the engine mounts?
The occurrence of problems with pillows is usually caused by the appearance of excess noise or vibrations during operation:
If such deficiencies are detected, the engine mounts are diagnosed . To do this, you can go to the nearest service station or carry out this work yourself.
IMPORTANT! The extraneous sound should be different from the sounds accompanying breakdowns of the vehicle's chassis, which often appear when driving over rough terrain.
How to check the condition of pillows
Before checking the supports, you need to understand the design features of the vehicle's power plant. There can be two or four pillows. They can be mechanical or hydraulic.
ATTENTION! On expensive cars, hydraulic engine mounts have adjustable stiffness and airbag performance controllers, which, if a unit breaks down, report information to the on-board computer.
Having dealt with the technical features, open the hood and inspect the engine mounts. If cracks are detected on the pillows, they are replaced . It is not always possible to see the presence of a problem from the engine compartment. In this case, use a more complex but informative method:
The absence of gaps in the engine mounts and intact surfaces of the support units indicate the absence of obvious defects. The cause may be hidden or related to other parts of the car.
But in 90% of cases, a faulty pillow will have an external sign of failure .
When the internal parts of the unit (spokes, membranes) fail, they destroy the rubber surfaces of the supports, forming external defects.
There is also a more dangerous way to determine a malfunction, which does not provide an objective assessment. It is performed by simultaneously pressing two pedals on a car equipped with an automatic transmission (with the gear engaged).
Depending on whether the engine remains in its place or jumps sharply, a decision is made about the possible presence of a defect. The danger of this technique is obvious and its use to identify a defect is not recommended.
Having weighed their capabilities, everyone decides whether to diagnose the engine mounts themselves or seek help from specialists.
The presence of extraneous noise when the engine is operating in certain modes requires the identification of the true cause of the malfunction.
Operating a vehicle with knocking and excessive vibration can lead to serious damage, the elimination of which will exceed the cost of the supports several times.
Fixing a fault at an early stage will cost less and will not affect other components of the car.
What is needed for this
Use a hydraulic or other jack.
To carry out the test, you will need:
- hydraulic or other jack you have;
- some kind of safety support, such as a wooden block or something else;
- lever – a pry bar or a strong stick is perfect for this.
Video.
If it happens that while driving on an uneven road you hear a sound from the engine compartment, accompanied by vibration in the body, which immediately disappears as soon as you move to a flat surface, then most likely you have problems with the engine’s locking elements. Simply put, there are faults in the engine mounts.
Video about replacing the front engine mount below:
On the VAZ-2114, the design provides for three such elements, and only one of them holds the engine, and the rest the gearbox.
Signs of a malfunction of the VAZ 2114 knock sensor. List and comments from the service station
Causes and Symptoms of faulty spark plugs and ignition coils. Signs of faulty ignition coils
- The engine begins to throttle. This is to say that the DD does not send signals to the control system, and it does not adjust the ignition timing;
- The dynamics noticeably deteriorate, the car begins to stall when accelerating;
- Acceleration becomes slow, the engine roars, and the car picks up speed slowly;
- The "Check Engine" comes on when you take off, when you roll downhill, and when you accelerate. Moreover, if the “Check” lights up only when the ignition is turned on, and goes out after 6 seconds, this is normal: the “brains” test all the components of the car.
- Code 0325 indicates that there is a break in the power wire. The most common version of what happened is oxidation of the contacts; the wiring itself breaks extremely rarely. Cleaning the terminals will eliminate the problem in most cases. However, if after processing the error does not disappear, you need to check the timing belt: it means it has jumped several teeth. After marking it, the problem disappears;
- 0328 in most cases signals a malfunction of high-voltage wires, but in some cases it can again indicate a belt jump;
- 0326 and 0327 indicate a low signal coming from the knock sensor. There are 2 options here: either the DD tightening has become loose, or the contacts have again oxidized.
- Turn off the ignition and climb under the hood;
- If there is a 2-pin knock sensor, the nut is twisted with a 13 wrench; if it is a 1-pin, use a 22 wrench;
- The multimeter (or voltmeter) is set to operate with a maximum of 200 MV;
- The electrodes of the device are connected to the DD terminals. It is officially believed that the voltmeter reading (they say there is voltage) is sufficient. However, experienced drivers do not think so: the sensor must respond to shocks caused by detonation. Therefore, additional research is carried out: the sensor is lightly tapped with the handle of a screwdriver; During impacts, the meter readings should change. If they remain constant, the DD requires replacement.
AutoFlit.ru
Replacing the front support
- Place the car on a level surface. Be sure to raise the handbrake or engage first gear. For safety, you can support the rear wheels.
- Remove the engine protection to gain access to the mounts.
- To remove the load from the support, place a jack under the oil pan and raise the engine. It is imperative to place a spacer between these elements in the form of a board.
- When the engine is supported by the jack, we inspect the mounting location of the cushion. We unscrew the bolt that connects the bracket to the support.
- After this, you can disconnect the pillow from the motor unit.
- We clean the fixation points and install the new part in the reverse order.
It is possible that in order to replace the front cushion, you will need to further lift the engine, since the mounting location of the old one has been worn out.