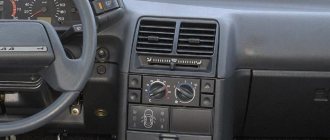
Interior heating control panel
Proper operation of the heating system in your car is important all year round. At the same time, as winter approaches, the health of the heating system becomes extremely important. The efficient operation of the stove on Kalina ensures a comfortable stay in the car, as well as visibility for the driver.
The heating system of the Lada Kalina is no different from similar devices in other cars. Despite the reliable and simple design that the Kalina stove has, this device requires periodic maintenance.
Technical device of the heating system
The functions of the heating system are to heat and cool the vehicle interior, as well as to blow warm and cold air onto the windows. If you cannot effectively warm up the interior, and the windows constantly fog up, you should look for the reason in the operation of the stove.
Lada Kalina has a traditional supply and exhaust system, and the air is heated by liquid heated to 90°C in the cooling system, which is then pumped through the stove. In the stove, heat exchanges water with air, which is subsequently directed through air ducts into the cabin.
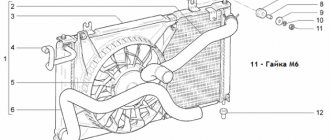
Heating system in the car
The heating system of the Lada Kalina includes the following elements.
- Radiator with air distributor.
- Electric fan.
- Ventilation system filter.
- Air ducts.
The fan on Kalina has 4 operating modes. The change in rotation speed is ensured by the operation of additional resistances. If it is necessary to replace resistors, it should be taken into account that they have a resistance of 0.23 and 082 Ohms.
The air flow is carried out through an intake device installed in front of the windshield. Before entering the cabin, the air is cleaned through a cabin filter. The filter element is made of synthetic fabric, and its replacement is necessary every 15 thousand km.
The degree of heating is provided by the amount of air passing through the heating radiator. Next, the heated and cold flows are mixed in the air duct, after which they enter the cabin. Diagrams, drawings, photos of the heating system can be found on the Internet.
Assembly
We return the brake pedal to its place. The emphasis will prevent you from doing this. so it needs to be moved to the side and this will allow you to return the pedal to its rightful place. If the stop is bent forward, then after returning the pedal to its place, straighten the stop using pliers.
After connecting the pedal to the rod, do not forget to install the locking plate.
Also, do not forget to install, connect and be sure to configure the brake pedal pressure sensor:
Don't forget to connect and configure the brake pedal sensor. The brake lights should light up when you press the pedal lightly.
Also, we install the gas pedal bracket and the pedal itself on it. which we must fix on the bracket with a locking plate.
That's probably all in the cabin, now let's move on to the engine compartment. Don’t forget to put the steering rod back in place and screw the thermal protection back into place (if you unscrewed it):
We put the air filter in place. air duct then the platform for the battery and the battery itself.
So, everything is assembled, all that remains is to fill in the antifreeze and remove the air lock from the stove. Before pouring antifreeze, make sure that all hoses are put in place and all clamps are tightened, including the throttle body heating hose.
Frankly, after filling in the antifreeze and checking the cooling system, at first I was a little depressed that the stove was not heating again. In desperation, I added gas and noticed that at high speeds the air coming from the stove was much hotter. Then it dawned on me: there was an air lock in the system. Air accumulates at the highest point (I have it in the hoses) and does not allow antifreeze to circulate normally through the stove.
I expelled the air from the system in the same way as I have been doing for about 7 years. It is enough just to drive at high speeds (3-4 thousand rpm) and the flow of antifreeze will itself break the air plug into bubbles, and then carry them into the expansion tank. Monitor the antifreeze level and make sure that the expansion tank plug allows air inside well. and then you won’t be afraid of an airlock.
That's probably all, dear readers! I sincerely hope that this article will help you replace the stove radiator and you will no longer have problems with this unit. I wish that the stove in your car works perfectly, never leaks, and that even in severe frost, your car will be warm and cozy!
I installed the standard radiator using a reverse circuit on December 5, 2022. I’ve been driving with it for almost a month, the New Year is just around the corner, I’m very pleased with the stove so far))
Diagnostics of the stove operation
The operation of the heating system should be periodically monitored. Such a check can be carried out as follows.
- With the engine running, check the operation of the stove without heating the air in all fan speed modes.
- We control the change in the direction of air flow when adjusting the direction switch.
- When the engine reaches operating temperature, check the degree of heating of the air entering the cabin by moving the regulator to the red zone.
- We check the operation of the heating system dampers by periodically moving the regulator from the red zone to the blue sector. The degree of air heating should change.
The owner of the car may not immediately understand that the stove is leaking. The carpets in the cabin are not necessarily wet and a persistent smell of antifreeze does not always appear. This is explained by the possible rapid evaporation of the leaking liquid. The stove in the Lada Kalina does not have pipes leading into the cabin that could wear out.
If it has been determined that the radiator is the culprit for the ineffective operation of the heating system and leaking coolant, it is time to repair it. Sometimes it may be necessary to replace this unit.
Recommended repair method
A special feature of the Lada Kalina is the not-so-convenient location of the radiator-heater. Replacing it may take quite a lot of time.
Owners of a Lada Kalina car can choose one of 2 ways to change the stove themselves. The first method is recommended in the car repair manual and, as a rule, is carried out at service stations. This method requires careful and step-by-step operations. It involves the dismantling of a significant number of parts and elements of the car, so independent replacement causes some difficulty.
If you decide to proceed in this way, you will need to carry out additional operations.
- The front panel is freed from the fastening bolts. Unscrew the following screws: at the ends on the side of the doors, at the top left and right in the corners of the front pillars, in the glove compartment, along the edge of the windshield.
- Release the plastic casing of the central tunnel near the parking brake.
- Remove the instrument panel, all external toggle switches, and buttons.
- As it is released, the plastic case is lifted, monitoring the condition of the electrical wires and connectors.
This work cannot be done alone; the help of 2-3 people is required, since the correctness of dismantling cannot be objectively controlled. It is better to remove the central panel completely, but if you can secure it securely, you can leave it in a slightly raised state. The main thing is to get free access to the radiator of the heating system.
It is imperative to follow the procedure and carefully place the dismantled parts and fasteners. Otherwise, you will not be able to reassemble and correctly connect all the necessary equipment.
How to change the heater radiator Lada Kalina
There is a classic method recommended by the automaker, which involves removing the panel (dashboard). And a relatively simple, popular method among many car enthusiasts. Its essence is that the heater radiator is removed from inside the car without dismantling the panel. Let’s take a closer look at the simplest method and carry out step-by-step work in the following sequence:
- The first thing to do is (for obvious reasons) drain all the coolant from the system. Next, to gain convenient access to the work site, it is necessary to completely dismantle the air filter housing along with the corrugation that is attached to it. Disconnect the battery terminals. We completely remove the battery from the smoke space. After which, you also need to dismantle the metal base (platform) on which the battery was installed. Increasing the internal working space is necessary to carry out comfortable manipulations and provide access to two hoses connected to the stove radiator.
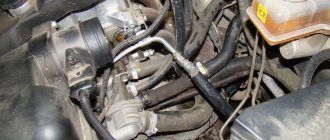
- Loosen the clamps and disconnect the 2 hoses that are connected to the thermostat housing.
- Now, let's move to the car interior, where the main work will be carried out. To ensure good access and ease of work, first of all we remove the plastic protection of the steering column. Our ultimate goal is to move the gas and brake pedals to the upper position, so that it becomes possible to easily remove and install the radiator. To do this, you need to loosen the steering column itself. We unscrew the four nuts to 13. Now we have access and all the conditions to carry out the work we need.
- Before the actual removal procedure, pay attention to the metal fastener (bar) that holds the heating unit body in place. This element must be removed. To do this, next to the hoses on the side of the engine compartment, we find and unscrew the 10 nut or self-tapping screw. If it is not possible to dismantle the bar, it is permissible to simply bend it, or better yet, saw it, and then remove it.
- Now, we should take a grinder and saw off the hoses. After this, the radiator is removed from the niche.
- Next, we take a new product and saw off two pipes on it. Please note that on the nozzles there are special edgings (bulges) necessary for a tight fit of the hoses. Sawing is carried out next to these edges. After that, thoroughly clean all the pipes with sandpaper.
- We place the “improved” new stove radiator in the niche. Here you will have to tinker a little, since installation is extremely inconvenient. The main thing is patience, and everything will definitely work out.
- Upon completion of installation, you need to connect all hoses. This must be done from the side of the engine compartment, directing the hose to the required pipe. Afterwards, you need to move into the cabin and secure the hoses with clamps.
- The work is almost finished, all that remains is to return the steering column to its original position, tighten all the nuts, and put on the cover. Replace the battery, install the air filter housing and, of course, pour the required amount of coolant into the expansion tank. This completes the replacement of the Lada Kalina stove.
Some useful tips
Any car owner who has to carry out work to replace or repair a heating system radiator wonders about the reason for the failure of the unit. It is important to consider 2 factors that allow you to extend the continuous operation of the device.
- It is necessary to timely replace the system air filter. A clogged radiator is more likely to fail. There is a set period for periodic replacement, but you can do it more often, for example, change the filter after winter use and at the end of the summer season.
- Replace the coolant in a timely manner. This operation should be carried out every 60 thousand kilometers. Accumulating wear products destroy the light metal of the radiator, depriving it of its tightness. Many car owners believe that by periodically adding antifreeze to the system, they will not have to change the unit. However, corrosion products continue to accumulate, having a detrimental effect not only on the heater radiator, but also on the engine as a whole.
A pressing issue is the use of high-quality antifreeze. You should buy it from trusted sellers and do not use water in the cooling system.
The operation of any vehicle involves not only the maintenance and repair of parts and systems that ensure its movement. Assistive devices play an important role in the operation of a car. And if the radiator of the cooling system fails, not only the microclimate in the car is disrupted, but it also becomes unsafe to drive due to fogging of the windows.
Despite the complexity and significant volume of operations performed, you can replace the radiator of the interior heating system yourself. The method described above will allow you to do this with the least amount of labor.
| Many car enthusiasts note that the Kalina’s heater is much warmer than that of other VAZ cars, but problems occur here too. In this article, we will consider in order why the stove on Kalina does not work. |
Why does the stove on Kalina not heat well? Operation and repair
Why the stove does not work on the Lada Kalina
So, why did a normally working heating system suddenly break down? There may be a number of reasons – direct and indirect. The latter are caused by problems in the cooling system or your carelessness. Eg:
- You turned on the air recirculation mode and forgot to turn it off;
- Or the ventilation holes in the luggage compartment are clogged.
- The culprit for poor operation of the stove may be the cabin filter, which has exhausted its service life and needs to be replaced.
Direct causes are associated with malfunctions of the heating system elements: a failed temperature sensor or a burnt out motor. Below we will look at the main problems in more detail.
Engine cooling system problems?
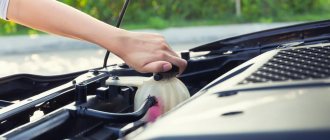
Most often, problems with the stove arise due to the EDS (engine cooling system). The first step is to check the coolant level in the expansion tank and, if necessary, add it to a level between o and “MAX”. By the way, many car enthusiasts in winter specifically add coolant only to the “MIN” mark; the less liquid there is in the system, the faster it will heat up, and therefore Kalina’s stove will start blowing warm air a little earlier than usual.
If coolant has to be added all the time, then the cooling system is leaking somewhere. You should carefully inspect all pipes for leaks, and also tighten the clamps. If the stove (radiator) is leaking, then it should be replaced.
Now you should check the circulation of antifreeze in the system, paying attention to the expansion tank.
If there is no circulation of coolant, or it is insufficient, then there may be two reasons for this ailment: the pump (it should be replaced) or the ODS is clogged (needs to be cleaned).
We check the thermostat: warm up the engine to 75 degrees and touch the upper radiator pipe (in diagram No. 6), if it is cold, then the antifreeze is circulating only in a small circle, the thermostat should be replaced with a new one.
A little about the device
It just so happens that Russian winters are some of the coldest, which means cars should be produced taking this little feature into account. In such weather conditions, the undoubted advantage of the Kalina is its powerful stove. It will not only bring the interior temperature to an acceptable minimum in a matter of minutes, but will also warm its owner with the warmth of the Russian automotive heart. However, there is a small drawback to this device - over time, you begin to notice how the main heat source leaks, forming oily drops on the rubber mats.
Problems with Kalina's heater elements?
To understand why Kalina’s stove does not work, you should understand its operating principle: The heater control unit (HCU) receives a signal from the ceiling temperature sensor in the cabin (installed in the interior lamp) and compares it with the temperature set by the driver. If the difference is greater than a certain value (for example, more than 2 degrees), then the ACS unit sends a control signal to the micromotor-gearbox (MMR), which controls the heater dampers (opens or closes hot air from the heater).
Therefore, if Kalina’s stove only blows hot or cold air, regardless of the position of the handle on the heater block, then start by checking the interior temperature sensor.
Also, the cause may be the MMR itself, for example, its resistor layers or gear teeth have worn out.
Sometimes it happens that the stove does not blow well - the first step is to replace the cabin air filter. The speed of the heater fan is affected by the heater resistor (for example, the 4th speed of the heater does not work), so it makes sense to check it too (it’s under the glove compartment).
If the electric heater fan does not turn on at all, then check the Kalina heater fuse - F5. And if the heater howls or hums, then most likely the problem is in the heater fan.
Another reason for the heater not working properly could be the Kalina heater control unit itself (for example, there are problems with the heater damper), but don’t rush to buy a replacement without making sure the actions are correct. The easiest way to find out why the stove is not working properly is to replace the part with a working one and check its functionality. It is not necessary to buy a new part; you can ask a friend for a known working part, or negotiate with the seller, leaving a deposit.
Thus, we have examined all the elements of the heater (see also the design of the Kalina stove). Start following the order of the article, moving from simple to complex, and then you will certainly be able to repair Kalina’s stove with your own hands!
Any inexperienced driver may have many questions: what is a heater radiator, on what principle does it work, how does it affect the car? There are simple answers to all these questions, which we will give below.
How to properly identify and troubleshoot problems
The Lada Viburnum stove is not a simple automotive component, it is a whole complex of devices and mechanisms that together provide a controlled microclimate and temperature in the car interior. The most important sign of a malfunctioning stove is a low heating temperature (supply of warm or cold air), or the absence of heating as such.
The malfunction may be due to several reasons, such as: - problems associated with the heater damper; — malfunction of the radiator itself; — a faulty fan; — low level of antifreeze; - other reasons.
Diagnostics
In any case, in order to understand which element is malfunctioning or simply does not function, it is necessary to carry out competent diagnostics. General advice when carrying out this boils down to the following basic principles: - diagnostics should begin with the simplest elements of the heating system. If no faults are found, move on to more complex units; — check the control unit and temperature sensor; — Inspect the cabin filter for significant blockages. You are lucky if the stove malfunction is caused by the failure of simple components. It is much more difficult to eliminate the consequences of a broken heater radiator. Therefore, we will dwell on it in more detail.
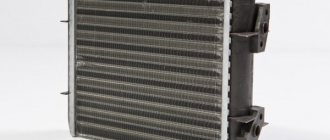
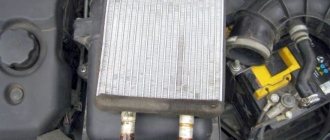
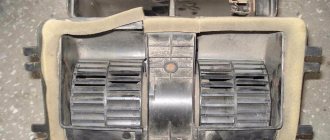
What is a heater radiator?
The heater radiator belongs to the cooling system. It looks like a mini version of the main engine cooling radiator and is essentially a small unit that consists of small tubes installed in parallel, connected by a series of cross plates (or fins) designed to dissipate heat. This radiator ensures the operation of the interior heater and the vehicle's glass heating system.
Replacing the radiator insert on models with air conditioning
Replacing the air conditioner radiator on Lada Kalina
The sequence of actions is as follows
- Remove the car bumper.
- Pour the antifreeze into a container prepared in advance.
- Disconnect the radiator fan terminals.
- Remove the pressure pipes and plug them to prevent dirt from entering.
- Press out the plastic fasteners of the cooling system and remove the air conditioner radiator from the car.
Installation of a new element is carried out in the reverse order.
If it is necessary to install a new element, the plastic line plugs are removed only immediately before installing it on the machine.
How to understand that the heater radiator is faulty?
Below are five main signs that indicate this particular problem. It is quite simple to understand that the heater radiator has malfunctioned or is out of order. But replacing this radiator is not an easy task.
Important information! Only one or a few signs of a heater core malfunction may appear at a time, but there are situations in which these signs appear all at once. This mainly depends on the age and condition of the car at the time the radiator failed.
Foggy windows
The very first sign of a malfunctioning heater core is sudden fogging of the inner surface of the windows without any obvious reason. Fogging of the windows does not mean slight fogging of the edge of the windshield, but the abundant formation of warm condensation over the entire area of all the windows of the car.
Major part malfunctions
The most common causes of radiator malfunctions are:
- Clogging of channels and honeycombs, which leads to an increase in pressure, results in a breakdown of the tube from the inside.
- Flow. The device may leak due to an air lock.
- Wear. During operation, the pipes wear out.
The most dangerous failure is a leak; it can occur in one or several places. Leaks can be detected by visually inspecting the system as a whole and the connections. A leak in a copper radiator can be eliminated by soldering; the aluminum product will have to be replaced.
Heating device made of copper
Heater core replacement procedure
- Disconnect the battery.
- Remove the steering wheel.
- Remove all exterior panels and housings for items such as the fuse box, speakers, and the compartment trim in front of the front passenger seat.
- Remove the glove box, radio, speakers and other accessories.
- Disconnect the instruments (be especially careful where the speedometer cable passes).
- Disconnect and remove the heater and air conditioner control panel.
- Unscrew the bolts and remove the dashboard.
- Do not disconnect the air conditioner (unless absolutely necessary and if you can properly dispose of the freon). Freon should never be allowed to leak, as it negatively affects the ozone layer and is also extremely toxic, especially for people with heart disease.
- Disconnect both hoses from the heater core in the engine compartment.
- Move all air lines and other components away from the heater core housing.
- Remove the radiator housing and place it on the table. Unscrew all bolts and other fasteners to get to the radiator itself.
- Take out the old radiator and replace it with a new one!
When installing the heater core, perform the above procedure in reverse order. If any element breaks during removal, it also needs to be replaced during installation.
Instructions for replacing the stove
Before removing all the necessary parts, cables and other components from Kalina, prepare a new radiator, pipes and clamps. The pipes will be required in case the old ones are worn out or they have never been changed over the years of operation. As practice shows, hoses are most susceptible to wear due to temperature changes, so in any case they need to be changed from time to time.
Instructions on how to change the radiator are presented below:
- We begin the replacement procedure in the engine compartment. First, place a container under the drain hole and drain all consumables from the radiator. If you notice that the coolant is already old and has exhausted its service life, which can be understood by its color and deposits, then it is also better to change the antifreeze.
- You need to ensure the most convenient access to all pipes and hoses of the radiator assembly in the engine compartment. To do this, dismantle the power unit air filter housing, the battery, and its platform. Next, you need to disconnect all the lines from the radiator unit in the engine compartment. Having done this, you can use a wrench to unscrew the nut that secures the metal casing to the engine shield. This nut is located next to the pipes that go into the Kalina's interior.
- Next, we move into the car interior. You need to remove the gas pedal; to do this, unscrew the three nuts. As for the brake pedal, it cannot be removed, so just move it to the side as far as possible.
- Now you have to cut the steel casing as shown in the photo, and then cut off the tubes of the radiator assembly. Having done this, you can dismantle the device from the pedals, but to do this you will also need to unscrew the bolts that secure it.
- Before installing a new radiator device, it will be necessary to carefully sand its tubes. Please note that they should be as even as possible. After all surfaces are ready, a line with a widened end is put on the upper tube, and a line with a narrower end is put on the lower tube. The remaining outputs must be connected in the engine compartment instead of the old ones. Also note that on the side of the Kalina’s interior, it is advisable to treat the place where the lines exit into the engine compartment with sound-insulating material.