You need to scald the stud as follows: screw in the stud, install the brake disc, wheel, tighten the whole thing with wheel nuts and scald it, this is done so that the stud is precisely centered, because it has play in the axle shaft and during the welding process it can move to the side.
We install the axle shaft and the sealed casing.
We install a spacer.
We install the brake disc.
We install the caliper bracket.
We install the pads.
And the caliper itself. Don't forget to lubricate the caliper guide pins. Important Note: Due to a design change, the right caliper is installed on the left side and the left caliper is installed on the right side.
We screw the reinforced brake hoses to the caliper through copper rings.
And to the tee, also through copper rings.
We install the handbrake cable into the caliper so that the cable goes around the bridge. This bending does not affect performance
We screw the handbrake cable to the standard handbrake mechanism, bleed the brake system, adjust the handbrake, install the wheels and enjoy the work done.
Instructions for installing the HCD on VAZ 2101 - 2107
The package includes:
- Left caliper VAZ 2108 – 1 pc.
- Right caliper VAZ 2108 – 1 pc.
- Shoe guide VAZ 2108 – 2 pcs.
- Front brake flexible hose – 2 pcs.
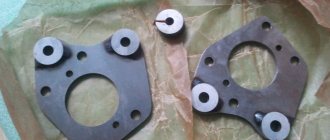
- Faceplate – 2 pcs.
- Distance washer – 2 pcs.
- Brake disc boot – 2 pcs.
- Half ring – 2 pcs.
- Brake pads Ladasport VAZ 2108 – 1 set.
- Brake disc VAZ 2108 – 2 pcs.
- VAZ 2101 axle shaft, modified – 2 pcs.
Work order.
- Place the car on a level surface.
- We install wheel chocks.
- Loosen the rear wheel mounting bolts.
- We jack up the car, completely unscrew the wheel mounting bolts and remove the wheel from the car.
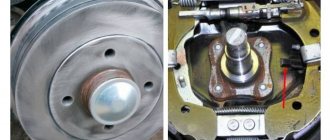
- Remove the brake drum.
- We turn the axle shaft until the large holes coincide with the two nuts securing the brake shield.
- Using a 17 mm socket wrench with an extension, unscrew the nuts securing the brake shield.
- Turn the axle shaft and unscrew the remaining 2 nuts in the same way.
- We remove the semi-axle from the car. This can be done with a special puller or by securing the wheel with 2 bolts to the axle shaft. With a sharp movement towards ourselves, we pull out the axle bearing from the flange of the rear axle beam.
- After unscrewing the bolts, remove the wheel.
- We take out the axle shaft.
- Remove the brake pads.
- Using a 10mm wrench, unscrew the brake pipe from the back of the brake shield.
- Remove the brake shield completely.
- We inspect the axle shaft seal and replace it if necessary.
- Take the modified axle shaft from the delivery kit.
- Install a half ring between the bearing and the oil reflective shield.
- Put the faceplate on and orient it so that the holes on the faceplate and the oil deflector plate line up.
- Place the brake disc boot on the rear axle beam.
- Install the axle shaft with the faceplate into the rear axle beam. Attention! The holes for attaching the brake mechanisms should be oriented so that the brake mechanism is located in front (in front of the bridge), the holes should be directed downward, as in the photo below.
- Tighten the 4 axle nuts.
- Attach the brake disc boot to the faceplate.
- Place the spacer on the axle shaft. Orient the washer so that the holes in the washer and the axle shaft line up.
- Install the brake disc and secure it to the axle flange.
- Install the caliper assembly onto the faceplate and tighten it with two M10 bolts. Attention. The fitting on the brake cylinder should point upward.
- Connect the brake hose to the brake pipe.
- Secure the brake hose with plastic ties. Secure in such a way that the hose does not have constant contact with other parts.
- Install the wheel. To secure the wheel, you must use extended bolts. Or replace the bolts with studs.
- Lower the car.
- Tighten the wheel bolts.
- Repeat steps 4-27 on the second side.
- Check the oil level in the rear axle gearbox. Add oil if necessary.
- Bleed the brake system.
FakeHeader
Comments 10
Only registered users can participate in discussions.
listen, please tell me, I installed hydraulic handbrake disc brakes, but without an adjuster right now, first of all, there is over-braking, like the sorcerer adjusted it, now the ass almost doesn’t take at all and the pedal is very soft
send a diagram or photo
then another tube to the tee and from the tee along the wheels)))
and from it goes a tube to the hydraulic handbrake
the sorcerer stands after the GTZ
everything works great for me!
and also without the sorcerer)))
there will be no re-brakes and the brake cable with the cable is rubbish! front gas 3110 rear with regulator
Maybe I should have just installed normal DZTs? Don't you feel bad for over-braking?
Front and rear disc brakes on VAZ 2107
If the car is not able to stop in time, there can be no talk of any safe driving. This rule applies to both trucks and cars. VAZ 2107 is no exception in this sense. The brakes of this car have never been famous for their reliability and have always caused drivers a lot of problems. And the most vulnerable point of the brakes on the “seven” have always been the brake discs, the service life of which was very short. Can a car owner change these discs himself? Yes maybe. Let's try to figure out how this is done.
Advantages of disk mechanisms
Accessories
The main advantages of replacing drum brakes with disc brakes include:
- Increased reliability when braking;
- Reduced braking distance;
- Uniform distribution of braking force, which is especially important for a front-wheel drive “ten”;
- The brakes respond faster when you press the brake pedal;
- Unsprung masses are reduced;
- More efficient cooling when driving in mountainous areas and during sudden acceleration or braking;
- Disc mechanisms are easier to replace and dismantle;
- There is no need to adjust the handbrake after each repair. You only need to do this once after installation and that’s it;
- Discs do not freeze in winter after washing, unlike drums;
- Disc mechanisms allow you to detect pad wear in a timely manner.
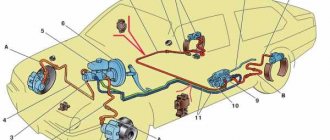
PURPOSE AND PRINCIPLE OF OPERATION OF BRAKE DISCS ON THE VAZ 2107
The VAZ 2107 has two brake systems: main and additional. The main one allows the driver to reduce the speed of the car while driving. An additional system allows you to lock the rear wheels of the car after it has stopped.
The brake disc is the most important part of the VAZ 2107 braking system; without it, normal operation of the car is impossible
Brake discs are part of the main braking system. They are located on the front axle of the VAZ 2107 and rotate with it. A caliper with brake pads and hydraulic cylinders is attached to the brake discs. As soon as the driver decides to brake and presses the pedal, brake fluid begins to flow into the hydraulic cylinders through special hoses. Under its influence, pistons move out of the cylinders, pressing on the brake pads. And the pads, in turn, compress the brake disc on both sides. The disk, and with it the front wheels of the VAZ 2107, begin to rotate more slowly and the car brakes smoothly.
Faceplate and installation features
Before installing disc brakes on a VAZ 2110, you need to remove the old drum brakes. This operation will not take much time and effort, the only thing is that it is advisable to have a puller for the hub and try not to damage the old brake caliper on which the pads and working cylinder are attached. After the old brakes are removed, you can install a new set, according to the instructions
Nothing new is written there, the only thing worth paying attention to is that the guide bolts are lubricated with a special grease, which is not advisable to remove
If the question arises about independently selecting spare parts for installing disc brakes instead of drum brakes, then the only difficulty is the manufacture of the faceplate. We have attached a drawing of the faceplate to the article, and this is what the finished rear beam of a VAZ 2110 with disc brakes looks like.
Despite the effective brakes, be careful on the highway and good luck to everyone!
BRAKE DISC MANUFACTURERS
As a rule, car owners, having discovered the wear of one or two brake discs, are in no hurry to replace them with standard VAZ ones, remembering their mediocre quality. But since the spare parts market is now literally flooded with discs from various manufacturers, a novice driver becomes completely confused by such abundance. Which companies should you prefer? Let's list the most popular ones.
ALLIED NIPPON WHEELS
Allied Nippon is a manufacturer very well known in the domestic auto parts market. This company specializes mainly in brake pads and clutch discs, but also produces brake discs that are suitable for “sevens”.
Allied Nippon wheels have always been distinguished by the optimal combination of price and quality
Allied Nippon wheels are made from high quality cast iron and undergo mandatory three-time sizing and balancing testing. The company produces both ventilated and non-ventilated discs, which are almost always supplied complete with brake pads. The manufacturer guarantees that the brake systems it supplies will cover at least 50 thousand km before the first failure. And finally, the price for Allied Nippon wheels is more than affordable, starting at 2,200 rubles per set.
ASP DISCS
The ASP company is widely known not only in Europe, but also among domestic owners of VAZ “classics”. The Russian market offers mainly non-ventilated brake discs, which are also suitable for the VAZ 2107.
ASP discs have the highest wear resistance and reasonable price
ASP discs are processed on high-precision machines and are triple checked for balancing and dimensions. They have the highest wear resistance: the manufacturer guarantees that they are able to travel at least 100 thousand km before the first breakdown. In fact, the only drawback of ASP disks is their considerable weight, but this drawback is more than compensated for by the attractive price, which starts at 1,500 rubles per set.
ALNAS WHEELS
Another large manufacturer of high-quality brake discs is Alnas. It produces mainly ventilated discs with a wide variety of perforations. Recently, the range has been expanded with radial discs with different notches. Alnas products are in demand primarily among drivers who tune their cars and among drivers who prefer an aggressive driving style. New discs can travel at least 80 thousand km before the first failure. They are lightweight, and the price, given their sporting purpose, is steep: the cheapest set will cost the driver 2,900 rubles.
Alnas wheels are designed for drivers with an aggressive driving style
These are, perhaps, all the major manufacturers of brake discs, whose products the owner of the “Seven” should take a closer look at. Of course, there are a lot of smaller companies that are very aggressively promoting their wheels on the auto parts market. But the quality of their products often leaves much to be desired, so there is no point in mentioning them in this article.
So which wheels should a novice driver choose?
When choosing wheels, you should consider two things: your driving style and your wallet size. If the driver prefers aggressive driving, reliable brakes and is not short on money, then the optimal choice would be Alnas products. If a person is used to driving carefully, and the main criterion for him is durability and reliability, it is worth purchasing ASP wheels. And finally, if money is short, but high-quality ventilated discs are still needed, the last option remains - Allied Nippon.
Disadvantages of drum mechanisms
Drum brakes
Despite the fact that drum brakes are correctly designed, mounted and adjusted at the factory, which is why intervention is not required, they have certain disadvantages:
- This is an outdated solution that is practically never found on new cars from leading European manufacturers;
- When compared with disk mechanisms, drums are significantly inferior in efficiency;
- There is no cooling or ventilation on the drums, which leads to overheating under heavy loads on the car;
- The drums have a closed space, so it is not possible to remove dirt and wear products in the form of black dust, leaks of fuel oil and trapped moisture naturally. This is done by cleaning.
Adjustment
After installing the disk mechanisms, a leak test procedure and, of course, bleeding are required.
But the work cannot be considered completed at this point, since the braking force needs to be adjusted.
The efficiency of disc brakes is much higher than drum brakes, therefore the braking force regulator must be adjusted.
This unit is located at the left wheel, fixed to the body and connected to the beam by means of a small traction. Loosen the fastening of the rod to the regulator (sorcerer), move it 2-4 millimeters back. In this position, the thrust is fixed. Such manipulations allow you to deceive the sorcerer
It will distribute less braking force to the rear brakes. Drive the car in favorable weather conditions for several days after replacing the brake system, brake carefully, and do not press hard on the pedal. Please note that “rolling” can have both a positive and negative effect on the behavior of the car. If the car behaves well, it means that you managed to correctly replace the drums with discs
If problems arise with the stability and balance of the brakes, it is advisable to entrust the adjustment to specialists from good service stations.
Installing disc mechanisms at the rear is a competent and correct decision for all VAZ 2110 owners. Of course, if the drums behave well, there are no complaints about the quality of braking, and you are not going to increase the power of the power unit, then there is no clear need to switch to disc brakes. But if you do this over time, you will clearly experience the difference between discs and drums from your own example.
Loading …
Necessary materials
If you decide to install the HTD yourself, then you will need the following materials:
- Directly disc brakes, machined under the hub by 0.6 cm. The diameter of the disk should be 24 cm. Please note that it is not necessary to grind the disk itself. If you want to leave it unchanged, then you need to groove the hub.
- Front calipers and hoses.
- Faceplates necessary for attaching calipers. You will have to tinker with this part, since it is quite unusual and requires separate manufacturing to the exact dimensions.
- High quality pads that fit true to size.
- 12 bolts M10 × 1.25 with groovers.
- 8 spacers. You can use timing belt tensioner roller washers for the VAZ-2108.
When you have acquired all the necessary materials, it’s time to proceed directly to the replacement. The procedure is performed in several stages.
What is needed for replacement
For a theoretical rework, the following elements will be required:
- Brake discs - parts from the front wheelset of a VAZ 2114 with a diameter of 240 millimeters are suitable. The only point is the diameter of the hub, which, using the appropriate equipment, needs to be changed from 58 mm to 60 mm.
- Pads, calipers and hoses are also suitable from Samara. It is worth remembering that in this system the VAZ 2114 is no different from the “nine”, so parts from 2109 will also fit.
- Plates for mounting calipers. You can find this part on the Internet or in the automotive market. Some motorists make plates themselves.
- Bolts M10x1.25 30 mm – 12 pieces.
- Distance washers from the timing belt of the VAZ 2114 or “nine” - 8 pieces.
Stories from our readers
“Fucking basin. "
Hi all! My name is Mikhail, now I’ll tell you a story about how I managed to exchange my two-wheeler for a 2010 Camry. It all started with the fact that I began to be wildly irritated by the breakdowns of the two-wheeler, it seemed like nothing serious was broken, but damn it, there were so many little things that really started to irritate me. This is where the idea arose that it was time to change the car to a foreign car. The choice fell on the melting Camry of the tenth years.
Yes, I had matured morally, but financially I just couldn’t handle it. I’ll say right away that I am against loans and taking a car, especially not a new one, on credit is unreasonable. My salary is 24k a month, so collecting 600-700 thousand is almost impossible for me. I started looking for different ways to make money on the Internet. You can’t imagine how many scams there are, what I haven’t tried: sports betting, network marketing, and even the volcano casino, where I successfully lost about 10 thousand ((The only direction in which it seemed to me that I could make money was currency trading on the stock exchange, they call it Forex. But when I started delving into it, I realized that it was very difficult for me. I continued to dig further and came across binary options. The essence is the same as in Forex, but it’s much easier to understand. I started reading forums, studying trading strategies. I tried it on a demo account, then opened a real account. To be honest, I didn’t manage to start earning money right away, until I understood all the mechanics of options, I lost about 3,000 rubles, but as it turned out, it was a precious experience. Now I earn 5-7 thousand rubles a day. I managed to get the car buy after half a year, but in my opinion this is a good result, and it’s not about the car, my life has changed, I naturally quit my job, I have more free time for myself and my family. You’ll laugh, but I work directly on the phone)) If If you want to change your life like me, then here’s what I advise you to do right now: 1. Register on the site 2. Practice on a Demo account (it’s free). 3. As soon as you get something on the Demo account, top up your REAL ACCOUNT and go to REAL MONEY! I also advise you to download the application to your phone, it’s much more convenient to work from your phone. Download here.
- Reducing braking distance.
- Uniformity of braking forces.
- Reducing the response time of brake mechanisms.
- Reduced unsprung masses
- Improved heat dissipation (important during active driving, at higher speeds and on mountain roads)
- Reliability
- Easy to maintain and replace pads
- No need to tighten the handbrake regularly
- Appearance.
- In winter, after washing, drum brakes freeze, but there are no such problems with disc brakes.
Article on the topic: How to bore a VAZ engine
Problems after replacing drum brakes with disc brakes
Do-it-yourself installation of rear disc brakes on a VAZ 2110
The main advantage of installing disc brakes yourself is cost savings. The savings are very large, about 10 thousand rubles. I will say right away that I am not a supporter of this method and believe that if you decide to install rear disc brakes, then it is better to install devices that have a certificate from the autonomous non-profit organization “Center for Assistance in Certification of Automobiles and Motorcycles” at NAMI. Rear brakes M5 13″ disc brakes (certified) and install this whole thing at large dealers at service stations, who also provide certificates stating that your VAZ 2110 rear disc brakes are adjusted in accordance with all standards. And this does not mean that your papers will provide you with a trouble-free MOT.