Not long ago, the rattling of the gearshift knob began to irritate me. All speeds had their own tonality of rattling and this terribly spoiled the nerves. At first I thought that the end of the bushings had come again, but after disassembling it, it turned out that everything was in place and they could still walk and walk. And then, taking a closer look, I noticed the hinge itself into which the handle rests. He did not naturally feel at ease in his place. It was decided to get into it, but before that I finally got there and bought a new one. For some reason I was sure that I would have to change it. And now the new thing is in hand, the car is in the pit, the tools are ready, coffee is in the mug - you can get started!
First, we climb into the cabin, remove the cover from the gearshift knob and the knob itself. Then we unscrew the fastening of the handle to the poker, where our favorite, often rattling bushings are located. I also had to unscrew the reverse speed guide in order to remove the screw from the connection between the handle and the poker. After that we climb under the car; now we won’t be back up soon).
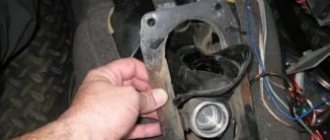
Below we see the factory protection, maybe it’s the screen, but it’s not that important. He's bothering us. It is secured with 4 x 10 nuts, after which it is relatively easy to remove.
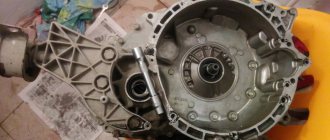
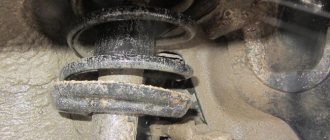
Now a view of the mechanism itself opens. The reaction rod from the gearbox is attached here, the limiter bracket is formed and the hinge itself is formed. All bolts are 13. In order to easily unscrew everything and not tear it off, I spilled everything with a liquid wrench.
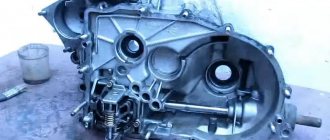
Removing and disassembling the gearbox control drive
We disassemble the drive to replace the bushings of the gear lever shaft and the lever ball joint. We change the plastic bushings of the lever axis if there is a large play in the connection of the lever with the drive rod. We replace the parts of the ball joint if they are worn out or broken. We change the control rod when it deforms. Remove the floor tunnel lining (see “Removing the floor tunnel lining”). If it is necessary to replace the plastic lining of the reverse gear lock bracket, which can be worn by the mating part during long-term use...
...using a 10" wrench, unscrew the two nuts of the upper fastening of the lining...
...and the lower mounting bolt.
Remove the bracket cover. Replacing the gearshift lever axle bushings, as well as all plastic (subject to wear) elements of the lever ball joint, can be done inside the car without dismantling the entire drive. For clarity, we show these operations on a removed drive. To remove the drive, it is necessary to release the fastening of the ball joint race from the bottom of the car and the rubber boot in the car interior. We turn the head “10”...
...six nuts securing the drive pressure plate to the body.
Remove the pressure plate. Remove the protective cover from the pressure plate mounting studs. From the bottom of the car, remove the power unit mudguard (see “Removing the power unit mudguard”) and dismantle the drive rod (see “Removing the power unit mudguard”). We mark the position of the control rod relative to the shank of the gear shift rod hinge.
Using a 13mm spanner, loosen the tightening of the nut of the coupling bolt of the clamp securing the control rod to the shank of the gear selector rod hinge. Using a slotted screwdriver, we open the clamp and move it along the rod. Remove the control rod from the rod joint shank.
We remove the mechanism with the control rod, removing the gear shift lever from the hole in the floor.
Replacing the ball joint race for a VAZ 2110 gearbox
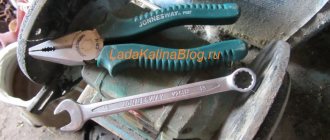
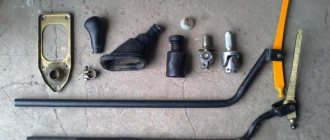
To work, you need to have a new clip, a set of keys, several screwdrivers, thick lubricant and about half an hour of time.
- First of all, we climb under the car and unscrew the torque rod from the ball joint. To do this, unscrew the four fastening points (two bolts and two nuts with a “13” wrench). Here you have to get a little used to it because the exhaust gets in the way. If the bolts are rusty or won't budge, use WD-40 penetrating fluid.
- Next, we remove the lever itself in the cabin. To do this, take a flat screwdriver and pry off the decorative cover.
- Once you have access to the fasteners, you can begin dismantling the lever itself. We unscrew the screw with a Phillips screwdriver, preferably an “L-shaped” one, which can easily fit into the limited space of the tunnel. Then take the key and unscrew the nut securing the lever.
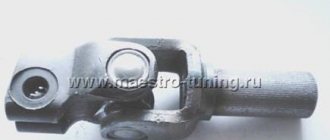
- Now, using a flat-head screwdriver, remove the retaining ring of the gearbox ball joint cage, after which you can try to pull out the shift lever, as well as the “butterfly” itself.
- Next, we take a new “butterfly”, remove the retaining ring from it and take out the plastic bushing. We take lubricant such as “Litol”, “Solidol”, etc. and generously lubricate the friction points. We put the bushing on the lever, then install it all in the holder and secure everything with a locking ring.
The appearance of sound, play and creaking
Replacing the backstage cushion
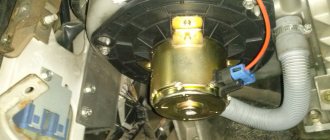
Generally speaking, the appearance of sound in the wings indicates either wear or the initial low quality of the cushion, and both options are essentially equivalent, since there is only one way out - replacing the wing cushion of the VAZ 2110. Many VAZ cars, due to the structural features of the design, often have the support is, to put it mildly, not of high quality. This fact becomes obvious when the car is not driving on a level surface. The sound is so noticeable that it becomes noticeable even to the driver who is in relative sound isolation.
Note: If you hear a sound in your car that was not there before, you should visit a technical service department or your own garage as soon as possible to determine the cause of the defect. Since if the defect is not identified immediately, the economic costs will be many times higher. Because the best way to fight is prevention in the first place.
Replacing the backstage cushion on a VAZ 2110
What kind of scenes were installed on the Priora?
Three types of scenes were installed on the Lada Priora (one for each box):
- long-stroke with rigid rod and flat lever (for 2170 (aka 2110));
- short-stroke with rigid rod and round lever (for 2180);
- cable (2181).
The gearbox 2170, which Priora inherited from the tenth family (the entire VAZ 2110 line), was distinguished by a large lever stroke: it was difficult to quickly change gears. When developing the gear shift drive for the 2180 gearbox, engineers took into account the criticism of car owners and created a short-throw mechanism that made it possible to change gears much faster. In addition, both scenes inherited from the “ten” a not very reliable mechanism for transmitting force to the box, which is why it had to be adjusted from time to time. Another common problem was the vibration of the lever, which irritated many owners of this car.
Also, a common disadvantage of both transmissions was the lower location of the gear shift mechanism, because this led to:
- leaks of the gear selector rod seal;
- Difficulty switching gears in the cold.
When developing a new type of gearbox switch (2181) for the Lada Priora, engineers took into account previous mistakes. The gearshift mechanism was moved to the top, and Bowden cables were used as rods. This immediately solved many of the problems of the previous units. But the price for this improvement was the low reliability of the mechanism connecting the lever and the cables, because it is made of plastic. However, with careful operation, its service life exceeds 100 thousand km.
Alternative supports
Replacement cushion for VAZ 2110
Considering the long-standing problem of Samara and a dozen, the manufacturer immediately released a whole series of alternative pillows:
Let's now consider their features:
- The support of JSC-BRT and the peculiarity of its structure is contained in a hinged product, which replaced the bearing in this place. At first glance, it looks like a panacea, since the general principle of operation seems to be clear: the creators of this technical innovation used an element that has increased rigidity in the radial direction. At first glance, the sounds should disappear and the car should become silent on uneven roads, however, conflicting reviews from the motorists themselves do not allow us to completely agree with this fact.
- An alternative to OAO-BRT is SS-20, where a steel bushing was installed in place of the standard bearing, which was completely welded into a rubber damper. The manufacturer of this new product claims that the SS-20 will completely eliminate the appearance of elevators and extraneous sounds. Moreover, the manufacturer directly promises that the SS-20 will be able to guarantee the classic behavior of the rocker (see Replacing the rocker on a VAZ 2110 on your own): regardless of the topography of the road surface, the lever will be stable and without extraneous sounds.
- The developers of "Assomi" boldly claim that the use of a special prescription rubber mixture will completely smooth out all impacts and sound noise, thereby significantly increasing the overall level of comfort of the car.
VAZ 2110 gearbox rocker
So, you need to choose who to trust, because there are a huge number of manufacturers to choose from, who all guarantee the high quality of their products. And most importantly, they guarantee that they managed to create a universal high-tech product that is most effective from a practical point of view.
Note. But it’s not entirely clear why some manufacturers of backstage cushions use rubber ears that quickly break?
Practical Feature of Alternative Choice
Unfortunately, “Assomi” and SS-20 are quite difficult to find in local stores; in the future they will go on wide sale, however, it is impossible to answer exactly when this will happen. It all depends on the store owners. The motorist is mainly offered imported products, as well as from national manufacturers, but only standard ones. It should be objectively understood that the quality of imported products varies significantly in comparison with national standard factory models, as does the price. Therefore, if you are pressed for time, it is best to order your own national alternative via the Internet, which is much lower in price than its foreign counterpart, and the quality is almost identical.
Preparation
There are 2 ways to replace the clutch. Instructions for replacing the VAZ 2110 clutch with your own hands without removing the box and without the need to drain the oil + informative photo report + video. With the replacement of the clutch, replacement without removal, replacement of the Priora stove gearbox without. One method involves completely removing the gearbox, the other does not. In any case, the following available tools are needed:
See:
- jack;
- an overpass, without which it will be problematic to replace the clutch;
- logs or bricks;
- a set of keys and sockets of sizes from 8 to 19, you may need a 15 socket, which is rarely required;
- extension cords for keys will not be superfluous, since sometimes a situation arises in which it will be impossible to reach the part by hand;
- a 10-12 cm mandrel for centering the driven disk.
Replacing the wing cushion with your own hands
- we place the car on the overpass;
- we go into the salon;
- remove the cover and the plastic handle on top;
- Use special pliers (platypus) to remove the retaining ring;
- we climb under the car;
- The rocker pad is held in place by four nuts that need to be unscrewed.
Note. It is worth noting that the standard ring can be removed very easily, because it has special lugs. If you bought a new imported set of backstage cushions, then there is another locking ring without ears, but it is better not to install it, but to use the old one.
After replacement, defects in the backstage support are not detected in most cases. Assembly is carried out strictly in the reverse order: a support is installed, which is secured with nuts. It is necessary to consolidate the above listed theoretical aspects of replacing the backstage cushion with the help of photo and video materials. Instructions on how to do the replacement yourself will be most effective if you have some visual reinforcement. In most cases, the price of the issue is small, but everything depends directly on the quality of the part itself. You can also find out about replacing the short-stroke rocker on our website.
Replacing the gearbox bushing with a fluoroplastic one
You will need the help of a turner, who must machine a new fluoroplastic bushing according to the following diagram:
By the way, he should also have all the necessary material. We install a fluoroplastic bushing on the gearbox lever instead of the standard metal one.