Hello dear owners of Lada 10-family! In this article we will talk about the so-called vasa disease, this rattling gear knob
in VAZ-2110, 2111,2112 and its struggle. There are several ways to solve this problem, but we will consider the method of installing rubber/plastic washers on the gearbox axle and sharpening the gearbox lever bushing, this will help us get rid of the rattling of the gearbox handle.
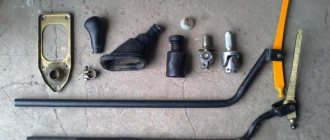
What do we need to eliminate the rattling of the VAZ 2110 gear lever?!
1) 10.13 wrench, scissors, grinder, Phillips screwdriver. 2) Plastic lid from a glass jar, or other similar plastic.
1. Remove the cover from the gearshift knob and lift it up. We remove it quite carefully, without fanaticism, so as not to break the casing. It is not necessary to remove the handle from the casing.
2. Next we need to unscrew the two nuts by 10.
3. Then unscrew the nut to 13.
4. Next, use a screwdriver with a Phillips head to unscrew the screw, tilting the lever to the right for easy unscrewing, or insert the screwdriver through the side of the tunnel.
The rattling of the gearshift knob of a VAZ 2110 car is not such a rare occurrence. There are several ways to fix this problem.
As is already known, to eliminate any problem, it is necessary, first, to establish the cause of its occurrence. There can be many reasons for the rattling of the VVAZ 2110 gearbox lever.
For example, rattling may appear due to the installation of a backlash-free gearshift lever from LADAKalina, since in the absence of play, all vibration from the gearbox goes directly to the gearbox lever in the VAZ 2110 interior (in the photo below: on the left is a backlash from a VAZ 2110, on the right is backstage without play from LADAKalina).
You can clearly look at the scenes with and without play (from VAZ 2110 and LADAKalina, respectively).
Another reason that leads to rattling of the gearshift knob may be wear of the gearbox and engine mounts, as well as other parts responsible for damping vibration of the gearbox and engine.
The easiest way to eliminate rattling gear lever is to install a spring
The simplest solution would be to install a spring that will hold the gearbox lever and prevent it from vibrating and making an unpleasant rattling sound. The best part about this modification is that we don’t have to disassemble anything! The photo below shows how to install the locking spring (and they also say that you can wrap the gearshift lever with a medical tourniquet along with the spring for a tighter fixation).
A more reliable way to combat gearbox rattling is to install plastic or rubber washers on the gearbox axle. True, this method takes a little longer and requires a little disassembly.
In order to install rubber or plastic washers on the gearbox axle you will need:
An ordinary plastic lid from a glass jar (or any soft plastic);
- Scissors;
- Key for 10 and 13;
- File; Screwdriver.
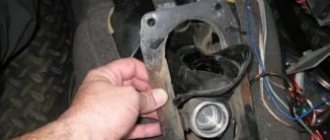
First, you need to remove the casing from the gearshift knob and lift it up (there is no need to remove the gearshift knob itself). Then unscrew the nut by 13 (the photo below clearly shows where it is located).
Then use a Phillips screwdriver to unscrew the screw (see photo below).
After this, unscrew the two nuts by 10 (see photo below).
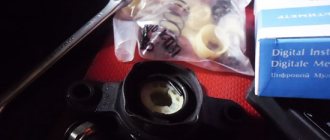
We remove the bolt, bushing and washers and generously lubricate them with thick lithol (photo below).
You need to cut a washer out of plastic to fit the sleeve. After this, we return the entire gearbox mechanism to its original position by adding two plastic (or rubber) washers to the small slots along the edges (photo below).
The washers, as can be seen in the photo above, must be inserted to the right and left of the bushing (the bushing will, apparently, have to be sharpened a little).
Disassembling and assembling the synchronizer
Synchronizers of 1st–2nd, 3rd–4th and 5th gears are disassembled and assembled in the same way. We show the disassembly and assembly of a synchronizer using the example of a 5th gear synchronizer. Before disassembling, we mark the blocking rings and their position relative to the synchronizer clutch. Remove the blocking rings. We mark the position of the hub relative to the coupling and the position of the crackers relative to the grooves of the hub, so that during subsequent assembly they will be installed in their original places.
To disassemble the synchronizer...
...carefully slide the coupling along the hub, holding the balls with your hand to prevent them from “shooting out”.
5th gear synchronizer parts
:
1 - coupling;
2 - ball;
3 - cracker;
4 - spring;
5 — hub Before assembly, inspect the synchronizer parts. Nicks and chips on the splines of the hub and coupling, the gear rims of the locking rings and the coupling are unacceptable. We replace defective parts with new ones. If there is significant wear on the working conical surface of the blocking ring (the minimum permissible axial clearance between the ends of the gear rims of the gear and the blocking ring is 0.6 mm), it must be replaced.
For ease of assembly of the synchronizer, generously lubricate the springs, crackers and balls with grease.
Putting the hub on the workbench...
...we insert springs into the hub sockets, and crackers into the grooves (in accordance with the previously applied marks). We insert the assembled hub into the coupling, orienting it so that when the ball is subsequently installed...
... it was located exactly in the middle part of the coupling groove - in its deepest place.
Place balls in the holes of the crackers...
...and, pressing each ball in turn with a screwdriver... ...we push the hub along the splines of the coupling.
When installing a synchronizing shaft on the synchronizing shaft, the grooves on the coupling and hub must face:
— for the synchronizer of 1st–2nd gears — to the 1st gear gear;
— for the 3rd–4th gear synchronizer — to the 3rd gear gear;
- for the 5th gear synchronizer - to the thrust plate of the shaft bearings.
Grooves on the clutch and synchronizer hub
Video eliminating bouncing of the VAZ 2110 gearbox lever
You can view the entire process described above in the video by following the link
Of course, all the methods described are good, but only for masking the negative consequences of a rattling gearshift knob. It is worth looking for the reason for the rattling of the gearbox lever deeper, in the gearbox linkage or in the engine - only by eliminating the main cause of the rattling can you no longer worry about the condition of your VAZ 2110.
Sometimes car owners are faced with the problem of removing the gear shift lever. This procedure must be carried out when replacing the silent blocks of the lever or extension, as well as when replacing the lever itself. The extension is removed to replace the silent blocks on it or to completely disassemble the front suspension. Since these repair procedures are not very difficult, you can remove the lever yourself rather than contact a service station for help.
Advice: it is advisable to carry out the work in the presence of an inspection hole or a lift.
Diagnostics
In any car, the gearbox slide serves to prevent the car from switching gears on its own . This part needs to be monitored and looked after; in addition, over time it becomes loose and requires adjustment. If the adjustment has not been made for a long time or it was performed poorly, then the driver will feel uncomfortable when driving the car.
As practice shows, those car owners who forget about the rocker and its adjustment can, over time, destroy the entire transmission system. And this is a very expensive repair.
It is because of this that prevention should be carried out, as well as due attention should be paid to the scenes. If the car begins to behave somehow differently, then it is necessary not to delay the repair.
Gearbox slide
To understand that the rocker requires adjustment or replacement, you just need to monitor the operation of the gearbox.
As a rule, when a failure occurs, the following symptoms appear:
- Difficulty when engaging 1st gear. As a rule, it is difficult to engage the gear; the driver has to practically drive the lever in to engage 1st speed.
- Possibly difficult shifting from 1st to 2nd speed.
- Due to a loose lever, it is not 1st speed that is engaged, but reverse. This is very dangerous, especially at a traffic light, at the start. It is necessary to urgently repair the rocker, otherwise the problem will only get worse.
- Difficulty engaging 5th gear, while other speeds can be engaged smoothly.
- There is play in the shift knob. As a rule, the rocker only requires replacement and adjustment is not necessary.
- Extraneous sounds appeared coming from under the car, or rather from the gearbox. As a rule, the sound becomes ringing. This problem is a disease of the entire VAZ 2110-2112 family. As a rule, such a ringing can appear after repairing the car’s suspension.
- When driving, the speed may jump. In other words, the car, gaining acceleration, independently disables the engaged gear and switches to neutral speed. For further driving, you will need to keep the lever at the desired speed constantly so that it does not jump out.
- Strong vibration that occurs on the shift knob. This is due to the failure of the scenes. It will need to be repaired to solve the problem.
If the symptoms described above appear, then you will need to begin repair work. You should completely replace the linkage or simply adjust it and gear shifting will become comfortable again. Therefore, it should be adjusted before replacing.
Adjusting the work of the scenes
The adjustment procedure will save money that could possibly be spent on completely replacing it.
Backstage adjustment
Adjustment is made only in cases where:
- The gearbox was removed and installed back;
- Previously, repairs were carried out to replace the cardan;
- In the case when the hinges on the slide have turned.
Of course, adjustments can be made at other points as described earlier. Do not forget that even minimal gaps can disrupt the correct operation of the entire transmission.
Naturally, before starting repair work and adjustments, you will need to prepare the right size wrenches . With their help, the clamps will be loosened. You should also place bricks, stones or special anti-roll devices under the wheels.
When everything is ready, you can begin the work process itself. To do this you need:
- It is recommended to use an overpass or pit for repairs; if these are not available, then use reliable jacks. Next, you should go to the garage.
- When the car is ready for repair, it is necessary for safety to put on the handbrake and throw bricks or specialized devices under the wheels that will prevent the car from rolling away.
- Next, you need to crawl under the car and find a special clamp. It connects the hinge and the rocker itself. Then you will need to loosen it using a wrench.
Loosen the clamp
- Next you need to get out from under the car and get behind the wheel. Now engage reverse gear, it is only important not to confuse it with 1st gear. Therefore, you should look at the position of the lever; it should be maximally in the upper left corner. It is recommended to do this procedure with someone. This person will need to hold the lever in a locked position.
- Next, you need to climb under the car again and tighten the clamp, applying great force.
That's the whole process of adjusting the scenes. Nothing complicated, the main thing is to follow safety precautions.
To remove the gearshift lever on a VAZ 2110, follow these instructions:
- Remove the engine splash guard.
Disconnect the ball joint from the lever or remove it altogether.
We hold the extension with a “24” wrench and use a wrench of the same size to unscrew the extension nut.
Next, knock out the bolt and remove it.
Using two “19” keys, unscrew the nut from the bolt that secures the lever to the body.
We remove the lever from the bracket, having previously knocked out the bolt.
The next step is to remove the washer from the stretcher, as well as the lever.
Behind the large washer on the extension there are three washers for adjusting the angle for the longitudinal inclination of the steering axis.
To unscrew the brace from the cross member of the front suspension, use a pair of 24mm wrenches, unscrew the nut, remove the washer and remove the brace from the silent block.
Ball joint selection rule
In order for the unit to function for a long time after replacement, you need to understand which ball joints are best for the VAZ 2110. Of course, when purchasing, you need to know: how many ball joints are included in the kit for the VAZ 2110. Unlike the classic scheme with rear drive wheels, the front-wheel drive has 2 ball nodes.
Purchased parts must meet the following requirements:
- Attention is drawn to the rod. It is made of highly hardened tool steel. After such heat treatment, the product acquires a gray color. At the end there is a rolled thread section.
- The body is made of 2 halves
- Scrolling of the rod should take place without biting. This is the main sign of low-quality ball joints. The check is carried out using a crank, since it is impossible to turn the part manually.
- Rated manufacturers include a nut with boot in the kit. If they are absent, it is better to refuse the purchase.
Removing the gearshift lever handle:
- To make this procedure easier, you will need to first follow the shift lever removal instructions above.
Once the lever is removed, clamp it in a vice.
We wrap the neck under the handle with tape and install an open-end wrench on the tape at “32”.
Lightly hit it with a hammer from below in order to knock the handle with the holder away from the lever.
When the handle comes out a little, remove the tape and remove the handle, first pressing the latches on the holder with a thin screwdriver. Tip: Be careful, as there is a spring under the handle, do not lose it.
Main manufacturers
To make a quality purchase, it is better to purchase from the most rated manufacturers.
These include:
- "Belmag". The “Favorit” series is specially manufactured for the VAZ 2110.
- "Cedar". The body is solid forged. The rod is rolled with diamond rollers, which ensures high manufacturing precision. After this, a zinc coating is applied to the surface. The boot is made of rubber with high elastic characteristics.
- "Track". Often used in vases. The support is capable of traveling up to 60 thousand km.