Payment via PayPal
After selecting payment via PayPal, the PayPal payment system will launch, where you need to select the payment method: bank card or PayPal account.
If you already have a PayPal account, then you need to log into it and make a payment.
If you do not have a PayPal account and you want to pay using a bank card via PayPal, you need to click on the “Create an Account” button - shown with an arrow in the picture.
PayPal will then prompt you to select your country and provide your credit card information.
After specifying the information required to make the payment, you must click on the “Pay Now” button.
How to replace the resonator on the Lada Granta Stinger with a sport one if it rattles
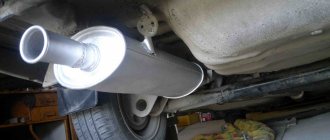
One of the most common problems with the Lada Granta is the failure of the resonator. I would like to present to your attention the resonator for the Grant Stinger (StinGer) and the factory resonator, as an option for installation on your car.
The muffler resonator is one of the links in the car's gas exhaust system; it is located in the middle part of the gas exhaust system chain and is designed to extinguish exhaust gases and their temperature. A roar indicates a car malfunction, but in addition to the roar, there are other resonator malfunctions, such as:
• A drop in motor power due to the resistance of gases to each other, as a result of which extinguishing does not occur, and the gases clog the outlet.
• A ringing and rattling sound, cancer is the result of metal burning in the resonator body itself.
The reasons for failure can be different, for example:
• Corrosion. • Metal fatigue. • Mechanical damage.
In the same way, one should not forget about the features of the Grant. When your car runs over 5000 km. up to 20,000 km, there is a possibility that it will start to rattle
What to consider when replacing the resonator
When replacing, you need to consider what you want to get as a result. You can install a 2190 resonator, which is installed on Grants at the factory, but it is not a fact that this will solve your problem for a long time.
Many owners do just this, but even when replacing, it is worth paying attention to the condition of the entire gas exhaust system of the car, the condition of its other components: the manifold, the gas receiver pipe, the gas extinguishing catalyst and the corrugated pipe. It may be necessary to change the entire system, or some additional components
But the whole problem is that after driving another 5-10 thousand, it is possible that you will return to your starting position - the resonator on the Grant rattles
It may be necessary to change the entire system, or some additional components. But the whole problem is that after driving another 5-10 thousand, it is possible that you will return to the starting position - the resonator on the Grant rattles.
Replacing the resonator
As for replacement, the Grant resonator is not difficult to replace. To do this, you need to drive the car onto a pit or a lift, remove the muffler, then the resonator itself. Install a new resonator, then install a muffler and that's it - off we go.
It's not so simple if you wanted to install a stinger resonator on the Grant. Well, it’s not easy, everything can be done “anyhow” with the help of an angle grinder, welding and straight hands. So at what stage of the installation will we need these tools?
If you decide to install this device with a standard exhaust manifold and muffler, we will not disassemble this method, since this is a “collective farm” from which we will not get anything except wasted time and a damaged exhaust system of the car.
To obtain the declared characteristics for improving the dynamic performance of a car, the manufacturer of this resonator (StinGer) needs to approach this issue comprehensively. An integrated approach consists of replacing not only the resonator, but also the exhaust manifold with a 4-2-1 “spider”, as well as the standard muffler with a so-called “can” with a diameter of 51 mm, you choose the manufacturer.
Materials for performing the robot:
• WD-40 (lubricant, for breaking stuck bolts).• Gaskets for the exhaust manifold, resonator.• Spare set of bolts.• Set of rubber bands for fastening the exhaust system.• “Spider” 4-2-1.• Stinger resonator.• Muffler “jar.”• A rag for wiping hands.
What materials are used for catalytic reactions
The immediate working area of the car muffler neutralizer is coated with platinum and palladium. Upon contact with them, most of the harmful toxins in the exhaust gases are neutralized. Manufacturers place the catalyst itself closer to the engine, since high temperature speeds up reactions.
Of course, there is still no universal muffler capable of neutralizing absolutely all toxins and harmful substances, but manufacturers are still constantly improving technology.
Muffler replacement process
It is necessary to prepare the car for work, for this we select a flat area, and then simply put the handbrake on and engage first gear. The procedure for carrying out operations when removing the muffler on Grant:
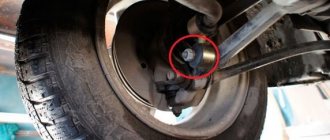
- Using a mechanic's tool, remove the tightening clamp located between the muffler and the resonator. To remove the clamp, you need to have two “13” wrenches in stock; for convenience, we use a head with a wrench and a “13” socket-type wrench. It should be noted that the muffler fasteners are located in a zone of thermally unstable temperatures; they are periodically subject to heating and cooling. Therefore, unscrewing such fasteners can sometimes be quite a difficult undertaking.
- After releasing the clamp from the two fasteners, it is necessary to move the Lada Granta muffler in the direction of the exhaust gas outlet, having previously tapped the bend of the product with a plumber's hammer.
- Next, we unfasten the muffler one by one from the rubber hangers with which it is attracted and fixed to the bottom of the car.
- We remove the muffler from the car and put it to the side, because it is necessary to install a new damper.
Installation of a new product is carried out in the reverse order.
"Doctor Muffler" - urgent and inexpensive repair of the Lada Granta muffler in St. Petersburg. Low prices for Lada Granta repairs, 1 year warranty on work, 6 services in St. Petersburg!
- repair of mufflers, or complete replacement of the resonator and main muffler of the Lada Granta using the manufacturer’s technology. This is determined by exhaust system diagnostics.
- catalyst repair: replacement with an original, alternative, or even a universal catalyst. If necessary, we install and replace the lambda probe. For “older” Lada Granta cars, we offer an effective replacement of the catalyst with a flame arrester. In this case, for proper operation of the exhaust system, a lambda probe is installed.
- Replacing the corrugation: the corrugation cannot be repaired, but replacing it with the original or even tuning the corrugation will significantly reduce the vibrations of the exhaust system. When installing the corrugation, the muffler catalyst and exhaust pipe must be diagnosed. If necessary, repair the leaking manifold, replace the muffler gaskets.
- For lovers of a spectacular exterior and a noble “roar”, within the permissible sound level, we offer muffler tuning: exhaust pipe routing, direct-flow mufflers, nozzles.
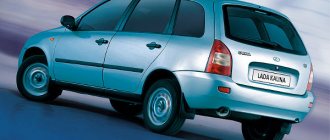
Model range Lada Granta
Removing the catalyst grant 8 valve
To avoid burns, it is recommended to start work after the exhaust system has cooled down.
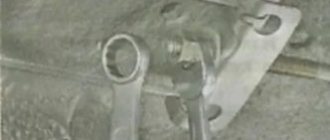
Using a 13mm wrench, unscrew the nut of the bolt securing the clamp connecting the pipes of the additional and main mufflers. We hold the bolt from turning with a wrench of the same size. Similarly, loosen the nut of the other bolt.
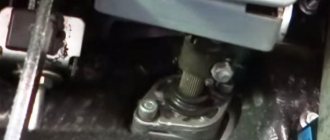
We take the main muffler pipe back, move it to the side and remove the connecting ring.
We lower the main muffler pipe onto the rear suspension beam.
We remove the main muffler bracket from the rubber cushion of the front muffler suspension. Prying the rear muffler suspension cushion with a mounting blade...
...we remove the muffler bracket from the pillow.
We remove the main muffler by bringing its pipe out from behind the rear suspension beam. To replace the rubber cushion of the front suspension of the main muffler...
...remove the cushion from the body bracket. We replace the pillow with a new one. To replace the rear suspension cushion of the main muffler...
...using a mounting spatula we bend the whiskers of the bracket welded to the body...
...and remove the pillow. Installing a new pillow. After installation, we bend the bracket's mustache. We install the main muffler in the reverse order, making sure that the exhaust system elements do not touch the body elements during vibrations.
According to forums on the Internet, many owners of Lada Granta and Lada Kalina complain about the noise of the exhaust system at low speeds or when the car is idling. Often this problem is not related to a malfunction of the system itself, as one might think, the whole point is the lack of high-quality vibration damping throughout the entire path and reliable fixation. People's ingenuity does not stand still and there are a number of ways to solve this problem, from those that will cost absolutely nothing to serious intervention in the exhaust system. Which method you choose is up to you.
The most expensive method is to replace the muffler corrugation with a larger one. Initially, the standard exhaust tract of Granta and Kalina has a corrugation running immediately after the catalytic converter, but its size is not large and it cannot cope with the vibration that comes to it. The solution to this problem is to install a 250mm long corrugation. We drive the car onto a pit, overpass or lift. Using a “13” wrench, unscrew the three nuts securing the exhaust pipe to the catalytic converter flange. We advise you to buy a set of new nuts and a replacement gasket in advance.
Using a “13” wrench or a socket of a similar size, unscrew the clamp securing the rear part of the exhaust tract.
We remove the muffler from the rubber hangers and mark the places for installing a new corrugation. The old corrugation will have to be cut off.
We weld a new corrugation. Pay special attention to the weld, because if there are holes in it, the exhaust system will begin to “sniff” and will soon burn out at the location of the hole. To reliably protect the weld, paint it with a heat-resistant primer and cover it with a similar sealant that is resistant to high temperatures.
Reinstall the exhaust tract and install a new gasket. Replacing the corrugation is a guaranteed way to get rid of exhaust noise, but it is also the most expensive and labor-intensive method.
The next method in terms of cost and time is to tie the standard corrugation with steel clamps. Purchase two or three screw clamps measuring 60*80 and install them according to the attached photo.
Thanks for subscribing!
Tightening the corrugation with clamps will increase the rigidity of the connection and will not transmit vibration to the muffler resonator, which produces unpleasant sounds. The essence of the task is simple, but note that this method does not help all, but only some car owners. Despite this, due to the low cost of the required materials, as well as the short time required to complete the work, it is worth trying.
What to consider when replacing the resonator
When replacing, you need to consider what you want to get as a result. You can install a 2190 resonator, which is installed on Grants at the factory, but it is not a fact that this will solve your problem for a long time.
Many owners do just this, but even when replacing, it is worth paying attention to the condition of the entire gas exhaust system of the car, the condition of its other components: the manifold, the gas receiver pipe, the gas extinguishing catalyst and the corrugated pipe. It may be necessary to change the entire system, or some additional components
But the whole problem is that after driving another 5-10 thousand, it is possible that you will return to your starting position - the resonator on the Grant rattles
It may be necessary to change the entire system, or some additional components. But the whole problem is that after driving another 5-10 thousand, it is possible that you will return to the starting position - the resonator on the Grant rattles.
Price policy
Before you start working, you need to pay attention to the financial side of the issue.
StinGer resonator:
• Resonator (steel), price - 1800 rubles. • “Spider”, price - 1600 rubles. • Set of gaskets, price - 500 rub. • Bolts, price - 350 rub. • A set of rubber bands for attaching the exhaust pipe, price - 280 rubles. • Muffler, price - 2000-3000 rubles. • Firmware, price - 3000-5000 rubles.
As a result, it turns out that to replace the exhaust system you will need 9530-12530 rubles.
Factory resonator:
• Resonator, price - 1450 rubles. • Set of gaskets, price - 500 rub. • Bolts, price - 350 rub.
In order to replace the resonator with a factory one, you will need 2300 rubles.
What you like and can afford is completely up to you. Moreover, StinGer also provides your choice of a resonator, which is an analogue of the factory one. No tuning is required during its installation. Installation is simple: remove the muffler, replace the resonator, install the muffler. In this case, the issue price will be 2500-3000 rubles.
Good luck with your renovation!
According to automotive experts, elements of the exhaust gas exhaust system, especially the so-called. The “pants” and muffler of the Lada Granta, and indeed all cars of the Lada family, can withstand about 50-60 thousand km of operation. After this, due to exposure to extreme exhaust gas temperatures, they require replacement due to failure. Holes form in them, where exhaust gases break through, uniformly affecting the entire surface of the muffler.
Problems when paying with bank cards
Sometimes difficulties may arise when paying with Visa/MasterCard bank cards. The most common of them:
- There is a restriction on the card for paying for online purchases
- A plastic card is not intended for making payments online.
- The plastic card is not activated for making payments online.
- There are not enough funds on the plastic card.
In order to solve these problems, you need to call or write to the technical support of the bank where you are served. Bank specialists will help you resolve them and make payments.
That's basically it. The entire process of paying for a book in PDF format on car repair on our website takes 1-2 minutes.
If you still have any questions, you can ask them using the feedback form, or write us an email at
Additional muffler - removal and installation
Removal
1. Place the vehicle on a two-post lift and apply the parking brake.
2. Open the hood and disconnect the ground wire terminal from the battery (electrohydraulic lift type P-3.2G with a lifting capacity of 3.2 tons, wrench 10 mm).
3. Raise the car to a height convenient for work and remove the middle engine splash guard.
4. Unlock and unscrew the three nuts of the studs securing the additional muffler to the exhaust pipe with the neutralizer assembly, remove the nut locking plate 10 (flat screwdriver, interchangeable head 13, extension and ratchet wrench).
5. Unscrew the two nuts of the bolts that tighten the clamp, remove the washers, remove the bolts, remove the clamp and the sealing ring (ring wrench 13, wrench 13 mm).
6. Remove the additional muffler assembly with suspension cushions from the body brackets and the muffler exhaust pipe flange gasket (flat-head screwdriver).
Installation
1. Hang the additional muffler by the suspension cushions on the body brackets, install a new gasket for the exhaust pipe flange, a locking plate, tighten the three nuts of the studs securing the additional muffler to the exhaust pipe and lock it. The tightening torque of the nuts is 22...26 N m (2.2...2.6 kgf m) (flat screwdriver, replaceable head 13, extension and ratchet wrench, hammer, torque wrench).
2. Install the sealing ring between the main and additional mufflers, install the connecting clamp as shown in the figure, install spring washers and screw two nuts 3 bolts 4 clamps. The tightening torque of the clamp bolt nuts is 14…16 N m (1.4…1.6 kgf m) (ring wrench 13, wrench 13 mm, replaceable head 13, torque wrench).
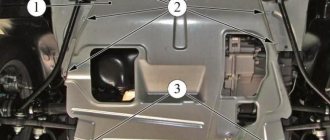
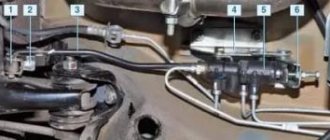
Connection of main and additional mufflers:
- additional muffler (part 21900-1200020-00);
- connecting clamp (part 11180-1203064-00);
- nut M8 (part 00001-0061008-11);
- bolt M8x60 (part 00001-0060444-21);
- main muffler (21900120001000)
3. Install the middle engine splash guard.
4. Connect the earth wire terminal to the battery, close the hood (10 mm wrench).
Description of the design of the Lada Granta exhaust gas system
Note:
Below is a description of the design of the Lada Granta exhaust gas system to understand the relative placement and functionality of the individual elements of the corresponding mechanisms.
Exhaust system:
1 – rear suspension cushion of the main muffler;
2 – main muffler;
3 – front suspension cushion of the main muffler;
4 – connecting ring;
5 – clamp bolts;
6 – clamp;
7 – clamp nuts;
8 – nuts securing the additional muffler to the catalytic collector;
9 – locking plate;
10 – sealing gasket of the additional muffler;
11 – diagnostic oxygen concentration sensor;
12 – catalytic collector;
13 – sealing gasket of the intake pipe and catalytic collector;
14 – control oxygen concentration sensor;
15 – bracket for fastening the catalytic converter to the cylinder block;
16 – metal compensator;
17 – additional muffler;
18 – suspension cushions for the additional muffler.
The exhaust system consists of an exhaust manifold integral with the catalytic converter (catalytic converter), additional and main mufflers and pipes connecting them.
A control sensor for oxygen concentration in the exhaust gases (lambda probe) is installed in the upper part of the catalytic converter (before the converter).
Control oxygen concentration sensor
The second oxygen concentration sensor - diagnostic is installed after the neutralizer in the lower part of the catalytic collector.
Diagnostic oxygen concentration sensor
A catalytic converter with two oxygen concentration sensors ensures compliance with Euro-4 toxicity standards.
Catcollector
The vehicle is equipped with a three-component exhaust catalytic converter designed to reduce emissions of carbon monoxide, nitrogen oxides and unburned hydrocarbons into the atmosphere. It is a ceramic block with many pores coated with so-called afterburning catalysts: rhodium, palladium, platinum.
Cat collectors for VAZ-11183 and VAZ-21116 engines
Passing through the pores of the neutralizer, toxic carbon monoxide (CO) is converted into low-toxic carbon dioxide (CO2), and nitrogen oxides are reduced to harmless nitrogen. The content of toxic hydrocarbon compounds (CH) in exhaust gases is significantly reduced. In general, the degree of gas purification in a working neutralizer reaches 90-95%.
Catalytic Converter Pores
Sealing gasket in the connection of the intake pipe and catalytic collector with the cylinder head
A metal multilayer heat-resistant gasket with a sealing coating is installed between the catalytic collector and the cylinder head (common for the catalytic collector and intake pipe in 8-valve engines).
Gasket for cathode and intake manifold of 8-valve engines
Gasket for catalytic collector of VAZ-21126 engine
For normal operation of the converter, the composition of the exhaust gases (in particular, the oxygen content in them) must be within strictly specified limits. This function is performed by the electronic engine control unit (controller), changing the amount of fuel supplied depending on the readings of the oxygen concentration sensors. The cause of failure of the converter may be interruptions in the ignition system: unburned fuel burns out in the converter, damaging the pores of the converter. This can cause the exhaust system to become clogged and the engine to stall (or severely lose power). Mufflers and catalytic collector are non-separable units; if they fail, they must be replaced with new ones.
The flange of the metal compensator pipe and the additional muffler is attached to the flange of the catenary collector with three studs and nuts.
The connection between the flanges of the additional muffler pipes and the catalytic collector is sealed with a heat-resistant gasket.
Sealing of the flanges of the pipes of the additional muffler and catalytic collector
A bellows-type metal compensator allows the power unit to oscillate on rubber-metal supports without transmitting these vibrations to the exhaust gas system.
Metal compensator for additional muffler
Between the rear part of the additional muffler pipe and the front part of the main muffler pipe there is a metal ring with two spherical outer surfaces, which makes it possible to compensate for errors in the manufacture of parts. The inner surface of the flanges is also spherical, the flanges themselves are tightened with a clamp.
Connection of pipes of additional and main mufflers:
1 – connecting ring;
2 - clamp.
Heat-protective covers are installed on the body, above the additional muffler and metal compensator.
Placement of heat shields for the exhaust system
The exhaust system is suspended from the body on four rubber cushions. Maintenance of the exhaust system consists of periodically inspecting it, checking for tightness of connections and the presence of through corrosion, and also involves tightening loose connections.
The design of the exhaust system "Lada-Priora"
The exhaust gas exhaust system on the Lada Priora is simple in structure and similar to the exhaust systems of most budget cars. It can be divided into three components:
- exhaust manifold with gas neutralizer;
- additional muffler including a resonator;
- main muffler.
All three parts are hermetically connected to each other. The main and additional mufflers are attached to the bottom of the car on rubber suspensions. The exhaust manifold is connected directly to the engine.
Priora is available in three body styles: sedan, station wagon and hatchback. Functionally, the exhaust systems of cars in different bodies do not differ from each other, however, due to the difference in dimensions, mufflers for different versions differ in the length of the pipes, the shape of their bends and the number of rubber suspensions. So, on hatchbacks the mufflers are somewhat shorter than on a sedan, and on station wagons the number of mounts will be greater.
1 - cylinder head gasket, 2 - exhaust pipe of the catalyst, 3 - reinforced gasket, 4 - corrugation, 5 - resonator, 6 - rubber suspensions, 7 - bracket, 8 - exhaust pipe, 9 - o-ring, 10 - rubber suspensions, 11 - main muffler, 12 — fastenings
Exhaust system malfunctions are most often associated with the main or additional muffler, so they are usually the ones that are replaced.
Types of products
You can buy the following types of mufflers for the domestic brand:
- assembly model “Izh-Auto”, which is suitable for VAZ 2104, 2106 and 2107;
- model for a sedan body, which is suitable, in addition to the VAZ 2107, on varieties 2101, 2103, 2105 and 2106.
The following types of exhaust systems are available on the market:
- stamped and welded. They involve stamping two metal parts of the product can, welding them and attaching them to the pipe. Initially, exhaust systems were made in this way, but then the more reliable rolling method replaced it;
Muffler for VAZ 2107 - stamped and welded
- sunset _ Involves wrapping sheet metal around the muffler. Despite the reliability of the method, factory parts are made only by the first method, so you can purchase roll-up exhaust systems separately.
Muffler for VAZ 2107 - sunset
How to repair a muffler
If your car's muffler requires repair or complete replacement, it is not recommended to do this work yourself, since there is a high risk that you will only worsen the condition of the exhaust system, and possibly the entire vehicle as a whole. In order to prevent such a situation, contact only specialized car services. In our car service center, qualified specialists with the necessary competence in the field of working with exhaust systems will competently diagnose the exhaust system of your car, and, if necessary, repair or install a new muffler in the shortest possible time.
If you encounter any malfunction in the exhaust system and you need to diagnose it, repair it or replace the muffler, then our salon specialists will be happy to help you with this, since we carry out all types of this work!
Today, owners of various cars, including Lada Granta, often contact our center with a request to install some alternative option instead of the neutralizer.
This is not strange, considering the cost of a new part, as well as the fact that it quickly fails. Driving with a faulty device is not only inconvenient, but also unsafe.
RUBBERS (CUSHIONS) OF SILENCER CS20 DRIVE VAZ 1118 KALINA, 2190 GRANT, 2192 KALINA 2 IN MAGNITOGORSK
Set of muffler cushions CS20 Drive series for VAZ cars:
— 1118, 1117, 1119 Kalina — 2190, 2191 Granta — 2192, 2194 Kalina 2
Made from high-strength polyurethane. Installed to replace standard ones.
Payment for the order is made after it is confirmed by the manager.
You can pay for your order in the following ways:
Goods are sent by transport companies throughout the Russian Federation. Primary packaging of the cargo and delivery to the terminal of the transport company or post office is free of charge. Payment for transportation occurs on site upon receipt. When placing an order, you can order rigid packaging for fragile items.
The warranty for spare parts is carried out under the following conditions: — Availability of a document confirming payment for the spare part (sales receipt); — Availability of an order - a work order for the installation of a spare part on a car, indicating the vehicle data and the work performed necessary for installing the corresponding spare part; — Availability of a service station certificate for carrying out this type of work; — The master’s conclusion about the inoperability of the part; — Documents confirming payment for work performed at the service station.
The warranty for spare parts does not apply in the following cases: — Normal operational wear of the spare part; — Damage to a spare part as a result of an accident or careless operation; — Malfunctions of spare parts of the fuel system and exhaust system due to the use of low-quality fuel (including due to contamination or the use of leaded gasoline); — Defects, malfunctions or corrosion of spare parts resulting from exposure to chemical reagents; — Consumable spare parts and materials (including oil, filters, fuses, lamps, suspension silent blocks, etc.); — Electrical spare parts cannot be returned or exchanged.
Return or exchange of goods of good quality: — The period for returning or exchanging goods is 7 days from the date of receipt of the goods by the buyer; — Return or exchange of goods is made only if its consumer properties and presentation are preserved (no traces of use, presence of original and undamaged packaging). The product must not show signs of installation, damage, chips, dents, scratches, etc. Except in cases of manufacturing defects; — The returned part is sent by the same transport company; — The shipping company’s services are paid in full by the buyer; — The refund period is no more than 10 days from the date of receipt of the returned goods at the warehouse and verification of its presentation; — The money is transferred to the buyer according to the details provided by him, or can be credited to the next order.
Source
Process robots
So, let's take a closer look at the robot process and its sequence:
1. We drive the car into the pit, but it is more convenient to carry out this work on a lift.
2. Wait for the exhaust system to cool down.
3. We process all the bolts with a high-pressure tool and wait 5-10 minutes.
4. We begin to dismantle the exhaust system from the muffler.
5. Install the spider exhaust manifold, corrugated pipe, resonator, and muffler. We tighten everything with a new set of bolts.
After installing this exhaust system, most likely, the idle speed will not be stable, the car's thrust will decrease, and throttle response will disappear. All of the above is associated with the need to edit the firmware of the engine ECU (electronic control unit) system. Unfortunately, you will not be able to carry out this procedure for making changes to the calibration cards yourself. To do this, you need to contact a specialist.
Recommendations for choosing a specialist for ECU firmware:
• The specialist must have a set of equipment for editing the firmware online (real time).
• The procedure for making adjustments to the firmware should take place online (changes to the firmware, as well as its rollback, should occur while driving a car, and not simply replacing the firmware with a pre-made one that the master has).
• The wizard has experience in debugging firmware for your upgrades.
If everything is done correctly, the manufacturer promises an increase in horsepower by 5-10 units.
Reviews
| № | Positive |
| 1. | Vasily: It’s a pity that the standard equipment does not include a muffler attachment. I bought a diffuser, did not shorten the pipe, the mount fit perfectly. |
| 2. | Gennady: I purchased a non-standard diffuser, the design did not fit the fasteners, I cut off a couple of centimeters from the pipe. |
| 3. | Kirill: since I live in a rural area, I can’t do without a diffuser. I bought it on the market a week ago, installed it myself, the process is not complicated. My recommendations to motorists. |
| 4. | Vladimir: I bought a metal diffuser and took it to a service station to have it painted in the color of the car with a special spray. We'll see what happens, but it should be beautiful. I will definitely share my impressions. |
| 5. | Kirill: I bought a diffuser in a store, special thanks to the seller for the recommendations. Looks very nice, less dust. |
| Negative | |
| 1. | Vladlen: I ordered the installation of a diffuser at a service station, after two months it started to “crack”, there was some play. The workmanship is low. |
| 2. | Ignat: installed the nozzle last summer, but lost it in the winter. I won't buy any more. |
| 3. | Ivan: the diffuser I bought lasted six months, after which it fell off on the way. I can't recommend it. |
Downloading a book
After successfully completing the payment (by any method) and returning to the KrutilVertel store from the payment system website, you will be taken to the successful payment page:
The book you purchased will be in your personal account, from where you can always download it.
Please note that after making the payment, you need to return back from the payment system website to the KrutilVertel website. If for some reason you did not return back to the site and closed the payment system tab with a message about the successful completion of the payment, please let us know - we will send you a letter indicating access to download the book
If for some reason you did not return back to the site and closed the payment system tab with a message about the successful completion of the payment, please let us know - we will send you a letter indicating access to download the book.