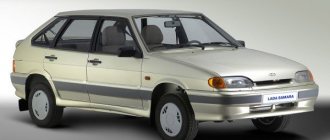
A stove is a device designed to heat the interior of a car, that is, the interior. Below we will consider in detail its design and operation on the VAZ 2110 model.
The heating system determines how comfortable people inside the car will feel. In the summer, it is not needed, but when frost sets in, it is very difficult to drive without it.
Of course, you can travel without a stove, but constant cold will have a negative effect on your body.
Guide to upgrading the VAZ 2110 stove
- Correcting deficiencies in airflow of side deflectors
This deficiency can be corrected by one of two methods. The simplest method is to simply seal all the holes into which the air flow is dispersed, this will greatly increase the efficiency of glass blowing. The second method is to lay corrugations instead of air ducts, but this method is more effective in improving the airflow for the feet of front and rear passengers; for the side deflectors the improvements will be insignificant.
That is why it is better to do sealing. To do this, you need to use modelin (anti-creaking). Using this material, it is necessary to seal everything, including bolt holes.
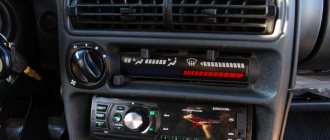
Quickly warms up the cabin and ensures a comfortable air temperature in the cabin
- set knob 16 to the desired temperature value on scale 17;
- Set switch 15 to position “A” or “2” (in the variant). To increase performance or prevent glass fogging, it is recommended to use the maximum fan speed;
- use lever 9 to set the desired air flow distribution;
- Open the side nozzles 2, close the central nozzles 6.
The automatic control system will ensure that the interior is heated to a given temperature at maximum speed and maintains the temperature at a given level within the limits of the heater’s performance and the established tolerance.
ATTENTION! To ensure efficient operation of your heating and ventilation system, regularly clear snow, ice and leaves from the fresh air intake openings located in front of the windshield.
Do not allow the air humidity in the cabin to increase due to the evaporation of water and snow from carpets and rubber mats, clean them in a timely manner. Keep your car windows clean, because dirty windows retain more moisture and increase their defrosting time.
Do not block the exhaust air outlets in the rear luggage compartment trim. On LADA 110 vehicles, do not block with anything the gap between the luggage rack and the rear window, which serves to remove used air.
“Human” hood or ventilation with valves
Interior ventilation. I wonder if anyone has ever wondered how it is made in modern Samara? Not at all like the entire global auto industry has been doing for the last quarter of a century. And not even at all in the same way as it was done on the Samaras produced in the 1990s. This can cause all the problems - fogging, stuffiness, cold in winter, dirt in the doors, dust in the cabin, weak air flow from the deflectors.
And at one point I got tired of it all. In particular, the biggest inconvenience was the fogging of windows in wet weather, especially when there are two or more people in the car. Combined with the “high” panel, this is a disaster. When it rained, everything got much worse. Moreover, there was no cabin filter.
The car was also soundproofed and sealed in the doors, but it only froze my feet in the winter and caused dirt to spread in the doors. After this, I began to notice that my ears began to become blocked, the air was not coming out anywhere at all, that is, the pressure in the cabin was being created quite strongly. I thought the problem was blocked ventilation, but I remembered that as soon as I bought the car, the problem already existed, and the windows sweated quite a lot.
In this regard, it was decided to take this issue seriously. It was necessary to put valves in the trunk, as on all modern cars, and an adapter for the 2110 filter, a very useful thing, simply necessary for Samara. There should still be a cabin filter - less dirt will get in, and with the adapter the ventilation system will be sealed, and in total - no leaves and dust in the air ducts.
For the upcoming work, I collected information, went to forums, looked for pictures, diagrams, photographs, and looked at how it was done on different machines. I found a lot of useful things and realized that I could implement this in my car, I went to the car market and bought valves from Kalina, but they were smaller than those of the “twelve”. But then, in 2009, it was quite difficult to find valves for the “two-wheeler,” because in the 2110 family, cars began to be equipped with them only after 2006, and today they are sold almost everywhere. (And looking ahead, I’ll say that you can pick up similar valves even from a foreign car.)
So, the only thing left to do is to deliver it.
The summer season has arrived, I came to the dacha. May 1 - everyone goes to the demonstration, and I go to the garage. Using the Murzilka, removing the bumper is just two steps, about 10 minutes. As it turned out, it had to be removed with the brackets; the bolts could not be unscrewed; I spent a good hour and a half on all this work. When I finally removed the trunk, I began to try on where to put the whole thing.
I thought it might not fit under the headlights, or closer to the center, but on a flat panel under the number, which is much easier. In the end, as a true “vasoman”, I was pushed away from the simple path, and I decided to put it under the headlights.
I removed the plastic, there was not much dirt there after seven years, just dust. I made a pattern from a piece of splen. I decided to modify the valve by sawing off the top edge, since according to calculations it should go flush with the bumper. Having attached the pattern, I made markings on the body. Everything is by eye, without any special measurements, no certainty.
I sawed through the space for the valve. This was my first communication with the “Bulgarian’s wife,” so I didn’t have to count on the “evenness” of the cut. I sawed off the edge of the valve from below so that it would not touch the bracket for attaching the bumper, and then, at the bottom of the cut, I went over it with a hammer, bent the metal and inserted the valve.
And the time has come to check your work. I turn on the fan, and there it is, a stream of air! It turns out, as expected, the system works. If you close one valve with your hand, the rubber bands on the second open much more.
The bumper fits into place normally and does not hit anything. I was even surprised that everything went without difficulties. The amplifier is of course close, but nothing interferes with the operation of the valve. Now you put your hand under the bumper, and air flows from there.
Then, out of curiosity, he reclined the seat and sat in the cabin. I turn on the fan, the valves open, the second speed is higher, the third is even higher. In order for them to close when the fan is on, you need to open the window more than three centimeters, and when you slam the door, they open very strongly. It feels like in practice the interior has become much better ventilated.
One day it was quite hot, I was driving along the Moscow Ring Road with the windows closed, the fan turned on at second speed. Quite comfortable at speeds of 80–120 km/h. Previously, this would have been a complete gas chamber. Thanks to the adapter with its filters, the fan can be turned off at 100 kilometers per hour, and then the air flow enters the cabin by gravity. Exhaust gases do not enter the cabin, either with the windows closed or open. The glass quickly becomes dry, in winter the interior warms up perfectly, the wind does not blow heat through the doors, and they are now clean. Which I am certainly happy about.
Sergey Turlyansky, Moscow
Features of climate control
The climate control system provides both heating and cooling of the air inside the car. The operation of the air conditioner reduces not only the air temperature in the cabin, but also its humidity, thereby preventing the windows from fogging, especially when the outside air humidity is high.
To turn on the air conditioner with the engine running and the windows closed, press button 18 and set the ventilation mode. To turn off the air conditioner, press button 18 again.
ATTENTION! The air conditioner operates only when the engine is running at an outside temperature of +10°C and when the fan is turned on to one of the positions on a scale of 14.
To set the desired air temperature in the cabin, as with heating, turn knob 16: clockwise - warmer, counterclockwise - colder. The temperature will be maintained automatically within the performance limits of the air conditioning unit and the established tolerance.
ATTENTION! In lever position 9, at least one of the nozzles 2 or 6 must be open, otherwise the air cooling heat exchanger may freeze up.
To speed up the cooling of the air in the cabin, you can turn on the recirculation mode for a short time, for which you need to press key 8, this stops the flow of outside air into the climate control system and takes air from the cabin. Using the recirculation mode also prevents unpleasant odors from entering the cabin, for example when driving in a traffic jam or in a tunnel.
ATTENTION! The recirculation mode can only be turned on for a short time, as this does not allow outside air to enter the cabin and the windows may fog up.
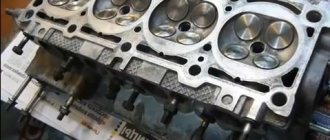
Diagram of the standard crankcase ventilation system
The crankcase ventilation system of VAZ engines consists of two circuits that operate at different load modes and speeds:
- The small ventilation circuit is connected to the valve cover and the intake manifold (behind the throttle body). This connection diagram provides intensive crankcase ventilation due to the vacuum that occurs in the intake manifold when the throttle is closed. To avoid an effect such as hyperventilation, the cross-section of the small circuit is limited by a jet in the cable throttle body with a diameter of 1.7 millimeters. This circuit operates in the region of 800-1500 rpm.
- A large ventilation circuit is connected to the valve cover and the air pipe (in the pre-throttle space). This scheme provides intensive crankcase ventilation at high speeds. The cross section of the large contour is 16-18 millimeters
Read more: Bipod Gur Kamaz 4310
Examples demonstrating the shortcomings of the standard crankcase ventilation system:
- A car is going down a hill with the gear in gear. In this mode, the engine operates at higher speeds with a reduced load. A high vacuum is created in the crankcase, and a large ventilation circuit is connected, in which there are no control valves. Since both circuits are connected to one volume of the oil trap, a strong vacuum in the crankcase will draw a fresh portion of air bypassing the throttle. The mass air flow sensor will show increased air flow, and the ECU will try to close the throttle. Having realized that this is not possible (it is already closed), the lean mixture will be corrected by increasing the fuel supply (fuel consumption will increase). As a result, the entire internal volume of the engine will work as a parallel receiver of very significant volume, connected to the intake, bypassing the throttle. It is this volume that will interfere with the formation of a high-quality mixture.
- A car in a traffic jam drives under tension with additional consumers (for example, the air conditioner is on). The compressor clutch is connected, the load increases abruptly. The engine does not have enough air, it begins to pull it from the crankcase, bypassing the throttle. But the ECU is also aware of the clutch engagement and also supplies more air by opening the throttle. The vacuum drops sharply, the vacuum brake booster (VBR) does not have enough strength to hold the car. Leap forward. The ECU sees an increase in oxygen and closes the throttle. A sharp increase in vacuum, VUT seizes. The car jerks, the transmission hits. And so on ad infinitum.
As a result, in both cases, when the engine is running, speed jumps occur and the engine choke under the load. Jerking and vibration are possible on manual transmissions, automatic transmissions and automatic transmissions. To eliminate these shortcomings, it is proposed to modify the design according to one of the presented schemes.
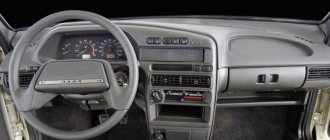
How heating and ventilation work
There is supply and exhaust ventilation in the interior of the VAZ 2110. The windshield trim has holes through which air either spontaneously (when the car is moving) or forcibly - with the help of a heater fan - enters the passenger compartment. The supplied air exits through the provided slots - at the ends of the doors, between the upholstery, and door panels.
But you don’t need to think that the VAZ 2110 is all covered with cracks, and the air simply doesn’t stay in it.
In fact, all of the holes mentioned are equipped with valves that work “for release” and prevent (at least hypothetically) the spontaneous entry of air from the outside.
However, you can make high-quality tuning of the heating system, then the car will be truly comfortable.
Heating is done as follows:
- The air passes through the heater radiator, while warming up. The heating temperature is controlled by a relay;
- Next, the warm air is distributed through the air ducts;
- Special deflectors direct the main flow of hot air to the windshield and to the center of the cabin. The flaps can be used to block/open the flow to the side windows;
- There are two more flaps - for heating the front window and also for the feet of the driver and passengers. For this purpose, deflectors are provided for the front seats: one pair is at knee level, the other is almost on the floor. For rear passengers, there are air ducts under the front seats plus a pad on the floor tunnel;
- There are special handles to control air flows;
- The fuse located in the mounting block protects the entire electrical heating system from blowing. Operating principle of the heater
If desired, you can carry out tuning, adjust the flow of heat to different parts of the VAZ 2110 interior, thereby improving comfort.
Air ducts
Air ducts are one of the elements of the heating system. They come from the stove and provide the following functions:
- ventilation of the interior of the car using central nozzles;
- distribute the air flow thanks to a distributor that supplies heat or simple air for ventilation;
- they heat the rear of the car through 2 more air ducts;
- the system, which includes 5 nozzles, warms up the floor of the cabin;
- two air ducts located on the sides heat the glass and transfer part of the heat directly to the cabin. Thus, heating efficiency is increased;
- two nozzles ventilate the car interior.
Disadvantages of the heater in the VAZ-2110
The main disadvantages, as a result of which car owners are forced to improve and modernize the heating unit:
- Weak air flow to the side mirrors and driver's feet. This problem often occurs during normal operation of the heating unit.
- Often consumers encounter a leak on a radiator device. The unit is equipped with a special tap, which wears out over time and begins to leak coolant. The faucet requires repair, but often the problem can only be solved by replacing the radiator assembly.
- The central air duct of the system includes two parts that are not sealed together. From the radiator device, this blower must supply a heat flow to the feet of the passengers sitting in the rear. If we take into account all the bends, then this is at least 2.5 meters. Of course, the heat flow does not reach the rear passengers.
Symptoms of a heater malfunction
The main signs by which you can identify problems with the heating unit:
- The temperature mode of the heater is not regulated. The problem usually lies in the control unit or in the operation of the heater dampers.
- The sensor located on the ceiling does not function. It is designed to determine the temperature inside the car.
- The heating unit does not function; only cold air flow is supplied to the vehicle interior.
- The side windows of the car or the feet of the driver and passengers are blown with hot air ineffectively.
- The volume of refrigerant in the cooling system decreases. The problem can manifest itself covertly or overtly. In the latter case, a leak can be noticed from the lines of the heating system or radiator device.
- The heating unit functions, but is very noisy.
The channel In Sandro's garage spoke in detail about replacing the electric motor of the heating unit on the "ten".
Interior ventilation
To ventilate the interior (supply unheated fresh air into it), it is necessary to set the controls of the heating and ventilation unit to the following position:
- Turn knob 16 counterclockwise until it stops (blue dot on scale 17). (In most cases, it is enough to leave handle 16 at the desired temperature value on scale 17; the controller will keep the damper completely closed until the set temperature in the cabin is reached);
- open nozzles 2 and 6, the recommended position of levers 3 and 7 is the uppermost position;
- set lever 9 to position ;
- set switch 15 to the desired speed;
- When the windshield fogs up, move lever 9 to position .
DIY seat ventilation
The above description of how the seat ventilation system works allows you to make a similar system with your own hands, based on the information received. In this case, seat ventilation can be installed in at least three different ways.
Installation of a ready-made kit (kit)
To do this, use a ready-made set of parts and assemblies that are commercially available, for example, as shown in the photo below:
Do-it-yourself installation of such a kit involves removing the seat trim, perforating it, as well as positioning and connecting the fans in the right places. As a rule, such a system has several speeds for regulating fan performance, which allows you to select the best option based on the current climatic conditions.
DIY installation using individual elements
To perform ventilation yourself using individual elements, you need to buy:
- computer fans;
- plastic mesh instead of a spacer;
- buttons, wires.
Their installation begins with the seats being dismantled and the places where the fans will be attached are determined, then holes are cut out in the foam rubber for them.
In these places, excess foam rubber is cut off and instead of it, a cut mesh fifteen millimeters thick is laid.
After the mesh has been installed, previously cut foam rubber must be laid on top of it, in which holes with a diameter of one centimeter must be made.
The fans are connected by wires, the button for turning on the ventilation in the seat is located on the panel, or in any other convenient place.
Seat ventilation system using a car heater
You can do the blowing with your own hands without using fans. How this is done should be clear from the given figure and photo. With this approach, air from the stove is supplied to the seat using a corrugation. Such an air supply system will allow not only cooling, but also heating of the seats. It is best if the corrugation is installed inside the channel.
Modifying the stove, simple techniques
Modernizing the VAZ 2110-2112 stove is a thorough and multifaceted process. If you don’t have the time or opportunity to fully remodel the stove system, but you need a positive result in the shortest possible time and with minimal effort, because winter is almost upon us, you can try to listen to the following advice.
1. The easiest way to increase the air flow of the heater for heating the feet of the front seats in the cabin is by blocking the heater ducts for the rear ones. Any tool at your disposal will do
Thus, you sacrifice the comfort of your passengers, but is this really important if, for example, you prefer to drive alone; 2. A similar result can be achieved by blocking the air channels of the central deflector oven by cutting a suitable plug from a sheet of aluminum
Obviously, in this case, the heat flow directed to the side windows and other furnace ducts in the car increases.
Stove damper tens
- 3. Often, standard VAZ 2110 door seals are not enough for reliable sound and heat insulation. Simply gluing additional insulating tape around the perimeter (for example, from K-Flex) can significantly improve the comfort inside the VAZ interior with minimal time and money investments;
- 4. Replacing the 5-hole thermostat with a more modern 6-hole thermostat, which controls the engine cooling and heating system in VAZ cars. These thermostats are completely interchangeable, so there should be no problems. A 6-hole thermostat is technologically more advanced, and therefore the heating of the stove radiator in a car will be more efficient. Such pleasure costs about 350 rubles.
Repair of heating radiator VAZ 2107
Often, repairing a VAZ 2107 stove involves replacing or repairing the heater radiator. Repair actions depend on the type and cause of the malfunction:
A clogged radiator can be flushed with water pressure. Scale on the walls of honeycombs can be removed using a special product that dissolves it.
A leak in a copper (brass) radiator can be soldered. Using a powerful soldering iron and solder, you can repair a hole or crack. Leaking aluminum radiators must be replaced.
Important: to eliminate a leak in the heater radiator or engine cooling system, you should not use products added to antifreeze - they can cause clogging of the VAZ 2107 radiator honeycomb.
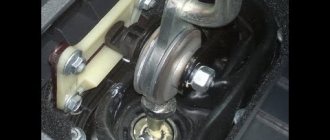
Stove tap repair
VAZ heater valve
The heater tap (see photo above) is designed to regulate the flow of coolant through the heater radiator. On VAZ 2113, 2114, 2115 models the same heater faucet is installed. The main failures of the stove tap are oxidation, jamming, leakage, which results in a puddle of coolant appearing under your feet.
Why is the faucet leaking?
- With the onset of spring, we close the heater tap and move the regulator to the extreme position.
- From spring to autumn, we don’t use it, so the faucet turns sour.
- In winter, we open the tap again, turn on the stove, and as a result the tap flows.
- In this case, it must be replaced.
- In addition to replacing the faucet itself, it is recommended to replace the cabin filter in the fall because... it becomes clogged with leaves and the air flow weakens.
Which faucet to choose
In the spare parts store you can see three heater taps:
- The body of a ceramic faucet is ordinary plastic, but the locking mechanism consists of two ceramic plates.
- Factory cost from 80 to 100 rubles. The operating principle of which is based on a rubber membrane. As practice shows, it is not reliable, subject to acidification and is installed only if there is nothing better at hand.
- Let's move on - ball valve. Its operating principle is based on a ball with holes instead of a membrane, as in the second version. This specimen is subject to oxidation, but is much more reliable than a factory faucet.
- The ceramic faucet is the most reliable of all of the above; we recommend installing it to avoid unnecessary problems.
- The only drawback is the reduced throughput of the ceramic faucet, which reduces heat transfer. It turns out: the most reliable faucet is a ceramic one, but the heating weakens when using it.
Where is the stove valve located?
The heater valve is located under the console (in the center). Remove the side panel near the passenger's feet. Two pipes lead to it. To change the heater tap you do not need to drain the antifreeze or remove the dashboard. But in this case, you have to lie head down and do some of the work by touch.. To change the heater tap you will need:
https://youtube.com/watch?v=jzYwcI9TPzw
How to replace a stove faucet
We carry out the work on a cold engine:
- Completely remove the instrument panel.
- Place a rag under the passenger's feet and the faucet to absorb spilled coolant.
- Open the hood, remove the heater hose clamps, then remove the pipes from the tap itself, drain the antifreeze into a prepared empty container.
- We move to the salon. Using a Phillips screwdriver, unscrew the clamps securing the heater pipes to the faucet and remove them. We place a container for coolant under the pipes
- We take out the lever rod bracket and pull it out of the hole.
We take out the rod bracket, pull it out of the hole in the lever
- Let's move under the hood again. Using a 10mm wrench, unscrew the fastenings of the faucet to the shield.
- We return to the salon and take out the faucet.
We insert the new tap in the reverse order of removal:
- Installing the new faucet in place
- We secure it from the engine compartment using two nuts (pre-lubricated with a product that protects them from corrosion)
- From inside, open the tap completely and tighten the bracket.
- Then we put on the pipes from the passenger compartment and secure them from the engine compartment.
- Pour in coolant
- We start the engine and warm it up. We check the pipe clamps, tighten them if necessary, and turn on the heating.
If you don't fully understand something, be sure to watch our video.
Refinement of the air duct system of the VAZ furnace, dismantling the standard installation
If you have a little time and desire, modifications to the VAZ 2110 stove can be done much more thoroughly, namely:
- sealing the cracks in the front panel of the torpedo air ducts;
- modernization of the car stove damper;
- modernization of the heating system for the rear seats and driver's feet, installation of corrugated heating ducts.
All this will certainly result in the desired result and significant heat transfer from the stove, but first you need to remove the dashboard along with the dashboard and heater air ducts, for which you need to:
- 1. Remove the floor tunnel lining cover and the interior heating air ducts of the VAZ 2110, and then the body itself, screwed with self-tapping screws to the bottom of your car;
- 2. To remove the instrument panel, you will first need to dismantle the glove box by unscrewing it from its hinges and turning off the glove box light;
- 3. Through the formed niche, unscrew the mounting bolts of the instrument panel;
- 4. Having unscrewed all the fastening screws of the panel in its upper and lower parts, as well as on the controller bracket, we can finally remove the instrument panel from the mounting studs;
- 5. In order to remove the panel from the car interior, you will need to disconnect the electrical connectors for connecting the devices.
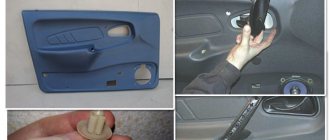
How to dismantle central deflectors and install new ones
Removal of deflectors may be necessary in one of the following cases:
- they are clogged and require cleaning;
- a deeper cleaning of the system with removal of the air ducts is necessary;
- the deflectors were pressed into the air duct;
- The deflectors are broken and need to be replaced.
In any case, whatever the reason for dismantling them, it is quite simple to do and does not require a lot of free time or special tools. The entire process of removal and reinstallation takes place in just a few steps, the first of which is removing the dashboard panel.
In order to do this, you need:
- disconnect the battery;
- remove the receiver/radio tape recorder, disconnect the cable harness from it;
- remove the center console screens;
- remove the cigarette lighter by disconnecting the harness of suitable wires;
- remove the ashtray light bulb and disconnect the wires that go to it;
- remove all protruding buttons and adjustment knobs (to do this, carefully pry them off with a screwdriver);
- Use a Phillips screwdriver to unscrew the screws holding the instrument panel panel (one each on the left and right);
- Unscrew two screws located above the dashboard and two screws located under it;
- pry and remove the rear window heating plug;
- Unscrew the self-tapping screw located under this plug with a Phillips screwdriver;
- move the panel back and to the right;
- disconnect all blocks with wiring harnesses from the switches and on-board computer.
Dismantling torpedo elements
Once the panel is completely detached, the deflectors themselves can be removed. To do this, you need to unscrew the three screws responsible for fastening the central deflectors. One of them is located under their body, the other two are on its sides. After this, all that remains is to remove the deflector, clean it (if necessary), and install it back.
Assembly of the front panel and its installation are also carried out according to the above described scheme, but in the reverse order.
Removing deflectors
Before installing the deflectors in their place, it will be very useful to cover their perimeter with sound-absorbing material, such as modelin.
Diagram and design of the heating system in the VAZ-2110
The heating unit itself is represented by several components:
- Electric motor. A ventilation device is fixed on it, designed to pump a hot air flow.
- A radiator device, the failure of which will lead to the inoperability of the stove. On old-style heating systems, the radiator assembly is not equipped with a valve designed to shut off the flow of coolant through the device. Therefore, the unit practically does not leak, since leaks are usually associated with the faucet. The absence of this element ensures the fastest heating of the car interior.
- Three dampers. One of them is designed to close and open the heating channel, the second is used for recirculation, and the third is necessary to control the heater.
- The resistor device is designed to regulate the blowing speed.
Components of the heating system
The main parts of the heating system for the interior of the VAZ 2110 car:
- 1 - electro-pneumatic valve device;
- 2 — front housing of the air intake of the heating unit;
- 3 - water deflector device, presented in the form of an air intake flap;
- 4 — valve device for controlling the damper of the air flow recirculation system;
- 5 — recirculation system damper;
- 6 — rear part of the air intake housing of the heating unit;
- 7 — heating channel damper;
- 8 — damper of the heating unit control system;
- 9 — radiator unit;
- 10 - protective plastic casing of the radiator device;
- 11 - bushing installed in the steam outlet pipe;
- 12 — bushing for the supply line of the heating unit;
- 13 — bushing of the outlet pipe;
- 14 - electric motor of the heating system;
- 15 — electric motor housing;
- 16 - supporting surface of the damper drive lever used to control the stove;
- 17 — drive handle for controlling the damper of the heating system;
- 18 — gear motor of the drive device, presented in small sizes;
- 19 - resistor element;
- 20 - protective cover for the heating unit lining.
Connection diagram for blowers and controls
Main components of the stove:
- 1 - air ducts designed to warm up the rear of the car;
- 2 — plastic lining running from the center console to the rear seats;
- 3 - blowers designed to blow feet;
- 4 - main nozzles for ventilation of the car interior;
- 5 — side nozzles for interior ventilation;
- 6 — nozzles intended for heating the glass installed in the front doors;
- 7 — control knob for the interior heating unit;
- 8 — plastic housing of the air distribution device;
- 9 — damper for the foot warming system;
- 10 - plastic flap designed to warm up the windshield;
- 11 - heating unit.
The difference between old and new stoves
Old and new type heating systems have some features in connection diagrams as a result of the following differences:
- Radiator design. Heats in cars of different years of manufacture have different radiator assembly designs. In older heating systems, radiators are equipped with taps to drain the refrigerant.
- Different designs of SAUO controllers. Cars manufactured before 2003 used five position controllers. In newer versions of the car, devices numbered 4 and 5 were removed from the design.
- Micro-gearbox design. The main difference is the different type of resistor elements. When replacing elements, you need to consider whether these parts are interchangeable or not.
How can you upgrade your VAZ-2110 stove yourself?
Owners of the “ten” often encounter various kinds of problems in the design of this car. They can touch, in principle, any unit, including the stove. At the same time, when it’s winter outside, of course, no one wants to freeze while traveling. So we have to finish what the designers started, modernizing the stove in order to make it work more efficiently. Considering the harsh Russian climate, such improvements can safely be called a necessity, and not a whim of car enthusiasts.
Generally speaking, the design solution of the VAZ-2110 stove can be described as quite successful. But in order for this unit to work normally, it also requires high-quality assembly and the absence of effects in the components. At the same time, both the first and second are long-standing problems of the domestic automobile industry. So motorists have to fix factory defects on their own.
Malfunctions of the VAZ 2107 stove and how to eliminate them
If the VAZ 2107 stove does not heat up and when the heater is on, the air leaving the deflectors remains cold, the reasons may be as follows:
- Airing the cooling system. This can happen when replacing antifreeze or repairing cooling system components. To restore heating, you need to remove the air plug.
- The heater valve in the open position continues to shut off the line. The reason for this is a clogged faucet or the formation of scale in it due to the use of water in the system instead of antifreeze. To restore the heater's functionality, the tap must be removed and then cleaned or replaced with a new one.
- The stove remains cold when the tap is open. The cause of this phenomenon may be a non-working pump. This breakdown quickly makes itself known through rapid overheating of the engine; it is impossible not to notice it. If the engine is warmed up to operating temperature, and the pipes leading to the VAZ 2107 heater remain cold, the pump needs to be repaired. One of the reasons why the pump will not work is a slipping or broken alternator belt.
- The air is cold and the supply hose is hot. This is a common problem resulting from clogged radiator honeycombs. They can become clogged due to scale build-up, oil in the antifreeze, or the use of “leak stop additives.” In this case, the VAZ 2107 stove must be dismantled and washed.
- The radiator pipes are hot and the air is cold. This occurs when a baffle in the radiator moves and creates a straight path between the inlet and drain pipes. You can restore functionality by replacing the radiator.
How to modify and modernize the stove with your own hands?
There are many options for tuning and improving the operation of the heating unit, which you can do yourself. To implement each task, you will have to completely or partially disassemble the heating unit.
Before remaking the heating unit of the VAZ 2110, it is necessary to seal the main air duct as much as possible.
Improved side ventilation
There are two ways to improve side ventilation:
- lay the corrugation, which will be aimed at blowing the glass of the side windows;
- modification of the VAZ 2110 stove may involve sealing all the cracks that lead to loss of air flow.
Heater assembly VAZ 2107
The repair of the VAZ 2107 stove is completed by assembling the heater. They assemble it in the reverse order of disassembly. The work has a number of features:
- rubber gaskets must be replaced with new ones and lubricated with silicone sealant;
- before assembling the heater, it is necessary to attach the pipes and tap to the radiator;
- Do not overtighten the nuts so as not to crush the gaskets;
- before putting on the rubber hoses, the outer surface of the metal radiator pipes must be treated with sealant;
- After the VAZ 2107 heater is assembled and connected, you must remember to add antifreeze to the system and check its tightness.