The reasons for replacing rear lights on a VAZ 2110-2112 can be different and the main ones are the following:
- damage due to unsuccessful parking or an accident;
- darkening and fading over time.
This repair procedure is quite simple and you can do everything yourself, having only a few tools on hand, the list of which is given below:
- Phillips blade screwdriver.
- Ratchet handle.
- 8 mm head.
- Extension.
Removing and installing rear lights on a VAZ 2110-2112
I think there is no need to explain once again that the rear lights are located in blocks, one of which is located in the wing, and the second in the trunk lid, so we will consider the removal procedure separately.
Removing the parking light and turn signal
So, first of all, open the trunk lid and open the “window” with Velcro in the place shown in the picture below:
As you can see, there is one nut that needs to be unscrewed. After this, you need to unscrew the self-tapping screw from the side with a screwdriver, with which the casing is attached. It is enough to do this in one place, as shown in the photo below:
And we move it back slightly to gain access to the remaining nuts securing the rear lights.
Now you can start unscrewing the two nuts that secure the lamp:
And then from the back side, you can carefully, without making excessive efforts, pull the lantern so that it comes out:
Since at first we did not disconnect the block with wires, we can do this now:
At this point we can consider half the work done. Now let's move on.
Removing the reverse light and brake light
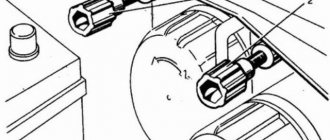
First, with the trunk open, remove the power plug from the board, as is clearly demonstrated below:
Now all that remains is to unscrew the two nuts, which are clearly visible in the picture below:
And also, as was done in the previous description, we take out the flashlight from the back side. The central pad may be slightly in the way, but you don’t have to remove it if you act carefully:
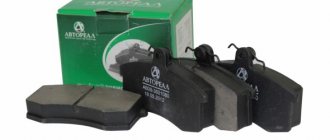
If necessary, we replace it, and installation proceeds in the reverse order. What can we say about the cost: at the moment, a set of rear lights for a VAZ 2110-2112 is about 2000 rubles, but all this can be bought separately in blocks, that is, two right and two left blocks.
Tinting and replacing factory lamps
You can replace the factory headlights on a VAZ 2110 in the garage; the operation takes 20 minutes and does not require any special tools.
Replacing standard lamps is carried out in the following steps:
- Remove the negative terminal from the battery.
- Remove the plug located near the wing.
- Unfasten the spring clip that holds the lamp.
- Disconnect the fastener and remove the lamp.
- Install the new light element in reverse order.
On a VAZ 2110, tuning often involves tinting the headlight housing. Film, painting, and tinting varnishes are used. Tinting of lighting equipment is carried out by tuning studios; the question of whether the procedure is legal or illegal remains open.
According to the rules for operating lighting devices on cars in the Russian Federation, shading of individual parts of the lens can only be carried out by the manufacturer. Set luminous flux color:
- for low and high beams – white, selective yellow;
- all turn lamps are orange;
- rear lights – red.
When tinting the headlight unit, it is not allowed to radically change the color of the lampshade. There is no separate regulatory act that regulates the degree of tinting. There is an official document GOST R 51709–2001 - “Safety requirements for technical. condition of the vehicle and methods of verification.” In 2009, the document removed the ban on installing any type of tinting, film, or additional optical elements on the lens, but did not provide additional clarification as to what type of tuning is allowed to be used for commercial optics. Motorists modernize headlights, adhering to general recommendations - do not change the main lighting parameters of headlights and additional lights.
Installing bi-xenon lenses
Installing bi-xenon headlights is one way to improve road lighting. With their help, visibility in low and high beams in the dark is improved, without blinding oncoming drivers. The difficulty of reinstalling the headlight unit from standard halogen to bi-xenon lies in the different operating principle of xenon lamps.
It is necessary to install ignition units, adapters, and change the headlight design. DIY algorithm for replacing bi-xenon lenses in VAZ 2110 headlights:
- Disconnect the wires from the battery.
- Disassemble the headlight.
- Remove the reflector and old lens.
- Make an adapter from a rigid metal plate, which will be adjusted to the place where the bolts are attached to the module.
- Screw the lamp into the module, connect it to the ignition blocks and screw the block to the frame.
- To connect the ignition unit, follow the instructions that come with the lamp.
- Reassemble and replace the unit in reverse order.
- Reconnect the battery terminals.
- Check functionality and make adjustments.
Installing xenon is not difficult, the main thing is to do it correctly. Installation of bi-xenon on any generation of VAZ is technically possible, but requires permission and legalization from the traffic police with a mark in the technical passport.
An administrative offense for illegally re-equipping a car's optical devices is a fine of 2,500 rubles or deprivation of the right to drive a vehicle for a period of 6 months to 1 year. Prohibited devices will be confiscated.
Repair work
VAZ headlights are dismantled using the following tools:
- crosshead screwdriver;
- 8mm head;
- extension;
- ratchet handle.
The rear optics are located in blocks, one of which is installed in the wing, the second - in the trunk lid. First remove the trunk trim. To do this you will need to unscrew the fasteners. The headlights are pulled out. The block with wires is disconnected.
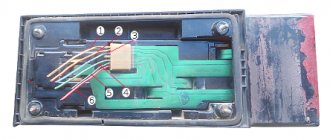
The next stage involves dismantling the rear optics and brake light. First remove the power plug from the board. Then unscrew the nuts. If necessary, the central cover can be removed. Refinement of the rear lights on the “ten” involves replacing the board. This device is presented in the form of a thin tape with conductive tracks. It is replaced with an analogue from the OSVAR “stick”.
Removing the rear optics of a VAZ 2110
Before replacing the board, you will need to disassemble the taillights. To do this, use a screwdriver. Tuning of the rear lights is done using double bulbs for dimensions and stops and single bulbs for turns. Repair work involves the use of wire with a cross-section of 2.5 mm and M3 bolts.
Metal cartridges require some work. The terminals for the tips are moved 180º. The holes are finished with a file. The cartridges are fixed to the plastic using M3 bolts and nuts. The next step is to lay and solder the wires.
The cartridges are connected. The wire with the “plus” is laid on the turn signal, stops and dimensions. The resulting circuit is called. Installation work is carried out in reverse order. To tint the headlights, you will need to disassemble them. Then the spring is removed, the module with the reflector is dismantled. The screw is unscrewed. Before painting the surface, you will need to clean the reflector from the coating. Experts do not recommend painting optical elements with regular enamel. To do this, it is necessary to use heat-resistant paint.
How to disassemble and improve headlights
Tuning of optics is carried out in specific cases:
- Improving the appearance of the car.
- Improving the quality of lighting.
To dismantle the headlight unit, you will need a standard set of tools: a screwdriver, a wrench, and a rag. The work is carried out in stages:
- Disconnect the terminals from the battery.
- Unscrew the bolts from the radiator grille.
- Unsnap the hydraulic corrector cylinder and turn it clockwise until it stops.
- Unscrew the 3 fastening nuts, move the trim to the center, and move the headlight unit back.
- Unscrew the buffer bolts.
- Remove the bottom bolt and remove the lighting.
- Disconnect the turn signal from the power supply.
- Unscrew the fastening bolts or remove the sealant, depending on the model and configuration.
Installation of the headlight unit is carried out in the reverse order, after tuning or other modernization has been carried out.
DIY angel eyes
Auto mechanics identify several ways to install angel eyes on the “ten”:
- installation of new headlights with ProSport LEDs;
- modernization of optics using LED strip;
- making angel eyes from a transparent tube.
To make ProSport optics using LED strip, you will need sealant or glue. If repair work is carried out using a transparent plastic tube, then you will need to buy LEDs, resistors, a round jar, pliers, a drill and a 5 mm cutter.
The plastic pipe is preheated with a construction hairdryer. You will need pliers to bend it around the can. The edges are sawed off. The next stage involves assembling resistors and LEDs.
Assembly of resistors and LEDs for ProSport optics
The ends of the tube are ground and drilled with a milling cutter on both sides. To make notches, use a hacksaw for metal. In this case, a step of 2-2.5 mm is observed. The ends are covered with foil. The contacts for connecting the LEDs are pre-displayed. To fix the ring, use sealant or glue. Notches are made from the inside of the structure. Using a similar technique, the Kirzhach optics are fixed. To install headlights, Bosh will need to make additional fasteners.
Tuning the rear optics on the “ten” is done by selecting the resistance when connecting resistors and ensuring reliable sealing.
In this case, the headlights will last 5-7 years. To upgrade the rear optics with LEDs, you will need to remove the lights. The device is mounted in a reflector. The glass is first removed and the internal elements of the headlights are removed. Polyurethane foam is poured into the resulting cavity. The surface is covered with fiberglass or epoxy resin.
Lada 2112 Snow Queen › Logbook › LED rear lights (diode dimensions)
Making LED dimensions
Hi all. I ordered a month ago on ebay, 5 meters (600 diodes) of tape and 5 square meters of black carbon film. And so, this whole thing came to me, I purchased the diodes specifically for the (butt) dvinar. And so, what and why I need this, I’ll tell you below. GO.
To begin with, I went to remove the rear lights, took an 8-way key, opened the trunk, and that’s it... I removed the key. Because it is not needed there, but a long, long, 8 cylindrical one is needed... like a finger...
There was a lot of dust there, of course, so I washed everything there, and I saw a little corrosion that wanted to creep up the career ladder, I cleaned the whole thing and zilch zilch with zinc.
Preparing for disassembly
I dragged the whole thing home and washed it under the tap. He laid out his arsenal on the floor.
Now, this is the most painful thing, never, people hear, NEVER, do what I’m going to do right now, unless of course you get on your nerves.
This whole thing is not dismountable, they were made and that means this is how they should be, but no, I want to piss, and I suffered aaaaaaaaaaaaaaaaaaaaaaaaally.
I blew my mind and regretted a million times that I got involved with this. It's just awful. Fairy tales about hair dryers and all sorts of warm-ups did not inspire me, and I started cutting all this thick armor-piercing plastic miracle with a knife. I cursed everything. Nevertheless, I cut all this and proceeded to work.
But what about without jambs? Damn the reflector broke, or rather it cracked, it had to be repaired right there.
This is what happened after cutting.
I thought that all the bad things were over, yeah right now, let’s solder everything and cut out the diodes, I soldered for 3 days and 3 nights, I won’t swear, because I can’t explain it with swear words.
Similarly with other lanterns, I cut everything out as needed and soldered it together, as I needed.
There were 5 lights in total, including reflectors.
In general, I glued everything together, it dried for two days while gluing, the result in the photo is not so colorful and does not convey what is in real life, so look in the city, you will definitely see, for a price, in fact, everything turned out very cool.
True, I also tinkered with the wiring with the hook-up. Have a smooth road everyone, take care of your nerves, money and health.
Source
Types of light sources for rear headlights on a VAZ 2110
When going to the store to change a burnt-out taillight bulb from a VAZ 2110, a motorist is often faced with the difficulty of choosing what to install. On the counters are the well-known incandescent and halogen lamps. And right there next to the same base it is proposed to buy LED light bulbs. Or you can get confused and even install xenon on the VAZ. So which is better and more profitable?
Replacing lamps in the rear light
There is no clear answer to the question posed. On the one hand, incandescent lamps in VAZ cars, as well as their samples with the bulb space filled with halogen gas, are considered outdated technologies. Such light sources are characterized by unsatisfactory reliability, high heating levels and extremely low efficiency.
On the other hand, the price of such light sources is relatively small in comparison with LED and xenon samples. The advantages include low cost and absence of counterfeits. But the disadvantages caused by high energy consumption and low service life still outweigh.
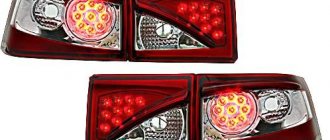
Types of tail lamps
Therefore, it would be more correct and rational to install LED bulbs in the taillights of the VAZ 2110. The easiest way would be to simply buy a ready-made proposal for the base of the existing lighting. Or you can spend a certain amount of effort and upgrade the taillights with individual tuning.
Rear LED headlights "ten"
Xenon has the highest brightness and is not provided as an alternative light source on the VAZ 2110. The problem is that xenon lighting can blind motorists with an excessively strong glow. The use of xenon on VAZ 2110 vehicles is subject to particularly stringent requirements in accordance with technical standards.
Buying a ready-made set
The fairly strong distribution of the car in question has become the reason that many optical manufacturers are creating special tuning kits. The advantages of this tuning method include the following points:
- Only high-quality materials and modern equipment are used in production.
- The created headlight sets are ideal for installation on a car. In other words, you don’t have to modify the car - installation takes no more than one hour, and you can get by with a standard set of tools.
- The next important point is the fairly large selection. There are several hundred sets of optics that are suitable for installation on the vehicle in question. The choice can be made quite simply - the type of light source, as well as the design, are taken into account.
- The service life of most offerings on the market is quite long.
The above points can be called the main ones. Headlights for a VAZ 2110 tuning cost relatively little, but still creating the design yourself can significantly reduce costs.
Tuning rear lights with LEDs on a VAZ 2110
Upgrading the standard lighting system of a VAZ is extremely simple. We will need:
- a set of 5 mm spot LEDs and resistors for them for automotive supply voltage. They can be bought at almost any lighting store;
- plexiglass, from which in the future a blank for mounting LEDs will be made;
- transparent glue moment and superglue;
- silicone, transparent or black.
When purchasing LEDs, do not forget about the concept of color differentiation. This means that, according to technical standards, VAZ rear lights must be red, and turn signals must be bright yellow or amber. Thus, the color of the LEDs is selected based on their intended purpose. The glow should be as bright as possible.
LEDs in the taillights for the “two-wheeler”
To begin, remove the stock lighting system from the VAZ 2110. Using a utility knife, we pass it around the perimeter of the rear headlights, separating them from the car body. Next, separate the outer diffuser of the lampshade from the reflector.
Cut out a blank from plexiglass to the size of the VAZ headlight, where LEDs will later be installed in the drilled holes. You can set a round shape for the new design, or place the backlight over the entire area of the taillight. It all depends on your imagination.
In order to give the finished product a stylish look, the outer part of the glass can be tinted with a special film or varnish. Plexiglass, in order to hide the glue deposits and the wiring hidden behind it, is matted from the front and painted, for example, silver. The finished product is attached back to the car body with Moment glue and sealed with silicone.
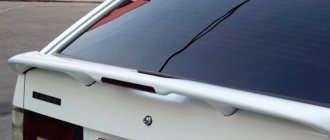
Rear optics
When tuning optics, do not forget about the rear lights of the VAZ 2110. For them, using an LED strip or ring . It's amazing how much one small element can really change the perception of a car.
Led lights
In addition to the already discussed option with angel eyes, which can also be installed on the rear lights, some resort to alternative solutions. We offer you one of them.
- LED strip or finished ring;
- Round reflectors, suitable in size for VAZ 2110 headlights;
- High-quality glue or silicone sealant;
- Cylinders for LED rings.
Replacing the H1 lamp in Bosch headlights model 2110 with H7
Many VAZ 2110 owners are faced with the fact that the Bosch lights on their car do not illuminate the road well enough at night. They have a standard H1 lamp installed.
Experts say that if you replace the Bosch with an H7, the situation will improve significantly.
The process of replacing a standard H1 lamp with an H7 in VAZ 2110 lighting sources is quite simple - it consists of the following steps:
- Disconnect all headlight connections.
- We remove the radiator grille - to do this you need to unscrew the bolts that secure it.
- We disconnect the blocks with wires from the turn signals.
- We remove the hydraulic corrector - to do this, press the latch and turn it ninety degrees.
- We unscrew the 3 bolts that secure the flashlight and move it back. We move the eyelash to the center, getting rid of the engagement with the wing.
- Loosen the 2 bolts securing the buffer and remove the eyelash.
- Unscrew another nut and remove the light source.
- We heat the sealant and use a knife to open the headlight.
- The hole for the H1 lamp will need to be drilled. It is smaller in diameter than needed for H
- You will also need to remove the terminals and install those that are suitable for the lamps that we installed - there will be 4 of them.
- After drilling, insert the lamp into the hole and fix it with standard fasteners.
- The fixation of the reflector will need to be adjusted so that it stays in place properly.
- Instead of lamps, we can install LEDs in side lights.
- Next, we assemble the lights back, install them on the car and adjust them.
By installing other lamps, you can make sure that the lighting will be of better quality - there will no longer be problems with visibility during night driving.
Advantages of modern diodes
Recently, diodes have been increasingly used in the production of optics. These light sources have the following advantages:
1. Service life is at least 5-10 years. The design of the diodes is quite simple, and the features of their operation determine the possibility of operation for more than 5 years. 2. Low energy consumption. The design of the car determines that by reducing the amount of energy consumed, fuel consumption is significantly reduced. Also, do not forget that when the internal combustion engine is not running, the lights are powered by a battery. The less energy they consume, the longer the battery will last. 3. Resistant to environmental influences. If ordinary lamps are quite susceptible to high humidity, then LEDs are not 4. When creating complex structures from several LEDs, a rather beautiful look is created.
In general, we can say that there are quite a lot of advantages of diodes. That is why they are used to create modern structures.
Table with technical characteristics
Brand and modification
DIY installation of bi-xenon lenses in VAZ 2110 headlights
Installing bi-xenon lenses in the headlights will also help eliminate the problem of insufficient road illumination. This gives us the opportunity to provide high-quality illumination of both the near and far zones, without blinding the drivers of oncoming cars. This makes the light more saturated. This also affects the quality of the review.
Installing lenses with your own hands is a rather labor-intensive and responsible process. You are interfering with the design of the lanterns. If mistakes are made, this may lead to an emergency on the road. All work must be done extremely carefully, conscientiously and responsibly.
The lens installation algorithm is as follows:
Do-it-yourself tinting of rear lights in VAZ 2110-2112 cars
Tinted taillights help make the rear of your car look more stylish and elegant. You can easily do this work yourself if you want to avoid unnecessary financial expenses that would be entailed by calling a car service center. You have the opportunity to tint the taillights of your car using 2 means:
- tinting varnish;
- tint film.
The varnish is sold in special cans. It should indicate that it is intended for car headlights.
The taillights can be removed for work, or all the work can be done without it. The process looks like this:
- you need to thoroughly wash and dry the taillights;
- degrease with alcohol;
- Apply the varnish from a distance of about 30 cm. It is necessary to take breaks between layers for drying. The more layers, the stronger the tinting effect;
- After the last layer has dried, you can perform a special polishing to obtain a matte effect.
Film tinting of rear lights
It must be remembered that the tinting varnish is washed off over time. If you want to remove it from your car's tail lights, use acetone. It will help you easily get rid of tinting varnish.
Film is a more convenient means of tinting, since it can be removed at any time.
On sale you can find a wide selection of different tint films. Try not to save money and buy the highest quality. The price difference won't hit your pocket too hard. The film is applied as follows:
- wash and dry car taillights;
- degrease them;
- we try on the film and do the cutting;
- spray the surface of the headlights with soapy water;
- remove the backing from the film and apply it to the surface to be pasted;
- Use a special rubber spatula to press, smooth and expel all the water and air from the inside;
- After drying, the work can be considered completed.
Replacing headlight parts
In some cases, a complete replacement of the headlights may not be necessary; sometimes damage can be eliminated by replacing the headlight parts. Quite often, car owners notice that when the car is moving, there is noticeable shaking of the light. This may be due to reflector rattling. To eliminate light flickering, you need to check:
- positioning the reflector in place in the latch;
- presence of adjusting bolt rods;
- emphasis in the seating recesses of the hydraulic corrector rod;
- sagging thread (high and low beam lamps are swapped);
- integrity of the hydraulic corrector tube.
More successful methods for eliminating jitter are:
- replacing the hydraulic collector with an electric corrector;
- increasing the length of the hydraulic corrector rod to tension the spring.
The caps can be replaced with a plastic dowel 8 millimeters long; a cap that can be removed from the brake fitting; another plastic cap. This is done in this order:
- the hydraulic corrector is removed from the illuminator;
- The cap is screwed tightly onto the corrector rod, preventing it from jumping inward;
- The corrector is installed in the mounting socket.
Replacing the headlight hydraulic corrector method 1
It is also common for the headlight hydraulic corrector to break down, causing the adjustment to stop working and the reflector to lower. The light beam has to be adjusted quite often, especially when the trunk of the car is heavily loaded, when the light is directed into the eyes of drivers of cars moving towards you. Repairing the headlight hydraulic corrector takes a little time:
- First, the headlight fasteners are unscrewed and removed;
- The headlight is disassembled: the glass and metal clips are carefully removed;
- Using a knife, the glass is cleaned of sealant;
- The convex profile on the glass is cut off;
- The screws are unscrewed from the reverse side;
- The paper reflector is removed.
As a result, there is a possibility that the corrector will be compressed again.
After completing the necessary steps, the headlight is assembled in the reverse order of disassembly.
Replacing the headlight hydraulic corrector method 2
There is also a second way to repair the hydraulic corrector. To do this:
- The adjustment screws are threaded (metric 3);
- The screws are screwed into the illuminator, then the washers are put on;
- The plastic fasteners are removed;
- A bar with low and high beam modules placed on it is put on;
- Put on top: a washer, a spring on the washer, on top of which another washer is put on. It is worth using locknuts;
- Everything gets twisted;
- The structure is fixed using anaerobic sealant.
DETAILS: VAZ 2109 starter - mechanism diagram, malfunctions, replacement Video » AvtoNovator
Lighter repair
The illuminator can be repaired without the need for disassembly. The ball can be snapped into place through the hole in the lamps on the back side of the illuminator without removing the glass. So:
- First, a hole is drilled directly opposite the latch at the top of the headlights;
- A screwdriver is inserted into the hole made;
- A collet is attached to the corrector ball;
- Then the drilled hole is sealed;
- Using a hinged loop from a furniture cabinet (loops 5-6 centimeters long, with a cutout on top and mounting holes where it is attached) it is attached to all broken corrector units;
- The canopy is inserted into the slot of the adjusting screw;
- The screw is moved so that the slot is in a narrow section of the canopy;
- Holding the canopy, the screw is unscrewed until it stops with force. This is how the canopy is fixed, which must be placed in a horizontal position;
- Using an electric drill, using a 3mm drill bit, holes are made in the base of the light where there are holes on the canopy;
- A shortened self-tapping screw is screwed into the hole so that it does not reach the high beam reflector. This slot will allow you to securely fix the adjusting screw, which will not be broken again.
Before carrying out work, it is recommended to watch this video, which shows how to replace the headlight on a VAZ 2115, which is completely similar to the ten.
In addition, as experts and craftsmen advise, when replacing, it is advisable to often use photographic materials, which provide a visual aid. With your own hands, if you do everything as required by the instructions, you can not only
or entire headlights, but also to repair any part of the car.
Replacing a headlight bulb - how it is done
Light bulb for rear light of VAZ 2110
To change the headlight bulb in the headlight, you need to perform the following steps:
- remove the battery;
- holding the lamp from behind, separate the wires in the block directly from the lamp;
- remove the rubber cover;
- remove the end of the spring retainer with the hook from engagement, move the retainer to the side;
- remove the light bulb from the headlight housing;
- install a new lamp, performing the reverse sequence of actions.
Note. If the side light bulb in the headlight turns out to be faulty, it must be replaced on site. Otherwise, you need to drive to where the repairs will be carried out with the headlight lamp turned off.
How to change light bulbs
Replacing the bulbs in both lanterns is easy and requires no tools.
Rear center
Open the trunk door and find the rear part of the lamp on it. The board with lamps is secured in it using two plastic clips and at the same time serves as the back cover of the lamp. Squeeze the clamps and remove the board along with the lamps. The power supply does not need to be disconnected.
Removing the panel with light bulbs
Lightly press down the burnt-out light bulb and, turning it counterclockwise, remove it from the socket. In place of the burnt one, install a new one, press and turn clockwise. We snap the board into place.
Back corner
There's not much more fuss here. We open the trunk door and opposite the lamp we find a valve in the upholstery, closed with Velcro. We open it and see the back of the light device.
The corner light is hidden behind a flap in the upholstery
Its back part is fixed with the same plastic latches. We squeeze them and take out the board along with the light bulbs.
Removing the panel with light bulbs
The turn signal lamp is located separately, the parking light and fog light lamps are almost next to each other. We take out the burnt one (press and turn), install a new one (press and turn in the opposite direction).
Replacing light bulbs in the corner rear light fixture of a VAZ 2112
We snap the panel into place and close it with the valve.
Causes of malfunction
Bulbs for the rear lights of the VAZ 2110
There may be several reasons why the lighting does not work. Each malfunction requires an individual approach and implies its own troubleshooting methods. Causes of the malfunction and methods for eliminating them (if some lamps of flashlights and headlights do not work):
- burnt fuses - replace them (see VAZ 2110: how to replace fuses);
- lamp filaments are burnt out - change the lamps;
- contacts on relays or switches have oxidized - clean them;
- the wires are damaged, their tips are oxidized or the connections are loose - replace the faulty wires, clean the tips;
- The contact jumpers at the location of the lamp control relay have oxidized - clean them.
Rear fog lamp bulbs for VAZ 2110
Sometimes the headlight lens fogs up a lot. What are the reasons and what to do in this case:
- leaky adhesion of the lens to the body - immerse the headlight unit in water, if liquid penetrates, replace the headlight;
- moisture enters in the direction from the engine compartment during the process of washing the car - eliminate the liquid from the headlight unit.
Poor Tail lights 2111 — logbook Lada 2111 silver metallic 2003 on DRIVE2
Hello everyone friends! Once again a problem arose with the rear lights. More precisely, their boards. Well, ours don’t know how to do anything normally. In December I changed everything to a new one. Boards, chips. Several times during the winter I had to move the chips, the contact kept coming off. And then the other day the turn signal went off. Because of this soft board. the contact burned out on the board, + to this were added fuses for the tidy, and the turn switch burnt out. And then my patience ran out. I decided for myself that I would make LED flashlights. This morning I started searching for the reel. I found it in the second store.
Price 80 rubles I bet, It works, but it clicks constantly both when the turns are working and when they are not working. Well, I think oops. I read on the Internet that many suffer from this disease. As always, I call mechanic 666, he says come over and we’ll take a look. While I was driving there, I decided to stop at another store and buy another one to double-check. I'll take it. exactly the same. price 160 rub. I stick it in. It works and doesn't click at all. Well, anyway, I’m going to him to solder the diode strips. Since I don't have a soldering iron. On the way, I stopped at a leruashka store and bought white and red ribbons. I arrived, began to remove the headlight, I removed it successfully, when I started to remove the glass I discovered that it was half glued to the headlight. The second part moved freely from the headlight. And there was immense dirt in it. and I wondered why it shines so dimly.
. Well, I washed everything and the actual soldering process began. The solder didn’t want to stick to the contacts on the tape. No matter how I tried it. It doesn't stick and that's it. As a result, the neighbor in the garage (Roman) soldered everything himself. He succeeded)))) He made a red one for the dimensions and stop. And the turn signal is white. I couldn't find the orange one. Then I’ll paint the diodes with orange float. It turned out something like this.
By the end of the day I only managed to do the right headlight. In the near future, the left and lanterns for the 5th door will be made. I will definitely post photos of the entire work. Good luck on the roads)))
As a result, by the end of the day I managed
www.drive2.com
Features of electrical equipment
In addition, the automaker carried out factory preparation for installation of:
- electric windows;
- power steering;
- fog lights in the front bumper.
Note! The ECM was installed even on the VAZ-2110 with a carburetor power system and differed from later models with a fuel injection system.
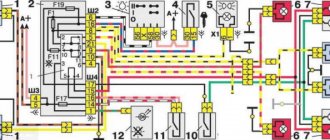
Electrical diagram of VAZ 2110
For reference: on models with a carburetor, the button for turning on the rear fog lights had an intermediate position (fixation), thereby acting as a kind of contact protection.
The advent of fuel injection and electronic ignition systems on automobiles has significantly increased the requirements for electrical components. The current increased and many devices required relays for protection. (See also the article Installing fog lights on a Grant: features.)
That is why, starting in 2000, on models with an electronic system, it was necessary to better protect the contacts. Therefore, a relay was installed in the PTF control circuit between the button in the cabin and “+”. And the button itself was replaced with a dual-mode one.
Independent design modernization
You should pay attention to the fact that you can independently change the original optics, make it more effective and beautiful. Headlights on VAZ 2110 tuning are quite often painted or covered with a special film. Let's look at the features of optics coloring:
1. You can use paint that does not react to environmental influences. 2. Work should be carried out at positive temperatures. 3. First, you need to decide on the color of the paint - as a rule, it is selected according to the color of the car body. 4. Painting of the protective glass can only be done when the optics are dismantled. Dismantling work can be completed quite quickly: the design of the 2110 car is quite simple; to remove the optics, minor dismantling must be performed. 5. After the optics have been removed, they should be disassembled. First you need to remove the protective glass, which will be painted. 6. The next step can be called covering with masking tape those elements that should not be painted. 7. When applying paint, remember that the protective glass must transmit quite a lot of light. Therefore, paint is usually applied in a small layer. 8. After completing the painting work, you can assemble the optics and install them.
The above points should be taken into account in order to carry out the work efficiently and quickly.
Tuning
Taping with film
The installation procedure is as follows.
- Remove the Kirzhach headlights. You will need to remove the glass. To do this, insert a flat screwdriver into the corner of the glass, and insert a sharp stationery knife into this gap with your other hand. This will remove the layer of sealant, allowing the glass to be removed. If you can't, just break the glass and buy a new one. It's quite cheap.
- Handle the optics carefully, do not touch the reflectors, and remove any remaining debris. If this is not done, you will soon have to completely change your headlights. And these are already significant expenses.
- Let's try out the tuning option. To do this, attach an LED ring to the lens.
- We correct inaccuracies. Decorative inserts can interfere with, or rather partially block, the glow from the LEDs. They can be trimmed and filed a little. A completely natural procedure for such tuning.
- Installing angel eyes. They are usually glued to the lens. Use super glue or high quality silicone caulk.
- Connect the power. Power to the LEDs must come from the side lights. Another option is to use a fuse and a separate switch.
- Reinstall the headlights. We put the glass back, just use a simple silicone sealant or liquid nails. The main thing here is to prevent the presence of cracks, due to which the inside of the glass will begin to fog up and condensation will be deposited on it. Over time, this leads to a short circuit.
- There is another option for mounting LEDs - not around the lens, but on the mask using silicone. Then the tape needs to provide the shape of a ring. For this, available means are suitable - a bottle, a glass. You just need to fill it with silicone in the selected place on the mask. The connection is similar to the previous installation option.
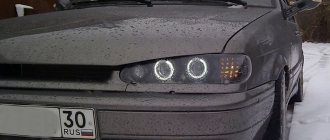
Available offers
Unfortunately, you cannot find LED rings that are suitable for the VAZ 2110 to create the angel eyes effect in regular auto parts stores. But they are available in numerous online stores. Therefore, there should be no problems with the search.
LED
Just remember that the inner diameter of the ring is 54 millimeters, and the diameter of the outer ring is 70 millimeters. These parameters are suitable specifically for installation in Kirzhach.
Although you may well go the other way - make your own rings from LEDs. You will need a transparent rod filled with LEDs. You will find similar components...in a building materials store. Just keep in mind that they need to be bent into a ring. To do this, use a hair dryer. It will soften the rod. The procedure requires precision handling, but it is quite possible to do it yourself.
The third option is to purchase at least 8 LEDs for each headlight and buy a plastic rod separately. This is the most complex approach and will require bending the rod, connecting the LEDs evenly and getting them to work.
The choice is yours. Go for it! And if you don’t want to take risks or waste time making your own LED rings a la angel eyes, then order them online. There are more than enough offers there now.