Causes
Below are the main reasons why your tail lights may fail and not come on when you are reversing.
- Burnt out light bulbs
- Fuse
- Reverse sensor
- Open circuit
- Contact oxidation
Lamp burnout
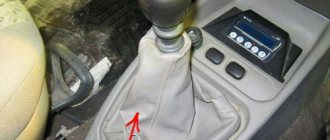
This is the simplest possibility, but it cannot be ruled out. It's unlikely that both lights will stop working at the same time, but you may have missed that one of the reverse lights was off. Therefore, it is worth checking the light bulbs first. To do this, you need to remove the flashlight; it is removed from the barrel and is held on by three thumbscrews.
Fuse
Both reversing lamps are powered from the same circuit, protected by one fuse. Therefore, if the fuse link melts, the power circuit to the headlight is lost and both headlights stop turning on. This is easy to check by looking at the dashboard because in the Preira the fuse that powers the backlight also powers the dash lights. If your car's headlights and dashboard lights stop working at the same time, the fuse has most likely failed.
This fuse has the number F12 with a rated current of 20 A or 10 A, depending on the vehicle configuration. In the list “luxury” is 20A, “standard” is 10A.
The fuse should only be replaced with a fuse of the same rating as the one previously installed to prevent blowing out the vehicle's electrical system.
Here you can see the markings of other fuses.
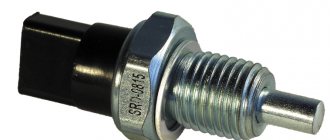
Reverse sensor
A special sensor is installed in the gearbox housing to turn on the reversing lights on a Priora car. He is the one who knows how to turn off the lights. This sensor is reliable, but sometimes fails.
It cannot be repaired, so it is recommended to replace the entire device.
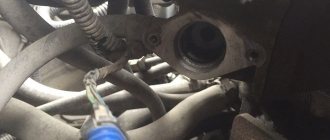
The sensor can be accessed from below, but the crankcase cover (if equipped) must be removed. Find the sensor marked in the picture with a red circle.
Then remove the chip from the sensor and short it with a thin jumper wire, then turn on the ignition and check if the indicators come on. If the indicators light up, proceed to replace the sensor.
Open circuit
Use a multimeter to make sure there is no open circuit. Turn on the car's ignition and engage reverse gear. Set the switch on the meter to measure DC voltage, as shown in the figure below.
We check whether the plus reaches the lamp; to do this, remove the lamp and connect the device between two contacts; if the device shows readings from 11V to 13V, then everything is normal and the system is suitable for service.
If there is no reading, connect one of the multimeter's measuring instruments to the car body. When we see the multimeter reading, it means that the lamp does not reach the “-” mass. We have to look for cracks.
Oxidation of contacts
The contacts can oxidize due to a poor connection between the lamp and the contact, as well as the sensor and the pin. Most often, oxidation occurs at the interface between the connector and the sensor. Check contacts, tighten if necessary
Reversing in the evening on a Priora will cause great discomfort if the rear running lights on the car have failed. This article will talk about finding the cause of this malfunction, as well as how to eliminate it and what will cause the lights to fail. After reading the article, you can easily eliminate or find the reason why your car’s lights do not light up when reversing.
Additional block
Additional relays are mounted on a bar and located under the dashboard, near the front passenger's feet. To get to them, you need to remove the right tunnel lining. Next to the additional relays is the electronic engine control unit (ECU).
If its connector interferes with access to the relay, disconnect it by first removing the negative terminal from the battery.
Circuit breakers
F1 (15 A) – main relay circuit, starter interlock.
F2 (7.5 A) – power circuit of the electronic control unit (ECU).
F3 (15 A) – electric fuel pump . If the fuel pump has stopped pumping (this can be determined by the absence of a sound when the ignition is turned on), check together with relay K2. There may also be problems with the immobilizer, it blocks the pump, see information about F20. If the wiring, this fuse and the relay are good, most likely the fuel pump itself has failed. To remove it, you need to disconnect the battery, remove the rear seat cushion, unscrew the cover, ring and fuel hoses, then carefully remove the entire fuel pump.
K1 – main relay.
K2 – electric fuel pump relay . See above about F3.
Causes
Below are the main reasons why reverse lights may malfunction and not light up when driving in reverse gear.
- Lamp burnouts
- Fuse
- Reverse sensor
- Open circuit
- Oxidation of contacts
Lamp burnout
This is the simplest option, but it still cannot be ruled out. It is unlikely that both bulbs could fail at once, but it is possible that you may not have noticed that one of the reverse lights is not on. Therefore, first of all, it is worth checking the lamps. To do this, you need to dismantle the lamp; it is removed from the luggage compartment and is held on by three wings.
Fuse
Both reversing lamps are powered by the same circuit, protected by the same fuse. Therefore, when the fuse-link melts, the power supply circuit for the lights disappears and both lamps stop turning on. This can easily be checked by looking at the dashboard, since on the Priora the fuse responsible for powering the rear running lights is also responsible for the dashboard lighting. If the car's lights and instrument panel lights stop lighting at the same time, the fuse link has most likely failed.
You can only replace a fuse with the same rating as it was previously installed in order to avoid a fire in the vehicle's electrical wiring.
Designations for other fuses can be found here.
Reverse sensor
To turn on the reversing lamps on the Prior, a special sensor is used, which is installed in the gearbox housing (gearbox). It is he who is able to disable the lights. This sensor is reliable, but it also sometimes fails.
It is not possible to repair this electrical appliance, so it is recommended to replace it entirely.
You can get to the sensor from the inspection hole, but to do this you will have to remove the crankcase protection (if equipped). We find the sensor, circled in red in the picture.
Next, remove the chip from the sensor and close it with a jumper made of thin wire, then turn on the ignition and see if the lights come on. If the lamps come on, then you need to start replacing the sensor.
Open circuit
Checking the circuit for open circuit is done using a multimeter. It is necessary to turn on the ignition on the car and set the gearbox to reverse gear. On the device, set the switch to measure DC voltage, as in the picture below.
We check whether the plus is coming to the lamp; to do this, remove the lamp and connect the device between the two contacts; if the device shows readings from 11V to 13V, then everything is normal and the circuit is working.
Oxidation of contacts
Contacts can oxidize due to a poor connection between the lamp and the contact, as well as the sensor and the chip. Most often, oxidation occurs at the contact between the chip and the sensor. We check the contacts, tighten them if necessary and clean them.
After carrying out all the manipulations described above, the rear running lights of your car will shine like new.
Below are the main reasons why reverse lights may malfunction and not light up when driving in reverse gear.
- Lamp burnouts
- Fuse
- Reverse sensor
- Open circuit
- Oxidation of contacts
Lamp burnout
This is the simplest option, but it still cannot be ruled out. It is unlikely that both bulbs could fail at once, but it is possible that you may not have noticed that one of the reverse lights is not on. Therefore, first of all, it is worth checking the lamps. To do this, you need to dismantle the lamp; it is removed from the luggage compartment and is held on by three wings.
Fuse
Both reversing lamps are powered by the same circuit, protected by the same fuse. Therefore, when the fuse-link melts, the power supply circuit for the lights disappears and both lamps stop turning on. This can easily be checked by looking at the dashboard, since on the Priora the fuse responsible for powering the rear running lights is also responsible for the dashboard lighting. If the car's lights and instrument panel lights stop lighting at the same time, the fuse link has most likely failed.
This fuse is numbered F12 with a rated current of 20A or 10A, depending on the vehicle configuration. In the “luxury” configuration 20A, “standard” 10A.
You can only replace a fuse with the same rating as it was previously installed in order to avoid a fire in the vehicle's electrical wiring.
Designations for other fuses can be found here.
Reverse sensor
To turn on the reversing lamps on the Prior, a special sensor is used, which is installed in the gearbox housing (gearbox). It is he who is able to disable the lights. This sensor is reliable, but it also sometimes fails.
It is not possible to repair this electrical appliance, so it is recommended to replace it entirely.
You can get to the sensor from the inspection hole, but to do this you will have to remove the crankcase protection (if equipped). We find the sensor, circled in red in the picture.
Next, remove the chip from the sensor and close it with a jumper made of thin wire, then turn on the ignition and see if the lights come on. If the lamps come on, then you need to start replacing the sensor.
Open circuit
Checking the circuit for open circuit is done using a multimeter. It is necessary to turn on the ignition on the car and set the gearbox to reverse gear. On the device, set the switch to measure DC voltage, as in the picture below.
We check whether the plus is coming to the lamp; to do this, remove the lamp and connect the device between the two contacts; if the device shows readings from 11V to 13V, then everything is normal and the circuit is working.
If there are no readings, then we connect one of the multimeter probes to the car body and take a measurement. The readings that appear on the multimeter will mean that the “-” mass is not reaching the flashlight. You need to look for a break.
If there are no readings, then the power supply circuit “+” and “-“ is open. It is best to contact an auto electrician to fix the problem.
Oxidation of contacts
Contacts can oxidize due to a poor connection between the lamp and the contact, as well as the sensor and the chip. Most often, oxidation occurs at the contact between the chip and the sensor. We check the contacts, tighten them if necessary and clean them.
After carrying out all the manipulations described above, the rear running lights of your car will shine like new.
POST REPAIR PROCEDURES
After the new VAZ 2114 low beam bulb is installed, it is necessary to check the assembled headlight unit for leaks. If it is not there, then the headlights will at least fog up, and at most dirt, dust and water will get inside them when it rains.
In addition, you should not experiment and try to install more powerful lamps in your headlights, since the fuse and wiring may not withstand the increased voltage, and there will be a constantly increased load on the generator. It is not even recommended to install additional headlights; it is better to contact a specialist and set up your family correctly - there will be more practical benefit from this.
SAFETY
Safety precautions when carrying out such work deserve a few words. The main danger is the thin glass of the lamps - it can burst from the slightest pressure, so it is better to work with glasses and thin gloves so as not to harm yourself. And if a breakdown of this kind occurred on the road, then you should not start repairs right on the highway; it is better to drive to a gas station or the nearest populated area.
The main result is that the headlights are shining ok
This is where all the nuances end, now you know how to change the low beam bulbs on a VAZ 2114 with your own hands quickly and correctly.
Reversing sensor Lada Kalina
In the practical budget model Lada Kalina, the reverse sensor is located on the transmission unit housing. The reverse switch ensures the synchronization of turning off the corresponding lamps in the stern headlights and completing the reverse movement, that is, turning off the gear.
There is a solenoid on the transmission that is responsible for blocking the transmission if the reverse sensor suddenly turns out to be faulty.
How does the system work in Kalina?
The gear selection lever of the Lada Kalina transmission is equipped with a special ring. If you do not lift it, it is impossible to activate reverse gear. The lifting of the element is accompanied by the application of a certain electrical impulse to the coil. As a result, the core is drawn into the coil, which allows the transmission to be engaged. The same pulse generates a signal to activate the reverse movement indicator.
How to restore functionality?
Reverse faults can occur throughout the power and control circuit. If such a situation occurs, then you should not rush to replace the sensor. It would be more advisable to check all links of the designated chain.
It is recommended to start checking with the ring present on the lever. Some craftsmen turn off the sensor and blocking and “ride” further. However, this is not a correct measure, since it jeopardizes security. It’s no secret that the movements of the lever when engaging both reverse and first gear are carried out almost identically, that is, “toward and forward.” The only difference is that the first speed is activated without a ring, and the rear speed is activated with it. That is, this element acts as a “safety guarantor” against accidental engagement of reverse gear.
Lifting the cover on the lever, you can find several wires that are fed from the ring to the connectors. This special solution is implemented to prevent wires from breaking while manipulating the transmission lever. It is also recommended that these cables be thoroughly checked.
The most common situation associated with a reverse gear malfunction is a break in the wires that go directly to the sensor. In addition to the risk of hitting road irregularities, there is also the influence of the external atmosphere. This implies the negative impact of not only moisture, but also various particles of debris, as a result of which the wiring and reverse sensor become unusable over time.
Finding these wires will not be difficult. They are the only cables that are connected to the transmission unit, or more precisely to the sensor located on the LADA Kalina crankcase. In addition to visual inspection, inspection is reduced to testing using a device. If, after calling the wiring, we find its integrity, then the likely cause of the system failure and failure is the designated sensor.
How to remove air from the stove on Kalina
Lada Kalina Cross station wagon
Radiator Lada Kalina
How to replace the reverse sensor?
Before the actual replacement procedure in the LADA Kalina model, it is recommended to acquire certain knowledge. As already noted, detecting the sensor is quite simple. To provide access to this component, you will need to hang the car with a lifting device or use the “services” of an overpass (pit).
- First, disconnect the supply connector with wires.
- After this, the sensor itself is unscrewed from the Lada Kalina transmission housing. This manipulation should be performed quickly enough to prevent large quantities of oil from leaking out of the unit. It is important to let the box cool, which will reduce the fluid pressure inside the transmission. When working, do not position yourself directly under the sensor installation site to avoid being exposed to a jet of oil.
- We keep the new reverse sensor directly at hand. As soon as the old component is removed, we immediately screw in the new one. This will ensure a minimum loss of lubricating fluid. When experience is insufficient, it is recommended to place a container under the transmission unit into which the spilled oil will fall. Upon completion of the operation, this liquid can be added to the box.
Related difficulties with the reverse sensor
Sometimes there are cases in which reverse gear is engaged in a LADA Kalina car, but the lamps are not activated. Also, only one of the lamps may not light up. This is probably the reason. Replacement is simple and does not require a service visit.
The procedure is carried out from the luggage compartment. It is necessary to dismantle the headlight housing and unscrew the socket. It contains a lamp. It is removed by pressing and turning counterclockwise. The new lamp is installed using the reverse algorithm.
If both lighting elements in a Lada Kalina car fail, you will need to check the electrical circuit from the sensor itself to the indicated lamps.
Functionality check
If a breakdown is detected, you need to check:
- switch on sensor;
- switching wiring.
Frog sensor
The following algorithm is used:
- Place the car on a viewing hole or overpass.
- Stop the engine and secure the vehicle with the parking brake or wheel chocks.
- Inspect the gearbox housing; the sensor is located on the rear wall. On some of the units nearby, a speed detection sensor is installed, which transmits a signal to the electronic speedometer.
- Remove the plug from the sensor connector and inspect the contacts.
- Using a piece of wire or a paper clip, close the metal elements inside the block.
- Turn on the ignition circuit. If the wiring is in good condition, the warning lights should light up.
The turning on of the warning lights indicates a malfunction of the control sensor, which must be unscrewed from the crankcase and replaced. If the indicators do not light up, the defect may be caused by the sensor or wiring.
To test the sensor, a lamp rated for 12 V is used, installed in a socket with patch cables. The indicator is connected to the sensor terminals when reverse gear is engaged and the ignition is active. If the lamp does not turn on, the sensor needs to be replaced or adjusted.
Circuit integrity
To test the continuity of the circuit, use a multimeter set to cable testing mode. When checking the wires, be sure to remove the flashlight or dismantle the cover, which allows you to get to the contact pad of the lamp. The device is connected to the beginning and end of the wire; if the circuit is closed, a buzzer sounds. You can use a control light with a battery that is connected through a wire running from the sensor to the lamp. The damaged wire must be replaced with a copper stranded cord with the appropriate cross-section.
Adjusting the gearbox switch
Some machines provide the ability to adjust the position of the sensor depending on the location of the shift knob. There is a lock nut on the sensor body that needs to be loosened. Then the reverse speed is switched on, and a warning lamp is hung on the sensor contacts. The housing is screwed into the box housing until the contacts are closed and power is supplied to the thread. The sensor is fixed in the found position with a lock nut, and then the electrical wiring plug is connected.
If the sensor design does not provide a lock nut, then the position is adjusted using washers. The thickness of the gasket package is selected experimentally with reverse gear engaged. It should be remembered that a large number of washers shortens the length of the thread holding the sensor housing in the crankcase.
On automatic transmissions there is a reverse sensor combined with a neutral or parking position indicator. Additional indication is necessary to allow the engine to start only when the kinematic chain is open. A similar design is used on some transmissions; there is also a switch in the selector that cannot be adjusted.
Brief algorithm for setting up the sensor:
- Remove the plug and determine the purpose of the contacts according to the markings or electrical diagram of the car.
- Turn on the ignition and move the selector lever to the reverse gear position.
- Rotate the sensor until the signal lights turn off and mark the position of the sensor body relative to the crankcase with chalk marks. To check, a test lamp with an external power source is used, which is connected to the reverse contacts.
- Connect the lamp to the remaining contacts and slowly tighten the housing until the filament turns on. Mark the position with chalk on the sensor housing and the box housing.
- Set the switch to an intermediate position between the found positions. With correct adjustment, when the lever is moved to position R (reverse movement), the lighting equipment at the rear of the machine will turn on, and in positions P and N it will be possible to start the engine.
Main reasons
- The fuse has blown. Both lamp bulbs are protected by one fuse link. Together with the lamps, the fuse will most likely protect some other circuits. Therefore, if your car’s taillights not only stop lighting, but also, for example, the dashboard backlight does not work, the first thing you need to do is check the fuse. You can find out which “socket” in the mounting block the lamp circuit goes through from the repair and operating manual for your car. In many cases, the main circuits are shown graphically on the inside of the fuse box cover.
Instead of a burnt-out insert, install only a fuse of the same rating. Installing a fuse link with a higher rating may cause the vehicle to catch fire. You can familiarize yourself with all the selection rules in the article “Classification of fuses for cars.”
- Limit switch faulty.
- Open circuit (breaking off pins in connectors, chafing wires).
- Formation of oxides, corrosion at the junctions of contacts, burning of pins.
- Poor ground contact of the lights. In case of problems with the general “mass”, brake lights and turn signals may also not work. It is extremely unlikely that both bulbs stopped lighting at the same time due to contact problems in the lanterns. But a bad ground can cause the reverse gear light to not light up on only one side. Of course, in this case it is worth checking the lamp itself.
Wiring
First of all, when the low beam stops working, check the reliability of the connections in all the blocks involved in the low beam electrical circuit. Their contacts often simply oxidize and after cleaning the problem is eliminated. Sometimes also due to vibration the connectors come loose and the circuit breaks.
The contact groups need to be cleaned of oxides - a needle file or a school eraser is suitable for this. A nail file will also work (this tool will probably be found in any car lady’s purse).
The reverse light does not light up - what to do?
Home » Electrics » Reverse light does not light up - what to do 312
You noticed that the reverse lamp on your car does not light up, what to do in such cases, where to start troubleshooting.
For cars with gearbox.
- The first thing you need to do is check the fuse, it’s as easy as shelling pears, look in the manual and find the fuse that is responsible for turning on the light bulb.
- Second. If you have a manual transmission, then you need to check the connector on the reverse sensor; as a rule, it is located alone on the gearbox, not counting the speed sensor; it is located on the gearbox between the battery and the engine. We remove the connector from the sensor, see if the contacts are oxidized, bridge them with a piece of hardware with the ignition on and check whether the rear lights are on or off. If the lights come on, then change the (frog) sensor.
- The third thing you need to check is the light in the rear light, you may ask, “How is it possible, I have two reverse lights, have two bulbs burned out at once?”
Yes, such incidents also happen when two light bulbs burn out almost immediately, or, for example, the lights are installed in the trunk lid, they slammed it harder, and the filaments of half the light bulbs fell off. It is also worth paying attention to the contacts of the light bulbs; if they are oxidized, be sure to clean them, for example on the VAZ 2107 they definitely oxidize.
But of course, this rarely happens when two lamps burn out or are shaken off at once; here it is more likely to look for a malfunction of the reverse sensor, popularly called the reverse frog. This name comes from ancient times when everyone drove a VAZ, Volga and ZAZ. By the way, on the VAZ 2110, as I said, there are two reversing lights and the connector there, as a rule, is constantly oxidized. There is no particular need to repair anything, just clean the contacts and install the connector in place.
After you have checked everything and nothing, the reverse light still does not light up, the problem remains unresolved, you need to dig into the wiring, look for a break and call.
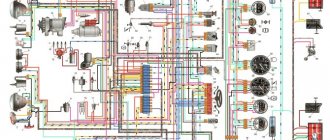
Approximate wiring diagram on a car:
- The first wire goes from the fuse box to the lamp
- The second wire from the body ground to the rear speed sensor at the gearbox
- The third wire runs from the sensor to the reverse lamp
Sometimes it happens the other way around, the rear lights are constantly on, well, it’s more likely that the sensor is jammed or the wires are frayed and shorted.
A modern car is re-equipped with various sensors that have a corresponding purpose. Some affect the operation of the engine, while others are responsible for the safe operation of the vehicle. One of these devices is the reverse light switch, better known as the reverse sensor DZH (not a scientific abbreviation) or the rear light switch. However, it is incorrect to call it a sensor, since it is an ordinary limit switch. It is an executive element responsible for turning on the lighting. Such devices are used on all cars, including Priora. If the product fails, this does not affect the operation of the engine in any way. In addition, the driver can operate the car for a long time without knowing about the malfunction of the device. We will learn in more detail why it is not recommended to drive a car with a faulty reverse light switch, as well as the design features of this device, where it is located on the Priora, and how to check and replace it.
Block in the engine compartment
The power fuse box is located in the engine compartment under the hood, near the left strut support. To get to it, you need to open the lid by prying the latch.
1 (30 A) - engine control system circuit . If there are problems with the electronic control unit, short circuits or other malfunctions, this fuse may blow out.
2 (30 A) - vehicle on-board circuit . 3 (40 A) - vehicle on-board circuit .
4 (60 A) - generator circuit.
5 (50 A) - electric power steering circuit.
6 (60 A) - generator circuit.
In case of any problems, it is important not to panic, to think soberly and logically. The most important thing is to diagnose and establish the cause of the breakdown. If you don’t have enough experience or nerves, it’s easier to sign up at the nearest car service center if it has a competent electrician.
I hope this article will help you deal with electrical problems and quickly fix any Priora malfunctions. If you have any experience or information, please leave a comment below, useful information will be added to the article.
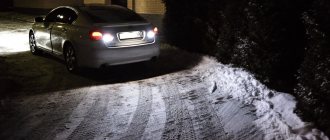
Reversing at night will be a real challenge if the car's reverse lights are not on. Let's look at why the lamps stopped burning and methods for independently searching for the root causes. Most likely, knowing how to test the reverse light switch will be the most useful skill when troubleshooting.
The purpose of the reverse light switch on a car
Many people know that when you put the car in reverse gear, the white lights in the taillights are activated. However, few people know why this is necessary. To understand the responsibility of operating a vehicle with a faulty 3D sensor, you need to understand its purpose.
Turning on the rear lights is the main purpose of the product. This need arises for a number of the following reasons:
- Warning drivers of vehicles driving behind, or pedestrians, about performing the appropriate maneuver. In this case, the driver (behind the moving vehicle) can react in a timely manner by reducing speed or avoiding the obstacle.
- The 3X sensor on the car is also needed so that when reversing, the driver sees obstacles on the way and has time to react in a timely manner.
Typically, a malfunction of the car's auxiliary control gear is detected when the driver engages reverse gear at night and notices the lack of lighting. In this case, it is necessary to determine the cause of the malfunction and be sure to promptly eliminate it.
Turn
The turn signal signal is located the highest (in relation to the hood), and to remove it you don’t even have to wrap your hand under the hood.
- Remove three screws and a self-tapping screw from the plastic cover, pry it up with a flat-head screwdriver and remove it;
- Turn the cartridge strictly counterclockwise;
- Remove the cartridge;
- It is easy to press down on the lamp and rotate it counterclockwise until it begins to fall out of the socket.
When choosing a turn signal PY21W (Voltage 21 W), you should be careful - a lamp with a similar marking - P21W - will not have orange, but colorless glass, and will not be suitable as a turn signal.
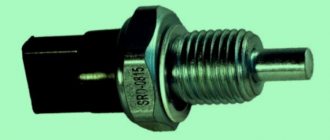
Design and principle of operation of the reverse sensor (headlight switch) on Priora
Knowing the purpose of the element in question, it is important to regularly monitor its serviceability. If the device fails, it must be replaced. It cannot be repaired, and to make sure of this, let’s look at the design and operating principle of the reverse sensor on the Priora.
The product has a simple design and consists of the following components:
- Contact pins.
- Spring.
- Contact plate.
- Frame.
- A pusher in the form of a rod.
The photo below shows a diagram of the reverse sensor.
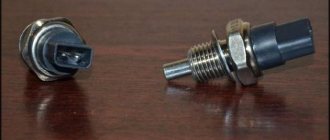
The sensor design on the Priora is almost identical, with only a slight difference in the design of the pusher. If in the diagram above the pusher consists of a ball, then the Priora uses a cylindrical rod. The photo below shows the product disassembled.
The operating principle of such a sensor is simple, but to understand it, we will use the diagram presented below.
Based on this, we’ll figure out how the rear lights come on when reverse gear is engaged. The operating principle of the sensor is as follows:
- The sensor is a limit switch, when the contacts of which are closed, power is supplied to the rear lights.
- The sensor contact receives power, which is supplied only when the ignition is turned on. Please note that the sensor is connected through a fuse, which protects the circuit from short circuits or overheating, thereby preventing the insulation from melting and the vehicle wiring from catching fire. Attention should be paid to the presence of a fuse because this element may also be the reason why the reversing lights on a Priora do not light up.
- The second contact on the sensor is the circuit that powers the tail lights (positive wire). Knowing this information, it will not be difficult to check the serviceability of the circuit.
- Having understood the diagram of the reverse sensor on the Priora and its pinout, you can begin to consider the functioning process.
- The switch works as follows: when the driver engages reverse gear, the gear shift fork rests against the protruding sensor rod. The rod pushes the contact plate, which, overcoming the force of the spring, closes the contacts inside.
- As a result, the circuit closes and the reverse lights come on. As soon as the transmission is disengaged, the contact plate returns to its original position due to the action of the spring, and the lights go out.
The operating principle of such a device is very simple and understandable, so there are no difficulties in determining the reason why the reverse lights do not work on a Priora. Most often, the cause is a sensor or switch in which the contacts wear out or the spring fails. If the DZH is faulty, it must be replaced.
Content
The low beam of the headlights does not light up, but the high beam is on - this phenomenon can be due to several reasons. And most of them are quite easy to fix. Moreover, this can happen to your car at a completely inopportune moment: on the highway, for example, when you need to switch to low beam so as not to blind oncoming drivers with headlights. Let's try to deal with all the flaws one by one, and consider: what might be the most common options for repairing and troubleshooting such an important segment as low-beam lighting.
Why the reverse lights don’t light up on a Priora: checking the 3D sensor yourself
This is often associated with the reverse sensor (light switches), but there is no need to rush to change it right away. First you need to make sure that this element is indeed faulty. There are several reasons why the reverse lights do not light up on a Priora. These include:
- Burnout of light bulbs in lanterns. It is important to make a note here, since two light bulbs cannot burn out at once. You can, of course, check the bulbs for serviceability, but in most cases, they will be suitable.
- The fuse has tripped. The power supply circuit for the rear lights is connected via a fuse. It is used in the circuit because a large current flows in the circuit, and in the event of a short circuit, the wiring may catch fire. Which fuse is responsible for the reverse circuit on a Priora? This is fuse F12 in the car interior for 10A. Below is the photo of its location. We check the serviceability of the fuse using a tester. If it is not working, then before installing a new fuse, you should determine the reason for the failure of the old one. After all, the fuse-link melted due to increased current in the circuit, which means it is possible that the supply wire is damaged, which breaks through to ground.
- The power cable is faulty. Before you begin removing and replacing the switch, you should make sure that the wiring is in good condition. The easiest way to check it is to use a jumper. Connect the contacts in the chip to each other and turn on the ignition. If the headlights do not light up, then the sensor has nothing to do with it, and the cause is a faulty circuit. Another way is to measure the voltage in the chip that connects to the sensor. One of the contacts should have 12V voltage when the ignition is on. Connect the multimeter as follows: one probe to one of the contacts of the chip, and the second to the ground of the car. Turn on the ignition. If there is no voltage, then touch the probe to another contact in the chip. If in this case there is no voltage, then it is necessary to look for the cause in the wire, since its core is damaged. Most often, the wire frays at the junction with the terminal. Inspect the wire and replace the chip if necessary.
- Faulty reverse sensor or switch. A multimeter will help you verify this. We turn on the device in the continuity or resistance measurement mode, after which we turn on the reverse gear (there is no need to turn on the ignition). If the tester produces a characteristic sound signal, it means the switch is working. We need to look for the reason elsewhere. The absence of a signal is a clear sign that the sensor needs to be replaced. If you check by measuring the resistance, then its zero value when the reverse speed is engaged indicates a sensor malfunction.
Having figured out the reasons why the reverse lights do not work on the Priora, you can resort to troubleshooting. However, first, let’s look at where the reversing light switch is located on the Priora.
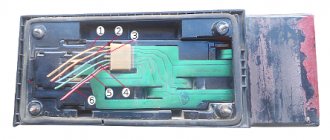
Fuse box in the passenger compartment of VAZ-2170, -2171, -2172
The fuse box in Priora is located at the bottom of the dashboard, on the left side of the steering wheel. To get to it, you need to open the cover, which is held on by three latches. Rotate each locking knob 90 degrees and pull the lid down and it will snap open.
Fuses in the interior mounting block
F1 (25 A) - radiator cooling fan . If your fan does not work, check its motor by applying 12 V directly to it from the battery. If the engine is working properly, then most likely the problem is in the wiring or connectors. Check the serviceability of relay K1.
The fan in the Priora usually turns on at a temperature of 105-110 degrees. Do not allow the engine to overheat, watch the arrow of the temperature sensor.
If the fan runs constantly and does not turn off, check the coolant temperature sensor located on the thermostat. If you remove the connector from the working sensor, the fan should turn on. Check the wiring to this temperature sensor, as well as the contacts of relay K1, move this relay, clean the contacts. If this is the case, replace it with a new relay.
F2 (25 A) - heated rear window . Check together with fuse F11 and relay K2. If the rear window does not fog up, the heating element threads may have broken. Inspect all the threads and if you find a break, seal it with special glue or varnish, which can be bought at car dealerships for 200-300 rubles. Check the connection contacts at the terminals to the heating elements at the edges of the glass, as well as the switch on the dashboard and the wiring from it to the rear window.
F3 (10 A) - high beam, right headlight . F4 (10 A) - high beam, left headlight . If the headlights do not shine on high beam, check the K7 relay and the headlight bulbs. The steering column switch, wiring or connectors may also be faulty.
F5 (10 A) - sound signal.
If the signal does not work when you press the steering wheel button, check relay K8. The signal itself is located under the radiator grille; you can get to it by removing the plastic casing from above. Check it by connecting the voltage to 12 V. If it doesn’t work, try turning the adjusting screw, or replace it with a new one.
F6 (7.5 A) - low beam, left headlight . F7 (7.5 A) - low beam, right headlight . When replacing lamps, be careful; there are separate lamps for the low and high beams, so they can be easily confused. It is better not to install lamps in high-power headlights; the reflectors may melt and the desired effect will not be achieved. Most low beam headlight problems that cannot be corrected by conventional means can be related to the light control module (LCM). The low beam relay is only available in cars equipped with a light sensor, it is located in the place of relay K1; on most cars this relay is not in the mounting block; the low beam circuit goes through the MUS block. It happens that the tracks in the block burn out; if there are problems, it is better to replace it with a new one. If the windshield wipers turn on spontaneously when the low beam is not working correctly, the problem is most likely in the windshield wiper control unit, located in the center of the dashboard, the topmost block, next to the radio, is best reached from the glove compartment, or by hand through the removed console covers at the feet.
Where is the reversing light switch (sensor) installed on the Priora?
Following the logic, you need to look for the reverse sensor on the gearbox. After all, it is when the reverse speed is turned on that it is triggered when the fork rests on the rod. Accordingly, the reverse light switch is located at the gearbox. It is located on the right side (if you are facing the car) on the gearbox housing closer to the radiator. The photo below shows where the reverse sensor is located on a Priora.
You can get to it in different ways:
- from the engine compartment - you need to remove the air filter housing, but access to the sensor will not be very convenient;
- on the left wheel side - to do this you need to remove the mudguard of the engine compartment (it is advisable to remove the wheel if you need to replace it);
- from below is the most convenient option (if there is an inspection hole), especially if the product is being replaced. To access the device, you need to remove the protection, if any.
When the location of the reverse speed sensor on the Priora is known, all that remains is to replace the product. The next section describes this procedure in detail.
How to remove and replace the rear speed sensor on a Priora: different methods
It is also necessary to know the location of the reversing light switch in order to check it. It is most convenient to check and replace the sensor from below, but subject to the presence of an inspection hole. To replace the device, you do not need to drain the engine oil, but keep in mind that after unscrewing the old product, you need to quickly install a new sensor in place to prevent large quantities of oil from leaking out of the box. After such a replacement, be sure to add oil to the gearbox to eliminate the possibility of rapid wear of the fifth gear gear.
Let's look at all the ways to replace the reverse switch on a Priora. The first method is the simplest, but requires an inspection hole. We remove the protection, if available, and, having access to the sensor, perform the following manipulations:
- Disconnect the block (power plug) from the sensor. There is no need to remove the negative terminal from the battery.
- Using the key set to “22”, we tear off the sensor mount, and then unscrew it manually.
- We quickly remove the sensor and put a new one in its place. Be sure to tighten it with a force of 28-45 Nm using a torque wrench. We connect the power supply, and do not forget to immediately add oil to the gearbox.
This completes the replacement process. The procedure takes no more than 15-20 minutes, including adding oil. Below is a detailed video of the replacement process from the inspection hole.
You can also replace the product from the engine compartment. This instruction is suitable for those who do not have the opportunity to enter the inspection pit. The video below shows how to do this correctly.
The third replacement method involves removing the engine compartment mudguard from the left wheel side. To remove the mudguard, you need to dismantle the wheel, and then unscrew all the screws.
Having gained access to the sensor, we unscrew it (preferably with a socket and a ratchet with an extension) and change it. Although doing it this way is extremely inconvenient.
After replacing, we put on the chip and add oil to the gearbox, which will still require putting the car in a pit and removing the protection.
Which reverse sensor should I install on the Priora? It is important to know that switches from Kalina, Granta and Vesta are not suitable for Priora. They have design differences, so you only need to buy sensors for Priora. Products for VAZ-2108 and VAZ-2110 cars have a similar design. The photo below shows the switch from all sides.
Pay attention to the stem, which can be plastic or metal. There is no big difference in this. The cost of the product ranges from 200 to 400 rubles, which depends on who the manufacturer is.
After replacement, we check that the reversing light is working correctly. This completes the procedure, and all that remains is to note the importance of the element in question. If a part fails and you are aware of this problem, then do not delay replacing it, because in this way you can create an emergency situation on the road and become not only a participant in an accident, but also the culprit.
To ensure safe driving of a vehicle, all its systems must work flawlessly. This rule also applies to external lighting devices.
At first glance, an insignificant element, including the reversing lights on a Priora car, is actually a very important detail. Turning on the light not only allows you to “illuminate” the area when reversing, but also indicates to all road users that there is a car on the road moving in the opposite direction.
How to choose
Having decided to replace a relay or fuse in a Priora, take full responsibility for their selection and purchase. Under no circumstances should you buy cheap parts of unknown quality and origin.
It is better to give preference to original products produced by VAZ. As a last resort, buy relays or fuses from one of the well-known companies, such as Bosh, Hella or Tesla.
Well, actually the problem was that the reverse lights did not light up. At first I took the easy route and, hoping for burnt-out light bulbs, reached into the lanterns themselves, but the bulbs turned out to be intact. I bought a sensor for turning on the reverse lights at the Iskra market, the price was 140 rubles. Remembering about the nearest overpass, I went straight to it, the price of entry for an unlimited time is 50 rubles.
Very little oil spilled out:
Having put everything back together, I checked whether the desired result was achieved:
Everything works, and as a bonus, the parking sensors are working, apparently they are powered by the reversing lights, a pleasant surprise))
Operating principle and reasons for failure
The reverse sensor of the Lada Priora is a simple design. The element consists of a housing in which spring-loaded contacts are located. When the gear is engaged for movement in the opposite direction, the electrical circuit is closed and the light is on; when turned off, the backlight goes out.
Despite the primitiveness of the design, insignificant current and the presence of contacts inside a closed housing, over time, the part wears out and can completely fail. Sometimes, a breakdown manifests itself in the form of unstable operation, that is, the lights may turn on every other time.
Burnt out light bulbs
The halogen lamps that the headlights are equipped with have two filaments. The first is responsible for the high beam, and the second for the low beam.
Read more: Replacing the hydraulic corrector for headlights on a VAZ 2114
If one of them is destroyed, the other will most likely burn normally. This is important to keep in mind when starting to troubleshoot.
Burnout is also indicated by the following circumstance - for example, there is no light in the left headlight, while the right device is working normally.
Replacing the light bulb is very easy. The procedure is as follows:
- open the hood;
- remove the headlight protection;
- disconnect the power connector;
- unfasten the fixing springs;
- take out the lamp;
- insert a new one.
It is important to remember that halogen appliances require careful handling. Traces of fat on the flask usually lead to their rapid failure - therefore, before installation, the glass surface is wiped with alcohol or acetone.
It is necessary to wear gloves when working with lamps - this will keep their surface clean.