Electric power steering is designed to make driving life easier. It helps to turn the steering wheel in a parking lot without putting much effort; in modern cars it prevents accidents and makes driving easier. It is more reliable and better than the hydraulic booster, but it still breaks down, although less often. Let's sort it out main malfunctions in the operation of the electric amplifier and how they manifest themselves in order to be prepared for repair costs.
Symptoms of EUR malfunction
The most obvious one is the warning light on the dashboard coming on. It's a steering wheel with an exclamation mark. This icon comes in two colors – yellow and red. In the first case, you can drive the car, but you need to pull out the fuse for the electric power steering to completely cut off the power. In the second case, driving is not recommended; the power steering mechanism may block the steering wheel or you will lose complete control of the steering wheel.
The second sign can be considered the appearance of “heaviness” on the steering wheel , like on a domestic “classic”. At the same time, the buzzing of the electric motor will not be heard from under the steering column in the case of Kalina and Priora. This failure is reinforced by a warning indicator on the dashboard.
Fuse blown . This is a clear sign of a serious malfunction in the electric amplifier. The cause may be problems in the electrical part - oxidized contacts, damaged wiring, short circuit. Failures in the mechanical part of the power steering can also lead to a blown fuse - jamming of the gearbox or destruction of the steering rack. This leads to increased load on the amplifier motor, and as a result, a large current flows through the fuse.
Increased car engine speed at idle can serve as an indirect sign of a breakdown of the electric power steering.
How to determine the malfunction?
Despite the fact that repairing the EUR requires contacting a car service, you can detect the first symptoms of a malfunction yourself
Viburnums on the front panel have a special yellow indicator, which, in the event of a breakdown of the electric amplifier, lights up and reports an error in the system. If it lights up, it means you have another reason to visit the nearest auto repair shop. But it’s immediately worth noting that the yellow indicator does not indicate a critical malfunction, but only signals the occurrence of a problem that allows you to drive the car, but without the participation of the ESD.
If the electric power steering has completely failed, it is better to stop immediately and pull out its fuses.
. In Kalina they are located on the left side of the steering wheel. Theoretically, in case of malfunctions, the EUR should turn off on its own. However, it doesn’t happen once at a time. Therefore, to be sure, it is still worth taking care of the fuses.
Where to look for the reason
Electrical problems may occur due to oxidized connector contacts. The ingress of moisture and dirt impairs the conductivity of the contacts, and as a result, errors in the operation of the EUR.
Failures in the electronics may be due to loss of signal from the torque sensor. For example, on domestic cars the contacts are poorly soldered. Over time, they “go away”, and problems with the electric booster begin. It is enough to clean them and solder them well and the problem will disappear. If the speed sensor does not work, the EUR will generate an error and refuse to work.
Fuse . Even if it looks intact, you need to examine it carefully. There were cases when the amplifier turned off and generated error 1058 “Engine, phase windings shorted” (relevant for VAZ models) due to burnt fuse contacts. Cleaning the contact surfaces or replacing the fuse eliminated the malfunction of the electric amplifier.
The reason for the failure of the amplifier may be in the mechanical part. This applies to the gearbox and steering rack. The first one may jam due to water and dirt getting into the planetary gears or their physical destruction - read “Design and principle of operation of the electric power steering.”
Damage to the rack boots leads to water, dust and dirt getting inside. This destroys the rack from the inside, the bearings are damaged, and the steering mechanism jams. There were cases when the ridges were licked onto the slats, the “worm” of the shaft rotated, and the connection between the car’s wheels and the steering wheel was lost.
What malfunctions exist in the Priora electric amplifier?
And again the same list, mechanics, electrical, electronics. Well, everything is clear with mechanics, this is a failure of shafts, connections and fittings. With this malfunction, the wheels simply will not respond to the steering wheel turning. And this problem is easiest to fix. But with other faults it is much more complicated.
If the malfunctions are related to the failure of the servomotor, amplifier, or Priora itself, there is no point in thinking about repairs. It’s easier to buy a new EUR at the store and replace it yourself. Or take it to a service center and try to repair it there. If the connection with the Priora ESD ECU is lost, then this is most likely the second connector, with a trail of wires, the same is true if the unit does not receive a signal from external sensors - the crankshaft and camshaft. Yes, yes, they are also important for the operation of the device. In these cases, an inexpensive bundle of wires can be removed and repaired, or replaced.
What remains is the “brain” of the electric amplifier, and the internal position sensors of the unit’s shafts. Messing with sensors is not an option, only repair service. But the computer itself, if it malfunctions, you can buy and replace yourself.
How to check the EUR yourself
To understand what is broken in the amplifier, you need to diagnose it. Not every car owner has a diagnostic scanner; some people like to repair the car themselves. In this case, you can determine the malfunction of the electric amplifier yourself using a paper clip. This option is suitable for Kalina and Priora cars.
"Paperclip" method
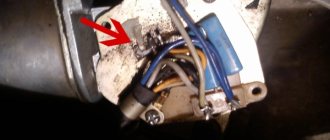
We disassemble the protective cover of the steering column and get to the amplifier control unit. We find a black block with six wires. It is necessary to close contacts 7 and 6 between each other - “ground” and “K-line”. If you look at the block from the side of the wires, then the countdown goes from right to left, from top to bottom. You need a brown wire - contact number 7 and an empty socket, not used - number 6 in a row.
Turn off the ignition, insert a paper clip into the contacts, make sure that it does not short-circuit the other wires. Turn on the ignition and count the number of flashes of the warning light on the dashboard. One long signal, and then several short ones, these are the ones that need to be counted. Let's look at the decoding of fault codes for Kalina's electric booster :
In practice, this method may not always show real breakdowns. In this method, the control unit checks itself, and it needs to be checked under load. There were cases when it generated false errors, and the fault was hidden in the electric power steering ECU.
About qualified electric amplifier replacement
If there is a need to replace the mechanism when the ESD does not work, we recommend contacting experienced technicians. When the car is under warranty, the most rational measure would be to contact the dealer network to resolve the problem.
There are situations that do not allow you to resort to these two methods of eliminating an amplifier malfunction. Then the only solution will be to manually replace the mechanism that has become unusable.
Let us immediately make a reservation that the replacement process if the EUR does not work is characterized by sufficient complexity. To carry it out successfully, you will need experience and the possession of special tools. Unqualified replacement actions can aggravate the scale of the breakdown, which will entail a significant waste of money on more expensive repairs in service conditions.
Before the actual replacement procedure, we recommend that you carefully study the entire list of features and actions if the ESD does not work. Here you will need to delve into the connection diagram of the unit, which will avoid damage to the electrical components of the mechanism.
To remove the amplifier, partial disassembly of the front panel of the Lada Kalina is necessary. After this, the device itself must be disconnected from the entire list of supply wires. Sometimes owners repair the electric power steering, avoiding the need to replace it with a new unit. As a rule, after a complex of restoration work, standard devices work no worse than their new counterparts.
A common malfunction is the occurrence of a knock that clearly comes to the driver from under the panel or the amplifier turns off. This phenomenon may be accompanied by a characteristic squeak that occurs during rotational actions with the LADA Kalina steering wheel. This situation is usually solved by using a special lubricant. If such an action does not bring the expected result, then a more detailed diagnosis of the amplification mechanism will be required.
To install the electric power steering in the seat of the Lada Kalina, you will need to be attentive and patient. All cable connectors must be tightly seated, and the device itself must be firmly secured. Only after this can you proceed to the reassembly of the previously dismantled front panel components.
Electric power steering Kalina significantly simplifies the car's movement and makes its operation enjoyable. Lada Kalina appeared on the modern automobile market not so long ago, but has already become widely known and has gained enormous popularity among the population.
This fact is due to the practicality of this machine and its convenience. In addition, the cost of such a brand sets it apart from other cars. This effect was achieved thanks to the presence of many additional parts included in the design of the machine, which not only simplify the use of the machine, but also make this process more comfortable.
What malfunctions threaten the EUR on Kalina and what are the ways to eliminate them?
Electric power steering is a component used to provide more comfortable driving. Not so long ago, domestically produced cars began to be equipped with EUR, in particular, in this article we will talk about Lada Kalinas. What malfunctions can occur with the Kalina EUR and what troubleshooting methods are there? Find answers to these and other questions below.
Repairing the EUR on-board computer
As for the “brain” and internal sensors, the procedure is as follows: to fix broken sensors, it is better to go to a service station, but you can change the computer at home. Tools that need to be used to work with the equipment:
- socket wrench 8;
- socket wrench 13;
- shaped screwdriver.
It is necessary to first remove the steering wheel.
How to repair the electric power steering of a Priora? Initially, the linings located on the steering column are removed. To do this, just unscrew the two screws and unfasten the 2 latches. The second step is to unscrew the bolts, there should be four of them. After this, with a slight movement, the lower part of the lining is separated, and all wires are disconnected. This can be done as follows: press the connectors on the antennae. You can loosen the clamp using a size 8 wrench. Afterwards, two connectors are disconnected from the EUR ECU - this allows you to remove the trim located there.
The nuts located at the bottom do not need to be completely unscrewed; just turn them using a socket wrench. The next step is to get the Priora EUR. If you cannot repair the device at home, contact a specialist. If the operations are performed correctly and there are no results, components may need to be replaced.
Causes of EUR failure
Why does the electric power steering on the Lada Kalina not work, turns off and refuses to work, what are the signs of a steering wheel with power steering knocking, jamming, biting or squeaking? To repair the system yourself, you need to know how diagnostics are carried out and what causes precede the breakdown. Most often, the failure of the amplifier is caused by a breakdown of the unit itself and the amplifier fails. Problems of this type are resolved by thoroughly checking the system to identify the exact problem.
As practice shows, often the inoperability of the electric amplifier (failure) is associated with a breakdown of the speed controller.
Because the speed controller sensor ensures activation and deactivation of the electric power steering under different driving modes. The amplifier on Kalina works if the car is moving at low speed. When the speed begins to increase, the booster automatically turns off, allowing for safer machine control when driving at high speeds.
So, briefly about the reasons for the inoperability of the EUR:
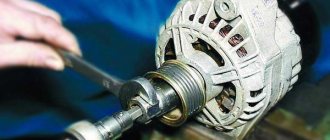
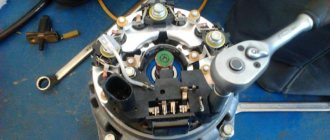
Dismantling and disassembling the electric amplifier
Before removing the amplifier, you need to remove all the steering column switches. Remove the steering rack cover and dismantle the devices, remembering to disconnect the connectors from the power supply.
How to remove the EUR with your own hands:
- After removing the switches, you will need to dismantle the lower cross member of the dashboard. To do this, you need to press the fasteners that secure the connector with wires, and then disconnect the wiring from the control module. Once these steps are completed, you can disconnect the connector from the switches.
- The system bracket is secured with nuts; you will need to unscrew them with a wrench.
- After this, the steering rack will need to be carefully lowered down. To do this, you will need to find the bolt that secures the driveshaft to the booster shaft. This bolt must be unscrewed, but when unscrewing, you will need to fix the nut, this will prevent it from turning. When the bolt is removed, the fastening will need to be loosened, after which the intermediate shaft will be carefully removed. At this stage, we recommend marking the position of the shaft and gears; you can use a marker for this. This step is very important because doing it will prevent possible installation problems in the future. If the marks on the shafts do not match, this may cause problems with the amplifier. When dismantling, be careful not to damage the wiring, as this will also lead to the inoperability of the ESD.
- When the unit is dismantled, it will need to be disassembled and the failed elements replaced. Further editing is done in reverse order (the author of the video is Murzik Bely).
Diagnostics
To check the amplifier in a car, you need to remove the plastic trim on the steering column; to do this, unscrew the bolts securing it from the bottom.
Then you will need to get to the 8-pin plug, its pinout is as follows:
More accurate results will be obtained by checking the amplifier using a scanner. But since such equipment can usually only be found at service stations, you can try to check the operation of the system with a paper clip.
To check you need to do the following:
How to understand where to look for the cause by the blinking indicator icons:
Error codes
c1044 - incorrect sequence of the rotor position sensor (RPS)
c1621 - incorrect voltage 5V
c1622 - speed signal circuit failure
c1011 - car engine speed signal circuit, no signal - the signal from the idle sensor (or the standard tachometer through a voltage limiter) is divided by 4 and applied to the tachometer input,
c1022 - error, voltage of the main output of the torque sensor - it is possible that the shaft cover has rubbed the insulation and the middle, green wire shorts to ground
Downloading a book
After successfully completing the payment (by any method) and returning to the KrutilVertel store from the payment system website, you will be taken to the successful payment page:
On this page you need to indicate your e-mail, where access to download the book will be sent.
If you are already registered on our website, then simply follow the link to your personal account.
The book you purchased will be in your personal account, from where you can always download it.
Please note that after making the payment, you need to return back from the payment system website to the KrutilVertel website.
If for some reason you did not return back to the site and closed the payment system tab with a message about the successful completion of the payment, please let us know - we will send you a letter indicating access to download the book.
How to tighten the electric power steering rack?
The appearance of a knocking sound in the operation of the electric power steering is associated with the need to tighten the steering rack.
How to do it right:
Photo gallery “Adjusting the steering rack”
Electric power steering connection diagram with icons
LADA KALINA (VAZ 1118) - electric power steering diagram
One of the new products of the Russian automobile industry, the Lada Kalina, became the first domestic car equipped with EMURU - electromechanical power steering. How does Kalina electric power steering work? A separate large article will be devoted to the answer to this question. We will only note that as the speed the car picks up increases, the compensating torque of the electric power steering gradually decreases, and when it reaches 60 km/h it turns off automatically. At first, this part was not completely “finished” and had one dangerous property - it could turn off while the car was moving, regardless of its speed limit. It should be noted that today all these problems are a thing of the past. Let us add that the electric amplifier can be completely turned off by removing one of its fuses. True, the steering will become even “heavier” than on the “ten” or “fourteenth”.
The EMURU device operates from the vehicle’s on-board electrical network with a voltage of 10.8 to 15V.
Diagnostics using third-party devices
For a more detailed check of the vehicle's performance, scanners and computers are used. They are connected to the diagnostic electrical connector (socket) located on the standard panel. Malfunctions are issued in the form of a standard set of alphanumeric codes, consisting of one letter and four numeric designations. The letter indicates specific nodes in which the malfunction occurred.
B - detects problems with electronics inside the cabin;
C - indicates defects in the chassis design;
P - errors in the engine control module or transmission;
U - loss of communication between electronic modules.
The letter designation is followed by four characters:
- the first character indicates a standard code established by engineers at the Automobile Association;
- the second character records personal codes set by manufacturers;
- the third character indicates which system the malfunction occurred in:
1-2 - in the fuel and air system;
- in the ignition system;
- in a secondary emission control system;
- in the speed control controls or when the load is off (XX);
- on-board computer system and wiring;
7-8 - errors in the operation of the gearbox;
9.0 - reserve;
the fourth and fifth symbols are considered together to more accurately locate the point of failure.
Location of contacts on the blocks
Block X1: 1. “Plus” from the battery (12V); 2. “Minus” from the battery. Block X2: 1. Ignition switch (“plus” from the terminal); 2. Signal input (tachometer); 3. Signal input (speed sensor); 4. Output (EMURU status indicator); 5. K-line output (diagnostic block); 6. L-line output (free); 7. General (mass); 8. Technological output (free). Block X3: motor phases: A. (1 and 2) – phase A; B. (1 and 2) – B; C. (1 and 2) – C. Block X4: torque sensor ESD “Kalina”: 1. Common wire 1; 2. General 2; 3. Power contact; 4. Output 1; 5. Output 2; 6. Frequency signal input terminal. Block X5: rotor position sensor: 1. General; 2. Phase A output; 3. Phase B output; 4. Phase C output; 5. Power (+ 5V). The electromechanical power steering installed on the Kalina can operate in the following modes: • Self-test • Compensation • Failure • Ready
Error codes for EMURU "Lada Kalina"
So, we have studied the general circuit of the Lada Kalina electric power steering; now we will consider possible digital error codes and briefly describe their meaning. Note that equipment can be diagnosed using a DST-2M scanner with an installed VAZ-IZH cartridge or MT-10 software.
• C1000 – no error detected. • C1011 – no signal (engine speed circuit). • C1012 – no signal (speed sensor circuit). • C1013 – the voltage in the on-board network has dropped. • C1014 – the voltage at the ignition switch has dropped. Torque sensor: • C1021 – voltage (main output). • C1022 – voltage (control pin). • C1023 – incorrect output signal. • C1024 – no signal. Steering shaft position sensor: • C1031 – circuit malfunction (main signal). • C1032 – circuit malfunction (control signal). • C1033 – lack of power. Engine rotor position sensor: • C1041 – phase A circuit – malfunction. • C1042 – phase B circuit – malfunction. • C1043 – phase C circuit – malfunction. • C1044 – incorrect sequence. • C1045 – lack of power. Power circuits: • C1050 – short to ground. Motor, overcurrent: • C1051 – phase winding A. • C1052 – B. • C1053 – C. Broken phase windings: • C1054 – broken windings. • C1055 – winding A. • C1056 – B. • C1057 – C. Closing of phase windings: • C1058 – closing of windings. • S1059 – winding of phase A. • S1060 – B. • S1061 – C. • S1070 – unidentified. ECU - electronic control unit: • C1071 - RAM error. • C1072 – ROM error. • C1073 – EEPROM error. • C1074 – block relay. • C1075 – the radiator temperature is exceeded. • C1076 – ECU supply voltage. • C1077 – voltage for power capacitors. • C1078 – capacitor charging time. • C1079 – excess current in one of the windings. • C1080 – breakdown of the power transistor. Currently, DST-2M scanners are no longer produced; their place has been taken by more modern and advanced devices of the DST-12 model. With this equipment, you can diagnose not only faults in the Lada Kalina electric power steering. The DST-12 scanner is universal; it is used to service many cars - both those manufactured by AvtoVAZ and models from other manufacturers.
Unpredictable steering behavior
The driver is driving on a flat road, the position of the steering wheel does not change, and suddenly the car turns to the side. Such unpredictable behavior of the power steering requires urgent diagnosis, since at the most inopportune moment the electric power steering of the Lada Priora can send the car to the side of the road or into the oncoming lane.
To remove this fuse, you need to do the following:
- The mounting block cover is located at the driver’s left foot;
- We turn the clamps and unclip the fasteners;
- You will find the block where the required fuse is located near the expansion tank;
- Feel free to take out fuse F5 (50 A) - it is responsible for providing the power supply circuit to the power steering unit.
The reason for this behavior is a malfunction in the electric amplifier device. This could be a torque sensor, control unit, clogged contacts or mechanical damage. It is recommended that diagnostics be carried out by professionals, since in a garage you will not be able to check the control unit; replacement can be done with your own hands.
Diagnostics of EMURU without a scanner
In the absence of a scanning device, fault codes for the electric power steering can be read using the “paperclip” method. To do this, you will need to perform the following steps: 1. Turn off the ignition; 2. Close contacts No. 6 and 7 at the 8-pin connector of the control unit (control unit), which is located next to the power connector. 3. Turn on the ignition. You will be able to “read” the codes by the flashing diagnostic light. Which contacts need to be closed? Look at the control unit connector from the wire side (we remind you that it is 8-pin, black). We consider the first contact to be the one located at the top right and count from right to left: 1. Ignition switch (+12V) – blue. 2. Tachometer – red-brown. 3. Car speed – gray. 4. EMURU control lamp – white and pink. 5. K-line – black and yellow. 6. L-line – empty contact. 7. Mass – brown. 8. Empty contact. If you are planning to independently repair the Lada Kalina electric power steering, you need to remember, or better yet, write down the following data: Light code parameters (temporary): 1. Initial pause - duration 2 seconds; 2. Long signal – 2 seconds; 3. Short signal – 0.5 sec; 4. Pause between signals – 0.5 seconds; 5. Pause between codes – 2 seconds. Decoding the light code of faults: 1. “11” - the system is working; 2. “12” - there is no engine speed signal; 3. “13” - torque sensor; 4. “14” - EMUR engine; 5. “15” — sensor PRV (steering shaft position); 6. “16”—PRD sensor (engine rotor position); 7. “17” — on-board network; 8. “18” - control unit; 9. “19” - vehicle speed sensor. That's all the basic information you need to know on this issue. We hope that you understand - if the electric power steering of the Lada Kalina does not work, there is no need to panic and run to a car repair shop; repairing the device is quite possible even for a non-professional. We are confident that this information will provide you with significant assistance in operating and maintaining your vehicle.
cimg5837-300×225.jpg
After the necessary repair of the electric power steering or its replacement, it is necessary to assemble the steering column, which is done in the reverse order. First, we install the lower hinge on the gear shaft and connect the steering column shaft to the intermediate driveshaft.
Next, remove the nut and bolt that tightens the intermediate shaft, and separate the upper and lower hinges. After installing the lower hinge in place, turn the steering shaft until the bolt hole in the upper hinge and the lower part of the shaft coincide.
We connect the hinges and tighten them together using a bolt. We connect the tire and wire blocks to the fasteners, and then install all the removed elements: steering column switches, ignition switch, and lastly, install the steering wheel cover and panels.
Thus, you can change the non-working electric power steering unit of the Lada Kalina yourself without any particular difficulties in a garage or auto repair shop. This will make driving more comfortable.