If the gearbox on the Kalina leaks, it needs to be repaired urgently. The longer the car drives with such a malfunction, the more expensive subsequent repairs will be, and in especially severe cases the unit will have to be completely replaced. After all, any leak means a loss of lubrication, which means an increase in friction of the contacting parts, which leads to accelerated wear and sharply increases the likelihood of jamming of individual gears or the entire transmission. If this happens while driving, then there is a very high probability of getting into a serious accident, so such a malfunction must be promptly corrected.
How to detect a leak
The first sign indicating that the transmission on the Kalina has leaked is oil stains under the car. They are especially visible on any hard surface, and during rain they appear as rainbow stains on the water. Having discovered such a symptom, drive the car onto a pit or a lift and carefully inspect its bottom in the area of the engine and gearbox, because many defects in the engine or fuel system give the same manifestation. Remember, the Kalina transmission leaks only if there is a reason for it, that is, there is serious damage.
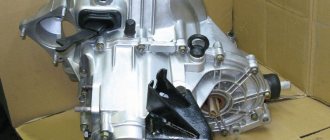
Gearbox for Lada Kalina
Next, follow the following procedure:
- Using a 10mm wrench, unscrew all the bolts of the protection and remove it. It is better to perform this operation with an assistant, because the protection is quite large and it is difficult to remove it alone. In addition, if the problem is in the gearbox or engine, then the protection will be covered with a layer of oil, which will further complicate its dismantling, because it is difficult to hold a large steel sheet of complex shape if your fingers slide along it due to oil.
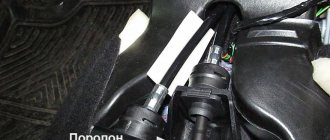
- Inspect the engine and transmission to determine the location of the leak, use a flashlight, because there is not too much light under the car, and everything is covered with a mixture of dirt and oil. In most cases, the upper edge of the oil trace is at the site of the leak, but if the drive shaft seals are leaking, then the oil traces may even be above them.
Oil leakage in the seal area at the Kalina gearbox
Don't forget to check the condition of the grenade suspension and boots, because even minor damage to them can lead to serious problems.
Replacing the outer CV joint
In the process of replacing the outer CV joint
The work of replacing an outer or inner CV joint is not very difficult and can be done by any motorist who has at least once repaired a car with his own hands. And in order for the repair to be easier and faster, you need to prepare the following tools:
- Socket heads for “17” and “30”.
- Driver or ratchet.
- Extension for the wrench.
- Jack.
- Wheel chocks.
- Hammer.
- Vise.
Step-by-step disassembly procedure
After you are convinced of the malfunction of one or another CV joint, you can begin to work.
- First of all, we tear off the mounting bolts from the wheel and the hub nut, then we set the wheel chocks under the rear wheels. (To make it easier to tear off the nuts, it is better to use an extension for the wrench - approx.).
- We put the car on a jack and hang the wheel.
- We remove the wheel and, for greater reliability, place it under the car next to the jack.
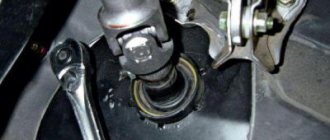
- Now that this picture appears before you, all that remains is to unscrew the 2 bolts that secure the ball joint to the steering knuckle.
Unscrew the bolts marked with a red marker on both sides.
CV joint VAZ. Lada grenade. Comparison of different manufacturers
They counterfeit everything related to the AvtoVAZ assembly line. Any part purchased at a car store can be a counterfeit...
BEWARE OF FAKE! CV joint LADA Image. features
CV Joint Review
(grenades) for VAZ 2108-2115.
Without causing strong blows, the CV joint will move out of place
If the internal CV joint is supposed to be replaced, then work 1 to 6 should be performed as well, after which, using a pry bar, we remove it from the gearbox and take out the entire assembly.
We take the inner CV joint assembled with the axle shaft to a vice where we clamp it and dismantle it.
- After the “bare” axle shaft appeared before us, the work on removing the CV joint can be considered completed.
Step-by-step assembly procedure
Work on assembling all parts should be carried out in the same order as removal, however, there are some nuances in these works.
- First of all, we put the new boot on the axle shaft; this may cause some difficulties. To make the task easier, the axle shaft can be coated with lubricant.
- Then add lubricant to the CV joint.
New lubricant added to CV joint
All work on changing the CV joint, if the work is carried out correctly, will not take more than 1.5-2 hours. You can check the quality of the work performed immediately after the repair. If you start driving with the wheels turned to the side and there is no crackling, squeaking or noise, it means that the repair was carried out correctly and the car can be safely operated further.
Most likely causes of leakage
The most common cause of lubricant leakage is defects:
- oil seals;
- gaskets;
- housings.
It is not difficult to identify a seal defect; there is oil leakage only around it or under it. If the problem is in the gasket, then traces of transmission fluid will go along the junction of the body parts of the unit. If the bottom of the unit is covered with an oil-mud mixture, but everything is clean on the sides and top, most likely the problem is a crack in the housing. Below we will talk about each of the reasons in more detail.
Damage to the drive shaft seal
This defect occurs on all types of gearboxes, including AMT and automatic transmission. If the Kalina gearbox drive seal is leaking, then the main sign of such a defect is the dirty surface of the box around the drive included in it (constant velocity joint), and the mixture of dirt and soil will be not only from below, but also from above. The cause of this defect is:
- aggressive driving with frequent sharp accelerations and accelerations;
- the service life of the oil seal is too long (it is advisable to change them every 3 years);
- poor quality or incorrectly installed oil seal;
- custom grenade;
- Damage to the constant velocity joint shaft.
Transmission oil leaking from the shaft block
To determine the exact cause, you need to wash the box from accumulated dirt, then pull out the drive shaft. If the oil flows in a thin stream, it means that the level has not been exceeded, so carefully inspect the surface of the grenade shaft and also run your finger along it. Any scratch indicates that the part needs to be replaced, because even the best seal will not be able to effectively hold oil if there are burrs, scratches or other defects on the shaft.
Measure the thickness of the grenade shaft in the area of the oil seal; it should be exactly 35 mm; if the shaft is larger or smaller, it will be impossible to eliminate the leak in the Kalina gearbox. A larger shaft will quickly destroy the seal, and a thin one will not provide the required tightness, so the CV joint, as well as the seal, will have to be replaced.
Pull the seal out of its seat and turn it back towards you. There is an arrow showing the correct direction of shaft rotation. If it does not correspond to the actual direction, it means that during installation at least one of the seals was reversed.
Having established the cause, replace the defective part, then add a little oil and after 10–50 km check whether the oil leaks have disappeared. If there are no new drips, it means you did everything correctly, otherwise you need to check everything again and then carefully inspect the seal seat. Its defect is extremely rare, but sometimes occurs. If there are cracks or scratches on the seat, then the manual transmission housing needs to be repaired or replaced.
Damage to the gear selector shaft seal
This defect occurs only on rocker boxes, because their gear selection rod is located at the bottom, while on cable transmissions this mechanism is placed at the top and is located above the oil level, and there is neither a rod nor its seal. Externally, this defect is very similar to a leak in the left grenade seal, so the defect can only be accurately determined by washing the box and removing the problematic part. To remove this seal, you will have to disconnect the torque rod from the rod and also remove the boot. If this is the problem, then there will be traces of oil under the boot.
Damaged rod seal
The main difference between this part and other sealing elements is that between it and the gearbox seat there is also a cylindrical tin body, which is sealed with sealant from the factory. If the seal is even slightly smaller than it should be, the tin housing will not be able to hold it effectively and shifting gears will cause the rubber piece to move out of place. Considering the low quality of spare parts and the frequent difference in size, such a defect is quite common and is familiar to all owners of cars on which boxes of this type are installed, that is, from 2108 to Vesta.
Sometimes even a serviceable seal leaves its place and comes out of it after the rod when the second or fourth gear is engaged, this is caused by the difference in the sizes of the seal and the tin body.
Oil leak in Kalina gearbox
There are several ways to deal with this defect:
- selecting the largest seal that will fit securely in the tin casing;
- placing the seal on the sealant;
- by punching the tin body so that the rubber sealing element does not move after the rod;
- installing two seals one after the other.
In addition, you need to check the rod and seat in the gearbox. If the Kalina box still leaks, it is necessary to disassemble the unit for serious repairs.
Damage to the input shaft seal
This defect occurs on mechanical transmissions and is manifested by an oil leak between the gearbox housing and the tin protective plate covering the flywheel. The danger of the defect is that if the gearbox leaks on a Lada Kalina car, due to which oil gets onto the clutch, you will have to change not only the cheap seal, but also the rather expensive friction (driven) disc.
Friction disc for Lada Kalina
If you find even a small leak in this place, drive the car onto a pit, overpass or lift (you can use jacks or even one jack, but this is not very convenient and requires increased safety measures), then remove the gearbox. It is impossible to change this part without removing the manual transmission, but dismantling this unit will allow you to check the clutch and flywheel ring.
To get to the seal, remove the fork and clutch release bearing. If you can’t pull out the rubber product, carefully screw a couple of screws into it and pull it out by pulling them. At the same time, check the condition of the input shaft: if it has defects, then replacing the seal will not help, the box will still leak, so serious repairs will have to be carried out.
Damage to the input shaft oil seal is also possible on AMT, but a specialist must diagnose and fix the problem.
Damage to gaskets
Not all Lada Kalina transmissions have gaskets; often the same gearbox model is found with gaskets or sealant that perform the same function. Under normal conditions, neither gaskets nor sealant ever leak, so there are only two cases where the transmission will leak:
- loosening bolts;
- mechanical damage to the body parts of the box.
The perimeter of the gearbox unit without a sealing gasket, traces of oil are visible
In the first case, it is enough to tighten the corresponding bolts, after which the leak will stop; in the second case, the unit requires serious repairs. It also sometimes helps to seal the leak with a sealant; to do this, wash and thoroughly degrease the problem area, then rub a good sealant into it. This measure is not a full-fledged repair, so do not delay the normal diagnosis of the box by a good specialist, who will then be trusted to fix it.
Hull damage
Impacts against various obstacles, as well as frequent acceleration in maximum power mode, lead to damage to body parts, causing cracks or holes to appear in them. To determine such a malfunction, wash the unit and carefully inspect it in good lighting. If there is a small crack that does not reach the mating plane of the box, then it can be temporarily repaired by cold welding or contact an argon welder to weld it. If the crack reaches the edge, then there is no point in welding the part; it will still not be able to withstand the necessary loads.
Depressurization of the cover due to wear of the seals or cracks
If there is a breakdown in the housing from an impact with an obstacle, then the hole can be sealed with argon welding, but after such repairs you will have to avoid sudden accelerations at maximum or even high power, because the strength of the housing part will be noticeably lower.
Signs of CV joint failure
The first signs of a faulty grenade are crunching sounds in the area of the front wheel on turned out wheels when starting to move. When the fault is severe, noise appears at less significant loads.
The anther begins to crawl
In order to prevent such damage in advance, you should periodically inspect the anthers from the outside for cracks and integrity in general.
What happens if you don't fix the leak?
A small leak from the drive shaft seals does not affect the operation of the internal gearbox mechanism, but other types of leakage pose a serious threat to the gearbox or clutch. Indeed, because of them, the level of transmission fluid may fall below a critical level, after which the wear of parts will sharply increase, because they are made of soft metal, and the thickness of the durable layer is a fraction of a mm. In addition, serious leaks are also a gateway for dirt, which, once in the oil, will turn it into an abrasive substance, and this unit will not last long. If the gearbox on your Kalina leaks, you should not take it lightly; the result could be the loss of several tens of thousands of rubles.
Assembly
When the old element is disassembled, it's time to prepare the new one for installation. Please note that when installing the CV joint, the boot of the Kalina “grenade” is also replaced. It is strictly forbidden to use the old one, even if it is intact. The element has already undergone wear and tear, and the clamps will not provide the same tightening.
Gearbox device
General view of the gearbox
Before proceeding directly to the process of replacing the oil seal, it is necessary to consider the structure of one of the main elements of the car - the gearbox. So, what parts does the unit consist of:
Gearbox: 1 – clutch release bearing; 2 – guide sleeve; 3 – input shaft; 4 – roller bearing of the secondary shaft; 5 – secondary shaft; 6 – retaining ring; 7 – satellite axis; 8 – speedometer drive drive gear; 9 – transport plug; 10 – wheel drive oil seal; 11 – tapered roller bearing of the differential; 12 – axle gear; 13 – satellite; 14 – differential box; 15 – clutch housing; 16 – driven gear of the main gear; 17 – drain plug; 18 – adjusting ring; 19 – driven gear of the 1st gear of the secondary shaft; 20 – synchronizer for 1st and 2nd gears; 21 – driven gear of the second gear of the secondary shaft; 22 – retaining ring; 23 – persistent half ring; 24 – driven gear of the third gear of the secondary shaft; 25 – synchronizer for 3rd and 4th gears; 26 – driven gear of the fourth gear of the secondary shaft; 27 – needle bearing of the secondary shaft gears; 28 – ball bearing of the secondary shaft; 29 – thrust plate; 30 – driven gear V of the secondary shaft transmission; 31 – 5th gear synchronizer assembly; 32 – nut; 33 – thrust washer; 34 – drive gear V of the input shaft; 35 – rear cover of the gearbox housing; 36 – ball bearing of the input shaft; 37 – gearbox housing; 38 – roller bearing of the input shaft; 39 – breather; 40 – input shaft oil seal
Oil seal replacement process
When the design, as well as the principle of operation of the gearbox, has become clear, you can move on to the process of replacing the gearbox drive oil seal. So. Let's look at the step-by-step process:
Part selection
– original catalog number of the gear selector oil seal manufactured by AvtoVAZ. The average cost of a spare part is up to 50
rubles
Backstage oil seal of different prices
Alternative oil seals must be selected according to markings, or rather according to size in automotive stores.
The cost of such a product will not differ significantly from the original. So the quality of such products is approximately the same.
Reasons for failure
Now that the issues of replacement and product selection have been considered, we can study the issue of the causes of failure.
Box drive oil seal and the drive itself
So, let's look at what affects the condition of the oil seal:
What to do if replacing the oil seal does not stop the oil leak?
In this case, the shaft in the satellites is faulty. Because of this, there will be a backlash in the grenade.
Which oil seal is better to install?
When replacing a gearbox seal on a Kalina, there are 2 choices of this product: regular and reinforced.
A regular seal is made twice as thin as a reinforced one, so the risk of it failing earlier is high. A reinforced one will last longer, and the risk of damaging it mechanically is low.
Many craftsmen manage to press two reinforced seals into the bushing, which provides greater reliability and protection against recurrent leaks. But you should press extremely carefully so as not to damage the bushing, which is made of soft material.
The price for a reinforced cuff does not exceed 200 rubles. The cost is low, but the part can save the car owner from expensive repairs. Therefore, at the slightest appearance of leaks in the area of the gearbox, it should be eliminated immediately.
Source
Lada Kalina hatchback Amphetamine™ › Logbook › Gearbox: Changing the gear selector rod oil seal
Through long and complex research in a top-secret laboratory, it turned out that the gear selection oil seal (the “rocker” oil seal) had given in... and the transmission quietly, little by little, but constantly, went into protection and then into the ground. “Looking into tomorrow” it became clear that this cannot continue for long, it is necessary to change:
Unscrew the rod and the rocker...:
...and the first surprise - having pulled the boot a little away from the gearbox housing, oil rushed out of it, probably 200-300 grams just leaked out:
It’s good that the substrate was laid in advance, otherwise they would have added a link and a cardan for 3.14):
Because The oil was almost all gone, and the boot was getting in the way a lot, so I threw it away:
Next it was necessary to unscrew and remove the cardan:
And the **** there)), still can’t get to it. In the end, somehow (I didn’t understand how) I turned it a little with the cap, then completely unscrewed it and removed the cardan:
Then the only thing left to do is to knock out (carefully) the “bucket” from the gearbox, in which this unfortunate oil seal is located. As it turned out, there was no oil seal in it... it was on the gearbox rod, that is, it was stupidly knocked out of its seat... so and such rivers of oil flowed.
Before all this crap, on the advice of KalinAklubnikov, I bought not one oil seal, but two: Kalinovsky and eight-wheel:
And the duster is also unforgotten:
I did not shorten the springs on the seals, because... if I had gone to remove them, I would definitely have messed up and torn them, from experience, it was...nah, I don’t want to)). I just carefully pressed the Kalinovsky one in first, and then pressed it down with an eight-piece... in size they are just like:
Sealant on the “buckle” from the outside and put everything in the reverse order, replenishing the loss of oil from the gearbox. Nothing complicated, though there is one point: adjusting the rocker so that the speeds turn on normally. Before removing it, someone puts a mark on the driveshaft, and then follows it puts on the drawstring, I completely missed this point, I didn’t put marks, I did it according to the ABC book: when putting the drawstring on the cardan, you need to leave a 13-15 mm gap between them. I didn’t climb there with a ruler, I just measured 1.5 cm using a match and set it up like this...well, you understand, in general, who regulated it)):
But no, not everything, I don’t remember, someone was wondering why the block below was covered in oil. Answer: dry crankcase gas hoses and a rubber seal on the dipstick. 1.5 or 2 years ago I changed everything, this is how it is at the moment, relatively clean:
What is the difference between a cable manual transmission and an ordinary viburnum?
What is this? Is the seal leaking? He's darling!
Jacked it up and removed the front left wheel:
I drained the oil from the box into a basin:
I hung them on a rope) They shouldn’t be hanging from the brake hoses! :
Unscrewed the ball joint from the hub:
We place a thick beam under the hub so that it does not twitch.
Unscrewed the steering knuckle:
Attention! I also unscrewed the two bolts securing the strut to the hub, because I decided to replace the “leaked” strut at the same time. If the rack does not require replacement, then these bolts:
Under no circumstances should you touch it, as it will disturb the wheel alignment. To maintain the “camber” you need to unscrew 3 nuts:
This will allow us to untie the strut from the body, thereby giving the hub more freedom to move when we pick out the CV joint from the leaking oil seal.
To pick out the CV joint we need a high-tech tool:
We insert the end of the nail puller into the gap between the box and the CV joint:
and begin to furiously uproot the CV joint from the oil seal. It comes out very tight! Therefore, you need to do it fiercely)
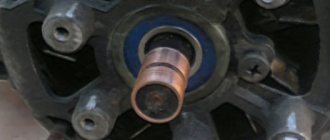
There is a retaining ring at the end of the CV joint. It must be alive!
We uproot the old oil seal:
We insert a new oil seal. I stuck it in like this: I leaned the old one against the new one and lightly hit the old one with a hammer.
Afterwards, you need to hammer the CV joint back. It should not be particularly bent relative to the shaft. The straighter you keep the CV joint on the shaft, the better.
I inserted the CV joint, supported the shaft, supported the hub and hit the hub a couple of times with a sledgehammer through a wooden board. The CV joint is in place.
Hevea brasiliensis
Rubber or rubber trees. They produce rubber or rubber resin in abundance, i.e. the milky sap of the bark, and more often the sap of the internal cells of woody tissue, is very viscous, viscous and flexible, and does not harden much afterwards.
It grows in fertile soils in the tropical forests of the Amazon River in Brazil.
The best batteries for Lada Kalina
The manufacturer installs lead batteries with a capacity of 55 Ah on the Lada Kalina car. At the same time, the discharge current is only 255A (at -18°C). If replacement is necessary, you should focus on these indicators when choosing a battery. The new battery must meet standard dimensions and have straight polarity. The capacity may be slightly larger, but not significantly (a battery with parameters of 70-75 Ah will not have enough generator power to fully charge). The starting current should not be lower than specified (if it is higher, it will be easier to start in winter). You can find out which battery models are best suited for the Lada Kalina in the category below.
Tuning
Many VAZ 2110 car owners, even having purchased a completely new car, strive to change the scenes. This can make it more comfortable, but only if done carefully.
The fact is that the short-stroke rocker is, in fact, a homemade product, a modification. If you have a short-throw shifter, the gearbox wears out less, and in general this is not bad for the gears - they engage more clearly.
In order for the short-stroke rocker to replace the standard one, it does not have to be completely removed.
It is enough for the ball joint to be disassembled from the outside. It is necessary to unclench the metal ring of the support and spread the plastic legs so that the ball comes out.
Next, you need to disconnect the rod from the support and weld a small piece of pipe to the rod, as well as a piece of durable sheet metal. Do not forget to lift up the hinge, which has a hook, to prevent the gears from being engaged by mistake.
Although the short-throw rocker requires more effort to engage, it increases the smoothness and clarity of gear engagement. But, in principle, choosing which is better for him - short-stroke or full-time - is the right of every VAZ 2110 owner.