Many people ask what does audio training mean on Grant? Audio preparation is, as a rule, a series of works already completed by the manufacturer (laying cables, installing speakers, etc.), which allow the future owner to install music in the Lada Granta without much effort. Interestingly, depending on the configuration of the car, audio preparation may be different.
Lada Granta standard
The car in this modification has a minimal set of options. The standard configuration has an option called “Audio preparation (cable, plug for the hole in the roof for the antenna).” This means that the car does not have a radio, but the necessary wires to connect it are there and they are hidden under the panel. But to connect the radio to the speakers you will have to lay the cable yourself.
The connection diagram is as follows:
- Rear left door: orange-blue (ground); blue-white (plus);
- Rear right door: yellow-green (plus); green-black (mass);
- Front left door: gray-red; green-red;
- Front right door: yellow-white; green-white;
Do-it-yourself installation
Next, we will look in detail at how to correctly install the radio on the Lada Granta manually. If you are not a fan of the standard audio preparation of the Lada Grant, pay attention to this algorithm.
As stated earlier, the power wires are initially wired, and all that remains is to understand how to properly connect them to the radio.
After removing the cover that covers the radio, two connectors will be visible in front of you. One connector is intended for connecting speakers in the doors, the second is for power supply.
The black and pink wires indicate ground and plus, and at the same time they are the main ones for power supply. If the connection is incorrect, the audio system will at least not work; in the worst case scenario, you will short-circuit the “–” and “+” terminals, which will result in the fuse blowing.
When connecting directly, be sure to insulate all wires, not just those used, to avoid a short circuit.
After connecting the necessary wires, we secure the speaker with self-tapping screws or screws and close the mesh.
It is recommended to install 5-inch speakers (12.5 cm) on the front doors of Lada Granta cars, but if desired, you can insert 16 cm, as a result of which the sound quality will only increase. Choose speakers so that the glove compartment can open completely. This problem often exists when owners choose larger speakers.
Some craftsmen cut out the trim on the rear doors and install pancakes (6x9), which sound even better. With this option, a teardrop-shaped mesh is purchased in the standard factory place for speakers, and speakers measuring 13 cm are installed.
After doing all this grant-audio preparation, all that remains is to turn on the speaker and wait for the radio to turn on.
Lada Granta liftback norm
The situation repeats itself, we have the option “Audio preparation (cable, external antenna)”. There are wires, and an audio system without TouchScreen is installed only in configuration 21917-710-41. All the necessary wires are already there, all that remains is to connect them.
Now you should understand what is included in Granta's audio training. If you have to connect the radio yourself, then we recommend that you read the instructions on how to install music.
Keywords: front speakers Lada Granta | rear speakers Lada Granta | cassette player Lada Granta | torpedo Lada Granta | Lada Granta doors | Lada Kalina doors
0 0 0 0 0 0
Share on social networks:
Conclusions and recommendations
Conducting standard audio preparation in cars such as, for example, the Lada Granta has now become much easier, because there is no need to conduct the wires themselves and the owners only have to make their proper connection.
Thus, the corresponding wires are connected to the power connector of the radio, as well as the connector for the speakers. Do not forget about the insulation of wires that are supplied directly.
After this, we cut out an opening in the door, where we insert the speaker and secure them with the appropriate fasteners. Most often, 5-inch speakers are mounted in doors.
Remember that independently connecting an audio system to existing factory outputs is in no way considered an excuse for refusing warranty service.
Good sound in the car: what is it, how much does it cost and how to install it
What's bad about the stock audio system?
Since the audio system does not directly affect the safety or reliability of the car, automakers traditionally do not try to make it sound better: the main thing is that the “music” is reliable and does not spoil the statistics with breakdowns. As a rule, cars on the assembly line are equipped with audio components from well-known brands - Blaupunkt, Clarion, Panasonic, Philips. But you shouldn’t buy into the “good name” - the standard equipment includes the simplest versions of the equipment without the goal of pleasing music lovers.
Standard acoustics usually have a narrow frequency range, playback with a “plural” sound and a flat, non-volumetric sound stage. In addition, at high volumes, the speakers often begin to “play along” with interior decoration details, “decorating” the soundtrack with trills and vibrations of fragments of the dashboard and door panels.
Of course, here we are not talking about premium-segment cars, which are equipped from the factory with components from elite brands (Harman Kardon, Bang & Olufsen, Bose), and are distinguished by special body preparation, the presence of amplifiers, a subwoofer and carefully calculated placement of speakers.
What is high-quality sound in a car?
This is an opportunity not only to enjoy the vocals of pop stars, but also to appreciate the skill of performers of individual instrumental parts, soloists with a wide range of voices. The “correct” speakers accurately convey all the nuances of the sound of instruments, without embellishing the sound or hiding its features. A good sound should be pure, without impurities in the form of resonance of interior parts. Of course, non-standard music can also be louder than “native” music, but this cannot be considered the main factor in a high-quality installation.
Who should leave the stock audio system?
Despite all its disadvantages, a standard audio system is usually reliable, has sufficient volume, and reproduces sound well in the range of human speech and many popular music genres. So if you drive an inexpensive car from morning to evening on rough roads in the company of talkative passengers, listen to chanson or FM radio and value the original condition of the interior, most likely, standard acoustics are just for you.
How many speakers should a car have?
The number of speakers is not the most important factor; the type of speaker system is much more important. To accurately convey all the nuances of a phonogram, the acoustics must be component - with at least two frequency channels. In fact, each such loudspeaker consists of two speakers: a high-frequency tweeter (“tweeter”) and a low-mid frequency speaker - midbass, as well as a frequency crossover filter.
The minimum required in a car is one pair of such two-channel kits, located in the front. This is the so-called front, which is generally enough to “feel the difference” against the background of the standard system. For better reproduction of low frequencies, it is advisable to place another pair of conventional (single-component) loudspeakers with a larger diameter (at least 16 cm or “ovals” 6x9 cm) in the rear part of the cabin.
Ideally, this should be a special low-frequency speaker - a subwoofer connected to a separate channel. Further increase in the number of speakers will affect not so much the sound quality, but rather better audibility at different points in the cabin.
How to select speaker parameters?
The first problem when selecting speakers to replace the standard ones is the size, because the standard ones are often smaller than the standard ones in diameter and depth. In addition to geometry, loudspeakers must be suitable for electrical parameters.
Two characteristics are especially important - resistance and sensitivity. If we are talking about connecting acoustics on a budget - directly to the head unit (without an amplifier), then the resistance should be at least 4 Ohms, and the sensitivity should be about 92 decibels.
How to choose inexpensive but high-quality speakers?
Most world-famous car audio manufacturers offer acoustics from all three price groups. There are few exceptions, for example, Focal with its exclusively top-end models or JBL with its budget orientation. A set of inexpensive front speakers (two tweeters, two midbass and two crossovers) of a good brand will cost about $45-50.
At the same time, loudspeakers with similar characteristics from an unknown manufacturer can be bought for $15, but, as a rule, these work for no more than a year. When it comes to an inexpensive audio system, it is recommended to pay attention to American brands that fall in the $45–50 range (Polk Audio, MTX, Kicker). They are traditionally designed for use in the free volume of a door, trunk, etc.
What needs to be done besides replacing the speakers?
The first condition is to choose the right place for the speakers. High-frequency tweeters should be placed higher, closer to the listener and directed towards him. Midbass (mid-low-frequency range speakers) are usually located lower; the subwoofer can be placed in any part of the cabin.
It is also important to ensure that the speaker is firmly attached to a massive body part. If this is not a standard plastic podium, then you will have to make at least spacer rings, for example, from thick plywood.
And finally, even local vibration and noise insulation will significantly improve the sound of the loudspeaker. If it is not possible to treat all the door panels in which the speakers are installed with special materials, you need to stick a piece of absorbing material at least opposite the back of the speaker. This will significantly eliminate unwanted sounds from vibrating metal.
How expensive are high-end acoustics?
Mid-price speaker systems from reputable brands sell for $100–120 per set, top models cost an average of $250–300. There are also premium-level acoustics priced at about $900 – 1,000 per pair. These are handmade speakers for true car audio connoisseurs and highly professional installers.
Such kits are produced to order and, if you are interested in their price, you also need to remember about the cost of installing them in a car (and this can be $1,000 or $2,000) - only high-class installers will help you fully realize the potential of such speakers.
What is the difference between a simple audio system and an expensive one?
In addition to more expensive speakers, a high-end audio system differs in the way they are installed. If in an inexpensive system the speaker “plays” the volume of the door, trunk or the entire cabin (depending on where it is installed), then for each (with the exception of some tweeters) speaker of the Hi-Fi system, its own chamber is created, the volume of which is determined by the manufacturer or installers.
An advanced system must have a subwoofer ($60 - 600), several power amplifiers ($70 - 12,000) for channel-by-channel amplification of front, rear, and subwoofer signals. All components are connected with special wiring ($100 - 1000). The entire car undergoes soundproofing work with complete disassembly of the interior and trunk ($400 - 1,000). Naturally, with this approach, the head unit does not remain standard, and it is either replaced ($60–1,500) or upgraded ($100 or more).
Finally, car audio professionals finalize the sound stage by changing the angle of the loudspeaker axis by a few degrees, adjusting the level and frequency range of the signal from each speaker. As a result, a more or less high-quality audio system will cost at least $2-3 thousand, and a truly perfect one can easily cost $10 thousand.
Norma already has wiring harnesses laid out for the speakers to the doors
On the Lada Granta “Norma” configuration, the wires are already in the doors, power is supplied to the head unit. All that remains is to connect the speakers and radio. Often, the connectors offered by the car plant and the sound system manufacturer are not compatible. You will have to purchase additional wires or connect them directly according to their designation.
The opening for the speakers will have to be cut with a jigsaw
The space for the speakers on the door is marked with a different pattern. You will need to cut a hole for the speakers.
VAZ push-button radio, video review
I bought a new MMS inexpensively for 2,500 rubles, they shared the phone number on the site. I wanted a new one with navigation, but the price kills all desire to buy it.
On the right side of the radio there is a USB connector, which is designed to connect:
1. USB Flash card (USB 2.0 and 3.0 up to 64 GB); 2.USB Flash player with a memory capacity of at least 1024 MB; 3.USB HDD with FAT32 file system; 4.Mobile phone (only in charging mode).
On the left side of the radio there is a slot for SD cards. SD Memory Card Slot: Supports SD, SDHC cards of 32 x 24 x 2.1mm size. SDHC up to 32 GB, SD up to 32 GB.
The file allocation table (FAT) of the connected device must be version FAT16 (2 GB). The maximum number of primary partitions should be no more than 4. It is advisable that the directory tree of the connected device have no more than eight levels. There should be no more than 1000 files in one directory.
While playing files, the display shows all the necessary information about the track. The playback source is selected using the AUDIO button on the left side of the radio. The radio has equalizer presets (JAZZ, POP, CLASSICAL, VOCAL and USER). The range of timbre adjustments for bass, treble, balance, and front/rear balance is from “‒7” to “+7” units.
The radio has Bluetooth and Handsfree functions. You can connect your phone by long pressing the handset button. When pairing on the phone, the inscription “MMC12” should appear in the list of found devices, the default password is “0000”. After successful connection, the BT icon will appear on the display of the radio. There is no phone book on the Kalina 2 and Grant radio, but it is possible to save up to 6 numbers in the radio’s memory. The audio system also remembers the last outgoing and incoming calls. The manufacturer does not guarantee operation of a phone in Handsfree mode that uses two or more SIM cards.
The radio allows you to listen to audio files from your mobile phone. To do this, you need to connect your phone to the radio via Bluetooth and launch the player on your phone. The manufacturer states that certain cell phone models may not work correctly with this radio, but this is not a sign of a malfunction.
The Kalina 2 and Granta radio has its own battery, which allows you to save user settings after disconnecting the battery for 10 days.
Supported Audio Formats
The audio system supports audio formats (MP3. With constant or variable bit rate, bit rate 32–320 kb/s and sampling rate 44.1/48 kHz; WMA. (without DRM protection). With constant bit rate and bit rate 10–320 kb/s , with variable bitrate and transmission speed 32–192 kb/sec).
Video review of the radio, the video is not mine.
The standard radio for Kalina 2 and Grant has all the necessary functions for a modern car. The audio system works flawlessly, there are no freezes, all operations are performed instantly. The build quality is at a high level. The only disadvantage is the lack of a CD/DVD drive, but nowadays discs are becoming a thing of the past. The standard radio of the Lada Kalina 2 and Granta without an LCD display is a good alternative for those who find physical buttons more convenient than a sensor.
Setting up an upgraded speaker system
Simple installation of acoustics in a car (connecting powerful speakers to a standard head unit) is limited in terms of customization. The ability to adjust the volume balance depends on the resources of the factory radio, which are quite primitive. You can diversify the timbre sound by choosing tweeters. Silk domes of tweeters give a softer sound; lovers of powerful sound choose tweeters with metal domes.
High-quality car audio installation with full adjustments is only possible when using additional gain with an equalizer. Since filtering in high-quality amplification is better, the head unit is set to the zero settings position.
The initial positions for adjusting the subwoofer channel are the position of the “LPF” filter and the crossover frequency in the range of 40-60 Hz. We begin tuning the front channel with crossover frequencies of 70-90 Hz and the “HPF” filter position. For front systems with channel amplification, each tweeter is adjusted separately, starting with setting the high-pass filter to the “HPF” position and the crossover to 2.4 kHz. Further adjustment of frequencies is done by ear. In this case, professionals use multiple tests with the engine turned off, the engine running, and while the car is moving.
Installation of acoustics using an installed sound processor will require separate adjustments. The device allows you to create time delays for audio channels, which is important for frontal acoustics. Focusing on the driver (and this is what the vast majority of tuning enthusiasts do), you need to take into account the closer location of the left speakers. By setting a time delay for the left channel, you balance the audio signals according to their travel time. The same is done to balance the rear acoustics. The interests of rear passengers are usually ignored.
At the beginning of amateur tuning, it is quite difficult to achieve impressive results, but beginners enjoy the modernization process itself. If you want to get the ideal quality of modernized acoustics, you need to contact the professionals of a car audio tuning studio.
Features of audio system settings
In most cases, incorrectly setting the playback parameters will lead to the speakers installed inside the car starting to wheeze. The vibrations of the rear speakers overlap with the front speakers, destroying the sound integrity of the speaker system. And too intense work of the subwoofer can completely distort the sound picture.
To avoid the described troubles, you need to know how to properly configure your car radio. In this case it is necessary to adjust:
- low frequency sounds;
- balance of front and rear speakers;
- signal distribution between right and left speakers.
Let's look at each stage in more detail.
Removing the standard radio in Grant Lux
The difference between grants of the luxury configuration: the MMS (multimedia system) installed from the factory. This is a 2 din device.
To remove standard acoustic grants :
- take a knife or plastic spatula to dismantle the acoustics and disconnect the decorative trims to the right and left of the radio. It is not necessary to take pictures;
- in the gap between the cover and the panel we find the head unit lock. There are two of them on both sides. Press it out with a screwdriver;
- we take out the GU on ourselves.
Everything is described in detail in the video:
Replacing the standard MMC in Grant
The process - after removing the acoustics, we install a new system.
Difficulties : you may have to finish the fastenings of the new system for VAZ ones. Plus you need the right frame. The factory MMC frame may not fit.
Have you bought a new 2 din radio, but there is no frame for sale? You can do it yourself . Example at the link.
Preparing the car for installing an audio system
The car itself already has all the necessary wires. And on the panel in a certain opening you can place a multimedia system. There is wiring for mounting the rear and front speakers, as well as for the radio itself. This is an excellent solution for normal audio system connections. If you take a little time and try to understand the electronics directly, you can carry out the installation completely with your own hands. To do this you need to perform the following sequence of actions:
- cut the partition;
- dismantle the plastic pocket;
- place the plugs correctly.
To do this, you first need to cut the partitions inside the console in order to install the radio. Installation of speakers is done as a last resort. And if necessary, you will also need to cut a suitable cantilever frame. If the implementation of this idea seems difficult, then it is advisable to contact a qualified specialist, otherwise the entire interior trim of the Lada will be damaged.
First you will need to dismantle the special pocket. It covers the stereo compartment. To do this, you need to use a screwdriver for flat-type screws. After the pocket is removed, you can see special sockets behind it where plugs for future acoustics should be placed. The protective frame made of metal installed on the radio will need to be removed.
Low frequency sounds
First you need to turn on a musical composition rich in sounds of both high and low frequencies. Then you should increase the volume until the speakers begin to wheeze. When you hear this unpleasant sound, you need to lower the volume a little.
Wheezing occurs because the system wants to produce too low a sound. To fix the problem, you need to adjust the maximum audio frequency playback level. The upper part of the range is not adjustable, but the lower part - the bass - is adjusted so that the audio system does not produce unpleasant vibrations.
How to choose a radio
Of course, you can buy a standard radio from the manufacturer. But often it costs too much money and does not have very rich functionality. Perhaps your car does not have a radio installed at all, or you want to choose something more suitable.
The most popular among car enthusiasts are radios from Pioneer, Alpine, JVC and Sony.
First of all, you should not mess with models cheaper than 2,000 rubles. As a rule, these are completely low-quality Chinese devices, with which you will spend more time visiting service centers than listening to music. And even if such a device works without problems, it most likely will not please you with good sound.
Universal car radios are available in standard sizes. They have the same width - 18 cm, but the height can be different: 5 cm (1-DIN size) and 10 cm (2-DIN). If you have a 2-DIN installation space, and you buy a 1-DIN radio, immediately buy a special adapter pocket. Also, in many cars (this is especially common in Toyotas), the width of the seat can be more than 18 cm. In this case, you will need special spacers specifically for your car. The seat depth is standardized and is 16 cm.
Not all manufacturers have switched to the DIN standard, and continue to install standard radios on their cars with dimensions not provided for by the standard. Therefore, when replacing a non-standard standard radio with a 1DIN or 2DIN radio, you must use an adapter frame
Let's look at the proposals for “small” 1-DIN radios. In the most budget segment of 2500–3000 rubles, there are options from well-known brands of audio systems that will not let you down with their reliability. Take a closer look at the Pioneer MVH-160UI, JVC KD-X130Q, Kenwood KMM-101AY models.
Inexpensive radios costing from 3,000 to 5,000 rubles are already equipped with a CD drive and USB connectors for flash drives. There are even models with Bluetooth for hands-free conversations and listening to music from a smartphone. Good models are Alpine UTE-80B, Sony DSX-A102U, Kenwood KMM-303BT.
The middle range is 5000–8000 rubles, and if you have the money, it’s worth purchasing a radio from this range. It will serve you faithfully for a long time. These radios are equipped with high-quality built-in power amplifiers and a wide range of multimedia functions. Reference models: Alpine UTE-72BT, Pioneer MVH-X560BT, Pioneer DEH-X5800BT.
Modern universal radios with a large screen and a navigator allow the car owner to listen to his favorite music, watch movies, listen to the radio and much more.
From 8000 and above you can buy a multimedia radio with a large screen and video playback. Pure audio solutions from this segment are characterized by high-quality amplifiers and digital-to-analog converters that allow you to accurately convey all the nuances of music. Examples: Alpine CDE-175R, Alpine CDE-193BT, Pioneer DEX-P99RS.
Also today, 2-DIN radios with a large display running on Android or Windows OS are gaining popularity. Their functionality is very wide: they have a built-in GPS navigator, support for playing video files, some even have access to the network. Advice when choosing such a device - carefully read reviews and reviews, many of them have “crude and buggy” firmware that neutralizes all the declared functionality.
Finally, you shouldn’t spend a lot of money on a radio if you have cheap car audio installed. Cheap speakers from an amplifier costing tens of thousands of rubles will not sound better.
Reviews
| № | Positive |
| 1. | Kirill , 33 years old: the standard front speakers are quite enough for me. To add volume to the sound, I installed a couple on the rear shelf. |
| 2. | Vasily , 44 years old: The standard radio on the Lada Granta Liftback is not bad, the sound is good. There are not enough speakers in the back row. I didn’t bother, I set the speakers to “13”. |
| 3. | Vitaly , 33 years old: after purchasing the Lada Granta Liftback, I supplemented the standard audio system with only two rear speakers, that’s enough for me. |
| 4. | Gennady , 41 years old: to increase the volume of sound, he added two speakers to the rear side doors and the rear parcel shelf. The standard radio works, no problems. |
| 5. | Mikhail , 35 years old: I heard a lot of complaints about the standard system, my feedback is positive. Yes, it is not super powerful, but it is enough for the average driver. |
| 6. | Gennady , 29 years old: the standard 2-DIMM radio on the Lada Granta Liftback is quite enough for good sound. Anyone who wants a concert hall should buy it separately. |
| 7. | Vyacheslav , 38 years old: I heard that they install rear speakers on the Grant at “16”, but did not bother. I bought it on “13”, I’m happy, there are no complaints about the sound, it’s not ideal, but it’s enough for me. |
| Negative | |
| 1. | Vasily , 28 years old: I didn’t believe the negative reviews until I bought the Lada Granta Liftback. Weak and terrible. Change the speakers and radio. |
| 2. | Kirill , 33 years old: I took the car with me, it had a standard radio, I replaced it with a new one from Pioneer. It's a completely different matter. |
| 3. | Georgy , 41 years old: when buying Grants, I knew in advance about problems with acoustics. I bought coaxial speakers and a good radio. |
Conclusion In general, the sound quality of the standard speakers on the Lada Granta liftback is good. Lovers of high quality and cleanliness do not like this, so they strive to replace it with expensive models.
It is necessary to start from the fact that the car is in the budget segment, which means there is no point in demanding the best. If desired, install 16 speakers on the rear side doors to enhance the sound quality.
vote
Article rating
Where are the wires for the rear speakers in Grant
When the alarm clock is set, the technicians suggested immediately placing speakers in the front door. "Temp" This was said with the sign METAL ONLY.
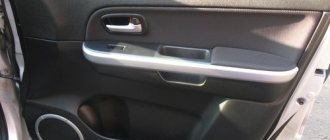
columns are screwed to the upholstery
Naturally, this result did not suit me. Without hesitation, the speakers decided to rearrange the metal of the “shirt”,
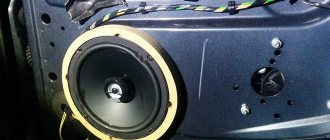
As you know, the standard speaker size in Grant is 13cm. I knew in advance that the 16cm columns would fit without problems, and I knew in advance that I would have to grind the metal. So, take a look before the intervention: Remove grid and column:
As you can see, the size of the landing area is small and, moreover, it does not coincide with the markings of the casing pipe network. Remove the skin, mark the appropriate size:
markings for columns 16 cm
Take a jigsaw with a metal file
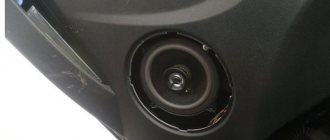
We then place the column in the desired location and cover all cracks with a vibrating layer. This creates a box for the speaker to play.
insert column, remove holes
Then place the pad in place and see how much space there is.
You'll need this space if you have regular speakers with a huge magnet. In this case, rings are placed under the column so that the magnet does not prevent the glass from falling. You can see for yourself in the photo, but in reality there is more than 1cm of space for the ring. If the rings are oily, you need to securely hold the skin and make noise. In my case, the magnets were narrow and the rings were useless. The cutting points must be treated with some chemical: any metal still exposed will rust. I sprinkled it heavily with Movil.
The result: cleaner sound. Previously, even with an average volume, there were small extraneous noises from small areas of the skin. They are currently unavailable. The bass has become softer. the fact that the speakers are now more difficult to repair and at least the "games" but the volume.
READ How to Disassemble a Headlight on a Grant
Audio preparation is the basis of car audio
It is worth understanding what audio preparation is in a car. This may mean both work on installing audio equipment, and the presence of a special place for an audio system, speaker jacks, and wiring for further installation of acoustic equipment.
Such a concept as standard audio preparation is an integral part of the car’s equipment. Its level affects the final cost of the new car and the owner’s further costs for acoustics. The manufacturer can install either simply a wiring harness with the necessary plugs and connectors, or additional elements: speakers, a radio antenna and the radio itself. Expensive versions even have high-frequency beepers and audio system control keys located on the steering wheel.
Selecting a speaker system
Having assessed the audio preparation of the car, you can begin selecting equipment.
Depending on personal preferences and financial capabilities, a minimum set is determined - in fact, a radio tape recorder (or, as it is called, a head unit) and a set of speakers. A true car audio connoisseur will select equipment with increased power, as well as taking into account the possibility of installing additional devices: subwoofer, amplifier. Typically such a complete audio system requires the purchase of an auxiliary battery. When choosing acoustics, beginners should consider the following main characteristics of the equipment.
For the head unit - available media formats (CD, MP3) and output sound power. It is worth focusing on the average value of 25 W for a standard four-channel device.
For speakers:
- dimensions of standard sockets and the possibility of changing them;
- power (take into account comparability with GI);
- frequency range during playback;
- sensitivity.
Audio system installation
After purchasing the equipment, the question of installation arises. This event is not easy and requires special technical skills. In most cases, in order to avoid unnecessary headaches, car enthusiasts turn to certified service centers, where experienced specialists will perform the necessary work and provide a guarantee.
Undoubtedly, there are people for whom everything related to the car is their hobby. For them, self-installation of sound equipment will be not so much saving money as it will be a pleasant pastime with a further reason for pride. In this case, what does audio preparation mean? In a nutshell, the higher the vehicle’s equipment level, the lower the additional costs for acoustics.
Many people ask what does audio training mean on Grant? Audio preparation is, as a rule, a series of works already completed by the manufacturer (laying cables, installing speakers, etc.), which allow the future owner to install music in the Lada Granta without much effort. Interestingly, depending on the configuration of the car, audio preparation may be different.