Any car must have its headlights adjusted correctly. If a car has problems with its headlights, it can blind the driver driving oncoming vehicles, leading to serious traffic accidents. At best, such a problem will significantly reduce visibility on the road.
It is recommended to check the correct adjustment of the headlights once a year or every time when replacing a light bulb or repairing the front body part. It is worth noting that self-adjustment of the car’s headlights is considered temporary and can be carried out until the car is serviced in a specially equipped workshop.
If your vehicle's headlights are not adjusted correctly, this can pose a serious safety hazard at night.
This especially applies to cars that have xenon installed. In order to prevent an emergency and not disturb other road users, the headlights should be adjusted correctly in a timely manner. Let’s look at how to do this yourself using the Lada Priora car as an example.
Necessary tool
To adjust the headlights on a Lada Priora you will need:
- hex bit 6 mm;
- plywood;
- chalk;
- roulette;
- pressure gauge
- First of all, we park the Priora car on a flat area five meters from a flat wall. Fill the tank with fuel until it is full and use a pressure gauge to equalize the pressure in the wheels. After inspecting the headlights, thoroughly wash them from contamination. We check that the headlight bulbs are working properly. If necessary, we install new ones.
- After the preparatory procedures, we proceed to adjustment. We move the lighting width control lever to position “0”. This position corresponds to the load of the vehicle with the driver. Turn off the lights and rock the car from side to side. Thanks to the rocking, all suspension elements will take a standard position. We ask a colleague (about the same weight as you) to sit in the driver’s seat of the car. For further adjustment, draw a special marking on a flat wall. The center line should be drawn so that the distance from the center of each headlight to the axle is identical. We mark the centers of each headlight with dots on the wall and draw two lines vertically through them. Draw a straight line between the lines and mark it with the letter “A”. Below, at a distance of 12 and 22 centimeters, draw two more lines in parallel.
- With the low beam on, close one of the headlights. The top point of the light spot from the headlight should coincide no higher than the horizontal center line. Also, the boundaries of the light beam of the fog lights are located along the same line.
- We make sure that the intersection of the inclined and horizontal sections of the boundaries of the light fluxes (at the point where the light beam breaks) coincides with a line that is drawn vertically and passes through the point marked as the center of the headlight. If deviations in the luminous flux are detected, we adjust the headlights with a hexagon of 6 millimeters by rotating the horizontal and vertical position screws. These screws are located under the hood in the headlights.
Hello. I ask for help with this - yesterday we tried (well, yes, on our own) to adjust the headlight in height to raise the light, when the screw was rotated, the reflector seemed to jump off and go down and now does not respond to the rotation of the screw in height. Help - what to do and where to dig, maybe someone has it - post a link to the BZ. Of course, I would like to do it without removing the headlights and bumper, but if there is no other way, then I will accept any method for consideration. Thanks in advance to those who responded!
Comments 23
Do you need to treat the screws with a WD tool before adjusting? Nobody touched the headlight adjustment from the factory for 7 years. Or is everything plastic and doesn’t stick?
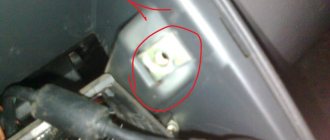
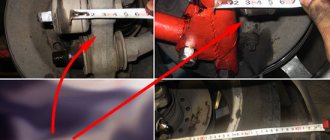
There are plastic twisters, just move them carefully, it doesn’t seem to stick. Be careful not to twist it too much, otherwise the fasteners may come off the bosses and the reflector will fall, then insert it back only with the headlight removed. Here you can see these fasteners that can come off, circled in red and blue in the photo.
Good evening, what can you come up with to easily adjust without a twist?
That's it, the issue has been resolved. I removed the bumper and then the headlights. I fixed everything without any problems and without disassembling the headlight itself (with the rubber covers removed, there is free access, but only if the headlight is in your hands). Thanks everyone for your help! By the way, Osram Knight Breaker turned on the lamps next door - I’ll see if I can see clearly or not!
Today we finally got around to repairing it. Well, what can I say - of course, I cursed the designer of this headlight design with a three-story curse, but in the end, through the hole in the low beam bulb, after unscrewing the adjustment screw as much as possible, everything seemed to fall into place. I'll try it today when it gets dark. By the way, I replaced the low beam lamps along the way, now I strongly doubt that this can be safely done at night on the road (as the designers intended).
PS As they say “the trick failed”, after driving over bumps the light went down again and cannot be adjusted. It turns out that the little girl didn’t get back into place. Along the way, you will still have to remove the headlight, again suffering until the weekend.
I won’t read the comments, there was such a situation, I pulled out the low beam lamp, stuck my finger into this hole, and pulled the reflector towards myself towards the engine and the reflector was put on the round pipe, it takes a little effort for everything to fall into place
I'll try it on the weekend, otherwise I can't see where to put my finger. I really hope your method works!
I won’t read the comments, there was such a situation, I pulled out the low beam lamp, stuck my finger into this hole, and pulled the reflector towards myself towards the engine and the reflector was put on the round pipe, it takes a little effort for everything to fall into place
You can easily adjust the headlights on the Priora yourself; this will solve the problem of lighting in the dark. There are several schemes for performing work; they are used in combination or separately. The headlights can be adjusted at a service station or independently; in the second case, a large set of tools is not required.
Lada Priora how to adjust fog lights
I have MTF Aurum bulbs in my car driver's manual, and at night in the rain and on damp asphalt, as well as in the fog, they work great..
Can you tell me exactly what key to use to adjust the Bosch fog lights? And what should be the length of the key in the SE bumper? Thank you)))
The torso is T15, and the length is Kick-Ass.
2-3 adjustments, use a wrench to loosen the sprocket or hexagon. I fixed it myself like this, radically using a Phillips screwdriver
I adjusted the Bosch fog lights T-15)))
Added after 35 seconds, you'll tear up the star with the key. This is definitely already scrolling for me.
Added after 1 minute I fixed it myself like this, radically using a Phillips screwdriver. Excellent option)))
I also recommend sealing the adjustment holes in the bumper with something. There is less chance of the adjustment screw becoming clogged with dirt. I have SE and the color “Space” (black), I immediately sealed it with black electrical tape.
I want to plug it with a furniture plug. from the outside it will look like parking sensors :laugh2:
Hello everyone. Please tell me who made the PTF as in the luxury version through the MUS, how to correctly supply the missing contact to the MUS, I read that it is only needed to power the diode (indication). It would be correct to simply throw from contact (87) as in option 1. And you can also ask about the power supply to the relay, contact (30)? In the diagram, the big fuse is green, is there only one there? And in which place is it better to solder on which side I think that this also matters.
Thank you in advance. I apologize for such questions if anything. All the best and thank you! https://s010.radikal.ru/i311/1411/70/e1f7d841af0c.jpg https://s009.radikal.ru/i309/1411/6a/04629b16961d.jpg
Dmitry82, Everything has already been discussed a bunch of times. https://www.priorovod.ru/showthread.php?t=168 Thank you, I gathered my courage and read all parts of the forum. But here’s a question I haven’t found yet, or maybe I skimmed through it somehow. Can you tell me if it would be a collective farm if you just carefully solder the wire for powering the relay somehow to the terminal of the green fuse, and don’t bite the wire and connect it and then solder both twisted ones to the connector. I just always do the second option, but here I don’t want to bite and break the factory chain.
Dmitry82, we are not tearing anything down, I have two sets of Chinese ones, one has a T15 key and the other has a T20. and they are the same. Well, to be precise, you need T20 for adjustment.
Pys: you can, of course, remove the bumper again, or you can try it on in a store. who studied what
Greetings! I got confused about raising and lowering, of course, I apologize. I didn’t do anything there with pliers, because the contact clicks in with a slight movement of the hand and the MUS connector is just as easily removed and inserted. The ICC was not finalized; I bought it new, factory-made with a QC mark. I didn’t use a soldering iron there and didn’t redo anything (although I could have, if I wanted to, because my hands grow exactly from the place where they should). I used pliers to bend exactly that contact with the PC power supply, for which half of the forum said that it fits perfectly (no offense, it is so). Here are some photos regarding the length of the key. https://s019.radikal.ru/i628/1412/30/b36745650ec8.jpg (https://www.radikal.ru) https://s010.radikal.ru/i311/1412/42/9d0d51de2b81.jpg ( https://www.radikal.ru) https://s004.radikal.ru/i206/1412/e8/d8caeff1b33a.jpg (https://www.radikal.ru) https://s45.radikal.ru/ i107/1412/ce/5b901a72ed5a.jpg (https://www.radikal.ru) To turn the key half a turn, you need to add another 10 mm.
When do you need to adjust headlights on a Priora?
If the Priora's headlights don't shine well, they are adjusted according to the diagram. This should be done as needed - for example, when there is little light. Incorrect adjustments sharply impair visibility, so this should not be allowed. With proper alignment of the optics, the angle of inclination will be optimal, and the headlights will no longer dazzle other road users with the directed flow of light. This will reduce the risk of accidents during oncoming traffic and eliminate other problems.
The adjustment is made for cars that constantly move along poorly lit roads with curved surfaces. The installation angle of the light sources will change, and it will be necessary to adjust the flow direction. Other reasons for carrying out the work:
- replacement of lamps, headlights, foglights;
- there was an accident, the front bodywork was deformed;
- work was done on the suspension;
- new tires and wheels installed.
You can carry out maintenance yourself without complex expensive tools.
Correctly setting headlights minimizes the risk of accidents
Preparing to adjust the headlights on a Priora
The mechanism for adjusting Priora's headlights may be different. Preparation includes:
- Leveling the body, checking wheel pressure, comparing with optimal values.
- Removing dirt from optics - it is advisable to do this simply with water; if the dirt is persistent, then use a solvent.
- Wetting the screws with a special compound, loosening the fasteners, checking the reliability of the headlights in the niche again.
Once this is done, you can check the pressure inside the tires. To do this, the car is driven onto a flat area, and vertically directed markings are made on the walls.
In order for the headlights to shine as needed, many drivers make the list of necessary settings themselves
Removing and installing the front headlight (for use on the Lada Priora model)
Typically, users of our site find this page by the following queries: VAZ Priora body number, VAZ Priora tire pressure, VAZ Priora malfunctions, VAZ Priora preparation for winter, VAZ Priora brakes, VAZ Priora oil filter, VAZ Priora fuel filter, VAZ Priora cabin filter , VAZ Priora headlight adjustment, VAZ 2170 body number, VAZ 2170 tire pressure, VAZ 2170 malfunctions, VAZ 2170 preparation for winter, VAZ 2170 brakes, VAZ 2170 oil filter, VAZ 2170 fuel filter, VAZ 2170 cabin filter, headlight adjustment VAZ 2170 , VAZ 2171 body number, VAZ 2171 tire pressure, VAZ 2171 malfunctions, VAZ 2171 preparation for winter, VAZ 2171 brakes, VAZ 2171 oil filter, VAZ 2171 fuel filter, VAZ 2171 cabin filter, VAZ 2171 headlight adjustment, number VAZ 2172 body , VAZ 2172 tire pressure, VAZ 2172 malfunctions, VAZ 2172 preparation for winter, VAZ 2172 brakes, VAZ 2172 oil filter, VAZ 2172 fuel filter, VAZ 2172 cabin filter, VAZ 2172 headlight adjustment, VAZ 2173 body number, pressure in VAZ tires 2173, VAZ 2173 malfunctions, VAZ 2173 preparation for winter, VAZ 2173 brakes, VAZ 2173 oil filter, VAZ 2173 fuel filter, VAZ 2173 cabin filter, VAZ 2173 headlight adjustment, LADA Priora body number, LADA Priora tire pressure, LADA malfunctions Priora , preparation for winter LADA Priora, brakes LADA Priora, oil filter LADA Priora, fuel filter LADA Priora, cabin filter LADA Priora, headlight adjustment LADA Priora, body number LADA 2172, tire pressure LADA 2172, faults LADA 2172, preparation for winter LADA 2172, LADA 2172 brakes, LADA 2172 oil filter, LADA 2172 fuel filter, LADA 2172 cabin filter, LADA 2172 headlight adjustment, LADA 2171 body number, LADA 2171 tire pressure, LADA 2171 faults, preparation for winter LADA 2171, LADA brakes 2171 , Lada 2171 oil filter, Lada 2171 fuel filter, LADA 2171 salon filter, LADA 2171 heading adjustment, LADA 2170 tire pressure, Lada 2170 tires, preparation for winter Lada 2170, LADA 2170 brakes, Lada oil filter 2170 , LADA 2170 fuel filter, Lada 2170 salon filter, headlights Lada 2170, LADA 2170 tire pressure, Lada 2170 tires, Lada 2170, Lada 2170, Lada 2170 brakes, Lada 2170 oil filter, Lada 2170 fuel filter. , cabin filter LADA 2170, headlight adjustment LADA 2170
#front_headlight #car_electrical equipment #Lada_Priora
Removing and installing the front headlight of Lada Priora
Note
: The following describes how to remove and install the front headlight assembly on the right side. Removal and installation on the left side are carried out in the same way.
1. Disconnect the wire from the negative terminal of the battery.
2. Remove the front bumper.
Note
: If the headlight unit is removed only from one side, then the entire front bumper does not need to be removed. You only need to unscrew the fastenings of the front bumper on the side from which the headlight will be removed so that you can move it a little to the side and gain access to all the fastenings of the headlight.
Headlight adjustment diagram for Priora
To correctly adjust the Priora headlights with your own hands, follow the video or the usual instructions. You should think over a marking scheme on the wall, then drive up to it a couple of meters, mark the central part of the machine, the axial zones of the lamps. Next, mark the distance from the road surface to the lighting fixture. From the central area of the light source, mark the distance to the middle of the car; you need to step back a few centimeters.
They are removed from the wall at a distance of about 7 m. The marks in the areas of the optical centers are connected to each other using a straight line. It can be supplemented with a set of vertically located segments. As soon as the markings are ready, adjustments begin to be made.
There is a standard adjustment scheme that should not be deviated from.
Tip 4: How to adjust low beam headlights
Low beam headlights can be adjusted both in a specialized workshop (service station) and independently. Positively adjusted headlights will perfectly illuminate any road at night and will help you avoid emergency situations.
You will need
- – flat horizontal platform;
- – a smooth, clear wall;
- – dark paper or thick cardboard;
- – chalk or large marker.
Instructions
1. Before you start adjusting the low beam headlights, thoroughly prepare your vehicle. Fill the tank of the car, ensure optimal tire pressure, check the headlight bulbs to ensure they are working, make sure the glass on the headlights is intact and, if necessary, replace faulty parts.
2. After this, drive the car onto a capacitive flat area, perpendicular to which a vertical wall will run. Place the car on the site so that its longitudinal axis is perpendicular to the wall, on which, in fact, the headlights will be adjusted.
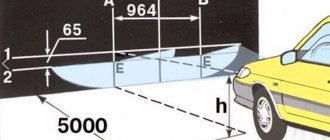
3. Next, place the car flush against the wall and mark the center of the car and the central axes of any headlights on it. After this, position the car so that the distance from the headlights to the wall is 5 meters. On the wall, use chalk or a marker to draw a clearly visible horizontal line that will connect the central points of the headlights. Draw short vertical lines through these center points. As a result, you should get two crosses. Below the original horizontal line 7.62 cm, draw a second line parallel to the first.
4. Turn on the low beam. Cover the headlights alternately with cardboard and tighten the adjustment screws until you achieve a perfect beam of light on the wall that matches the standard. The screws that adjust the headlights are located under the hood of the car. To adjust the headlights in some car models, you need to rotate the gears using a special key or screwdriver.
Video on the topic
Note! Before making adjustments, pay attention to what type of headlights they are, i.e. separate or combined, because each model requires individual settings. Please note that abnormally adjusted headlights can lead to an accident.
Helpful advice When checking the car in advance, it is advisable to ensure that all suspension parts are in the required working condition; to do this, rock the car from the sides.
Methods for adjusting headlights on a Priora
There are the following ways to adjust the light:
- at a stand (you need appropriate equipment, the method is usually used by car services);
- using the device;
- completely handmade.
The last option is used most often in a garage. Possible adjustment methods are vertical or height.
How to adjust the headlights on a Priora in height
To refine the flow of light in height, first measure the distances from the central points of the light fixtures to the floor, then draw a line through the screen, stepping back down about 65 mm (minor errors are allowed), and make an additional line. Then vertical stripes are drawn taking into account the centers of the spotlight elements and a single line at the same distance from them.
The regulator is fixed, then one lamp is closed, and the low beam is turned on. You will need to adjust the direction of the glow of the beams from the open headlights by rotating with a cross-head screwdriver.
Sometimes you need to check the light bulbs themselves, perhaps they are the cause of the bad light
How to adjust the headlights on a Priora horizontally
In the horizontal direction, adjustments are made through the holes in the crossbar. It is located close to the longitudinal axis of the machine. By rotating the adjustment screw wheel (it is located on the headlight housing and is equipped with teeth), you adjust the height of the light beam in the horizontal direction.
There are two types of adjustments - horizontal, height
It is necessary to ensure that the top of the spot coincides with the second working line of the screen, and the fracture zone aligns with the vertical ruler in the central area of the headlight. Using a similar scheme, the position of the spots on the second device is adjusted.
How to adjust headlights on a Priora with your own hands
For settings, standard schemes are usually used. They can be found in the car's owner's manual.
How to adjust low beam headlights on a Priora
As the marking is completed, the light flow is turned on so that it does not interfere with the settings. To begin with, adjust the angle - ideally it coincides with the horizontal position of the line on the wall, but other options are possible. The screws are turned from the back of the headlight in the engine compartment.
Adjustments are made one by one. The second one is covered while the first one is being adjusted. To cover the duty headlight, you can use a piece of cardboard or plastic.
The beam should be below the central areas of the marks
How to adjust the high beam headlights on a Priora
High and low beam must be adjusted separately. The surfaces of the walls are prepared for marking; distances of 10 m or more are maintained between the lines.
Work order:
- The machine is placed on a flat, vertical platform and the centers are set.
- To secure the centers, they are first found on the car. The points are connected to each other, a horizontal line is drawn 10 cm below the group.
- As the marking process is completed, the car is driven 10 m, then the light control is adjusted to zero.
The light beam should act as upper and lower boundaries.
How to adjust fog lights on a Priora
The main principle of adjusting the fog light involves rotating the optics in different directions to select the optimal tilt angle. The fastening bolts are first loosened. Then you need to do the following:
- Place the car at a distance of 5-7 m from the main vertical axis (for example, an ordinary wall), the surface should be flat. The machine is positioned so that its axis looks perpendicular to the marking area.
- Test the pressure inside the wheels - it should be normal, the spring elements will quickly fall into place if you rock the body from the side.
- Measure the distance from the base of the platform, the central part of the anti-fog optics.
- Mark a horizontal ruler, taking into account the level of preliminary measurements.
- Place vertical marks and center on the low beam headlights.
- Turn off the fog lights and turn on low beam lights.
- Make the beam limiter on top less than the height of the platform, which is located horizontally, by 10 cm. Fix the optics parallel to the longitudinal axis.
It is optimal to leave the intervals between centrally located beams of light a little more than 1 m. Draw lines on the walls that will divide the car into two equal parts. Additionally, in the lower zone, a strip is made below the first by about 10 cm. The degree of distance from the ground to the headlight, from the center of the car axis to the lava lamp is measured. The point of intersection of the lines is the approximate center.
The easiest way to assess whether the fog lights are set correctly is in the dark.
Priora PTF button diagram – Automotive portal AutoMotoGid
Participate in the discussion can only registered users.
Basic Setup Aspects
After the fog lights are installed, their luminous flux will need to be properly adjusted so that the operation of the optics is most effective. Adjustment of fog lights should be carried out in conditions that are closest to real ones. Therefore, make sure that there is a spare tire in the trunk, the tank itself is fully filled, and the tire pressure should be the same. In addition, for greater realism, a load weighing about two hundred kilograms can be placed in the car interior.
When all these conditions are met, you can begin adjustment. First of all, the vehicle must be placed on the most level surface, this will allow you to get the most accurate result. If this condition is not met, the adjustment will be incorrect. The setting is done in front of a wall or garage door, this is a prerequisite.
To begin the adjustment, measure the distance from the ground to the middle of the lantern. After this, you should draw a straight line on the wall or garage door that corresponds to the distance measured earlier. Having done this, you will need to draw another stripe - it should be 5 centimeters lower, while the first line can be erased. The anti-fog optics should be adjusted so that the upper limit of illumination is located on the horizontal strip that you draw on the network.
Article: 995.3710-07.06
Order code: 139319
Available for order – 2 pcs. Data updated: 07/05/2021 at 01:30
Product reviews
Articles about the product
The series of articles “Crystal VAZs, or typical breakdowns of domestic cars” talks about typical problems and malfunctions of cars produced by the Volzhsky Automobile Plant. Today we will talk about the front-wheel drive Samara family, as well as its modern analogues.
- Switch button VAZ-2170 fog lights AVAR Article: 995.3710-07.06 Order code: 139319 355 ₽ or place an order by calling 8 800 6006 966
Availability of goods in warehouses and stores, as well as the price of the goods is indicated on
05.07.2021 01:30
Prices and availability of goods in all stores and warehouses are updated once an hour. If there is a sufficient quantity of goods in the store you need, you can buy it without pre-ordering.
– valid when ordering on the website or through a call center operator by phone
. Subject to sufficient quantity of goods at the time of order.
Price in stores
– retail price of goods in store sales areas without pre-order.
The period for moving goods from a remote warehouse to the warehouse of an online store.
The parts data presented on this page is for informational purposes only.
Add to cart
Available to order:
Order quantity:
Product successfully added to cart
How to replace a burnt out lamp
Let's start with replacing the lamps in the foglight of the Lada Priora. This is a simple matter, and there is absolutely no need to go to a service station because of such a trifle - everything can be done on your own. First of all, what lamps are installed in the PTF of this car? The manufacturer installs H11 type halogen lamps with a power of 55 W on both regular Priora and Priora Restyling (production since 2013).
Diagram of correct installation of fog lights
On Priora, fog lights are installed according to the same rules as any other car. Installation is carried out at a height of no more than half a meter from the level of the road surface. Low-mounted fog lights are out of the wet condensation zone and can actually significantly improve visibility. If you install PTFs on the roof of the trunk (as jeep owners often do), then they will turn out to be completely useless, especially during fog, rain, or a snow or dust storm. Therefore, the most effective way was and remains to install foglights under the bumper (for outdated metal structures) or directly into it (for new generation metal structures).
The fog lights that you install on your Priora must meet not only all traffic regulations, but also UN standards. The latest changes clearly state that any fogs must distribute light at a wide angle and have a clearly defined upper border. The dispersion index should be seventy degrees horizontally. Only a device with such characteristics will create an anti-fog effect.
Most often, fog lights with a halogen illuminator inside are installed on the Priora. They are enough to ensure that the space thirty meters in front of the car is sufficiently illuminated in any weather.
Video “How to independently install xenon in Priora foglights?”
If you are interested in how to install xenon lamps in the fog lights of a Lada Priora car, then detailed instructions for this process are presented in the video below (author - Sergey M).
Connecting Priora foglights
Let's take a closer look at the connection diagram for the Priora fog lights. The fog lights are controlled by the lighting control unit. Specifically, the switches for the front (A5) and rear (A4) fog lights. Upon examination, we can only notice one wire to enable each option. This wire passes through pin 2 to both switches through various resistances because it is a signal wire. It runs from the electrical package control controller to the switch. From the controller side, a stabilized voltage is supplied to this wire. The electrical package control unit controls changes in the amount of current passing through it.
Adjusting headlights on a Priora using an electric corrector
It is allowed to adjust the head and fog lights according to a single scheme. They carefully study the sequence of work, then make adjustments. There is no urgent need to contact the experts, although this will make solving current problems easier. The need for regular maintenance should not be neglected.
Electromechanical headlight range control is a high-tech device with a wide range of applications. The design includes a gear motor, wiring, and position switch. It is placed in an optimally convenient place on the instrument panel - usually slightly below the steering column. The driver then begins to adjust the boundaries of light and shadow by raising and lowering the switch to a fixed position.
The meaning of the settings is that the driver reacts to changes in body position under the influence of the mass of cargo and passengers, then using a switch or manually adjusts the optimal position of the lighting devices. There are also automatic spotters.
What is it and how does headlight range control work?
This is a device that maintains the set position of the optical axis of the headlight unchanged when the load and driving conditions of the vehicle change.
The light created by the vehicle's optics is adjusted when the vehicle is unloaded and is highlighted in yellowish color in the above figure. But the luminous flux
changes depending on the load of the car, moving up or down from the correct optical axis, which is displayed in the figure in a reddish color. To correct this configuration, the headlight corrector is used.
Necessary tool
To adjust the headlights on a Lada Priora you will need:
- hex bit 6 mm;
- plywood;
- chalk;
- roulette;
- pressure gauge
- First of all, we park the Priora car on a flat area five meters from a flat wall. Fill the tank with fuel until it is full and use a pressure gauge to equalize the pressure in the wheels. After inspecting the headlights, thoroughly wash them from contamination. We check that the headlight bulbs are working properly. If necessary, we install new ones.
- After the preparatory procedures, we proceed to adjustment. We move the lighting width control lever to position “0”. This position corresponds to the load of the vehicle with the driver. Turn off the lights and rock the car from side to side. Thanks to the rocking, all suspension elements will take a standard position. We ask a colleague (about the same weight as you) to sit in the driver’s seat of the car. For further adjustment, draw a special marking on a flat wall. The center line should be drawn so that the distance from the center of each headlight to the axle is identical. We mark the centers of each headlight with dots on the wall and draw two lines vertically through them. Draw a straight line between the lines and mark it with the letter “A”. Below, at a distance of 12 and 22 centimeters, draw two more lines in parallel.
- With the low beam on, close one of the headlights. The top point of the light spot from the headlight should coincide no higher than the horizontal center line. Also, the boundaries of the light beam of the fog lights are located along the same line.
- We make sure that the intersection of the inclined and horizontal sections of the boundaries of the light fluxes (at the point where the light beam breaks) coincides with a line that is drawn vertically and passes through the point marked as the center of the headlight. If deviations in the luminous flux are detected, we adjust the headlights with a hexagon of 6 millimeters by rotating the horizontal and vertical position screws. These screws are located under the hood in the headlights.
Headlights are important and necessary devices for any vehicle. Their repair or tuning involves dismantling work.
Installation of anti-fog equipment
It is impossible to install PTF without dismantling the previous headlight model. For these purposes, the plugs are removed from the bumper, the old headlights are taken out, purchased ones are put in their place and secured with screws. If the size of the holes is not enough for installation, then it is necessary to disconnect the bumper and carry out installation work. If the bumper did not previously have places for fog lights, then they can be made using a sharp knife.
Then you need to lay the wires from the headlights along the cable under the hood in the form of a bundle, which is secured with a clamp. It should be shorter on the left side than on the right. The output of the wires to the control panel is most often installed through the hole behind the fuse box.
The negative wires need to be connected to the car body, after which the crankcase protection (and bumper) is secured in place.
Imported kits often do not include wires, connectors, and plugs, without which it is impossible to install the PTF, so they need to be purchased additionally.
Rules for replacing headlights
Experienced auto mechanics know how to remove rear and front headlights. To do this you will need the following tools:
- key to "10"
- Phillips screwdriver.
The wire is disconnected from the negative terminal of the battery. Then the front bumper of the Priora is removed. The latch is released and the wiring harness block is disconnected from the headlight. Having unscrewed the side screw securing the lighting element, unscrew its 4 latches. Removing the casing involves the subsequent dismantling of the upper mounting bolts. Thus, the headlights on the Priora have been removed. Installation of these devices is carried out in reverse order.
The rear lights on the Priora are removed in the same way. Initially, the wires are disconnected from the negative terminal of the battery. Next, the trunk lining behind the lighting unit is folded back. The clamps are released and the rear harness block is disconnected from the wiring of a similar lamp.
Having turned the upholstery to the side on the side of the last element being replaced, first unscrew its fastenings. Unscrew the 3 nuts of the studs on which the rear lights are attached. The wiring is displayed. The lamp itself is removed. The installation process of dismantled devices is carried out in reverse order.
In some cases, Priora car owners wonder how to disassemble the headlight. A similar question may arise if the constituent elements of this unit fail. Initially, the rear lights, like the front ones, heat up. In this case, the sealant begins to melt, and the lighting device will separate from the housing without any problems.
It is necessary to take into account that the sealant melts at a temperature of 300 °C. This indicator does not have a negative effect on the glass and body of the lighting fixture.
Scheme for adjusting headlights on a Lada Priora car
To prevent the situations described above, it is recommended to promptly and correctly adjust the lighting elements. To do this you will need the following tools.
Adjusting the headlights begins with choosing a location. Lada Priora is installed on a flat area at a distance of 5 m from a smooth wall. After filling a full tank of gasoline, check the tire pressure using a pressure gauge. If there is a deviation from the norm, it is adjusted to the minimum value. If the headlight is sweaty or dirty, then it is wiped and washed accordingly.
Next, the functionality of the light bulbs is checked. To do this, the light is turned on. If faulty lighting elements are identified, they are replaced with new ones. The next step is to move the headlight beam adjustment lever to the zero position. The headlights turn on and the car rocks from side to side. This action will allow the suspension parts to take the appropriate position.
Special markings are drawn on the wall. The center line is drawn in such a way that the distance from the centers of the lighting units to it is the same. Then the centers of each headlight are located. They are marked on the wall with dots. 2 vertical lines are drawn through them. A straight line is drawn between them and o. Parallel to it below, at distances of 12 and 22 cm, 2 more lines are drawn.
Next, the low beam is turned off and one headlamp is closed. The upper part of the light spot should coincide with the middle horizontal line “B” (see Diagram for adjusting headlights on a Lada Priora car). It should be taken into account that the intersection points of the inclined and horizontal sections of the boundary of these spots coincided with a vertical line, which was drawn through the point corresponding to the center of the lighting device.
Adjustment of lighting elements provides for some deviations. In this case, their horizontal and vertical position is adjusted. To do this, tighten the screws located under the hood of the car.
We learn to change headlights and adjust their light on a Priora without outside help
Optics on a car is one of the components of the safety of the driver and passengers; visibility on the road depends on its quality. Like any car part, the optics on a Lada Priora car sometimes require replacement. The article describes the reasons for replacing optics, how to properly replace and adjust the headlights on a Priora.
In what cases is it necessary to replace and adjust headlights?
The main reason why optics are replaced is their failure and the inability to perform their functions: high-quality road lighting. In addition, the lamps in the lanterns are changed. Bosch lamps are in demand. Bosch brand xenon produces better quality light and has a longer service life.
Bosch xenon lamps
Optics should be changed for the following reasons:
- the headlight sweats, its ventilation is impaired;
- cracks, chips on glass;
- reflector malfunction;
- faults in electrical connectors;
- defects in fasteners;
- tuning
During the replacement process, you can not only restore the functionality of the flashlight, but also improve its performance characteristics by replacing halogens with xenon. Using xenon in lamps, the driver receives better lighting. At the same time, tuning of the headlights is also carried out: lens glass is installed, black headlights look impressive. LED lamps are installed in the parking lamps, as well as in fog lamps.
Front lights with lenses
To make your car tuned, you need to know how to remove the front and rear optics.
Replacing headlights from A to Z
The toolkit for the procedure for replacing headlights on a car consists of:
- socket wrench to “10”;
- Phillips screwdriver;
- flat screwdriver.
Replacing a headlight on a Priora begins with disconnecting the negative terminal of the battery (the author of the video is the channel In Sandro's Garage).
Before removing the headlight on a Priora, you need to remove the bumper. Then you need to remove the headlight covers from above. Next, pressing the latch, the block with wires is disconnected. When the headlights are removed, you can change the bulbs, for example, with Bosch xenon ones. The glass version of the optics can be replaced with a lens one.
The rear lights of Priora 2 are removed in the same way. The upholstery is dismantled and the wires are disconnected. Now you can remove the rear lights of Priora 2.
Tail lights on Priora
To disassemble and replace the headlight glass, you will need the following materials and tools:
- industrial dryer;
- thin screwdriver;
- new glass;
- new lamp;
- sealant.
Before disassembling the headlights on the Priora, you need to place them on a clean, dry surface. Then heat the glass until the sealant begins to melt. Next, the glass should be pryed off with a screwdriver and separated from the body. The next step is to remove the old sealant.
Before changing the light bulb and replacing the headlight glass, the seat must be lubricated with a fresh layer of sealant. Then the glass is carefully placed and pressed firmly. After 12 hours you can assemble the lantern.
Features of headlight adjustment
To adjust the optics, the machine must be placed on a flat horizontal surface.
It is advisable to place an assistant in the driver's seat or place a load weighing about 75 kg. The vehicle's tires should be well inflated and the tank at least half full to bring its weight closer to the weight at which it is driven daily.
The adjustment is carried out on a vertical wall or stand on which markings are applied. To correctly adjust the optics, it should be possible to move away from the wall at a distance of 5-10 meters. This makes it possible to create an imitation of lighting on the road.
Replacing and adjusting headlights on a Priora
Lada Priora is a very good car, but very often the owners have a desire to change something in the appearance of the car, for example, tuning the optics. Often there may be an urgent need for changes, for example, you need to replace the headlights on a Priora. For those who decide to do this procedure on their own, without the help of a professional mechanic, it will be useful to familiarize yourself with the recommendations presented below. Let's look at what are the reasons for replacing a headlight and how to do it yourself. Below are instructions on how to disassemble the headlight and adjust it correctly.
The main reasons for replacing and adjusting headlights
The main reason for replacing a headlight may be its failure or inability to fulfill its functional purpose. For a Priora car, the main reasons for which replacement is required are the following:
Cause
The replacement process allows not only to restore the original properties of lighting devices, but also to increase the level of safety of driving. By replacing the rear or front headlight, the driver provides better control of the car at night and in bad weather, and for other drivers on the road.
Wiring diagram for headlights on Lada Priora. 1 — block headlights; 2 - indicator lamp for turning on the high beam headlights in the instrument cluster; 3 — mounting block; 4 — steering column headlight switch; 5 — lighting control module; 6 — ignition switch (lock); K7 - headlight high beam relay; A - to the main fuse block (F3); B - to the electrical package controller, pin “14”
Connecting fog lights
Installing a PTF will not take much time if you understand car electrics. Connecting fog lights at the next stage of work assumes that the car owner will independently fix the headlight switches on the front panel of the car. For these purposes, you need to open the decorative panel covering the steering column by turning the locks ninety degrees. Remove the plug, which is located to the left of the clock equipment. Underneath it will be found the wires to which the switch is connected. To connect the fog lights, you need to connect short wires to the contacts of the same name, and carry out the same actions with the heated glass buttons.
Connection diagram for headlights and other lighting devices
The fog light connection diagram included with the standard equipment kit usually contains detailed information on the headlight installation process, including the possible colors of each wire. Therefore, equipping Priora with this equipment with your own hands is not difficult. To connect the fog lights to the mounting block, you need to mount the “K10” relay, and also install two fuses.
Replacing old or installing new headlights is completed by returning the mounting block to its original location. After which the negative wire can be connected to the battery and checked how the fog lamp connection diagram, which we made ourselves, functions. Note that replacing the PTF using this scheme does not imply an indication of the operation of the headlights on the dashboard.
Adjusting the headlights
To adjust the light of car headlights, you need to choose a suitable place and prepare the following tools:
- Phillips screwdriver;
- round screwdriver;
- screwdriver;
- ruler;
- pencil.
The car, fueled and with inflated tires, must be placed in a garage or other place where there is a vertical wall for marking. The main condition for correctly adjusting the headlights is the ability to drive away the distance required by the adjustment process, 5-10 m. The point of the procedure is to create in a static mode an imitation of the operation of the lenses as if the Priora was moving along the road.
To adjust the headlights, you need to park the car close to the wall and turn on the low beam mode. After this, you should alternately mark the centers of the traces of the two headlights and the centers of their symmetry. Connect the dots to form a straight horizontal line. The second line should be drawn parallel to the first, but with an interval of 5-12 cm, and the third - at a distance of 22 cm from the first. In addition to horizontal lines, it is necessary to draw a strictly vertical line through the center points of the headlights and the car.
When the light is on, the top point of the light should be at the level of the 2nd line, and the position of the inclined beam should extend from the intersection point of the vertical marking corresponding to the center of both headlights and the 2nd horizontal line. If deviations are detected, it will be necessary to make adjustments with special screws using tools in order to establish the correct position of the headlights, in which the points of light will coincide with the specified values.
An example of adjusting headlights on a Lada Priora
Then the car must be driven to the distance indicated in the passport and the headlights must be turned on again. You can look at the passport and check the correct angle of the light beam. It is recommended to adjust the headlights one by one by twisting the screws. If anything from the marking description remains unclear, the presented photo will clearly show how to do it correctly.
PTF adjustment
Draw a horizontal line on the screen 50mm lower than the height from the fog lights to the ground. The light spot should be positioned so that the upper border on the screen is at the level of the drawn strip. The adjustment is made by rotating the adjusting screw, which is located next to the fog lamp.
Let us remind you that we previously told you how to independently replace the lamps in the Priora headlights, as well as install PTF.
Keywords: Lada Priora headlights | external lighting for Lada Priora
0 0 0 0 0 0
Share on social networks:
Why don't the low beams come on?
In a Priora, the low beam may not light up for several reasons: the fuses have blown, the light bulbs have burned out, or the light switch (MUS) is faulty. Let's look at each of the reasons in more detail.
Headlight fuse
The possibility of failure of the low beam headlight fuse is possible, since with frequent use of the car, the load that the headlights take on heats up the fuse link and thereby disables it even without any current surges in the circuit.
It should be noted that the fuse protects each headlight individually, that is, failure of two fuses at once is unlikely. But it is recommended to start checking with them. These fuses are located in the prior mounting block under numbers F6 and F7 and have a fuse current of 7.5A.
If they are working properly, move on to the next point.
Burnt out low beam lamps
Burnout of lamps is possible due to long-term use and thermal overload. In the summer, when operating a car in the city with the headlights on, it does not provide proper cooling of the lamp, which often leads to burnout of the lamp filament. But, as in the case of fuses, failure of both lamps at once is unlikely.
All Lada Priora, regardless of the year of manufacture, are equipped with H7 type low beam lamps. But the high beam lamps will be different, namely with and without DRLs. Models with running lights are equipped with a high beam lamp of type H15, and those without running lights are equipped with type H1.
Light control module
Quite often, the MCC is the main culprit of this problem due to burnout of tracks on the board or oxidation of contacts. This can be treated by replacing the module with a new one or troubleshooting the old one with your own hands. You can understand that the reason is in the module by blinking the high beam; if the high beam is blinking and the low beam is not on, then in most cases the light control unit is faulty.
Priora car headlight: Bosch and Kirzhach - what is the difference
Let's highlight two manufacturers (not taking into account the copies of Chinese origin) that have a number of differences. Popularly known as kirzhach, bosh. There is a significant difference between them: Kirzhach - a corrugated inner surface of the well, a cast low-beam lamp reflector without a cutout, glass (plastic) attached with a refractory sealant. The marker lamp is located at the bottom of the reflector well. Two separate plugs for the rear of the optical device. The device from the Bocsh brand has a smooth inner surface of the well, a low-beam lamp reflector with a cutout, and a low-melting sealant is used to fix the glass (plastic). The size lamp is placed in the upper part of the well; one plug from the rear of the lighting unit is used. Minor differences in design, quality of parts, presence of a chrome-plated rim of the signal amplifier of the rotary element. The number of taillight design variations available to the buyer is numerous.
How to turn on headlights without MUS
You can turn on the headlights when the light control module has failed by dismantling and removing the chip from it. On the chip you need to find contacts numbered 10 and 12 and insert a copper wire jumper between them. After installing the jumper, the headlights turn on when you turn the ignition key.
This method will help you get to the nearest service station in the evening. It is not recommended to use the jumper for an extended period of time as it does not provide proper contact and can cause heat to build up, putting you and your vehicle at risk.
Replacing the Priora light module
Replacing the ICC is quite simple. The first step is to remove the fuse box cover by turning the three latches 90 degrees and pulling the cover towards you.
Then unscrew one screw that secures the light block and take it out. We disconnect the chip and install the new MUS in the reverse order.
Light module chip
The cost of a light module may vary depending on the vehicle configuration; the initial price of a module is from 1000 rubles and above.
Please note that it is best to buy an ICC with your own sample and depending on the configuration of your car. If you install a module from a car of a different configuration, its correct operation is not guaranteed. Most often, when installing a non-native module, the side lights remain constantly on.
How to adjust headlights on a Priora
How to adjust the headlights of a Lada Priora
Any car must have its headlights adjusted correctly. If a car has problems with its headlights, it can blind the driver driving oncoming vehicles, leading to serious traffic accidents. At best, such a problem will significantly reduce visibility on the road.
It is recommended to check the correct adjustment of the headlights once a year or every time when replacing a light bulb or repairing the front body part. It is worth noting that self-adjustment of the car’s headlights is considered temporary and can be carried out until the car is serviced in a specially equipped workshop.
If your vehicle's headlights are not adjusted correctly, this can pose a serious safety hazard at night.
This especially applies to cars that have xenon installed. In order to prevent an emergency and not disturb other road users, the headlights should be adjusted correctly in a timely manner. Let’s look at how to do this yourself using the Lada Priora car as an example.
How to choose fog lights?
This is how this headlight shines
Installation of fog lights is preceded by purchasing them at the store. In this case, you must first look at the integrity of the glass of each light bulb, the matching of the headlights and mounting systems.
Compliance with the UNECE is confirmed by the presence of the “E” stamp on the diffuser; it is also desirable to have a GOST terminal, TU, date of manufacture and manufacturer. When we choose fog lights, Priora as a model allows us to purchase articles of predominantly round shape, while the latest fashion is considered to be slit headlights, which have small vertical angles (about 30-50 degrees) and are very well suited as fog equipment.
Fog lights can be produced in:
The first options almost always do not have certification data and have a lot of power, which only causes harm on the road (blinds oncoming drivers). Japanese and European models have moderate power, but are quite expensive. Therefore, when purchasing, it is better to focus on domestic models that comply with GOST standards and are relatively inexpensive.
Necessary tool
To adjust the headlights on a Lada Priora you will need:
- First of all, we park the Priora car on a flat area five meters from a flat wall. Fill the tank with fuel until it is full and use a pressure gauge to equalize the pressure in the wheels. After inspecting the headlights, thoroughly wash them from contamination. We check that the headlight bulbs are working properly. If necessary, we install new ones.
- After the preparatory procedures, we proceed to adjustment. We move the lighting width control lever to position “0”. This position corresponds to the load of the vehicle with the driver. Turn off the lights and rock the car from side to side. Thanks to the rocking, all suspension elements will take a standard position. We ask a colleague (about the same weight as you) to sit in the driver’s seat of the car.
- For further adjustment, draw a special marking on a flat wall. The center line should be drawn so that the distance from the center of each headlight to the axle is identical. We mark the centers of each headlight with dots on the wall and draw two lines vertically through them. Draw a straight line between the lines and mark it with the letter “A”. Below, at a distance of 12 and 22 centimeters, draw two more lines in parallel.
- With the low beam on, close one of the headlights. The top point of the light spot from the headlight should coincide no higher than the horizontal center line. Also, the boundaries of the light beam of the fog lights are located along the same line.
- We make sure that the intersection of the inclined and horizontal sections of the boundaries of the light fluxes (at the point where the light beam breaks) coincides with a line that is drawn vertically and passes through the point marked as the center of the headlight. If deviations in the luminous flux are detected, we adjust the headlights with a hexagon of 6 millimeters by rotating the horizontal and vertical position screws. These screws are located under the hood in the headlights.
There is a special offer on our website. You can get a free consultation with our corporate lawyer by simply submitting your question in the form below.
How to install PTF correctly, and why do you need to replace standard lamps?
Fog lights on Priora, as well as on any other car, are installed quite low, at a level of 0.3-0.7 meters from the road level. In this case, a narrow beam of light enters an area free of wet condensation and actually improves visibility.
But located on the roof of the trunk (additional lighting is often installed on jeeps), they are absolutely useless in a curtain of rain, in fog or during a dust storm. Therefore, fog lights used to be placed under the bumper (for old-style metal structures), but today they are placed directly into it (for modern integrated parts).
Fog lamps must comply not only with traffic regulations, but also comply with UNECE standards. The latter suggest that the fog beam on the Priora and any other car must have a special wide-angle light distribution, with a clearly defined upper limit and dispersion of up to 70 degrees horizontally. Only compliance with these parameters gives the required anti-fog effect.
The most common today are fog lights with halogen lamps with a power of 55 watts. They create a luminous flux of 1.1 thousand lumens, which is enough to illuminate a space of 25-30 meters in front of the car.
Replacing conventional incandescent lamps with them is almost always required, because... old-style lamps provide the necessary illumination at a distance of about 8-10 meters, which is clearly not enough for modern driving conditions.