Self-replacement of VAZ 2106 front suspension springs
The reason for the need to replace the front suspension springs may be a violation of the integrity of the springs. This may be the result of mechanical damage or the occurrence of cracks, as well as in case of serious subsidence.
Worth reading:
- Self-replacement of the VAZ 2110 CV joint
- How to replace the steering rack of a VAZ 2115 yourself
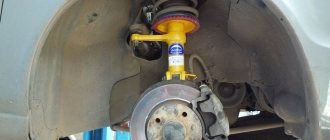
- Using a rope or wire, pull the upper arm higher, thereby providing access to the front suspension spring.
Self-replacement of VAZ 2106 front suspension springs
- Use a pry bar to pry the lower end of the spring and remove it from the lower arm support cup.
Self-replacement of VAZ 2106 front suspension springs
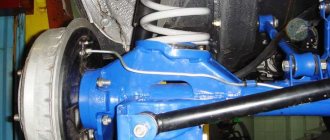
The work of replacing the front suspension springs of the VAZ 2106 takes place in several stages:
- Preparation: We tear off the wheel mounting bolts in the area of the planned work with a bologna. After this, use a screw jack to lift the side of the car where the problem appeared and remove the wheel.
- Removing the shock absorber. You will need keys 6, 13, 17 and 19. While holding the rod from turning, loosen the nuts and remove them. Remove the spring washer and the cushion washer, as well as the upper mounting cushion. We also dismantle the spring washers and nuts securing the bracket to the lever.
Using the mounting hole in the lever (bottom), remove the shock absorber.
Dismantling of other components. It is necessary to loosen the nuts holding the lower arm on the axle (just loosen, it is not worth removing them yet). A hydraulic jack is installed under the lower control arm to level it and also to provide load to the suspension.
We remove the stabilizer bar, dismantle the stabilizer bracket (after unscrewing the nuts holding it) together with the elastic cushion. We remove the ball joint. By loosening the nut holding the pin in the ear of the steering knuckle, we can remove the lower ball joint. We knock out the support pin. To do this, lower the jack and, tapping the lower ear of the steering knuckle with a hammer, knock out the support pin.
Providing access to the front suspension spring. After removing the lower ball joint, there is no longer a need to load the suspension, but the jack will still come in handy. With its help, we will hold the lower arm until we finish working with it. Now unscrew the ball pin nut completely, and then carefully lower the lower arm down. Using a mounting spatula, hold the stabilizer to the side so as not to catch it on the studs on which the bracket is attached. After this we remove the jack.
Now, using a wire or a reliable rope, we raise the upper lever as high as possible, opening access to the spring. Using a mounting tool, we pry up the lower edge of the spring, carefully remove it from the support cup, and remove the gasket from there. Now you can remove the suspension spring. Replacing the front spring. We fix the gasket on the new spring (for this you can take regular electrical tape), install the spring in the required place. Using a mounting blade installed in the hole for the shock absorber and supporting the spring, we fix the lower coil. The correct position of the spring can be determined using the screw surface on the surface of the lower arm and given it to the spring using the same mounting blade. We install the jack under the lever, creating a load for the new spring, and finally seat the spring on the screw surface of the lower arm.
While maintaining (and even increasing) the load on the spring, we use a mounting spatula to secure the stabilizer bar with the bracket studs.
We carry out the assembly in the same way, only in reverse order.
Also check out
- How to replace the support bearing of a VAZ 2110 without wheel alignment
- Installation of new front struts on Lada Priora cars
- How to replace a VAZ 2110 timing belt and tension roller at home
- Remove the suspension spring, remove the spring gasket from the upper support cup. After this, you can replace the front suspension spring.
Self-replacement of VAZ 2106 front suspension springs
To do this, do the following:
- Use electrical tape to secure the gasket to the spring and install the part in place.
Self-replacement of VAZ 2106 front suspension springs
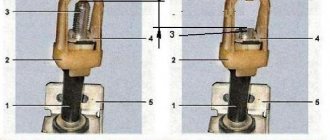
- Place the blade in the hole for the shock absorber, supporting the spring with it, and fix the lower coil. There is a screw surface on the lower arm that indicates the correct position of the spring. Installation should achieve this position
Self-replacement of VAZ 2106 front suspension springs
Self-replacement of VAZ 2106 front suspension springs
- Having installed the lower coil in the correct position, jack up the lever and load the spring. Using a mounting spudger, seat the spring onto the screw surface.
Self-replacement of VAZ 2106 front suspension springs
- Increase the load on the spring, install the stabilizer bar between the two studs that secure the bracket.
Self-replacement of VAZ 2106 front suspension springs
Self-replacement of VAZ 2106 front suspension springs
20
- Reassemble everything in reverse order.
After this, the replacement of the VAZ 2106 suspension springs can be considered complete.
You can check it out:
- Installation of new front struts on Lada Priora cars
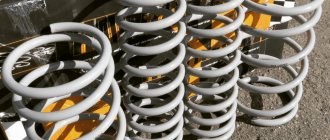
Spring selection
Domestic roads are not famous for their excellent quality, everyone knows this. Therefore, for many car enthusiasts, a serviceable and well-chosen suspension is the main task in ensuring comfortable movement. The main suspension unit is the shock absorber strut, and the spring is its important element.
They determine the ground clearance and provide the load capacity declared by the manufacturer. In addition, springs affect overall handling. One of the main criteria that determines the characteristics of an element is rigidity. Ideal will help avoid car roll when making sharp turns. If the unit is selected correctly, the roll in turns, regardless of speed, will not exceed a few degrees.
How to determine hardness
The main task of suspension springs is to quickly return the body to its original position, as well as ensure the vehicle’s load capacity and ground clearance. The stiffness of a spring means its ability to resist compression. Excessively hard, for example, will cause a lot of unpleasant sensations when driving on uneven roads. Too soft - they will absorb all the bumps, but in corners the car will begin to roll heavily.
The rigidity of these parts is influenced by several factors.
- Diameter of the rods (the thicker, the tougher).
- External diameter (the larger this indicator, the softer the element).
- Number of turns (the more turns, the stiffer).
- Shape (you can find barrel-shaped, conical, cylindrical, and each type has its own advantages and disadvantages).
You can find out the stiffness of the springs by the code or marks on them. However, if they are applied with paint, then you will not be able to navigate by them, because during operation the inscription will simply be erased. If there are no stamped marks, determine the hardness yourself using a hand press, scales and a regular school ruler.
On floor scales you need to put a board with a thickness of more than 12 mm. The width should be greater than the area of the end part of the spiral, and this side should be installed on the board. A board of similar size is installed on the upper end part, and the length is measured with a ruler or tape measure. Using a press, you need to compress the spring by 40–60 mm and look at the results on the scales.
This is not the only way to determine hardness. Remember your physics lessons. The product in this case is defined as an object of initial length that is stretched and compressed. Denoted by the letter "L". Based on Hooke's law of longitudinal deformation, body changes should be considered proportional to the initial length of the object “L” and the applied pressure force “F”. Next you need to use the formula x=F*L/C. In this formula, “C” is considered as a proportionality coefficient, depending on the number of turns, their radius and diameter.
Spring checking rules
Most car enthusiasts pay attention to its condition only after characteristic signs of malfunctions appear, for example, knocking, creaking, etc. But, as practice shows, it is easier to prevent a problem than to correct the consequences of a breakdown later.
“Tired” coils that need immediate replacement can be identified by characteristic signs.
- When hitting bumps, the suspension begins to “punch”.
- The smooth running of the car disappears.
- Vibration in the body.
- The car falls over on one side.
- When planting the front or rear helixes, the difference in height of the front compared to the rear is immediately noticeable.
- Ground clearance decreases.
- Upon careful inspection, it is noticeable that the coils touch each other during compression.
A spiral part may cease to perform its functions for several reasons. The main and obvious one is the natural wear and tear of the metal. The second reason: mechanical damage. The third and sometimes the most common is systematically exceeding the permissible load capacity of the vehicle, as well as driving over uneven surfaces and potholes at high speed. Also, the cause of breakdown can be natural corrosion due to high humidity and the action of chemical reagents on the road in winter.
If a crack or other damage is visually detected, the element must be replaced. It would be a good idea to check how much the spirals have sagged (do this using compression and weights). When performing diagnostics, you need to pay attention to the gaskets: when they are worn out, they also need to be replaced. If minor defects are identified, urgent work is not required.
But if the following defects are detected, parts should be replaced immediately:
- the lower or upper coil has broken off;
- traces of severe corrosion and mechanical damage are visible;
- ground clearance has noticeably decreased;
- uneven height of the corners of the car (the body falls on one side).
To diagnose spring malfunctions, you will need not only ordinary wrenches and other familiar tools, but also ties for removal. Without them, removing, for example, the front spiral elements is quite problematic. Although experienced motorists know ways to get by without them.
Method for checking the technical condition of the rear suspension
To check the serviceability of parts, the car is placed on an inspection hole or overpass. During a visual inspection, mechanical damage (cracking, ruptures, etc.) is unacceptable on rubber products. If the silent blocks of the rear suspension of the Zhiguli are a rubber mass squeezed out of the eyelets of the rods, they also need to be replaced. Be sure to inspect the attachment points of the rod brackets to the body for cracks. Defective areas must be welded.
To determine the condition of the rubber hinges of the longitudinal rods, put the car on the handbrake and rock the body in the longitudinal direction. Play in the connections will indicate worn bushings. The wear of the longitudinal thrust elements is checked by rocking the rear of the vehicle in the transverse direction. Repairing the rear suspension of a VAZ 2106 does not require special knowledge, but some metalworking skills are still needed.